
Frequently Asked Questions - 2007/10
Bob Aberle | [email protected]
This is the 43rd monthly column in which I try to give the best possible answers to questions you have written or E-mailed to me. Each new inquiry is given a sequential number for future reference. Many questions and answers have been posted to the AMA Web site at www.modelaircraft.org/mag/faq/index.asp. Unfortunately that posting stopped in August 2005 and will not continue until this section of the AMA Web site is revamped. In the meantime, if you can't find the subject matter you are interested in, drop me an E-mail or letter and I will try to assist you.
Q316: Using Lithium batteries in your RC transmitter
Q: "I've read a lot recently on the various model nets and forums about replacing Ni-Cd and NiMH RC transmitter batteries with lithium batteries. Is this technically possible? Would I benefit by doing this?"
A: It is certainly possible from a technical standpoint. I suspect that many RC manufacturers will be switching to lithium-type batteries with their next-generation equipment.
At full charge, Ni-Cd and NiMH eight-cell battery packs provide approximately 10.5 volts. The built-in transmitter low-voltage alarms generally go off at roughly 8.8 volts. A three-cell Li-Poly battery will supply 11.1 volts (nominal) at full charge. The slight extra voltage shouldn't be a problem for most RC transmitters, but you should check with your particular RC-system manufacturer. You might also consider using Li-Ion cells such as A123-type cells. With typical Li-Ion cells you can obtain close to 10 volts at full charge (about 3.3 volts per cell for three cells). The alarm's going off at 8.8 volts (if it does) will still prevent your lithium cells from being discharged below recommended limits.
Main considerations and recommendations:
- Fit: How to fit the lithium battery pack into your transmitter. Some packs are sized to allow the compartment cover to close; others are not.
- Charging: How to charge the pack. If you use a 2100 mAh Li-Poly pack, it would normally be charged at 1C (2.1 A). Many transmitter internal charging circuits have a fuse that might blow at that current, so I suggest charging the lithium battery externally rather than through the transmitter unless the manufacturer specifies otherwise.
- Connectors: You will need the proper mating transmitter connector; these are usually obtainable from the RC manufacturer.
- Balanced charging access: Use the pack’s balance connector so you can charge directly (not through the transmitter circuit).
Example installation:
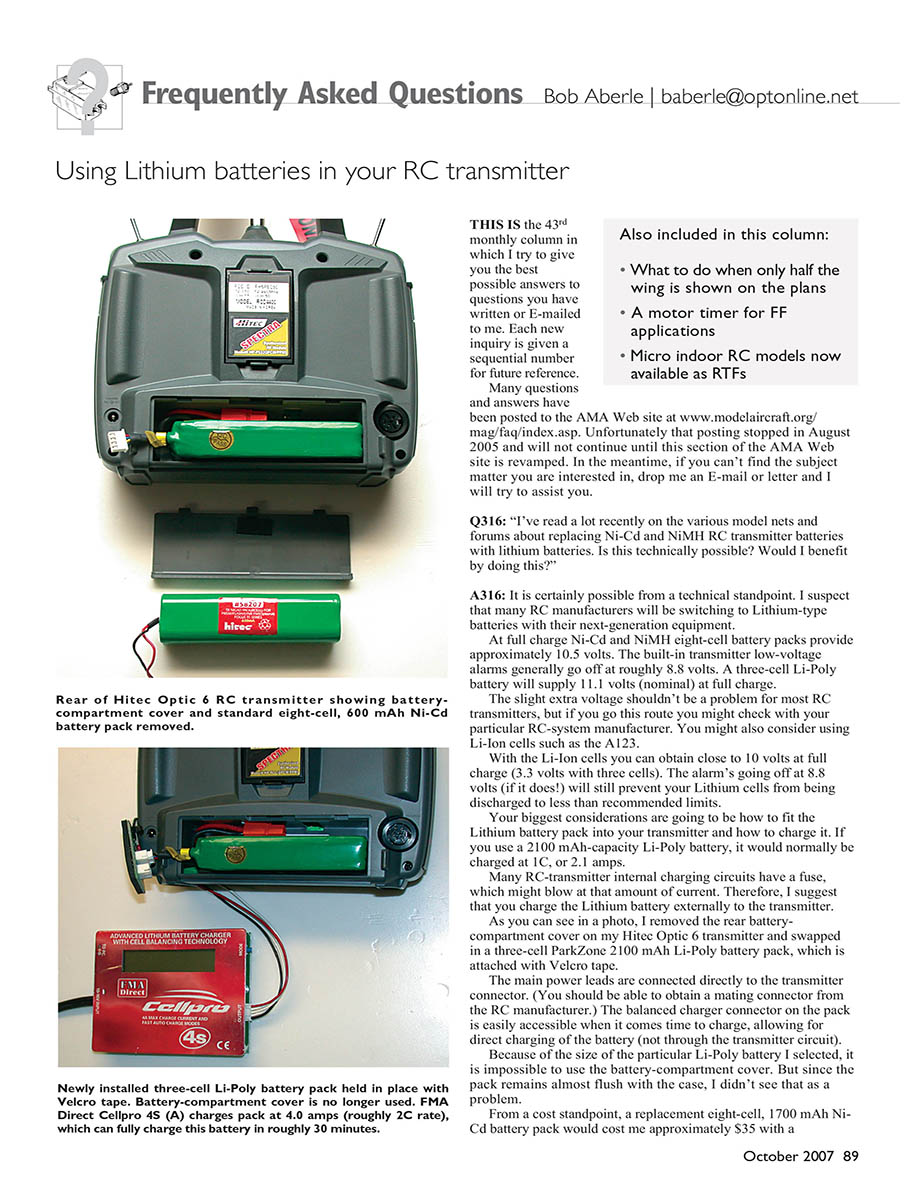
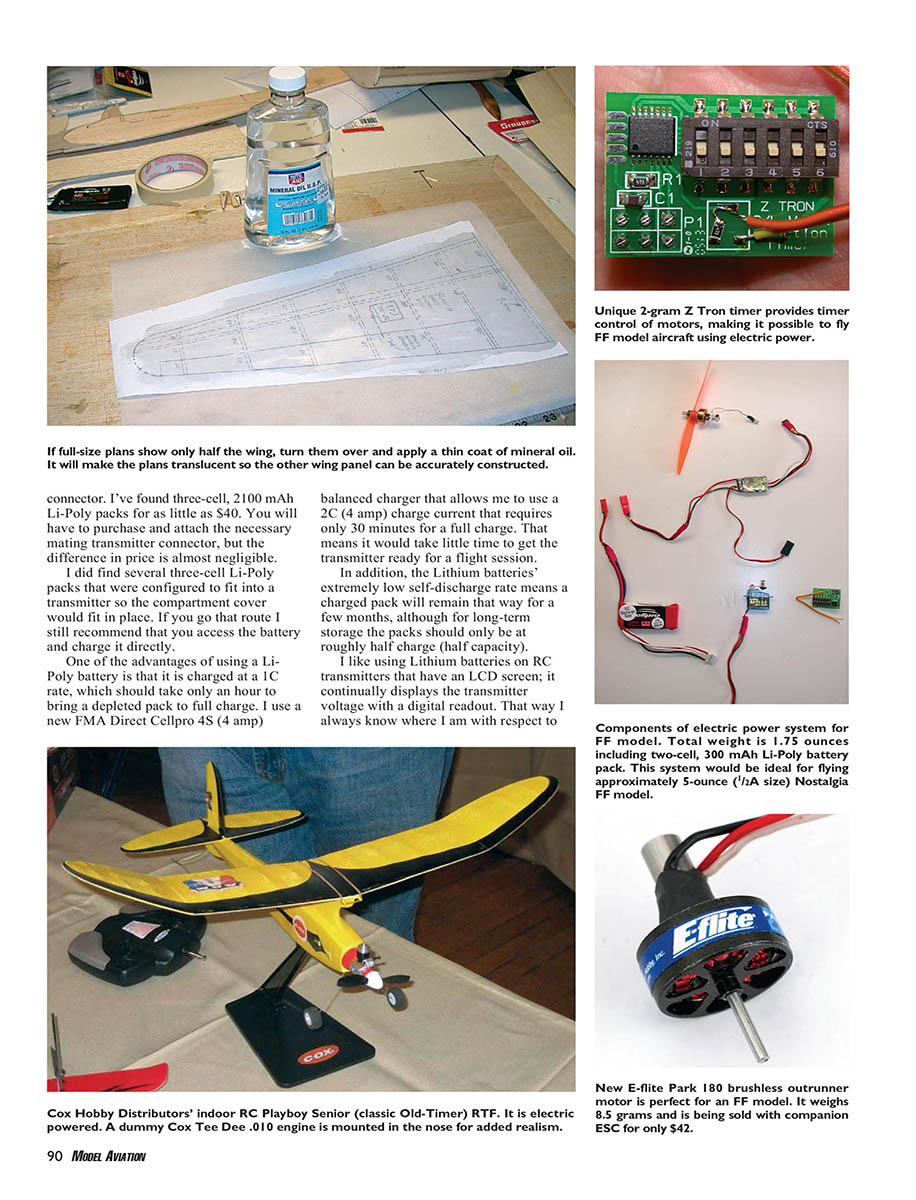
- I removed the rear battery-compartment cover on my Hitec Optic 6 transmitter and swapped in a three-cell ParkZone 2100 mAh Li-Poly pack, attached with Velcro tape. The main power leads connect directly to the transmitter connector, and the balanced charger connector is accessible for direct charging. Because of the pack's size, I could not use the original compartment cover, but the pack remained nearly flush with the case and that worked for me.
Cost:
- A replacement eight-cell, 1700 mAh Ni-Cd pack would cost about $35 with a connector. Three-cell, 2100 mAh Li-Poly packs can be found for around $40. You will likely need to purchase and attach a mating transmitter connector, so the price difference is minimal. Some three-cell Li-Poly packs are configured to fit inside a transmitter so the cover will fit.
Charging speed and storage:
- Li-Poly batteries are commonly charged at 1C, which brings a depleted pack to full charge in about an hour. I use an FMA Direct Cellpro 4S (4 A) balanced charger that allows 2C (4 A) charge current for a 2100 mAh pack, cutting full-charge time to about 30 minutes.
- Lithium batteries have an extremely low self-discharge rate, so a charged pack will remain charged for a few months. For long-term storage, keep packs at roughly half charge (about half capacity).
- The minimum recommended discharge voltage is approximately 3.0 volts per cell.
Other notes:
- I like using lithium batteries on transmitters with an LCD voltage readout so I always know the current pack voltage.
- RC manufacturers will likely adapt transmitter battery compartments and internal charging circuits to accept lithium packs and higher charging currents. Improved battery safety from balanced charging should make internal charging safe in the future.
Q317: Building the missing half of published wing plans
Q: "I purchased a set of full-size plans from a hobby publication and was disappointed to see only half of the wing shown. How am I supposed to build the other wing panel that is not shown?"
A: This is common practice. To keep full-size plans from becoming excessively large (and costly), many designers print only half the wing. To build the other half, you can create the mirror image easily:
Steps:
- Turn the plans over and rub mineral oil onto them with paper towels. Mineral oil is available at most pharmacies. The paper becomes translucent almost immediately, showing the reverse image needed to build the other panel.
- Position parchment paper (from a roll in supermarkets) over the oiled plans to prevent the wood from sticking and to keep any residual mineral oil off the wood.
- Build the opposite wing panel from the reverse image. Mineral oil dries quickly and leaves the plans almost like new for storage. Avoid vegetable or olive oils — they don't work as well and their residue can ruin the plans.
Q318: Using small brushless outrunner motors for free flight (non-RC) models
Q: "I've seen several of the new, very small and lightweight brushless outrunner motors. The prices seem to be continually coming down making them quite attractive. But I'm a free flight modeler and was wondering if these new motors can be adapted to aircraft that don't employ RC control?"
A: Yes. Sergio Zigras of Z-Tron developed a motor timer for free flight (FF) applications. The device:
- Costs $30 and weighs only 2 grams.
- Works with brushed and brushless motors and their respective speed controllers (ESCs).
- Allows motor run time adjustable from 1 to 63 seconds in one-second increments.
- Allows motor speed control from full off to full on in 63 steps.
- Provides a microservo output to operate a DT (e.g., a pop-up stabilizer) with timing adjustable from 0.25 to 15 minutes.
Example power package I built:
- Motor options: BSD Micro RC Mighty Midget 13/4/15T brushless outrunner or Horizon E-flite Park 180 motor.
- ESC: Phoenix-10 brushless ESC.
- Timer: Z-Tron motor timer.
- DT servo: Blue Arrow 2.5-gram servo.
- Battery: FMA Direct Cellpro two-cell, 300 mAh Li-Poly battery.
- Total airborne weight: 1.75 ounces. (For comparison, an .049-powered (1/2A) FF model typically weighs about 5 ounces.)
This setup lets you convert Nostalgia FF designs (for example: Fubar 36, Mini-Hogan 34, Baby Phoenix) to quiet electric power. Being able to limit motor run duration, power level, and using a DT allows easy flying in small fields or schoolyards and quiet operation at dawn.
You can purchase the Z-Tron FF timer from BSD Micro RC for $30. Bob Selman has the complete Z-Tron instruction sheet posted at: www.bsdmicro.com/pdfs/Products/FF_TIMER.pdf
Q319: Ready-to-fly (RTF) indoor RC models — is this a growing trend?
Q: "I saw several references recently to RTF models that are now being made available expressly for indoor RC flying. Is this becoming a trend? Should I expect to see more and more RTF RC indoor models coming on the hobby market?"
A: Yes. Plantraco in Canada was one of the first to offer a complete RTF indoor RC model package that included the RC and power system and received favorable press. Horizon Hobby's 18-gram ParkZone Cessna 210 Centurion is another example.
A new entry shown at the 2007 WRAM Show and the Toledo Show is Cox Hobby Distributors' Lil Playboy:
- Replica Old-Timer design
- 18-inch wingspan
- Weighs 45 grams (1.6 ounces)
- Powered by a 135 mAh Li-Poly battery and a GWS motor
- Flight times of around eight minutes per charge reported
- Street price expected to be about $39; initially available at www.coxmodels.com
If you're already a sport RC flier and want more details about indoor RC flying, see "Intro to Indoor RC Guide" at www.cloud9rc.com/indoorflying.asp.
Transcribed from original scans by AI. Minor OCR errors may remain.

