
Frequently Asked Questions — 2007/12
By Bob Aberle | [email protected]
Fuel tanks and tubing connections explained
This is the 45th monthly column in which I try to give you the best possible answers to questions you have written or e‑mailed to me. Each new question is given a sequential number for future reference.
A good many questions and answers have been posted on the AMA web site. Unfortunately that posting stopped in August 2005 and will not continue until that entire section of the web site is revamped. In the meantime, if you can’t find the subject matter you are interested in, drop me an e‑mail or letter and I will try to assist you.
Also included in this column:
- Tubing bender
- Digital scale batteries
- Magnetic coil servos
- AMA Insider
- Follow-up on FMA Direct Li‑Poly batteries
- Follow-up on 1/2A engine mounts
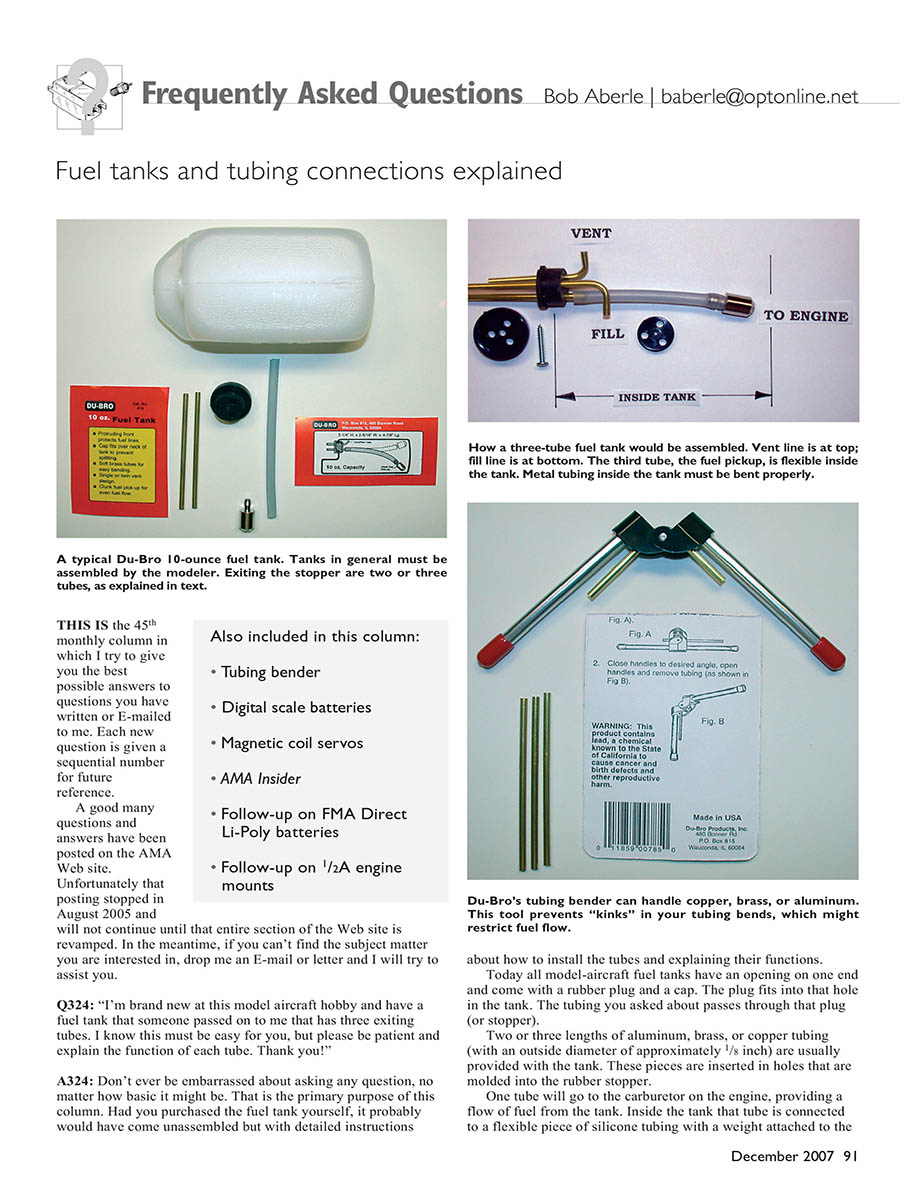
Q324: "I’m brand new at this model aircraft hobby and have a fuel tank that someone passed on to me that has three exiting tubes. I know this must be easy for you, but please be patient and explain the function of each tube. Thank you!"
A324: Don’t ever be embarrassed about asking any question, no matter how basic it might be. That is the primary purpose of this column. Had you purchased the fuel tank yourself, it probably would have come unassembled but with detailed instructions about how to install the tubes and explaining their functions.
Today all model‑aircraft fuel tanks have an opening on one end and come with a rubber plug and a cap. The plug fits into that hole in the tank. The tubing you asked about passes through that plug (or stopper). Two or three lengths of aluminum, brass, or copper tubing (with an outside diameter of approximately 1/8 inch) are usually provided with the tank. These pieces are inserted in holes that are molded into the rubber stopper.
One tube will go to the carburetor on the engine, providing a flow of fuel from the tank. Inside the tank that tube is connected to a flexible piece of silicone tubing with a weight attached to the end. The weight keeps the tubing at the bottom of the tank, regardless of the aircraft attitude. The other two tubes are for fill and vent purposes.
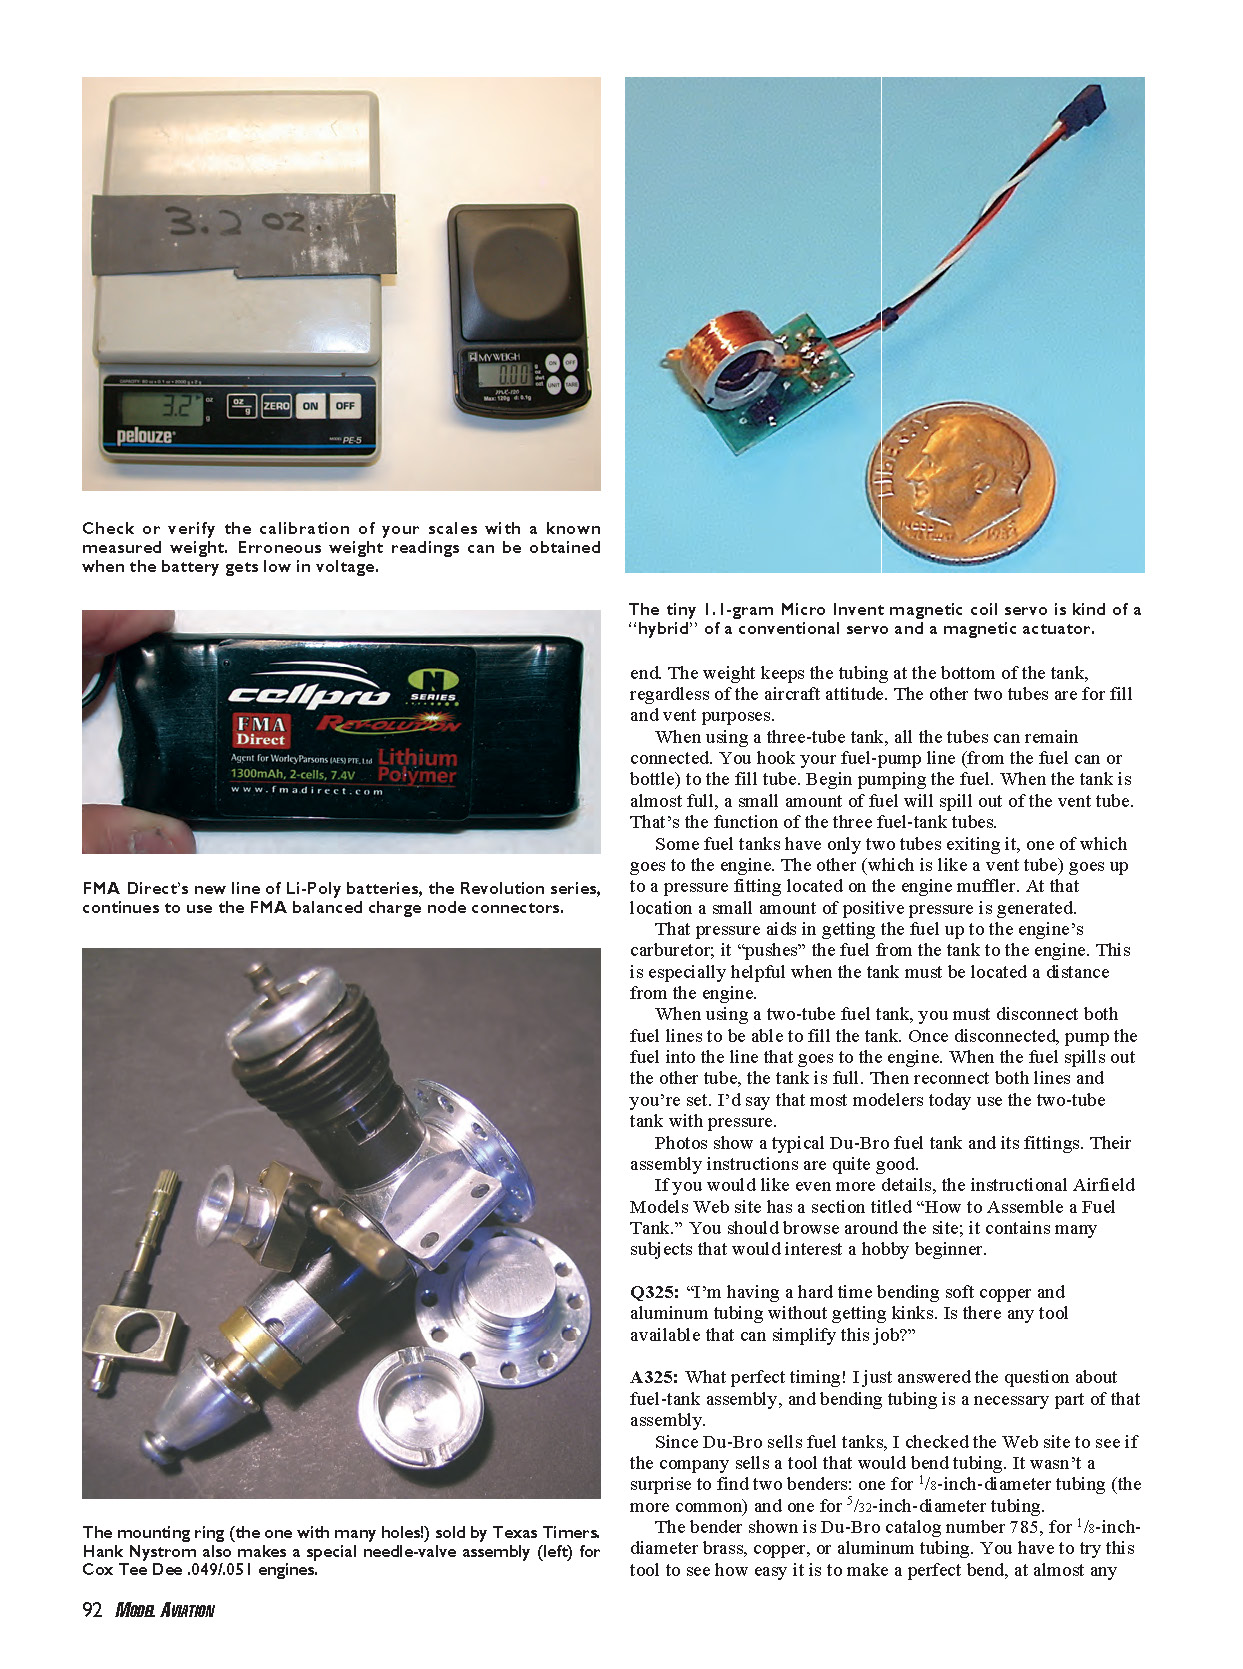
When using a three‑tube tank, all the tubes can remain connected. You hook your fuel‑pump line (from the fuel can or bottle) to the fill tube and begin pumping the fuel. When the tank is almost full, a small amount of fuel will spill out of the vent tube. That's the function of the three fuel‑tank tubes.
Some fuel tanks have only two tubes exiting them, one of which goes to the engine. The other (which acts as a vent) goes up to a pressure fitting located on the engine muffler. At that location a small amount of positive pressure is generated. That pressure aids in getting the fuel up to the engine's carburetor; it "pushes" the fuel from the tank to the engine. This is especially helpful when the tank must be located a distance from the engine.
When using a two‑tube fuel tank, you must disconnect both fuel lines to be able to fill the tank. Once disconnected, pump the fuel into the line that goes to the engine. When the fuel spills out the other tube, the tank is full. Then reconnect both lines and you're set. I'd say that most modelers today use the two‑tube tank with pressure.
Photos show a typical Du‑Bro fuel tank and its fittings. Their assembly instructions are quite good. If you would like even more details, the instructional Airfield Models web site has a section titled "How to Assemble a Fuel Tank." You should browse around the site; it contains many subjects that would interest a hobby beginner.
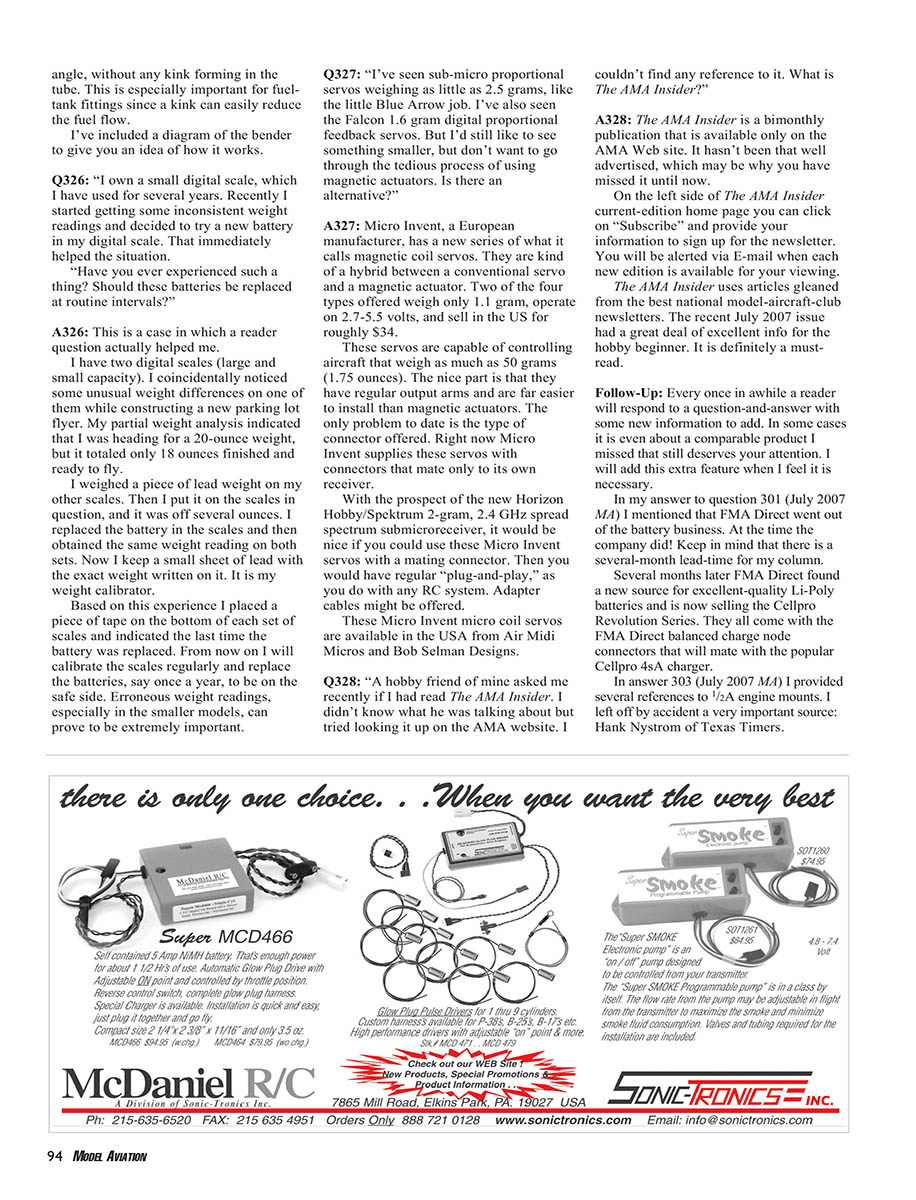
Q325: "I'm having a hard time bending soft copper and aluminum tubing without getting kinks. Is there any tool available that can simplify this job?"
A325: What perfect timing! I just answered the question about fuel‑tank assembly, and bending tubing is a necessary part of that assembly.
Since Du‑Bro sells fuel tanks, I checked the web site to see if the company sells a tool that would bend tubing. It wasn't a surprise to find two benders: one for 1/8‑inch‑diameter tubing (the more common) and one for 5/32‑inch‑diameter tubing.
The bender shown is Du‑Bro catalog number 785, for 1/8‑inch‑diameter brass, copper, or aluminum tubing. You have to try this tool to see how easy it is to make a perfect bend, at almost any angle, without any kink forming in the tube. This is especially important for fuel‑tank fittings since a kink can easily reduce the fuel flow.
I included a diagram of the bender in the original column to give you an idea of how it works.
Q326: "I own a small digital scale, which I have used for several years. Recently I started getting some inconsistent weight readings and decided to try a new battery in my digital scale. That immediately helped the situation.
Have you ever experienced such a thing? Should these batteries be replaced at routine intervals?"
A326: This is a case in which a reader question actually helped me.
I have two digital scales (large and small capacity). I coincidentally noticed some unusual weight differences on one of them while constructing a new parking lot flyer. My partial weight analysis indicated that I was heading for a 20‑ounce weight, but it totaled only 18 ounces finished and ready to fly.
I weighed a piece of lead weight on my other scale. Then I put it on the scale in question, and it was off several ounces. I replaced the battery in the scale and then obtained the same weight reading on both sets. Now I keep a small sheet of lead with the exact weight written on it. It is my weight calibrator.
Based on this experience I placed a piece of tape on the bottom of each set of scales and indicated the last time the battery was replaced. From now on I will calibrate the scales regularly and replace the batteries, say once a year, to be on the safe side. Erroneous weight readings, especially in the smaller models, can prove to be extremely important.
Q327: "I've seen sub‑micro proportional servos weighing as little as 2.5 grams, like the little Blue Arrow job. I've also seen the Falcon 1.6 gram digital proportional feedback servos. But I'd still like to see something smaller, but don't want to go through the tedious process of using magnetic actuators. Is there an alternative?"
A327: Micro Invent, a European manufacturer, has a new series of what it calls magnetic coil servos. They are kind of a hybrid between a conventional servo and a magnetic actuator. Two of the four types offered weigh only 1.1 gram, operate on 2.7–5.5 volts, and sell in the U.S. for roughly $34.
These servos are capable of controlling aircraft that weigh as much as 50 grams (1.75 ounces). The nice part is that they have regular output arms and are far easier to install than magnetic actuators. The only problem to date is the type of connector offered. Right now Micro Invent supplies these servos with connectors that mate only to its own receiver.
With the prospect of the new Horizon Hobby/Spektrum 2‑gram, 2.4 GHz spread‑spectrum submicro receiver, it would be nice if you could use these Micro Invent servos with a mating connector. Then you would have regular "plug‑and‑play," as you do with any RC system. Adapter cables might be offered.
These Micro Invent micro coil servos are available in the USA from Air Midi‑Micros and Bob Selman Designs.
Q328: "A hobby friend of mine asked me recently if I had read The AMA Insider. I didn't know what he was talking about but tried looking it up on the AMA web site. I couldn't find any reference to it. What is The AMA Insider?"
A328: The AMA Insider is a bimonthly publication that is available only on the AMA web site. It hasn't been that well advertised, which may be why you have missed it until now.
On the left side of The AMA Insider current‑edition home page you can click on "Subscribe" and provide your information to sign up for the newsletter. You will be alerted via e‑mail when each new edition is available for your viewing.
The AMA Insider uses articles clipped from the best national model‑aircraft club newsletters. The recent July 2007 issue had a great deal of excellent info for the hobby beginner. It is definitely a must‑read.
Follow‑Up
Every once in a while a reader will respond to a question‑and‑answer with some new information to add. In some cases it is even about a comparable product I missed that still deserves your attention. I will add this extra feature when I feel it is necessary.
In my answer to question 301 (July 2007) I mentioned that FMA Direct went out of the battery business. At the time the company did! Keep in mind that there is a several‑month lead time for my column.
Several months later FMA Direct found a new source for excellent‑quality Li‑Poly batteries and is now selling the Cellpro Revolution Series. They all come with the FMA Direct balanced charge node connectors that will mate with the popular Cellpro 4sA charger.
In answer 303 (July 2007) I provided several references to 1/2A engine mounts. I left off by accident a very important source: Hank Nystrom of Texas Timers. On his web site you will find his 1/2A engine aluminum mounting ring that can accommodate several types of .049–.061 glow‑fueled engines. Hank makes an entire line of accessories for the free‑flight (FF) enthusiast, so it is worth your time to look through his entire web site.
Sources
- Air Midi‑Micros (Micro Invent micro coil servos)
(775) 783‑8545 www.airmidimicros.com/MIServos.htm
- Airfield Models: "How to Assemble a Fuel Tank"
www.airfieldmodels.com/information_source/model_aircraft_engines/assembl...
- Bob Selman Designs (Micro Invent micro coil servos)
(417) 358‑9521 www.bsdmicrorc.com/productDetails.cfm?ProdID=10501&catID=10004
- Du‑Bro
(800) 848‑9411 www.dubro.com
- MA's "Frequently Asked Questions"
www.modelaircraft.org/mag/faq/index.asp
- Texas Timers
(423) 282‑6423 http://texastimers.com/accessories/engine_mounts.htm
- The AMA Insider
www.modelaircraft.org/insider/index.html
Transcribed from original scans by AI. Minor OCR errors may remain.

