

Frequently Asked Questions - 2010/09
Please write in with your questions, since that is the only way we can keep this column format going. When referring to published Qs and As (for follow-ups), provide the number as a reference.
References to addresses and Web sites are placed in a group, separate from the text, at the end of this column under "Sources."
A new feature, "Tips," will be provided in addition to questions and answers. These helpful hints will also be numbered.
Using old iron-on covering
Q461: "I have a large inventory of leftover rolls of iron-on covering. Some of these rolls date back ten to fifteen years. In many cases there is sufficient material left to cover a full aircraft.
My question to you concerns the shelf life of these products. How long will the built-in adhesive still work?"
A461: This is an excellent question, and obtaining the answer involves good, old-fashioned common sense.
I've had rolls of covering with built-in adhesive for more than 15 years, on which the glue still worked fine and the shrinkage still allowed for a tight and smooth covering job. On the other hand, I've had a couple of unopened rolls (not that old), still in the original wrapper, on which the adhesive no longer worked and the material wouldn't shrink properly.
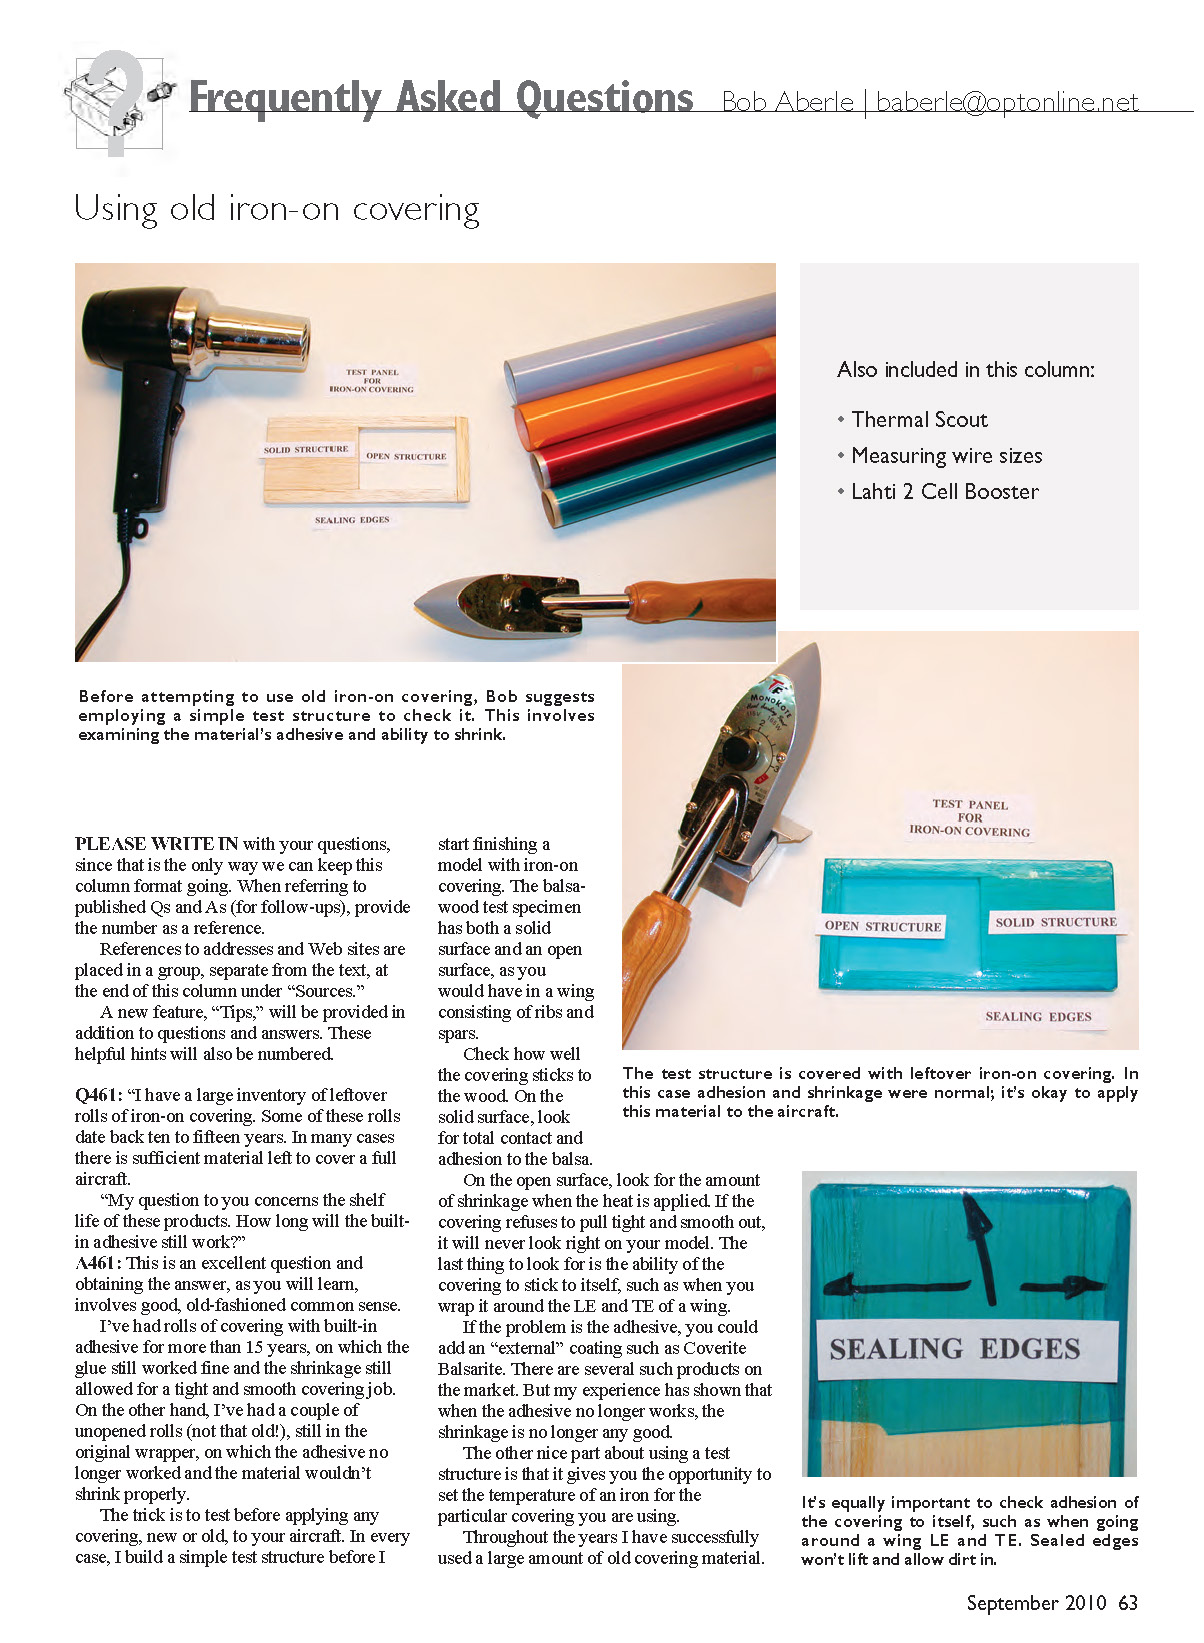
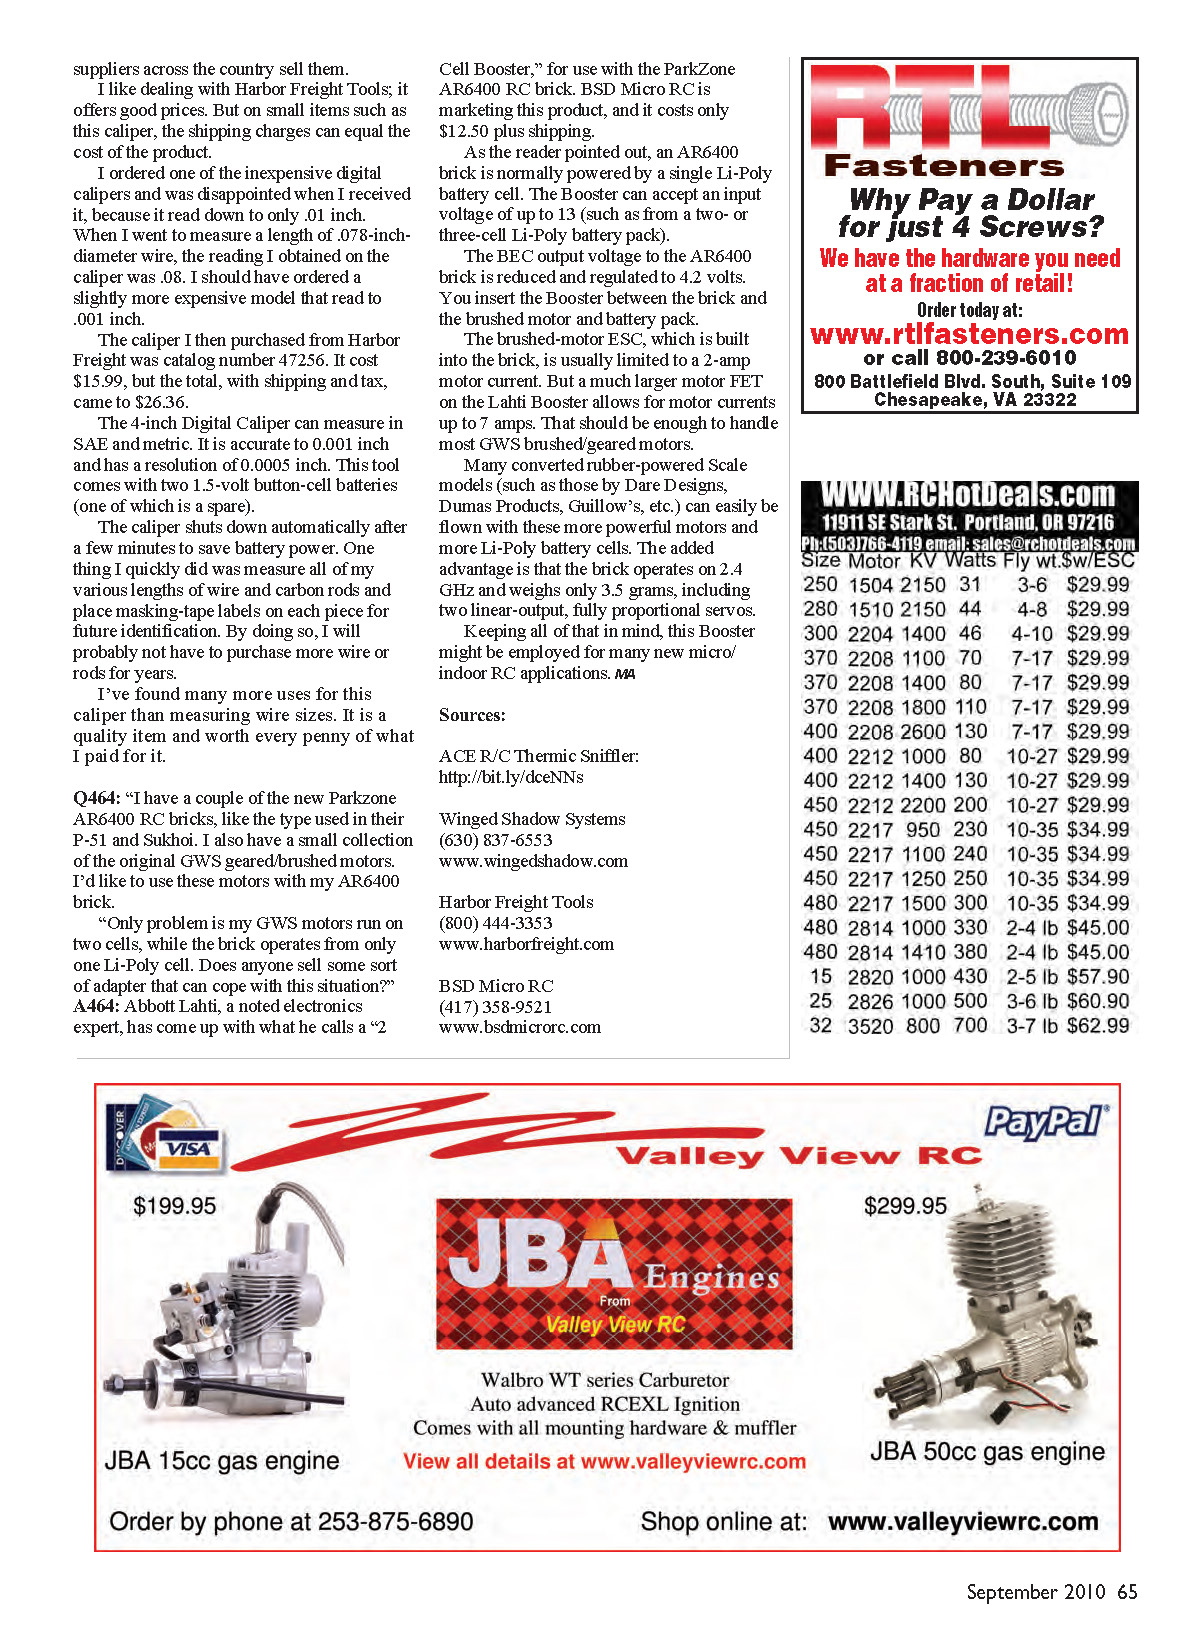
The trick is to test before applying any covering, new or old, to your aircraft. In every case, I build a simple test structure before I start finishing a model with iron-on covering. The balsa wood test specimen has both a solid surface and an open surface, as you would have in a wing consisting of ribs and spars.
- Check how well the covering sticks to the wood. On the solid surface, look for total contact and adhesion to the balsa.
- On the open surface, look for the amount of shrinkage when heat is applied. If the covering refuses to pull tight and smooth out, it will never look right on your model.
- The last thing to look for is the ability of the covering to stick to itself, such as when you wrap it around the leading and trailing edges of a wing.
If the problem is the adhesive, you could add an external coating such as Coverite Balsarite. There are several such products on the market. But my experience has shown that when the adhesive no longer works, the shrinkage is usually no good either.
The other nice part about using a test structure is that it gives you the opportunity to set the temperature of an iron for the particular covering you are using. Throughout the years I have successfully used a large amount of old covering material.
Q462: Thermal sensing device for RC gliders
Q462: "Years ago I remember seeing a thermal sensing device for RC gliders that telemetered information back to the pilot on the ground. I haven't seen reference to this product in years and was wondering if the system might still be available."
A462: In the 1970s Walter Good, Don Clark, and Ben Givens (then of the District of Columbia Radio Control Club) developed a device they called the "Thermic Sniffler." It was later marketed by ACE R/C. This equipment used a thermal sensor installed inside the model along with a 49 MHz transmitter. The transmitter sent a signal back to the ground, where the pilot could "listen" to the thermal activity via headphones.
As I recall, when the pitch of the tone sent to the ground increased, the aircraft was rising in a thermal. When the tone changed to a lower note, the airplane was descending or had fallen out of the thermal.
The equipment that went into the aircraft was large and weighed approximately 2 ounces. The full system cost about $150. I found a PDF of the original ACE R/C instructions; see the "Sources" for the link.
I doubt any of the ACE systems are still around, but you could look on Internet model sites, forums, or eBay. The good news is that Dave West of Winged Shadow Systems (maker of the onboard How-High altimeter and How-Fast airspeed indicator) has released the Thermal Scout: an onboard device that can help you detect thermal activity while flying an RC sailplane.
The Thermal Scout is smaller than a postage stamp and weighs only 1/8 ounce. It costs about $49. Unlike the Thermic Sniffer, the Thermal Scout is not a telemetry device. When a thermal is sensed near your model, it will wag the rudder or rock the ailerons to indicate lift.
The Thermal Scout installs between the rudder (or aileron) servo and the RC receiver. So when your sailplane rises in a thermal, you will get a warning from the rudder wagging or the ailerons rocking the wing.
Winged Shadow Systems claims that an exclusive Flight Filter removes false lift signals. The Thermal Scout is advertised as a "Lift Finder for RC Gliders" so you can "visualize" thermals using it.
It is suggested you plug the Thermal Scout into an unused channel port on your RC receiver; the retract channel function might be a good choice. This will allow you to turn the thermal sensor on or off during the flight.
This product sounds fun and I expect to try one soon.
Q463: Identifying wire and carbon rod sizes
Q463: "I have acquired over the years many sizes of piano or music wire ranging from something like .015 inch diameter up to at least 5/32 or 3/16 inch diameter. I also have a variety of carbon rods that are usually identified with metric dimensioning.
My problem is that I never marked the leftover lengths and now I have trouble identifying the various sizes. I tried using template-type wire gauges and many do not go down to the very small sizes. I also tried using a micrometer, but they can be difficult to use and interpret.
Have you ever faced this kind of problem?"
A463: Yes—I have. The best solution is to use a digital caliper. Many tool and hobby shops and suppliers sell inexpensive 4-inch digital calipers that read in either SAE or metric and are easy to use. These calipers can read to 0.001 inch (or 0.01 mm), are fast to use, and allow you to identify the diameter of wire and the outside diameter of carbon rods quickly.
I like dealing with Harbor Freight Tools because it offers good prices. On small items like this caliper, shipping charges can equal the cost of the product, so watch for that.
I once ordered a very cheap digital caliper that read only to 0.01 inch and was disappointed. When I measured a length of 0.078-inch-diameter wire, the reading showed 0.08. I should have ordered the slightly more expensive model that reads to 0.001 inch.
The caliper I then purchased from Harbor Freight was catalog number 47256. It cost $15.99; with shipping and tax the total was $26.36. The 4-inch digital caliper measures in SAE and metric, is accurate to 0.001 inch, and has a resolution of 0.0005 inch. It comes with two 1.5-volt button-cell batteries (one spare) and shuts down automatically after a few minutes to save battery power.
One thing I quickly did was measure all my various lengths of wire and carbon rods and place masking-tape labels on each piece for future identification. By doing so, I will probably not have to purchase more wire or rods for years. I've found many more uses for this caliper than measuring wire sizes—it's a quality item and worth every penny.
Q464: Using GWS geared/brushed motors with ParkZone AR6400 bricks
Q464: "I have a couple of the new ParkZone AR6400 RC bricks, like the type used in their P-51 and Sukhoi. I also have a small collection of the original GWS geared/brushed motors. I'd like to use these motors with my AR6400 brick.
Only problem is my GWS motors run on two cells, while the brick operates from only one Li-Poly cell. Does anyone sell some sort of adapter that can cope with this situation?"
A464: Abbott Lahti, a noted electronics expert, developed a "2 Cell Booster" for use with the ParkZone AR6400 RC brick. BSD Micro RC markets this product; it costs about $12.50 plus shipping.
As the reader pointed out, an AR6400 brick is normally powered by a single Li-Poly battery cell. The Booster can accept an input voltage of up to 13 V (such as from a two- or three-cell Li-Poly battery pack). The BEC output voltage to the AR6400 brick is reduced and regulated to 4.2 volts. You insert the Booster between the brick and the brushed motor and battery pack.
The brushed-motor ESC built into the brick is usually limited to a 2-amp motor current. A much larger motor FET on the Lahti Booster allows for motor currents up to 7 amps, which should be enough to handle most GWS brushed/geared motors.
Many converted rubber-powered scale models (such as those by Dare Designs, Dumas Products, Guillow's, etc.) can easily be flown with these more powerful motors and additional Li-Poly battery cells. The added advantage is that the brick operates on 2.4 GHz and the unit weighs only 3.5 grams, including two linear-output, fully proportional servos.
Keeping all that in mind, this Booster might be employed for many new micro/indoor RC applications.
MA
Sources
- ACE R/C Thermic Sniffer: http://bit.ly/dceNNs
- Winged Shadow Systems — (630) 837-6553 — www.wingshadow.com
- Harbor Freight Tools — (800) 444-3353 — www.harborfreight.com
- BSD Micro RC — (417) 358-9521 — www.bsdmicrorc.com
Transcribed from original scans by AI. Minor OCR errors may remain.

