

Frequently Asked Questions - 2010/10
Bob Aberle | [email protected]
Please write in with your questions; that is the only way we can keep this column format going. When referring to published Qs and As (for follow-ups), provide the number as a reference.
References to addresses and Web sites are placed in a group, separate from the text, at the end of this column under "Sources."
I am including a new "Tips" feature. These hints will be numbered in the same sequence as the FAQs.
Q465: AstroFlight meter for low-voltage applications
Q: "I have owned an Astro Flight digital wattmeter for many years. Recently I had the need to measure voltages less than 4.0 volts. My meter can only work down to about a 3.7 volts minimum. So this rules out any testing I might do with a single Li-Poly battery cell under load.
"I know Astro Flight now sells a series of these meters (Model 101) that uses a plug-in 4-cell battery pack to allow reading down to almost zero volts. But I also heard that someone published a simple modification that would allow my older style meter to read low voltage.
"Unfortunately I can't find any reference to that scheme. Can you help me out?"
A: I own the AstroFlight model 101N, which is the Super Whattmeter. An additional cable exits from this meter into which you plug a four-cell RC receiver–type battery pack. By doing so, the unit will read down to practically zero volts.
The meter modification you are referring to was published on the E-zone portion of RCGroups in July 2002. Chuck Haverlah of Thousand Oaks, California, developed the original scheme. Gordon Johnson, a noted micro/indoor specialist, wrote the E-zone article. I have included the Web site address for that article in the "Sources" section. If you have trouble accessing the site, please drop me an e-mail; I may be able to help.
The interesting part is that Chuck employed a 9‑volt battery rather than a four-cell NiCd or NiMH pack. That type of battery must be charged before using. With the 9‑volt, the meter is always available to take readings. When the battery finally runs down, you merely swap in a new one.
Q466: Electric-powered control line (CL) models
Q: "I know over the past couple of years you have made mention several times to electric-powered control line models. I'm sure even more progress has now been made in this field. Can you direct me to some reference sources where I might pursue this type model aircraft further?"
A: Electric-powered CL models have been steadily on the rise in the past few years. The lack of motor noise makes them perfect for flying sites located in the inner city.
At least four years ago I answered a frequently asked question about the CL aerobatics (stunt) championship efforts of MA Editor Emeritus Bob Hunt. He has been pursuing this form of CL flying ever since and has accumulated a lot of experience. He concentrates on what I call "full size" or "traditional size" CL aircraft for outdoor flying and specifically competition. I've included Bob's contact information in the "Sources" section. Please take his time only if you are serious about this type of flying.
Another interesting electric-CL category is indoor flying. Bob Wilder of Colleyville, Texas, has been a champion in this effort for the past couple of years and now operates a business that sells various models and accessory equipment related to electric CL. My original comments about this were in Q336, published in the March 2008 MA.
Bob's airplanes weigh 6–12 ounces. Indoor CL has proved interesting because, by nature, the lines prevent the aircraft from colliding with obstructions such as walls, ceilings, basketball hoops, etc. I've listed Bob's phone number in the "Sources" section. This is the way he prefers to be contacted.
Another indoor electric-CL category has recently emerged. Del Ogren, a noted indoor flying enthusiast, has come up with a micro-size electric-powered CL model called the Yakety Yak. It has only a 10‑inch wingspan, with an all-up weight of 8.5 grams (not ounces!). Del is using the motor from a ParkZone Cessna, a Nick Leichty ESC/timer, and a single tiny Li‑Poly battery cell. This type of airplane opens up an entirely new arena of indoor possibilities. Del has published an account of this model on RCGroups; his e-mail is in the "Sources" section for those who want to pursue this subject with him.
I've given you some information that should enable you to research this subject much further. If you do get involved in electric-powered CL, I would like to hear from you.
Q467: Lightweight iron-on covering sticking to itself
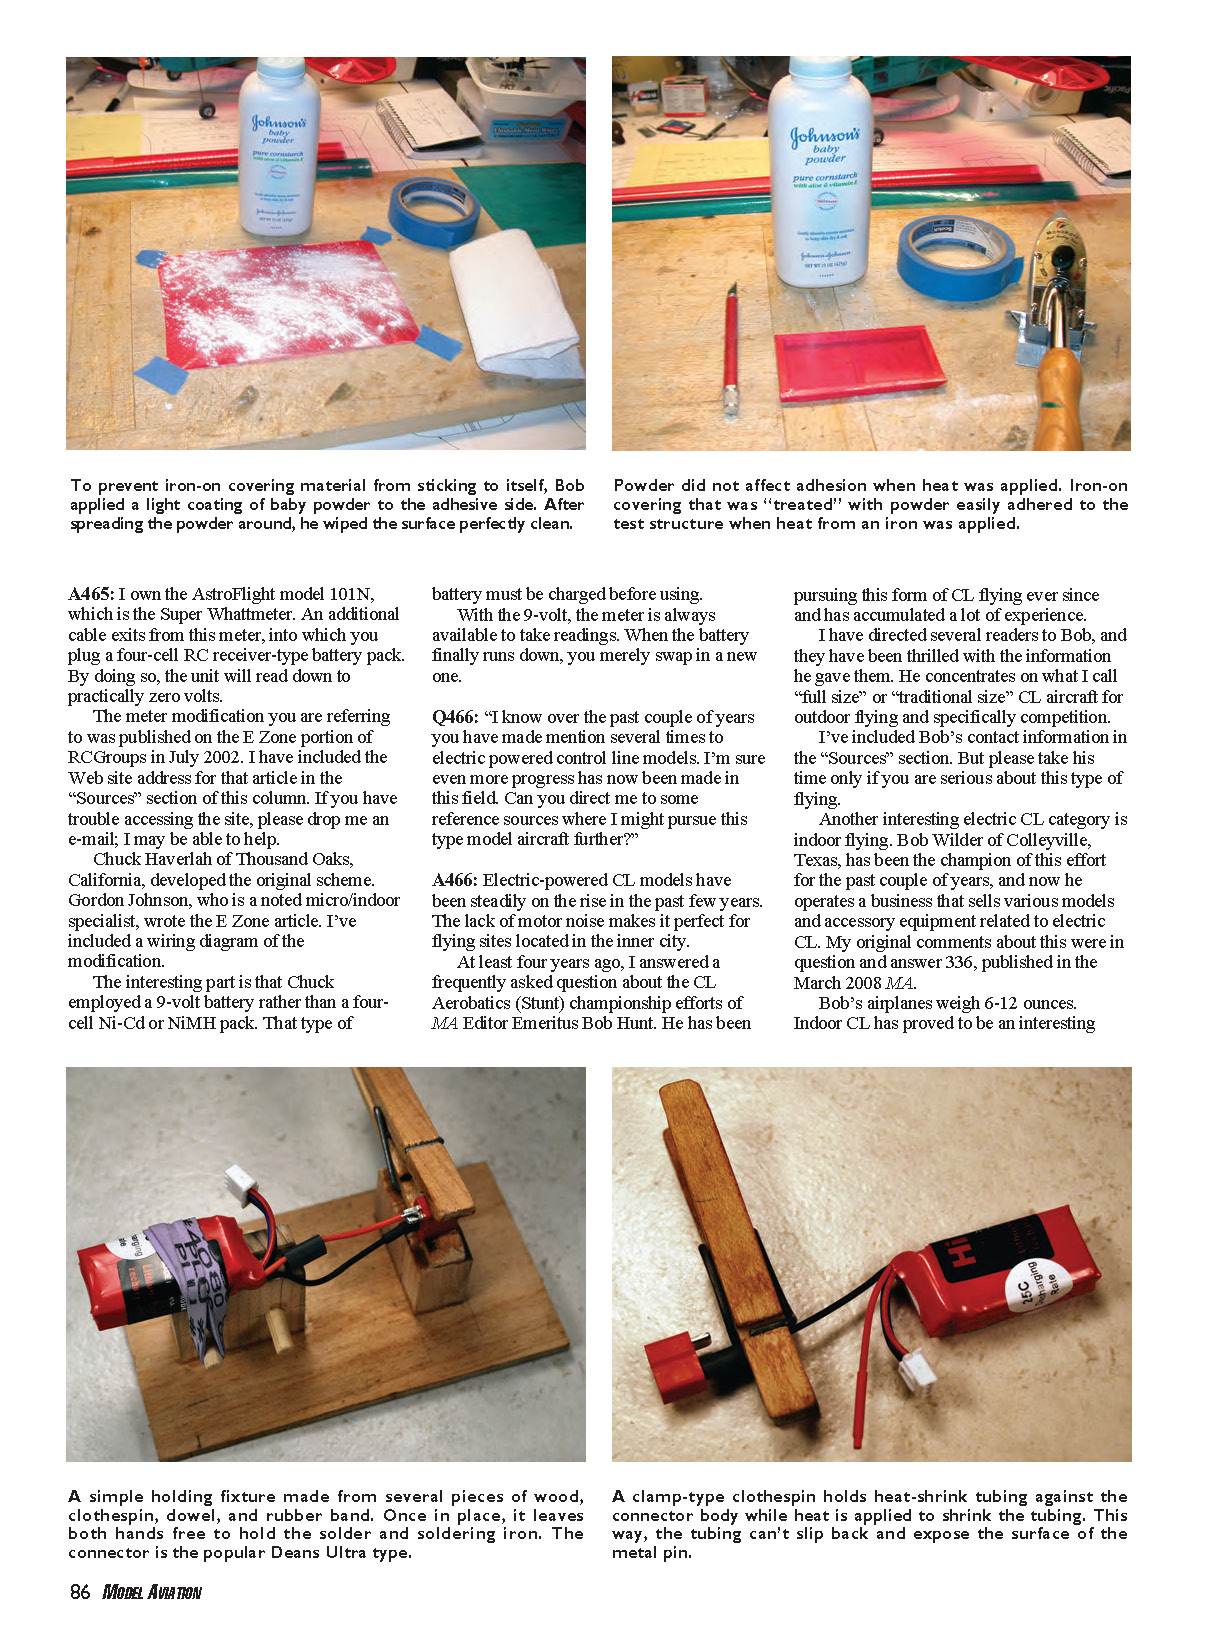
Q: "I have found an annoying tendency on many of the lightweight iron-on coverings where the material sticks to itself, as soon as the protective backing is removed. It's almost like a magnet the way it attracts itself. In many cases I'm unable to straighten the material out and it ends up in the garbage.
"Have you ever experienced this? If so do you have any suggestions?"
A: Yes — I've certainly had this experience, and at times it has driven me crazy. It doesn't happen with all brands of covering, but it occurs more with lightweight materials. The solution came from my old friend Frank Korman of the Dallas Electric Aircraft Fliers club in Texas: use common talcum powder, baby powder, or even cornstarch.
Try this technique:
- Measure the size of covering you need to apply.
- Carefully remove the clear protective backing, leaving the adhesive side facing up.
- Attach the four corners of the covering to your workbench using low-tack painter's blue masking tape.
- Sprinkle a light coating of powder onto the covering material — don't use a lot.
- Use folded paper towels to spread the powder so that it covers the entire surface.
- Use a clean paper towel to wipe off all the powder you can see. (Getting all the powder off is more important when working with transparent material; it’s less critical with opaque covering.)
- Once the visible powder is removed, the covering will no longer stick to itself before heat is applied, giving you an opportunity to smooth it onto the structure.
- Apply heat with the usual hobby iron; the material will stick and shrink as normal.
I haven't tried it, but a tack cloth might help at the powder-removal stage. The powder will not affect adhesion. Give this technique a try — I think you'll be pleased with the results.
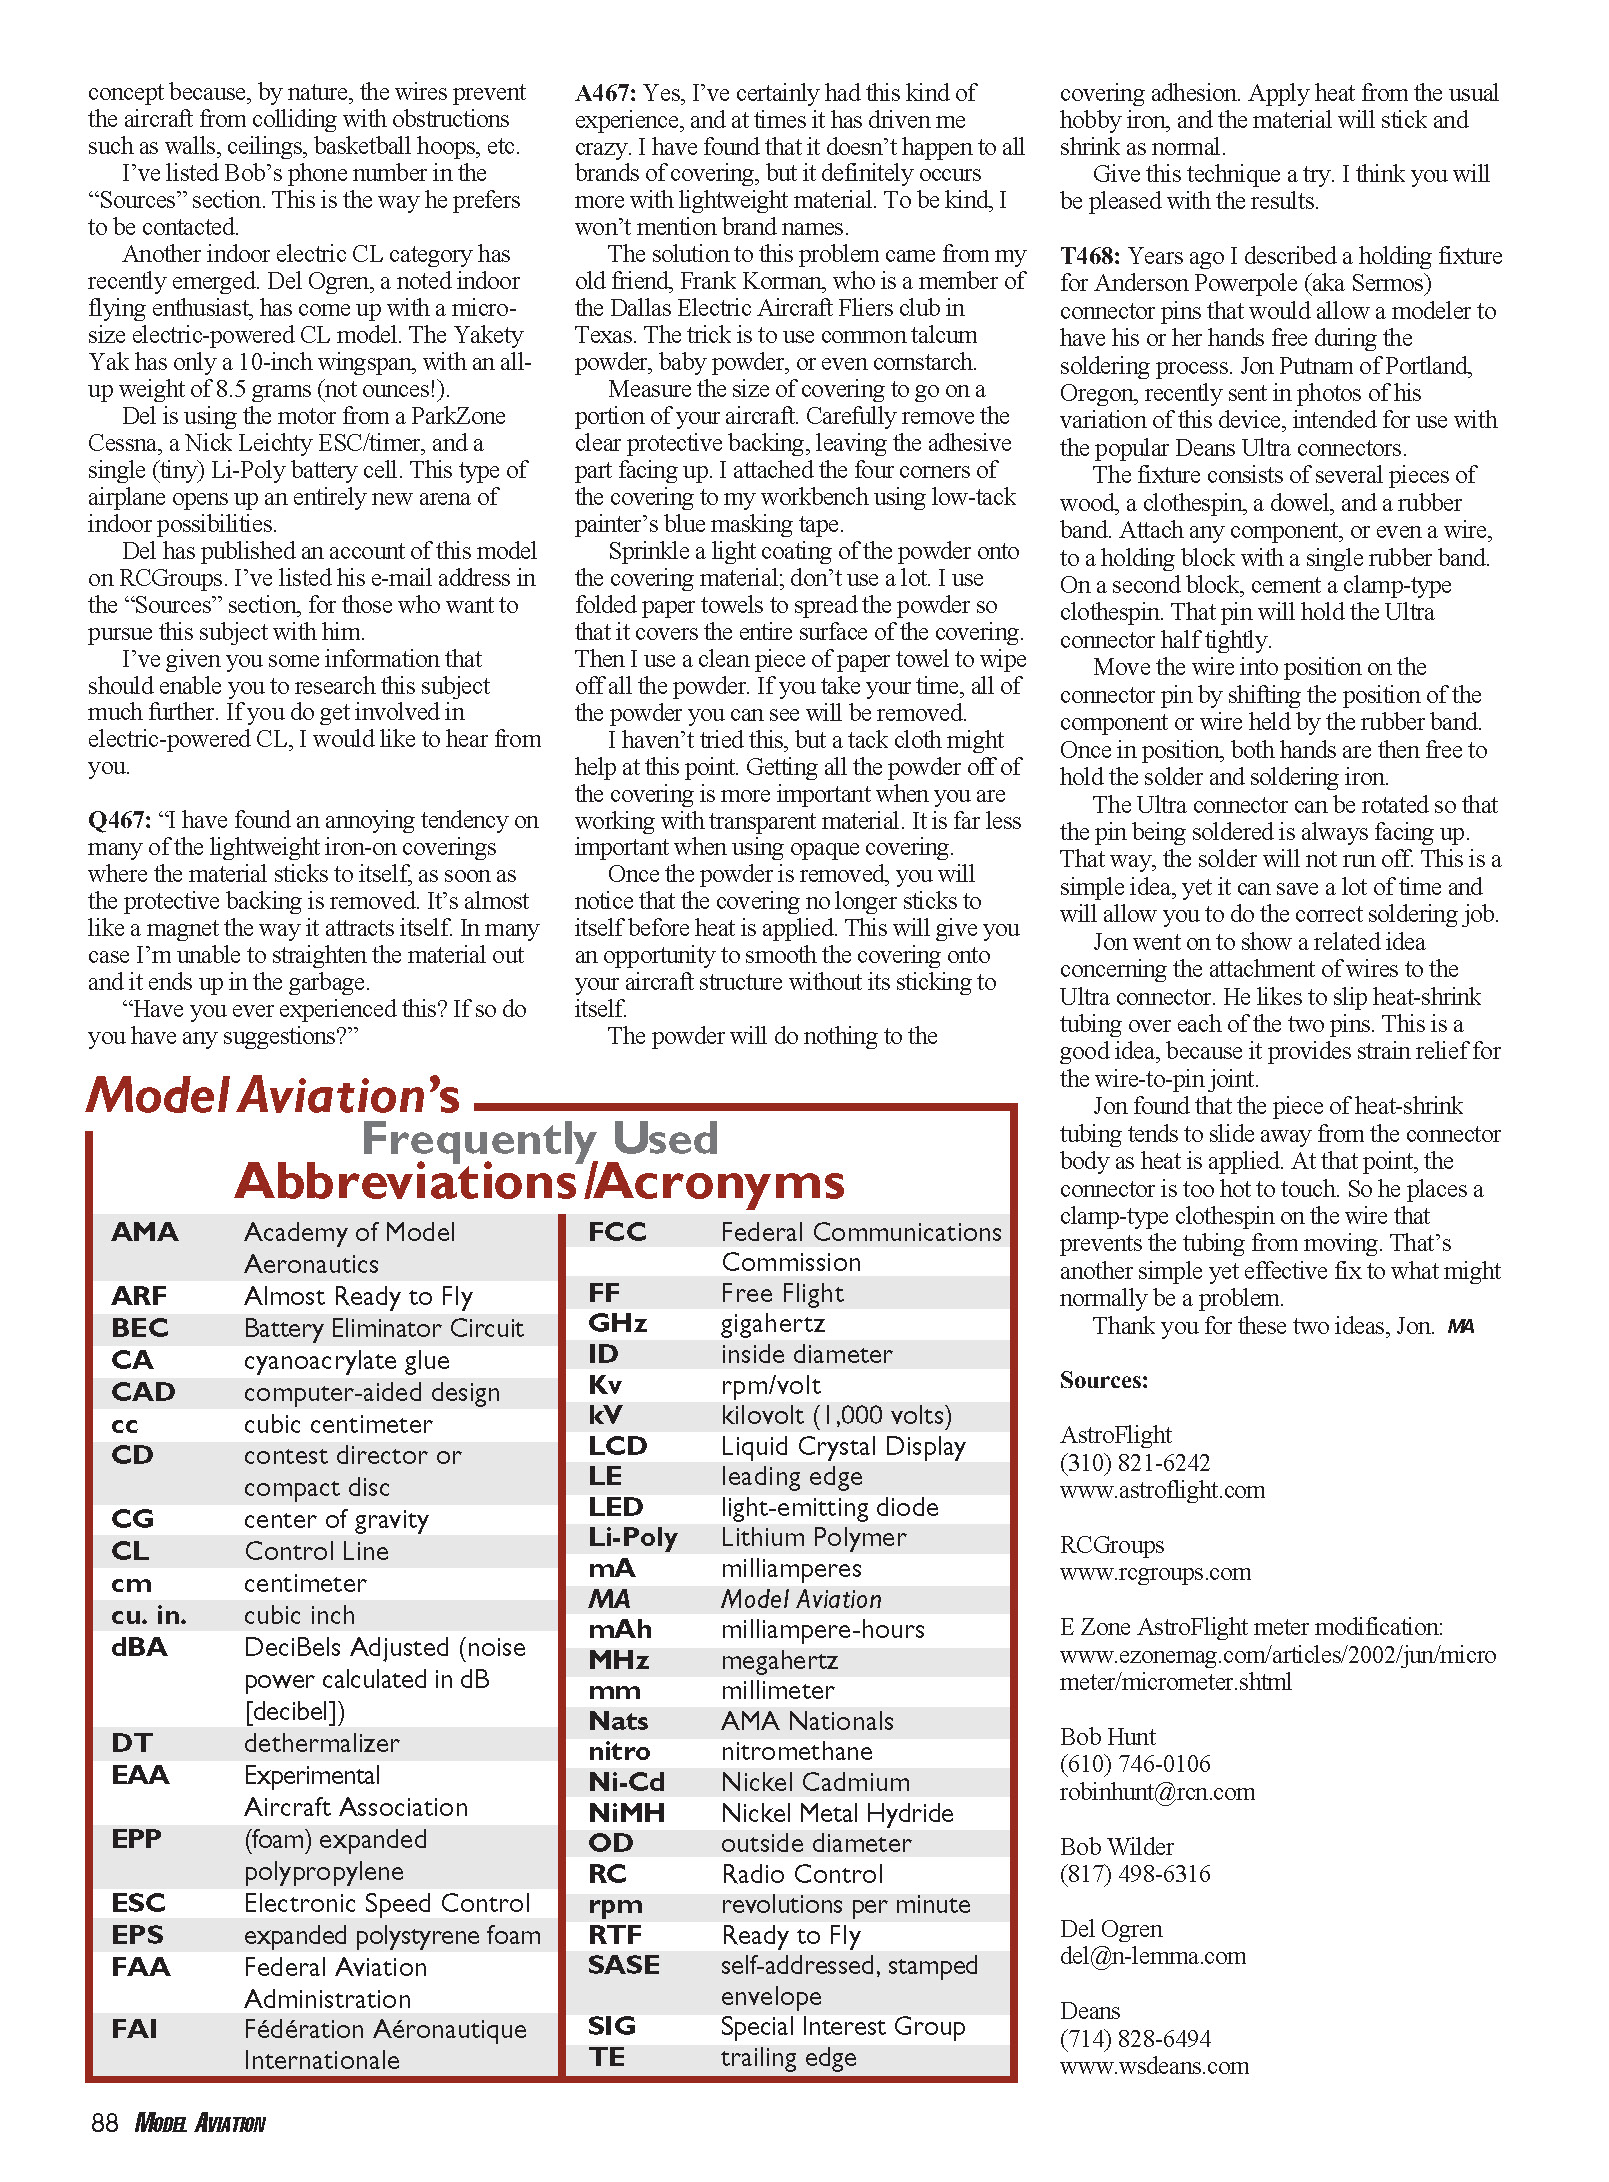
Q468: Simple holding fixture for soldering connectors (Deans Ultra)
Years ago I described a holding fixture for Anderson Powerpole (aka Sermos) connector pins that allowed a modeler to have hands free during soldering. Jon Putnam of Portland, Oregon, recently sent photos of his variation intended for use with the popular Deans Ultra connectors.
The fixture consists of several pieces of wood, a clothespin, a dowel, and a rubber band. Attach any component, or even a wire, to a holding block with a single rubber band. On a second block, cement a clamp-type clothespin; that pin will hold the Ultra connector half tightly.
Move the wire into position on the connector pin by shifting the position of the component or wire held by the rubber band. Once in position, both hands are then free to hold the solder and soldering iron. The Ultra connector can be rotated so that the pin being soldered is always facing up; that way the solder will not run off. This is a simple idea, yet it can save a lot of time and help you do a correct soldering job.
Jon also shared a related idea concerning attachment of wires to the Ultra connector. He slips heat-shrink tubing over each of the two pins to provide strain relief for the wire-to-pin joint. He found the tubing tends to slide away from the connector body as heat is applied (at which point the connector is too hot to touch). To prevent this, he places a clamp-type clothespin on the wire to keep the tubing from moving. Another simple but effective fix.
Thank you for these two ideas, Jon. —MA
Sources
- AstroFlight
(310) 821-6242 www.astroflight.com
- RCGroups
- E-zone AstroFlight meter modification:
www.ezinemag.com/articles/2002/jun/micrometer/micrometer.shtml
- Bob Hunt
(610) 746-0106 [email protected]
- Bob Wilder
(817) 498-6316
- Del Ogren
- Deans
(714) 828-6494 www.wsdeans.com
Transcribed from original scans by AI. Minor OCR errors may remain.

