
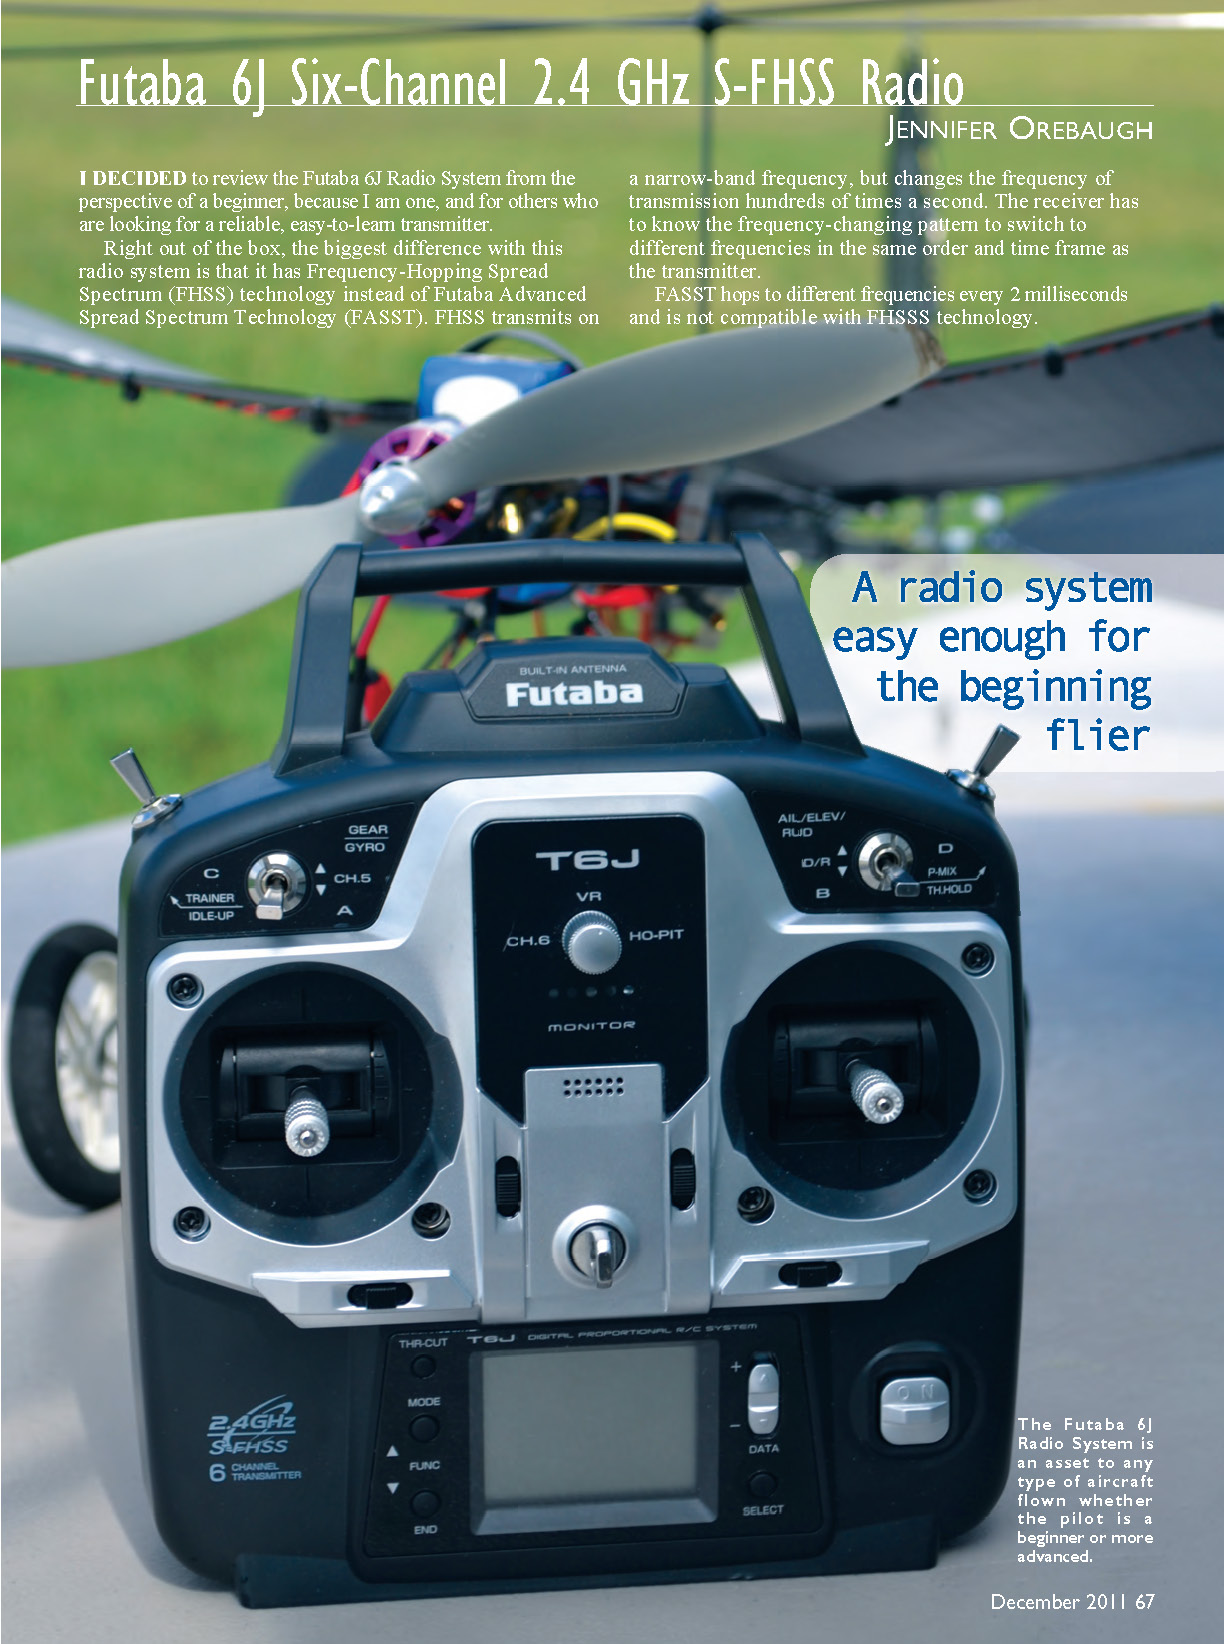

Futaba 6J Six-Channel 2.4 GHz S-FHSS Radio
Jennifer Orebaugh
I decided to review the Futaba 6J radio system from the perspective of a beginner — because I am one — and for others who are looking for a reliable, easy-to-learn transmitter.
FHSS vs FASST
Right out of the box, the biggest difference with this radio system is that it uses Frequency-Hopping Spread Spectrum (FHSS) technology instead of Futaba Advanced Spread Spectrum Technology (FASST). FHSS transmits on a narrow-band frequency but changes the frequency hundreds of times a second. The receiver must follow the same frequency-hopping pattern as the transmitter to maintain the link.
FASST hops to different frequencies every 2 milliseconds and is not compatible with FHSS technology. Because of this, I could not link to or fly models that were set up with FASST receivers using the 6J.
Controls and physical features
- Trainer switch: located on the left side of the transmitter. When the 6J is used as the instructor transmitter and the trainer switch is activated, the model is controlled by the instructor transmitter. The trainer function will work with either a Futaba FASST or FHSS student transmitter once properly configured.
- Center knob: controls flap trim and hovering pitch fine-tuning. Both functions are inhibited until enabled within the function menu. The knob can also be assigned to operate a sixth channel.
- Sticks and gimbals: adjustable for comfort. The stick tip can be turned counterclockwise while holding the locking piece to lengthen or shorten the stick.
- Antenna: internal full-range antenna — no external antenna to extend or break.
- Weight and grip: lightweight and comfortable; can use four AA cells (1.2 V each) or a five-cell NiCd/NiMH battery pack.
Instruction manual and learning curve
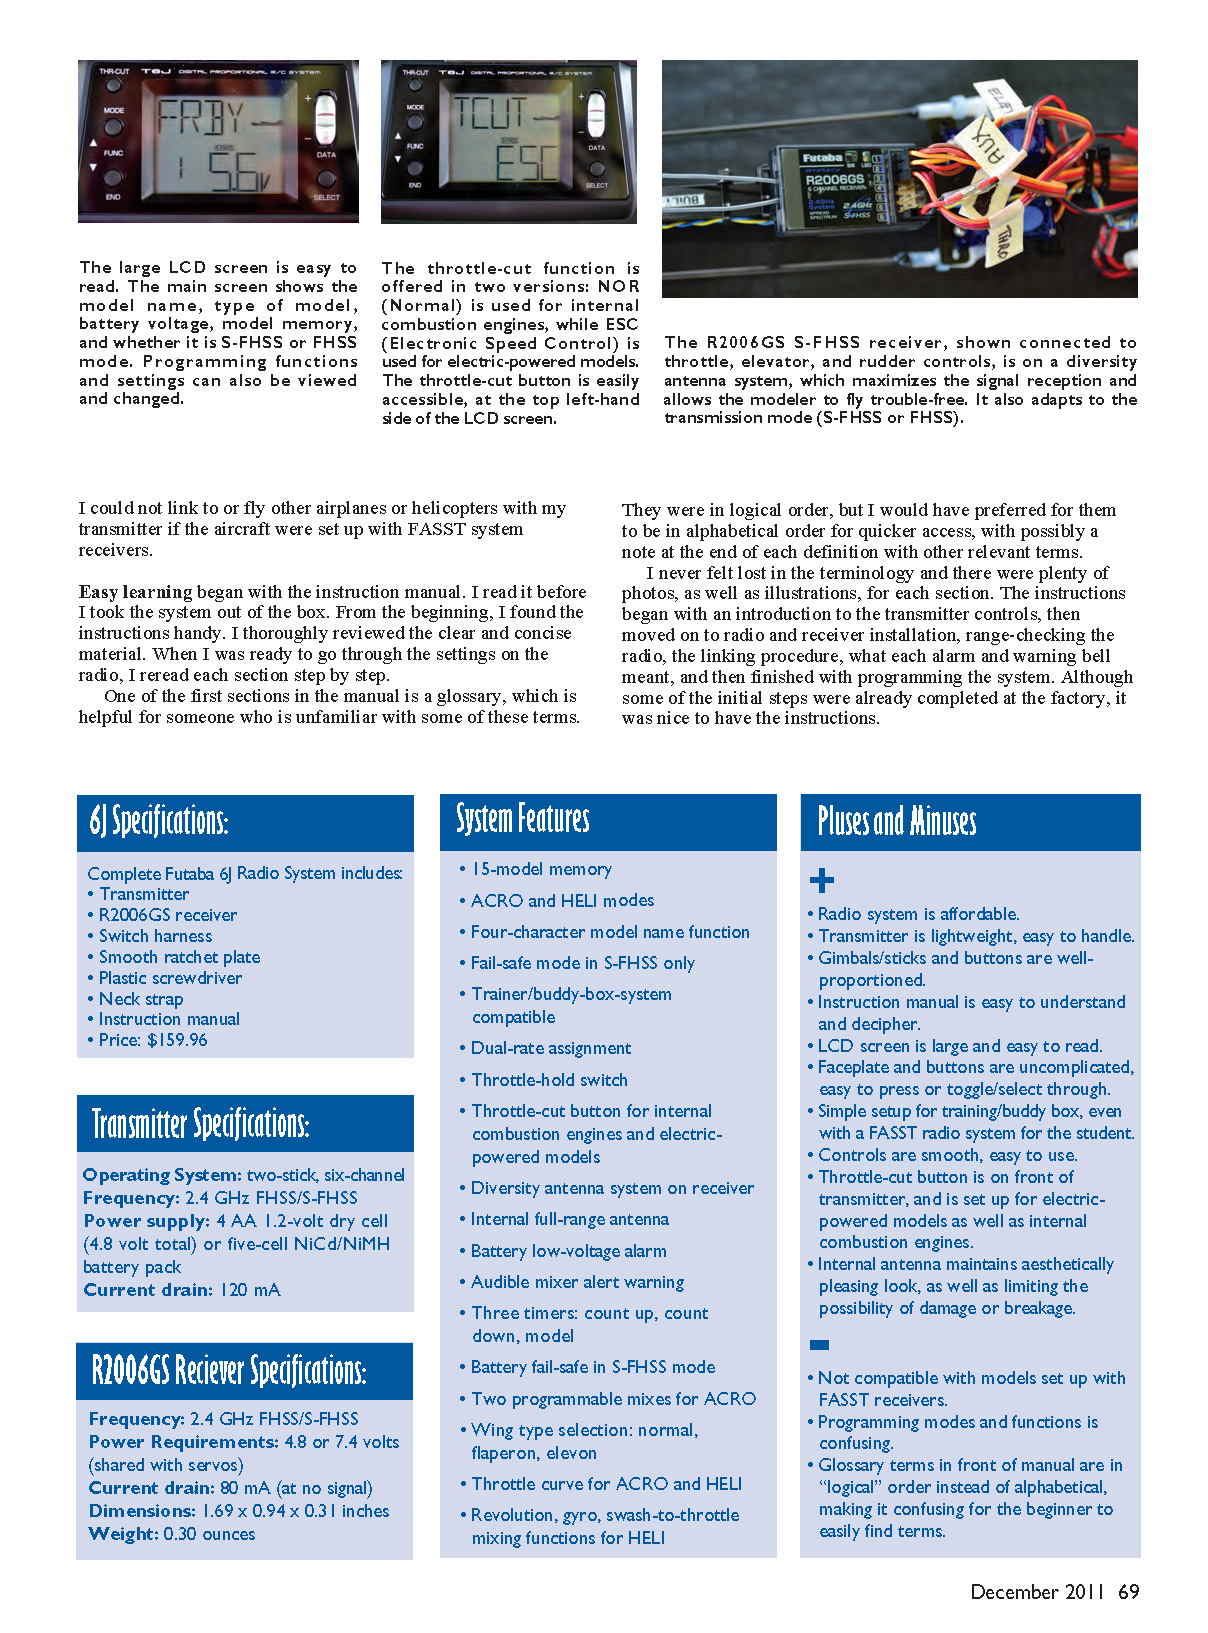
The instruction manual made learning easy. I read it before taking the system out of the box and found the material clear and concise. The manual includes a glossary, photos, and illustrations for each section. The instructions proceed logically from transmitter controls to radio and receiver installation, range-checking, linking, alarm/warning meanings, and programming.
The glossary is helpful for beginners, though the terms are listed in a logical order rather than alphabetically; alphabetical order would make quick reference easier. Despite that, I never felt lost in the terminology.
6J Specifications
Complete Futaba 6J radio system includes:
- Transmitter
- R2006GS receiver
- Switch harness
- Smooth ratchet plate
- Plastic screwdriver
- Neck strap
- Instruction manual
- Price: $159.96
Transmitter specifications
- Operating system: two-stick, six-channel
- Frequency: 2.4 GHz FHSS / S-FHSS
- Power supply: 4 AA 1.2 V dry cells (4.8 V total) or five-cell NiCd/NiMH battery pack
- Current drain: 120 mA
R2006GS receiver specifications
- Frequency: 2.4 GHz FHSS / S-FHSS
- Power requirements: 4.8 or 7.4 volts (shared with servos)
- Current drain: 80 mA (no signal)
- Dimensions: 1.69 x 0.94 x 0.31 inches
- Weight: 0.30 ounces
System Features
- 15-model memory
- ACRO and HELI modes
- Four-character model-name function
- Fail-safe mode in S-FHSS only
- Trainer / buddy-box compatible
- Dual-rate assignment
- Throttle-hold switch
- Throttle-cut button for internal combustion engines and electric-powered models (ESC)
- Diversity antenna system on receiver
- Internal full-range antenna (transmitter)
- Battery low-voltage alarm
- Audible mixer alert warning
- Three timers: count up, count down, model
- Battery fail-safe in S-FHSS mode
- Two programmable mixes for ACRO
- Wing-type selection: normal, flaperon, elevon
- Throttle curve for ACRO and HELI
- Revolution, gyro, swash-to-throttle mixing functions for HELI
Pluses and Minuses
Pluses:
- Affordable radio system
- Lightweight and easy to handle
- Well-proportioned gimbals/sticks and buttons
- Easy-to-understand instruction manual
- Large, easy-to-read LCD screen
- Uncomplicated faceplate and buttons; easy to press and toggle
- Simple setup for trainer/buddy-box, even with a FASST student transmitter
- Smooth, easy-to-use controls
- Throttle-cut button on front of transmitter; appropriate for both electrics and internal combustion engines
- Internal antenna preserves aesthetics and reduces chance of damage
Minuses:
- Not compatible with models set up with FASST receivers
- Programming modes and functions can be confusing
- Glossary terms are presented in a non-alphabetical order, which makes quick look-up harder for beginners
Setup, linking, and range check
The receiver is linked at the factory, but the manual includes instructions for setting up and relinking. When I attempted to link, the receiver initially flashed a red light (no signal). Unplugging and reconnecting the receiver battery returned the light to steady green.
The 6J has a special power-down (range-check) mode. To range-check:
- Put the transmitter into power-down mode (follow manual).
- Walk 30 to 50 paces from the model while operating the controls; have an assistant verify control function at the model.
- Walk back, start the engine (for IC engines be sure the throttle stick is fully down), and repeat.
- Run the airplane at various throttle speeds, but do not fly in this mode. The transmitter reverts to full-range mode after 90 seconds.
During range-check, the blue light on the front of the model will blink and beep, and "down" will blink on the LCD screen so there’s no confusion about the active mode.
Programming and menus
The front-panel buttons are simple and the faceplate is uncluttered.
- Left of the LCD:
- Top button: Mode key — used to view, select, and change program functions and settings. Press and hold for one second, then scroll up/down using the mode and the bottom-left (End) key.
- Bottom button: End key — also used for scrolling and to exit or confirm certain menus.
- Right of the LCD:
- Top button: Data input key — used to change values in programming modes.
- Bottom button: Select key — used to set the function/mode.
The Parameters (PARA) menu is the first one I set up. Here you select aircraft type (airplane or helicopter), model selection and name, throttle-cut, mode settings, and model reset. The manual walks the user through each step with numbered instructions and photos.
Model selection and naming:
- The 6J stores up to 15 models.
- You can name each model (four characters). Use the MODL function, press Select, then use Data Input to scroll through characters; press End when finished. I named my model "FRBY" for my Flutter-By.
Model reset:
- REST in the PARA menu resets only the current model on screen to factory defaults (does not wipe all 15 models).
Fail-safe and battery fail-safe:
- S-FHSS offers fail-safe on all channels (recommended for safety).
- S-FHSS factory default also includes a battery fail-safe: if battery voltage drops below 3.8 V, the throttle servo is moved to a predetermined position.
Throttle-cut:
- Factory setting is for internal combustion engines but can be switched to ESC for electric models.
- When throttle-cut is activated it beeps and flashes "MIX" on the LCD. The throttle will not respond until the function is turned off by pressing the throttle-cut button again.
Dual rates and exponential (expo):
- The manual’s definitions are somewhat vague. Basic concepts:
- Dual rates change the travel amount of a servo relative to stick movement (expressed as a percentage). Lower percentages reduce control surface travel and are gentler — good for beginners. Higher rates allow more aggressive maneuvers.
- Exponential affects sensitivity around the stick center. Futaba uses negative expo (opposite sign convention to some other brands): positive expo increases sensitivity around center; negative expo reduces sensitivity, producing softer, milder movement near neutral. Too much positive expo can make the aircraft overly responsive.
- Best way to learn: place the model on a workbench and observe how different settings affect control-surface movement, especially at high and low rates.
Other function menus:
- End Point Adjustment (EPA): should be set before dual rates and expo.
- Trim (TRIM): fine-tunes adjustments and stores trim values in memory.
- Sub-trims (STRM): further fine calibration of servos.
- Programmable mixes: correct unwanted flight tendencies.
- Wing-type selection: normal, flaperon, elevon (and some delta configurations); V-tail mixing available.
- Throttle curves for internal combustion engines and pitch-curves for variable-pitch propellers.
- Helicopter functions: throttle hold, idle up, gyro sensitivity, pitch-to-rudder mixing (REVO). Helicopter programming is separated from airplane programming in the manual and indicated by ACRO or HELI headings.
Training (buddy-box) function:
- Three training modes: Normal (student controls with their transmitter), Function (student controls but instructor’s settings apply), and Off (instructor controls).
- Until enabled in the menu, the trainer is inhibited (shows "INH"). Enable by pressing the data input lever upward for two seconds; a beep confirms activation.
Final thoughts
The 6J was a great radio to learn on. It's affordable, lightweight, and has a straightforward layout with helpful features like internal antenna, throttle cut, model naming, and S-FHSS fail-safe. Programming takes some getting used to, and certain concepts (dual rates and expo) may require additional reading or hands-on experimentation. Overall, it’s a solid choice for beginners and hobbyists who want a capable, entry-level Futaba transmitter.
Sources
- Futaba RC / Great Planes Model Distributors — (217) 398-8970, ext. 2 — www.futaba-rc.com
- Hover and Smile transmitter series — www.hoverandsmile.com
- RC Helicopter Wiki (transmitter features for beginners) — www.rcheliwiki.com
Transcribed from original scans by AI. Minor OCR errors may remain.

