

Graupner MZ-24 HoTT 2.4 GHz Radio
I've always been a minimalist when it comes to radios. Fancy gadgets and doodads on a transmitter don't impress me. Too many switches, knobs, and levers can complicate the simple joy of flying.
For that reason, I approached the Graupner MZ-24 radio with a suspicious eye. The MZ-24 is a feature-rich, 12-channel radio with plenty of bells and whistles. I was determined to sort out whether those features are marketing hype or truly useful additions that would enhance my flying.
What's Included
The first thing I noticed about the MZ-24 was that it comes with a nice carrying case. The foam inside is pocketed to receive the transmitter on its back. Perhaps it isn't the most efficient use of space, but the radio appears to be secure and well protected, which is the whole point of having a case.
After I emptied the included accessories from the case, a sizable side compartment emerged. I use it to stash flight batteries and a few tools when I head to the field.
Included with the MZ-24:
- AC charger for the 4,000 mAh LiPo battery
- Two receivers: one 12-channel GR-24L and one 6-channel GR-12L
- USB cable and USB adapters
- 4 GB micro SD memory card
- Neck strap
- Lengthy user's manual
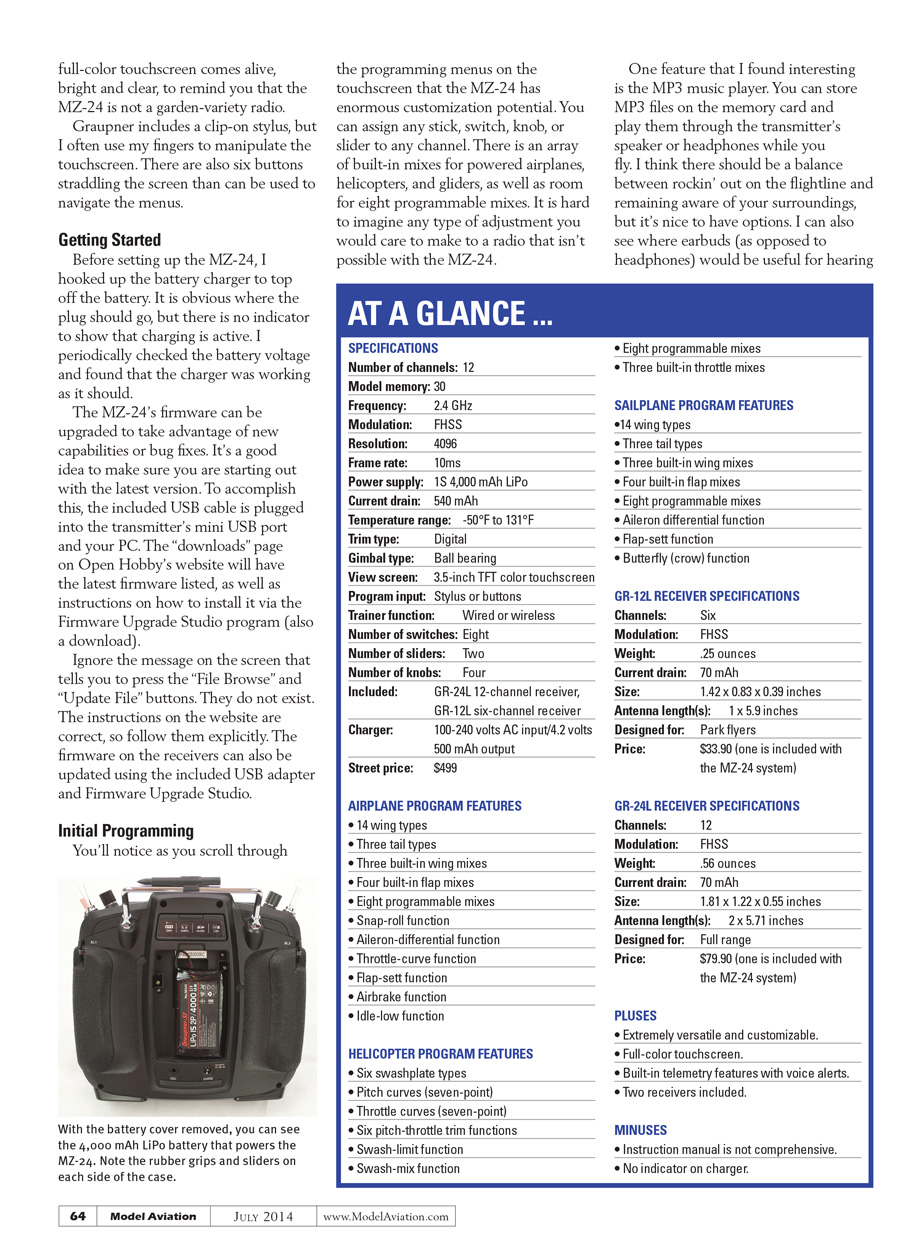
I prefer my electronics to be on the meaty side and the MZ-24 does not disappoint. It weighs 32.5 ounces with the battery and feels well balanced. The sides and back of the case feature rubber grips that I found comfortable and secure. I don't use a neck strap when I fly, but I kept the swiveling attachment point in place because it is useful for lifting the transmitter from its case.
The transmitter has a familiar look and feel. That familiar appearance, however, vanishes as soon as you turn the power on. The 3.5-inch (diagonal) full-color touchscreen comes alive, bright and clear, to remind you that the MZ-24 is not a garden-variety radio. Graupner includes a clip-on stylus, but I often use my fingers to manipulate the touchscreen. There are also six buttons straddling the screen that can be used to navigate the menus.
Getting Started
Before setting up the MZ-24, I hooked up the battery charger to top off the battery. It is obvious where the plug should go, but there is no indicator to show that charging is active. I periodically checked the battery voltage and found that the charger was working as it should.
The MZ-24's firmware can be upgraded to take advantage of new capabilities or bug fixes. It's a good idea to make sure you are starting out with the latest version. To accomplish this, plug the included USB cable into the transmitter's mini USB port and your PC. The "downloads" page on Open Hobby's website will have the latest firmware listed, as well as instructions on how to install it via the Firmware Upgrade Studio program (also a download). Ignore the message on the screen that tells you to press the "File Browse" and "Update File" buttons — they do not exist. The instructions on the website are correct, so follow them explicitly.
The firmware on the receivers can also be updated using the included USB adapter and Firmware Upgrade Studio.
Initial Programming
You'll notice as you scroll through the programming menus on the touchscreen that the MZ-24 has enormous customization potential. You can assign any stick, switch, knob, or slider to any channel. There is an array of built-in mixes for powered airplanes, helicopters, and gliders, as well as room for eight programmable mixes. It is hard to imagine any type of adjustment you would care to make to a radio that isn't possible with the MZ-24.
One feature that I found interesting is the MP3 music player. You can store MP3 files on the memory card and play them through the transmitter's speaker or headphones while you fly. I think there should be a balance between rockin' out on the flightline and remaining aware of your surroundings, but it's nice to have options. I can also see where earbuds (as opposed to headphones) would be useful for hearing music without isolating you from your surroundings.
I installed the GR-24L receiver in my Sig Kadet Senior. Even counting the glider tow release, I was able to configure my radio preferences for the Kadet in roughly 15 minutes. This included dual rates and exponential throw on all control surfaces, reversing several channels, setting servo end-points, and adjusting subtrims. Having graphs on the screen that displayed the effects of my inputs helped me.
How many times have you started to set exponential values and forgotten whether they should be positive or negative? With the graph in front of me, I was assured that my inputs were correct. If you have prior experience with any brand of computer radio and you understand the basic flight-control adjustments, I think you will find this aspect of the MZ-24 easy to grasp.
I also set up my Multiplex Twinstar II using the GR-12 receiver. As with the Kadet, setting up the control surfaces of the Twinstar was a quick and intuitive process. My Twinstar, however, also features twin brushless motors utilizing differential thrust (the motors are independently controlled to provide yaw authority).
Implementing differential thrust with the MZ-24 required me to utilize three of the programmable mixes. I have configured these mixes on numerous other radios, but I think it was easiest with the MZ-24. Again, the onscreen graphs provided real-time feedback on the effects of my inputs and helped me avoid my typical trial-and-error approach.
Telemetry
One of the main features of the MZ-24 is its built-in telemetry capability. If you're not familiar with telemetry, it is real-time data sent from the aircraft to the flier via the radio. Think of it as an instrument panel for your model.
Graupner produces a variety of sensors for the MZ-24 and other radios in the Hopping Telemetry Transmission (HoTT) series. If you want to know how high, how fast, or how far away your model is — that's no problem. Maybe you want to know how many amps your motor is pulling in a steep climb, the rpm of your nitro engine, or the temperature of your ESC. All of that data and more is available with the right sensors.
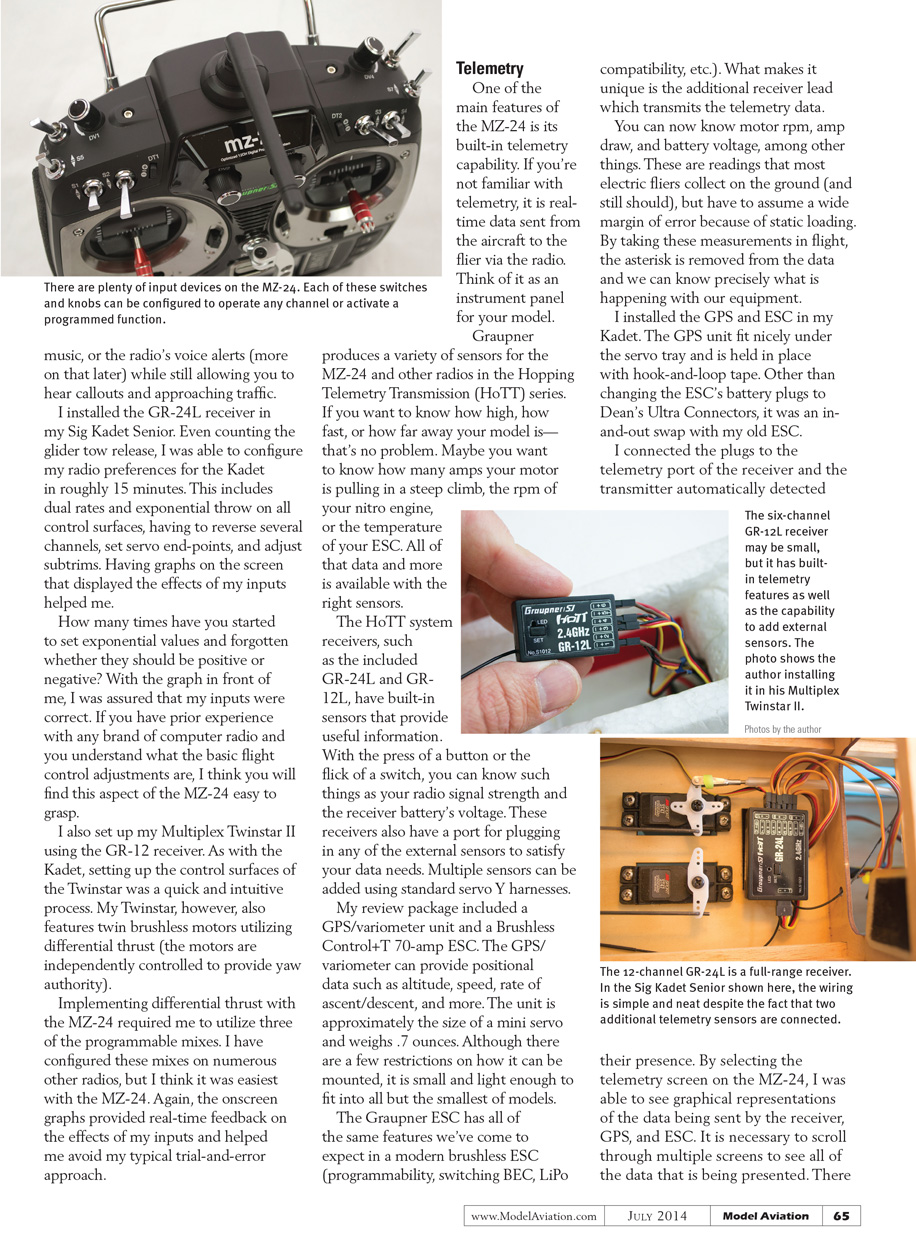
The HoTT system receivers, such as the included GR-24L and GR-12L, have built-in sensors that provide useful information. With the press of a button or the flick of a switch, you can see things like radio signal strength and the receiver battery's voltage. These receivers also have a port for plugging in any of the external sensors to satisfy your data needs. Multiple sensors can be added using standard servo Y harnesses.
My review package included a GPS/variometer unit and a Brushless Control+T 70-amp ESC. The GPS/variometer can provide positional data such as altitude, speed, rate of ascent/descent, and more. The unit is approximately the size of a mini servo and weighs 0.7 ounces. Although there are a few restrictions on how it can be mounted, it is small and light enough to fit into all but the smallest of models.
The Graupner ESC has all of the same features we've come to expect in a modern brushless ESC (programmability, switching BEC, LiPo compatibility, etc.). What makes it unique is the additional receiver lead which transmits the telemetry data.
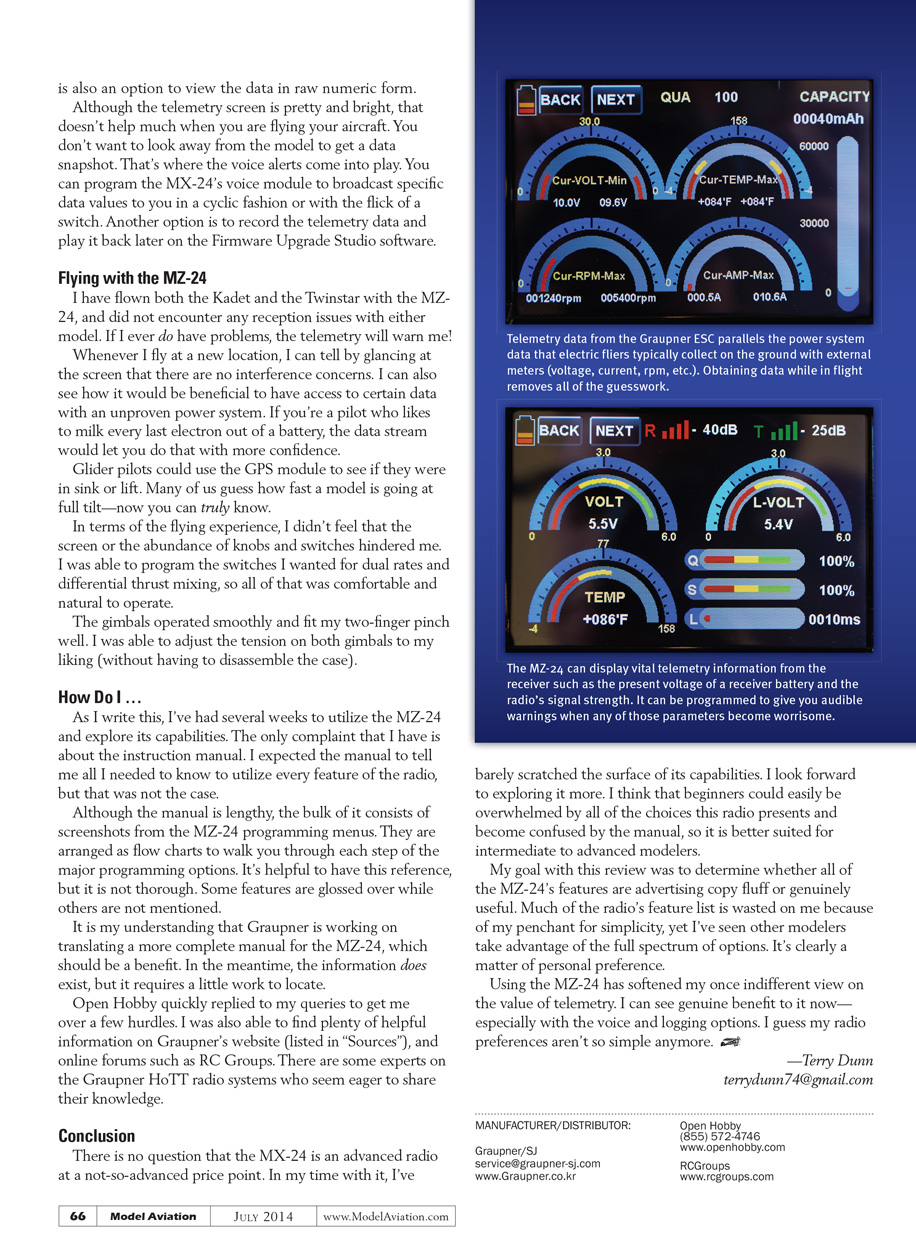
You can now know motor rpm, amp draw, and battery voltage, among other things. These are readings that most electric fliers collect on the ground (and still should), but have to assume a wide margin of error because of static loading. By taking these measurements in flight, the asterisk is removed from the data and we can know precisely what is happening with our equipment.
I installed the GPS and ESC in my Kadet. The GPS unit fit nicely under the servo tray and is held in place with hook-and-loop tape. Other than changing the ESC's battery plugs to Dean's Ultra Connectors, it was an in-and-out swap with my old ESC.
I connected the plugs to the telemetry port of the receiver and the transmitter automatically detected their presence. By selecting the telemetry screen on the MZ-24, I was able to see graphical representations of the data being sent by the receiver, GPS, and ESC. It is necessary to scroll through multiple screens to see all of the data that is being presented. There is also an option to view the data in raw numeric form.
Although the telemetry screen is pretty and bright, that doesn't help much when you are flying your aircraft. You don't want to look away from the model to get a data snapshot. That's where the voice alerts come into play. You can program the MZ-24's voice module to broadcast specific data values to you in a cyclic fashion or with the flick of a switch. Another option is to record the telemetry data and play it back later on the Firmware Upgrade Studio software.
Flying with the MZ-24
I have flown both the Kadet and the Twinstar with the MZ-24, and did not encounter any reception issues with either model. If I ever do have problems, the telemetry will warn me.
Whenever I fly at a new location, I can tell by glancing at the screen that there are no interference concerns. I can also see how it would be beneficial to have access to certain data with an unproven power system. If you're a pilot who likes to milk every last electron out of a battery, the data stream would let you do that with more confidence.
Glider pilots could use the GPS module to see if they were in sink or lift. Many of us guess how fast a model is going at full tilt—now you can truly know.
In terms of the flying experience, I didn't feel that the screen or the abundance of knobs and switches hindered me. I was able to program the switches I wanted for dual rates and differential thrust mixing, so all of that was comfortable and natural to operate.
The gimbals operated smoothly and fit my two-finger pinch well. I was able to adjust the tension on both gimbals to my liking (without having to disassemble the case).
How Do I...
As I write this, I've had several weeks to utilize the MZ-24 and explore its capabilities. The only complaint that I have is about the instruction manual. I expected the manual to tell me all I needed to know to utilize every feature of the radio, but that was not the case.
Although the manual is lengthy, the bulk of it consists of screenshots from the MZ-24 programming menus. They are arranged as flow charts to walk you through each step of the major programming options. It's helpful to have this reference, but it is not thorough. Some features are glossed over while others are not mentioned.
It is my understanding that Graupner is working on translating a more complete manual for the MZ-24, which should be a benefit. In the meantime, the information does exist, but it requires a little work to locate.
Open Hobby quickly replied to my queries to get me over a few hurdles. I was also able to find plenty of helpful information on Graupner's website and online forums such as RC Groups. There are some experts on the Graupner HoTT radio systems who seem eager to share their knowledge.
Conclusion
There is no question that the MZ-24 is an advanced radio at a not-so-advanced price point. In my time with it, I've barely scratched the surface of its capabilities. I look forward to exploring it more. I think that beginners could easily be overwhelmed by all of the choices this radio presents and become confused by the manual, so it is better suited for intermediate to advanced modelers.
My goal with this review was to determine whether all of the MZ-24's features are advertising copy fluff or genuinely useful. Much of the radio's feature list is wasted on me because of my penchant for simplicity, yet I've seen other modelers take advantage of the full spectrum of options. It's clearly a matter of personal preference.
Using the MZ-24 has softened my once-indifferent view on the value of telemetry. I can see genuine benefit to it now—especially with the voice and logging options. I guess my radio preferences aren't so simple anymore.
— Terry Dunn [email protected]
Transcribed from original scans by AI. Minor OCR errors may remain.

