
Great Planes Stinger II ARF
ORIGINAL DESIGNER GETS STUNG AGAIN!
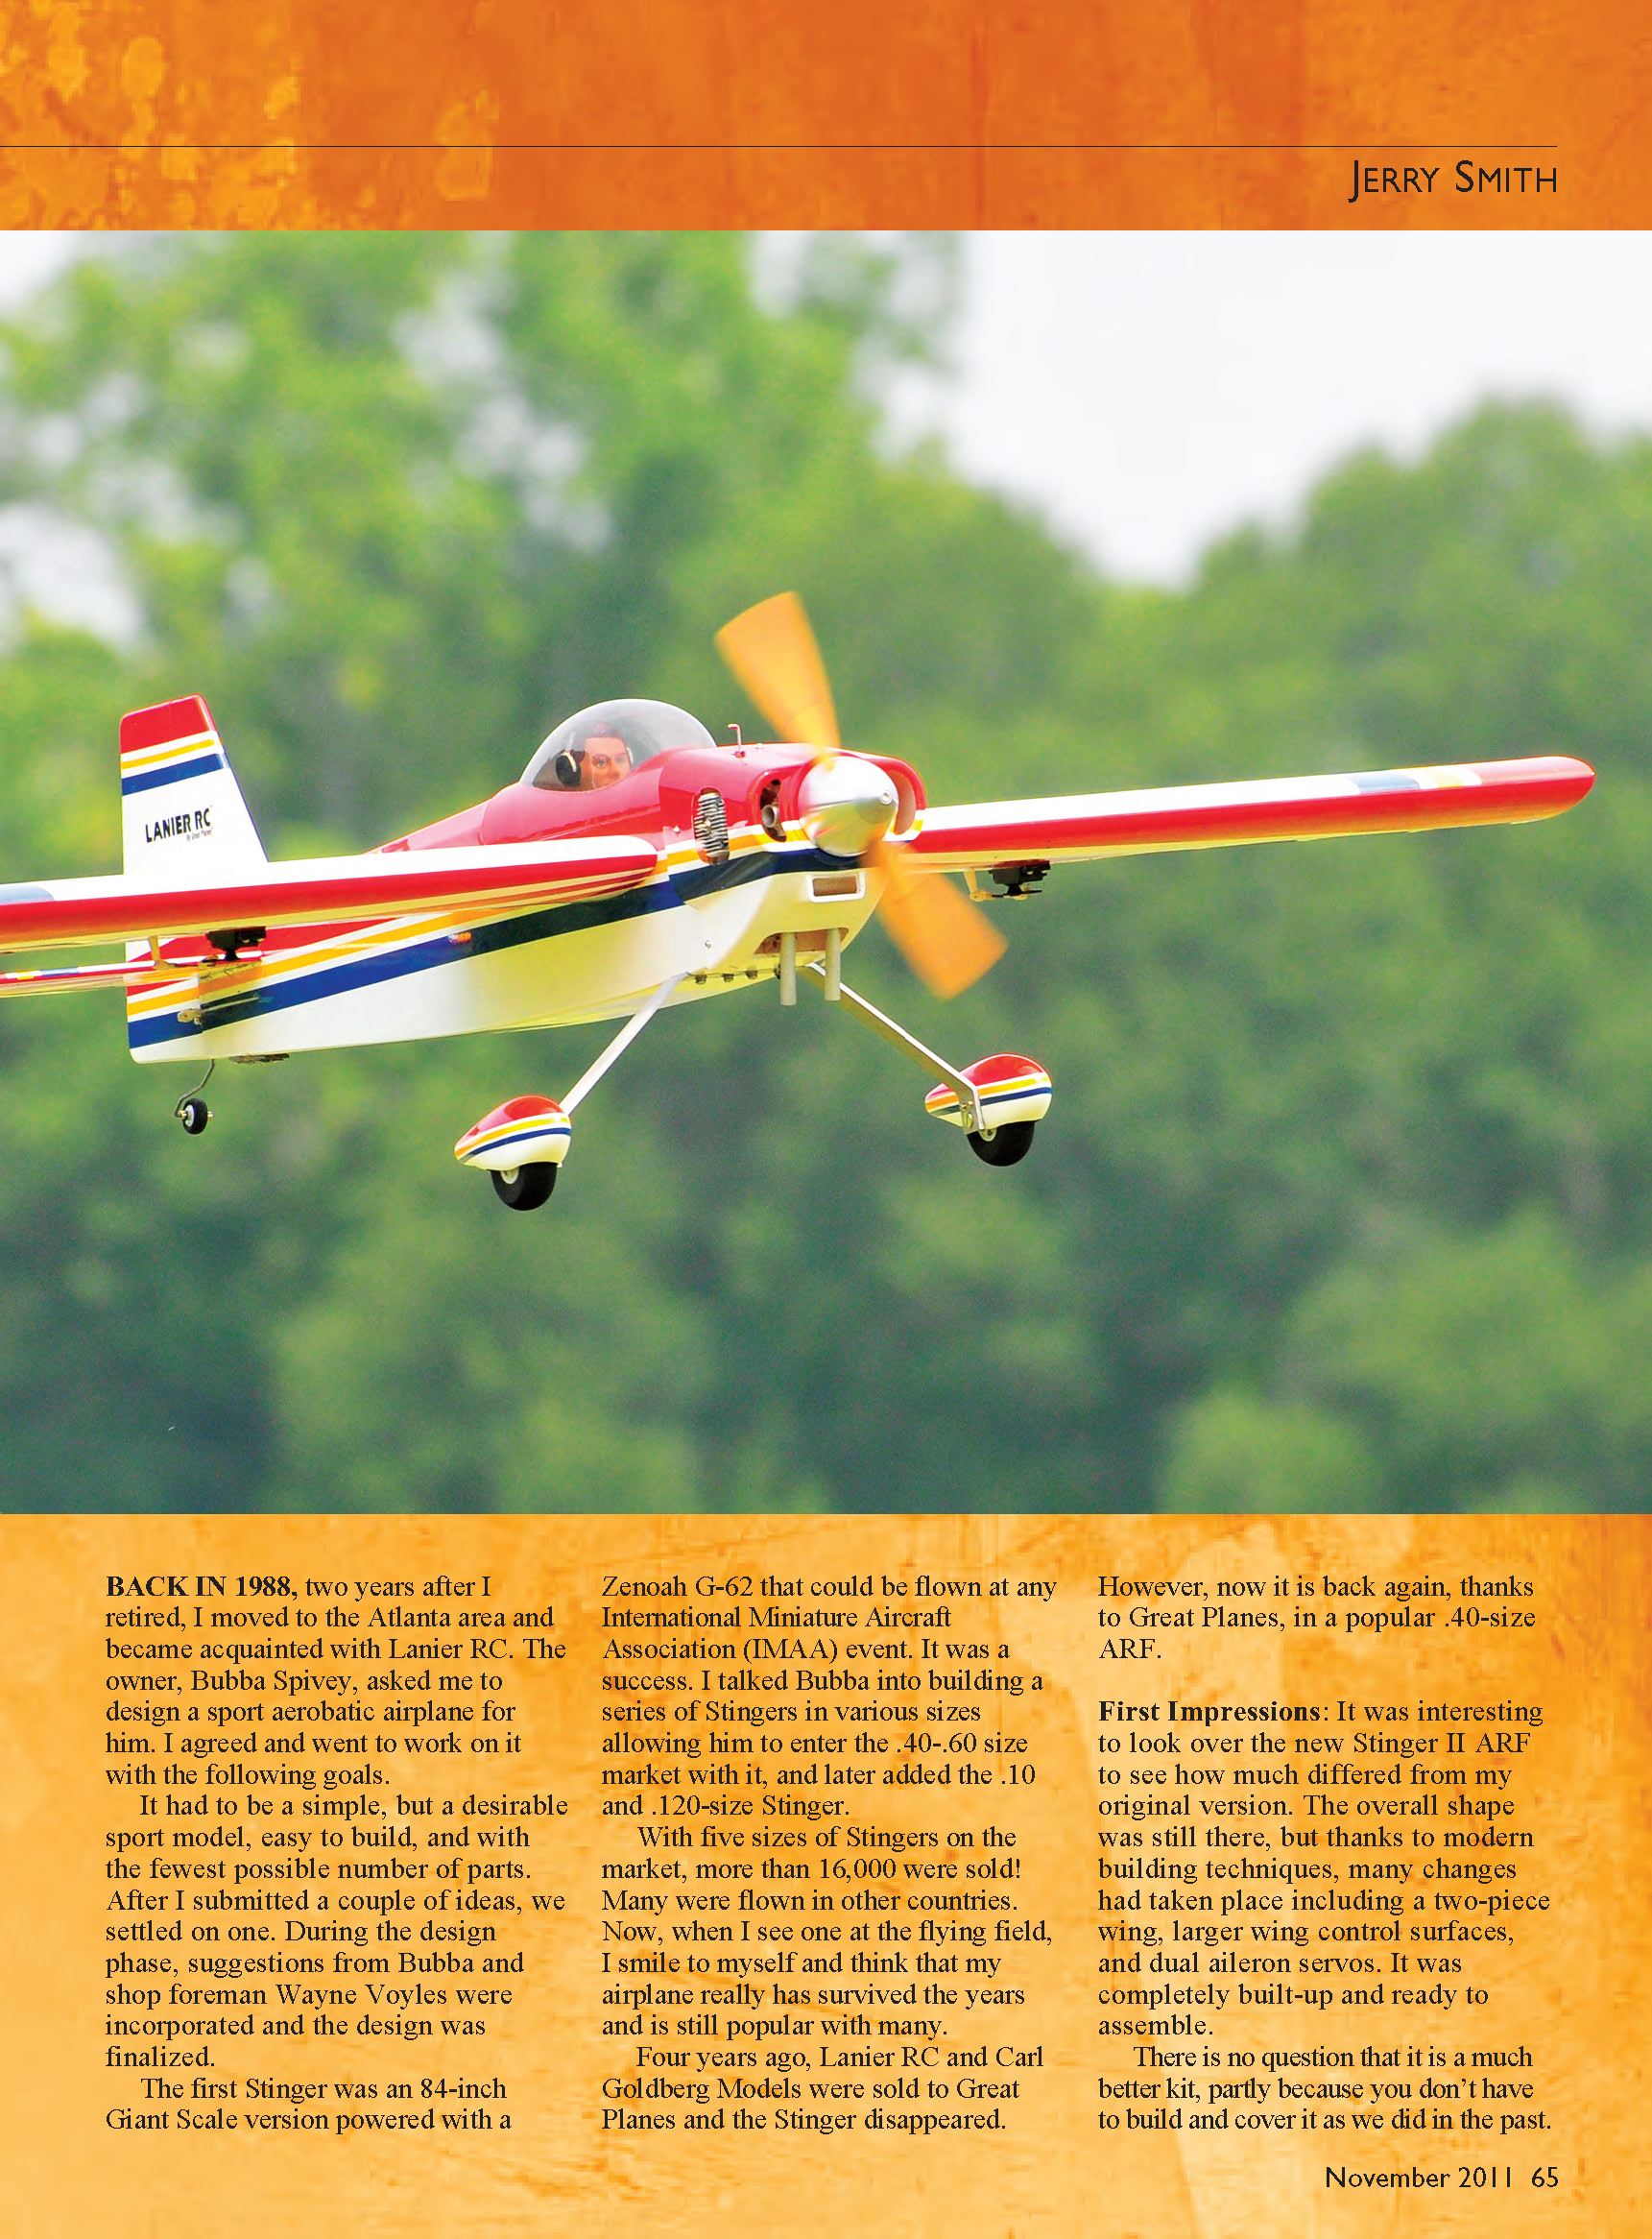
Back in 1988, two years after I retired, I moved to the Atlanta area and became acquainted with Lanier RC. The owner, Bubba Spivey, asked me to design a sport aerobatic airplane for him. I agreed and went to work on it with the following goals: it had to be a simple but desirable sport model, easy to build, and with the fewest possible number of parts. After I submitted a couple of ideas, we settled on one. During the design phase, suggestions from Bubba and shop foreman Wayne Voyles were incorporated and the design was finalized.
The first Stinger was an 84-inch Giant Scale version powered with a Zenoah G-62 that could be flown at any International Miniature Aircraft Association (IMAA) event. It was a success. I talked Bubba into building a series of Stingers in various sizes, allowing him to enter the .40–.60 size market with it, and later added the .10 and .120-size Stinger.
With five sizes of Stingers on the market, more than 16,000 were sold. Many were flown in other countries. Now, when I see one at the flying field, I smile to myself and think that my airplane really has survived the years and is still popular with many.
Four years ago, Lanier RC and Carl Goldberg Models were sold to Great Planes and the Stinger disappeared. However, now it is back again, thanks to Great Planes, in a popular .40-size ARF.
First Impressions
It was interesting to look over the new Stinger II ARF to see how much differed from my original version. The overall shape was still there, but thanks to modern building techniques many changes had taken place, including a two-piece wing, larger wing control surfaces, and dual aileron servos. It was completely built-up and ready to assemble. There is no question that it is a much better kit, partly because you don't have to build and cover it as we did in the past.
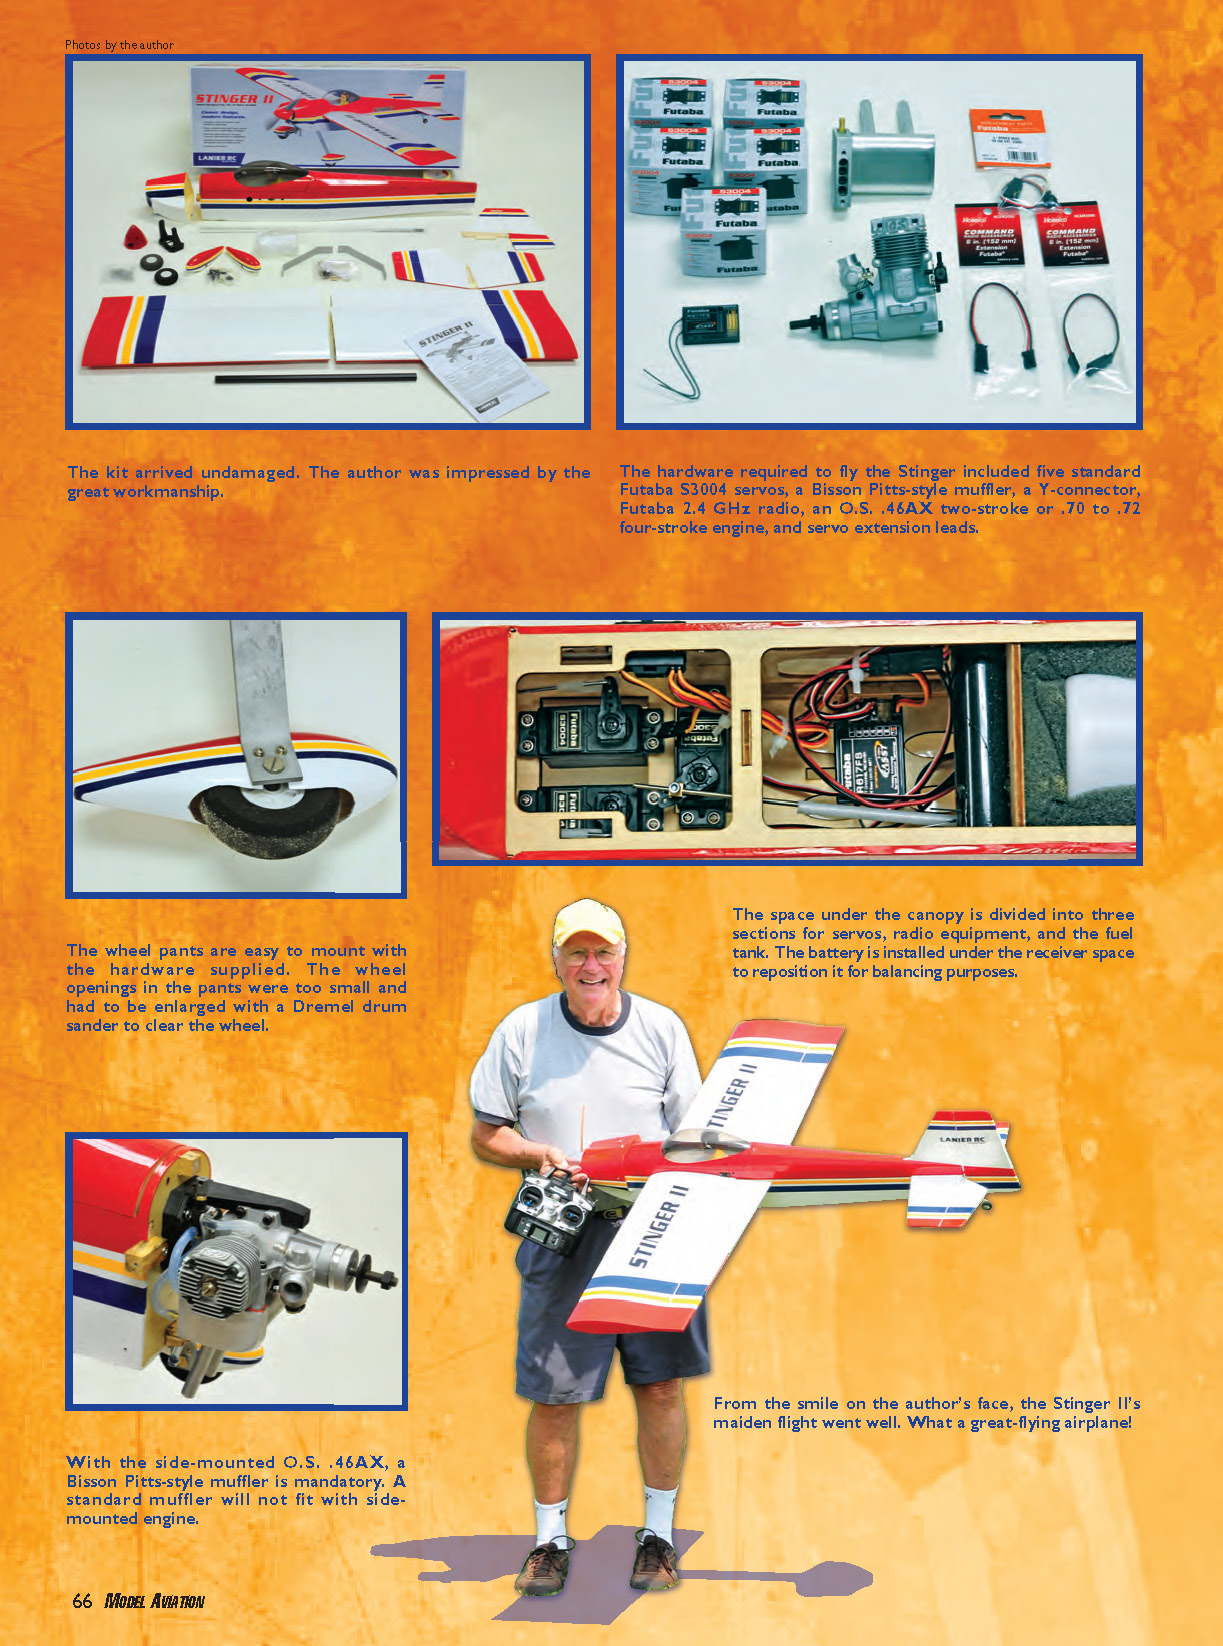
The kit arrived undamaged. I was impressed by the great workmanship.
The hardware required to fly the Stinger included five standard Futaba S3004 servos, a Bisson Pitts-style muffler, a Y-connector, Futaba 2.4 GHz radio, an O.S. .46AX two-stroke or .70–.72 four-stroke engine, and servo extension leads. The space under the canopy is divided into three sections for servos, radio equipment, and the fuel tank. The battery is installed under the receiver space to reposition it for balancing purposes. From the smile on my face, the Stinger II’s maiden flight went well. What a great-flying airplane!
The wheel pants are easy to mount with the hardware supplied. The wheel openings in the pants were too small and had to be enlarged with a Dremel drum sander to clear the wheel. With the side-mounted O.S. .46AX, a Bisson Pitts-style muffler is mandatory. A standard muffler will not fit with a side-mounted engine.
Specifications
- Model type: Sport ARF
- Skill level: Intermediate builder, intermediate pilot
- Wingspan: 49.5 inches
- Wing area: 586 square inches
- Airfoil: Symmetrical
- Length: 46 inches
- Weight: 5–5.5 pounds
- Engine: .46–.55 two-stroke or .70–.72 four-stroke
- Radio: Four-channel with five standard servos; standard receiver
- Construction: Balsa and plywood
- Covering and finish: MonoKote with painted cowl, wheel pant, and canopy cover
- Price: $169.98
Test Model Details
- Engine used: O.S. Max .46AX
- Propeller: Top Flite 11 x 6
- Radio system: Futaba 2.4 GHz T6EX transmitter; Futaba R617FS receiver; five Futaba S3004 standard servos; 4.8-volt 2700 mAh NiMH battery pack; two 6-inch servo extensions; one Y-connector
- Ready-to-fly weight: 5 pounds, 2 ounces
- Flight duration: 10–12 minutes
Pluses and Minuses
- Great curb appeal.
- Solid plywood and balsa construction.
- Two-piece wing on tube.
- Simple assembly.
- Great flight performance.
- Tolerates aggressive flying.
- Wheel pants holes for wheels too small.
- Cowl paint does not match covering.
- Canopy hold-down screws too small.
- Weight needed to balance CG.
The overseas manufacturers have become building and covering experts, and you can't build and finish an airplane for the price you pay for an ARF, let alone replicate their building skills. Having worked in the industry in the past, I found it difficult to deal with a factory 6,000 miles away. Hats off to Great Planes for finding a way to work this out!
Popping the cover on the kit box I knew what to expect because I have reviewed several Great Planes kits in the past. I wasn't disappointed. I found a well-packaged kit able to withstand the rigors of shipping during its long ride to the U.S.
The components were well wrapped and supported to maintain pristine factory condition. The complete airplane is built-up balsa and plywood and no foam wings. I removed and inspected the covering on each part. I saw good, straight seams with a few wrinkles, but they were easily removed with an iron.
The color match between the painted fiberglass cowl and wheel pants and the covering was only fair. The Stinger used standard MonoKote colors so any color can easily be replaced. The two-piece wing has a joiner tube — a real plus when it comes to transportation and field assembly.
The larger ailerons are driven by two servos, making it possible to mix in differential if needed. The canopy is clear plastic with the pilot figure — a reasonable-looking little guy — installed, and it lifts off for access to the radio compartment. The landing gear legs are sturdy 1/8-inch aluminum and split; each was bolted on separately with 2-1/2-inch wheels supplied. The tail wheel is a nice 1-inch size with the pre-bent strut and hinge ready to mount.
Before assembling the Stinger I read through the instruction manual. My motto is that it's always good to know what you are going to do before you do it. Great Planes has done an excellent job with the manual. There are good, clear pictures and straightforward explanations done in a well-organized manner.
You will encounter no trouble assembling this aircraft. Although it is a simple four-channel airplane, the Stinger is not for the beginner, but is well within the abilities of an intermediate pilot. You will need very little experience in assembling this ARF to get it flying quickly.
Construction
I won't go into step-by-step details on the construction, but I'll offer some tips that will make things easier. I started assembly by installing the servos in the wing panels.
After connecting the 6-inch servo extension leads and providing pull-apart safety to the connectors with the supplied shrink tubing, you will need to pull the servo extension through to the wing root. You might struggle with this step. A piece of string is in place to help you do this, but do not tie the string to the servo connector. Place a spot of CA onto the string end to keep it from raveling. Tie a loop in the end of the string just big enough to fit over the connector. Slide the loop over the connector, stand the wing panel in a vertical position, and pull the lead through. Slide the loop off the connector and save it for the next one.
When installing the aileron control horns — or all control horns for that matter — I always position and CA them to the surface after removing a small patch of covering beneath. I match-drill the holes required for the bolts. This ensures perfect alignment for the bolts to fit the plastic nut on the far side.
Before installing the plastic clevis on the pushrod, run a 2-56 tap through it. It will make installing and adjusting easier later. Also run the tap through the holes in the plastic nut. The control horn mounting bolts will install easier.
Moving on to the tail installation, I found it straightforward. There was no need to measure either side of the horizontal stabilizer to make sure it was centered in both directions. Great Planes has taken care of this by providing a slot in the center of the horizontal for the vertical stabilizer to key into for perfect alignment. Excellent — you can't miss.
I noted that there were no tail struts, although there were on the original.
After mounting the engine it was time to install the cowl. There is always some trimming to do because of the engine configuration. The manual tells you to make a template of the engine head and at this point a problem arises: the head of the engine sticks out beyond the cowl so it is impossible to fit the cowl with the engine installed to make the template. The engine must be mounted to align the spinner with the cowl.
The manual suggests you remove the engine head. I tried it and it worked. You can easily draw around the head with it off to make the template. The instructions are clear, so just follow them and you will be fine.
I noted several interesting things about the fuel fill line plywood clip that comes with the Stinger. It is mounted on the bottom of the firewall and provides a convenient way to support the fill line while allowing you to pull it out for filling. The plug for the fuel line is also included.
The plywood clip supports the throttle pushrod casing to a former. It shows that some thought has been given for convenience. I recommend installing the fill line in the fuel tank as a way of removing fuel from the tank.
When assembling the wheels to the axle I noted a flat spot machined on the end of the axles to help retain the wheel collar. A plastic spacer is provided to space the wheel in the center of the wheel-pant opening. The rudder leading edge was pre-grooved with a hole to accept the tail wheel; all I had to do was glue it in.
The cowl's mounting blocks were notched into the firewall and glued and screwed in place. This saved time and helps prevent mishaps later on.
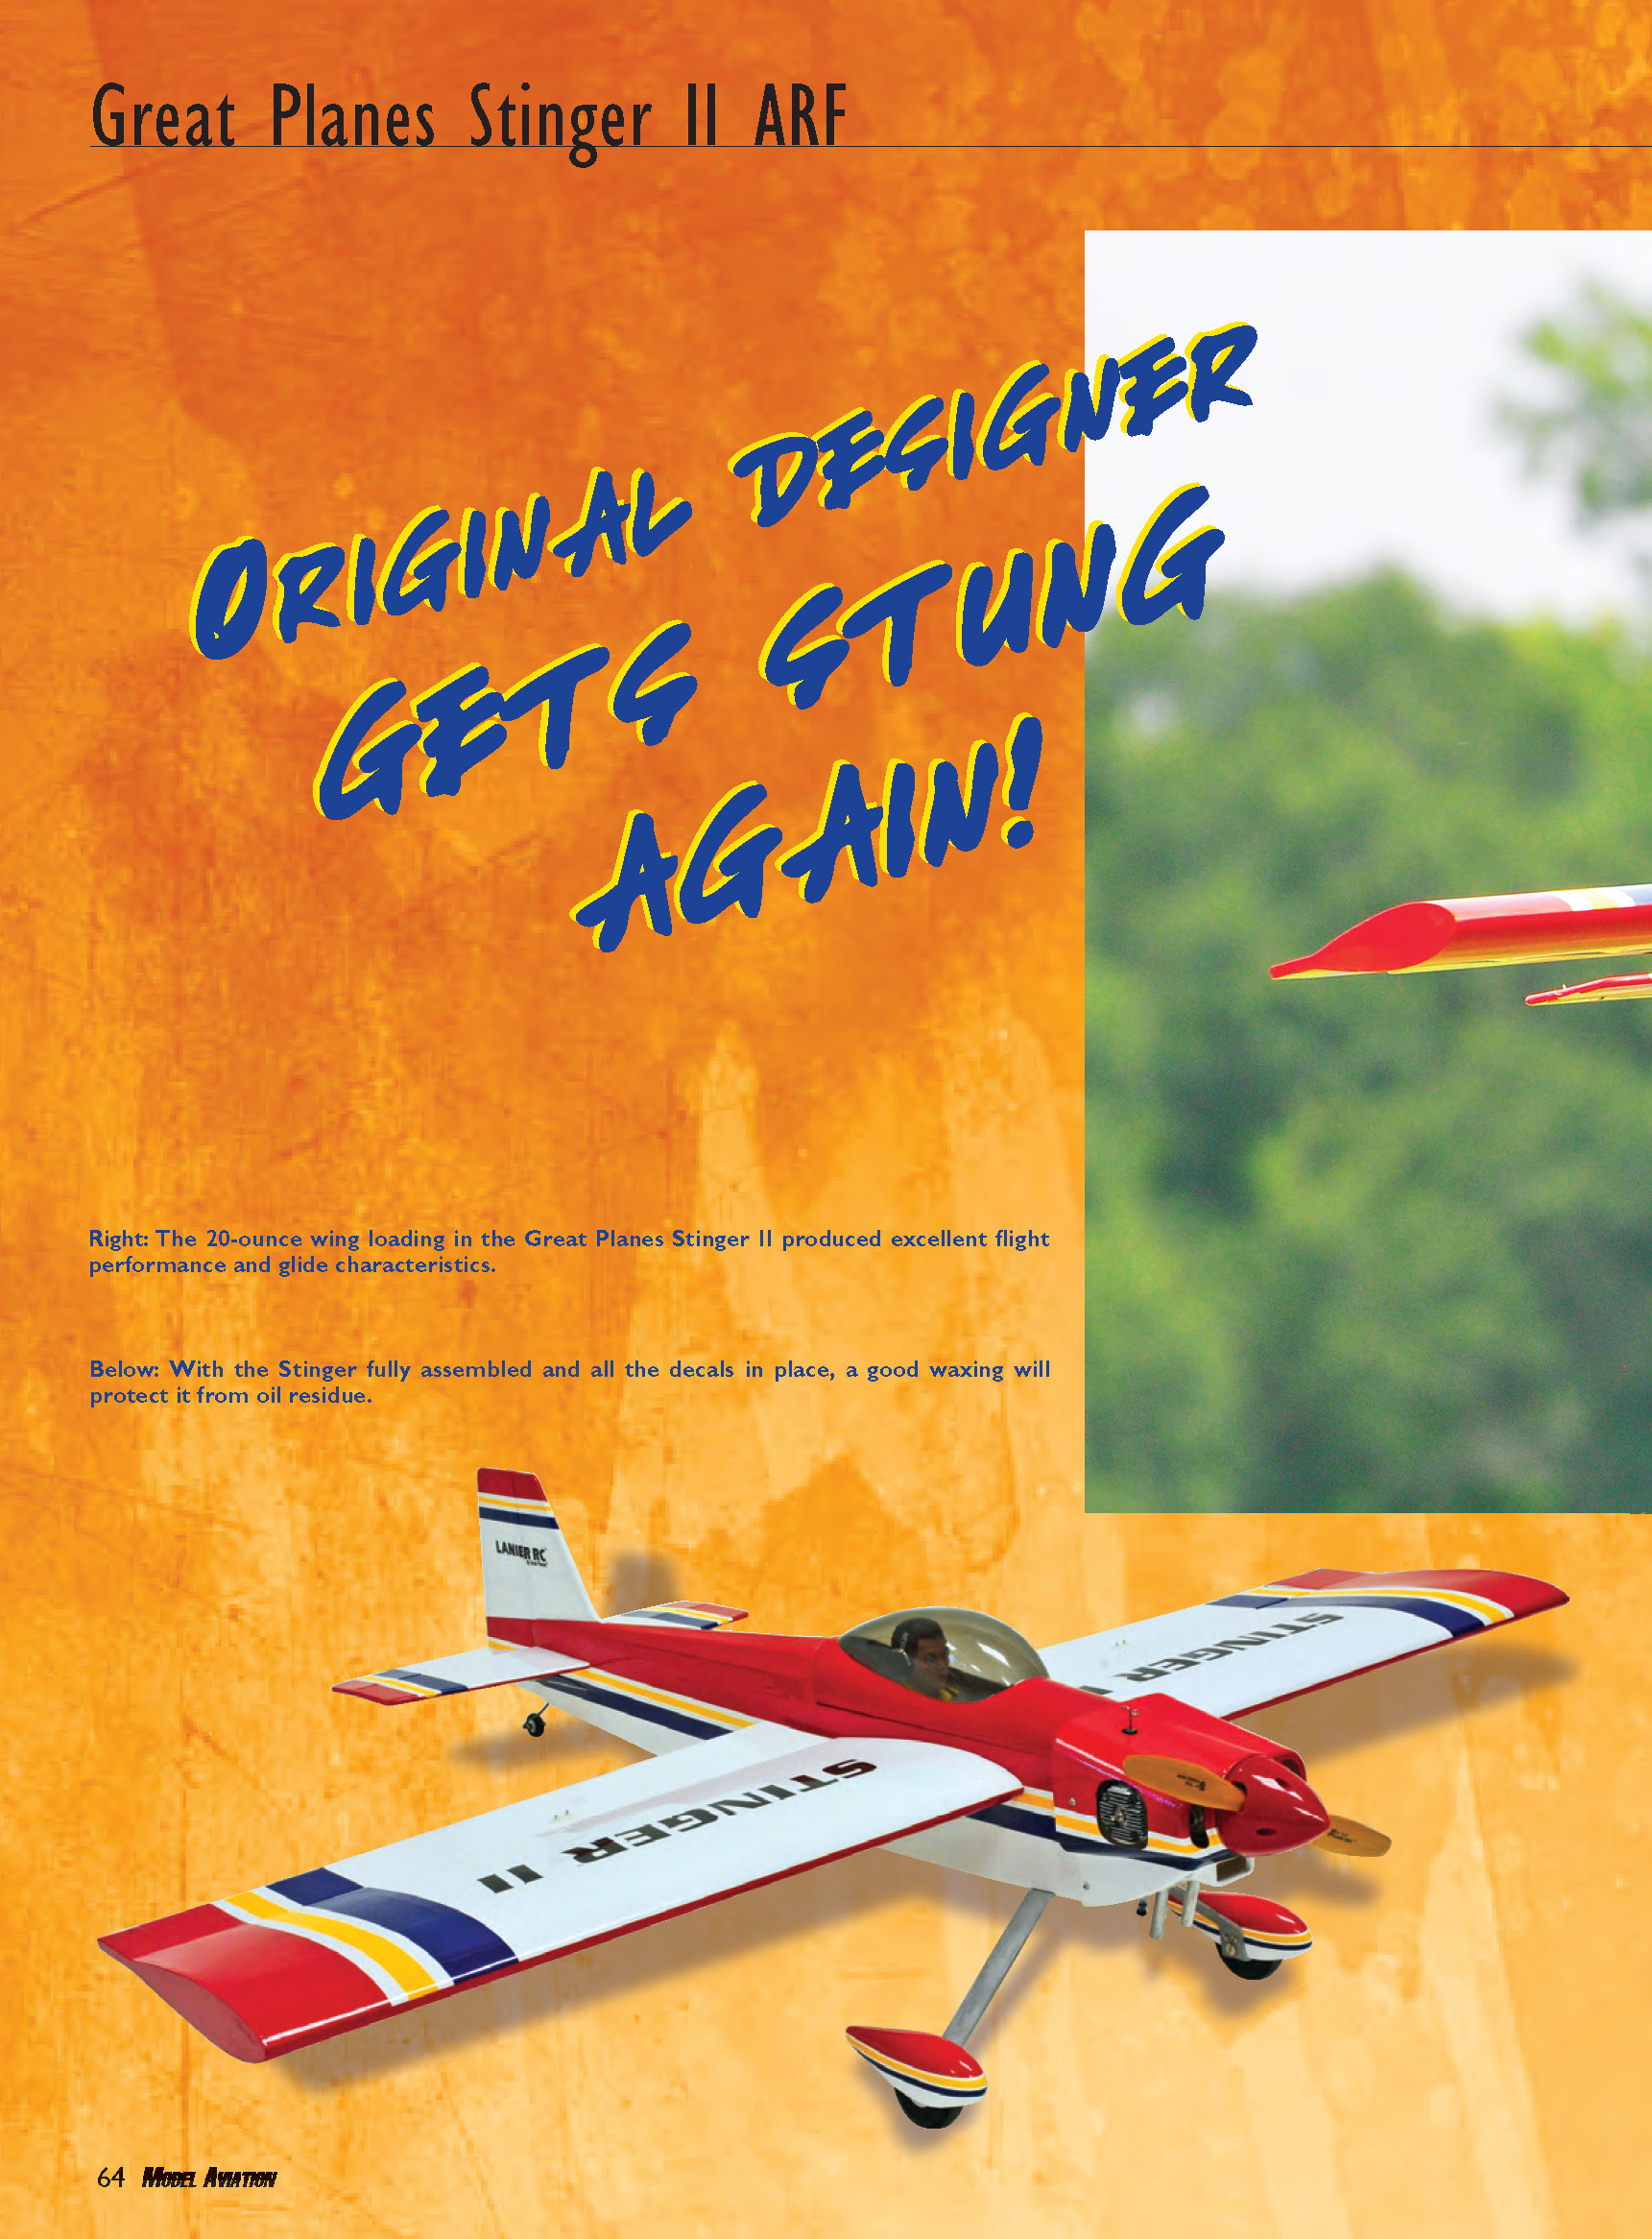
With the Stinger fully assembled and all the decals in place, here is another tip to make it look even better: purchase a bottle of Eagle One Wax As-U-Dry at your local auto parts store and give it a good waxing. This will keep it looking like new and protect against oil residue from the engine. I use it on all my airplanes. It's a great product to use on film covering.
Flying
Before flying the Stinger, it is important to check the CG. The factory-specified 3-1/4-inch position was 27% of the chord. I had to add 1 3/4 ounces of weight to the tail.
For better tracking, be sure to balance the aircraft laterally. Pick up the airplane by the propeller, fingers under both blades, and note which wing is heavier. Add weight on the tip to balance it — it won't take much.
After putting in the specified control throws, the Stinger was ready to fly. I chose a perfect day for the maiden flight. I transported the fully assembled Stinger to the field in my van. I fired up the glow plug with my DuBro EZ Glow lighter that beeps when the glow is lit.
The O.S. .46AX started immediately. I ran it up to full throttle to make sure the glow plug was hot, and then idled it down. With the engine idling I range-checked to make sure the radio was working properly.
After a short taxi with up-elevator to check out ground handling, the Stinger was ready to fly. Our flying field has two runways, one grass and the other a hard surface. The Stinger is a taildragger and more at home on grass.
Lining up with the runway, I advanced the throttle slowly, let it run a little to gain speed, and lifted off. At altitude I trimmed it for three-quarters throttle. It was slightly nose-heavy and needed some up-trim. When I was satisfied with the trim, I flew it for 7 or 8 minutes to get acquainted, and then landed to check things out. I greased it in — well, maybe one little bounce.
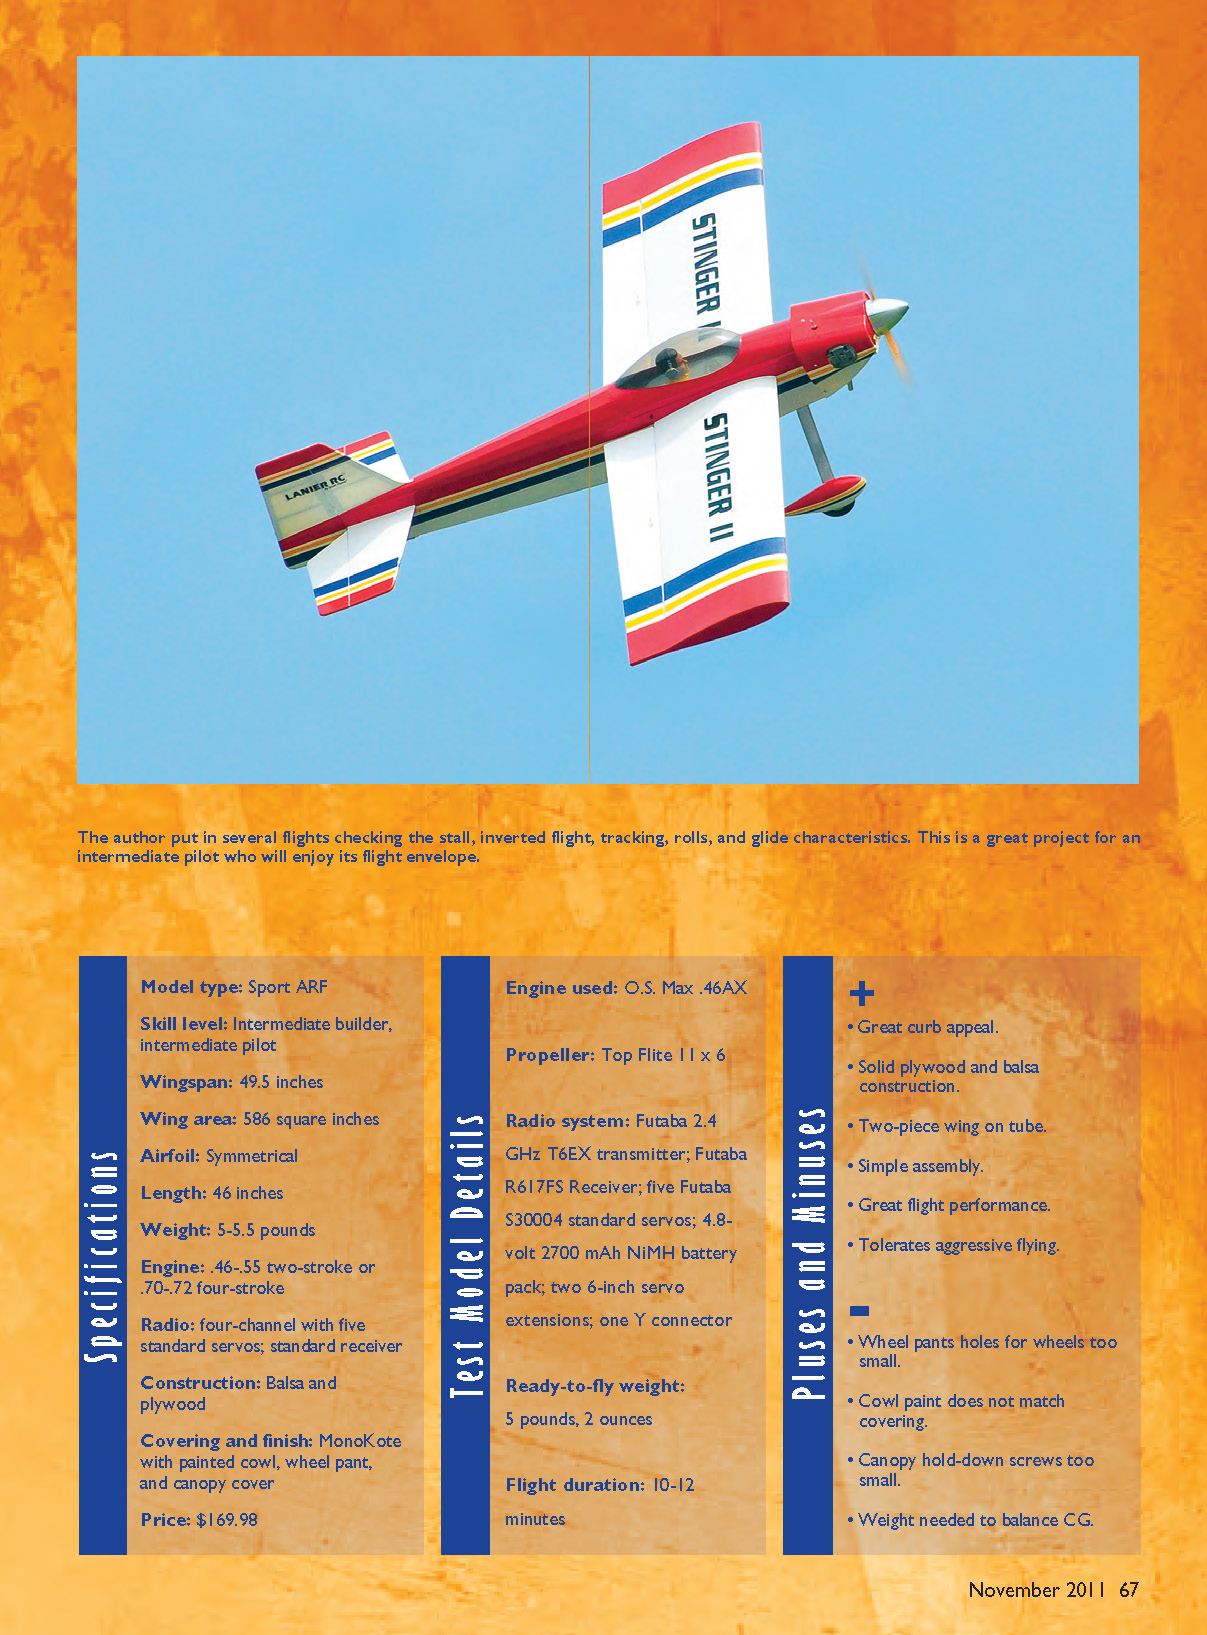
I put in several more flights that day checking the stall, inverted flight, tracking, rolls, and glide. In inverted flight, I needed more weight in the tail because level flight required moderate down-elevator.
The tracking was great. Rolls were slightly fast, requiring some reduction in aileron travel. The glide was excellent. My Stinger had a 20-ounce wing loading. I handed the controls over to my good friend, Pat Manville, who flew it while I manned the camera. Throughout the test flights, the O.S. .46AX started easily and performed flawlessly.
Conclusion
You can be sure when you buy a Great Planes kit that you will get quality and value. I have never been disappointed.
Reviewing the Stinger II brought back the memories I had of the airplane I designed for Lanier RC. There is no question that modern building techniques have made it a better airplane. Great Planes has done a good job of replicating the Stinger for the better.
I hope the company decides to come out with larger sizes. The Stinger II is a great build for an intermediate pilot who will thoroughly enjoy its flight envelope. For more information, visit the Great Planes website and check out the instruction manual.
MD — Jerry Smith [email protected]
Manufacturer/Distributor
Great Planes Model Manufacturing (217) 398-8970 www.greatplanes.com
Sources
Bisson Custom Muffler (705) 389-1156 www.bissonmufflers.com
Transcribed from original scans by AI. Minor OCR errors may remain.

