
GROUND SCHOOL: HOVER TRAINING, PART 2
Crawl-walk-run
by Dave Scott
Part one of this hover training series (December 2014 issue of Model Aviation) detailed all of the control techniques required for a helicopter pilot to maintain a stationary hover. This issue builds on that knowledge by applying the crawl-walk-run approach to learning how to hover in the shortest amount of time.
Conventional wisdom says that anything worth doing is worth doing right. That has traditionally been interpreted to mean that new pilots should strive to fly the best possible maneuver right away, using all of the techniques that an experienced pilot would use and then chalking up the ensuing struggles to the need for more practice. (This would be the equivalent of asking a first-grader to learn algebra before being taught simple addition.)
A more efficient approach recognizes that overall success hinges on first learning good fundamentals. This establishes a solid foundation on which to build refinements in a natural progression for steady advancement.
Crawl-Walk-Run
The quickest way to learn the skills needed to maintain a stationary hover is to practice them individually before bringing them together. Fortunately, training on a flight simulator allows heli pilots to learn the controls one at a time.
In the interest of simplicity, I’ll continue to use the term aileron to describe bank and roll control, elevator to describe tilting the heli forward and backward, and rudder to describe yaw control.
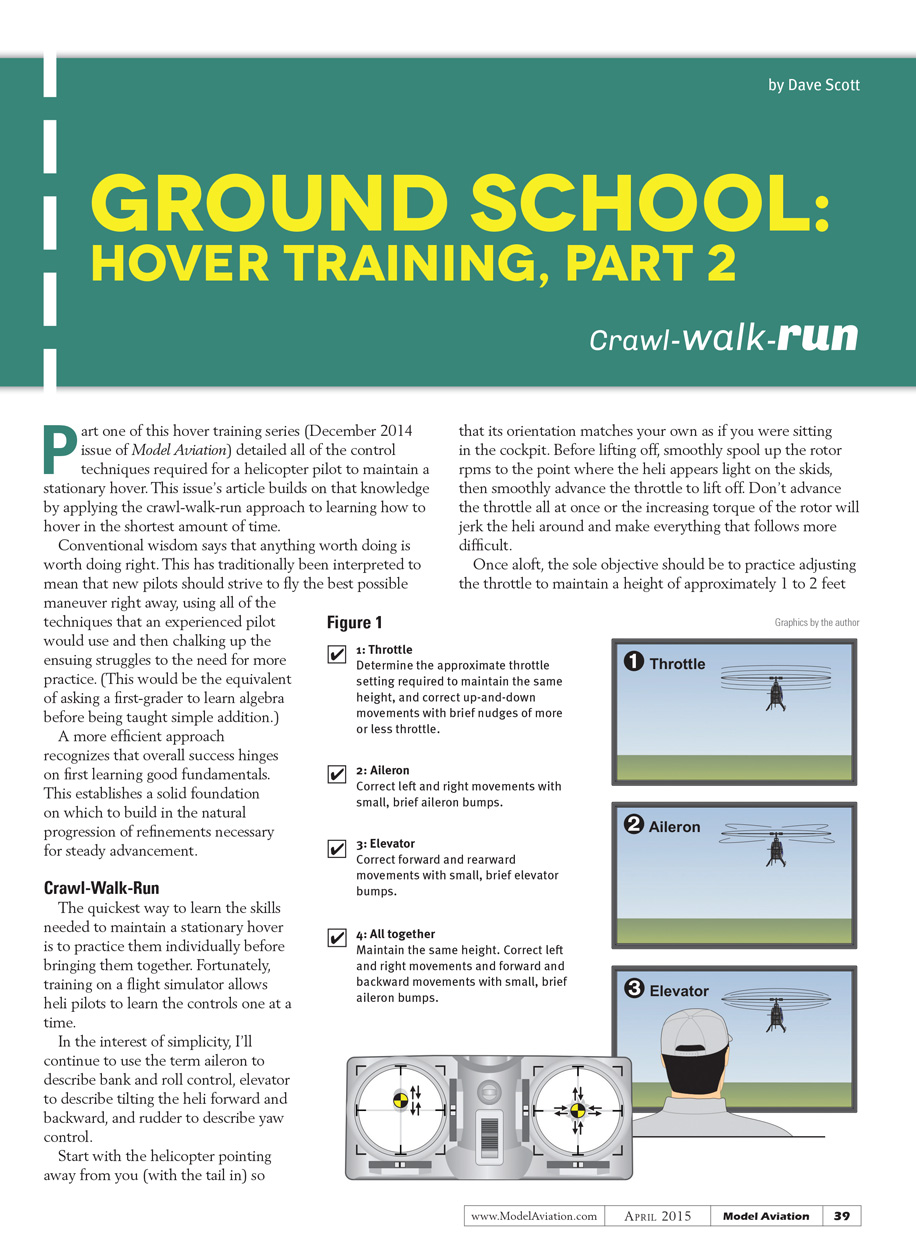
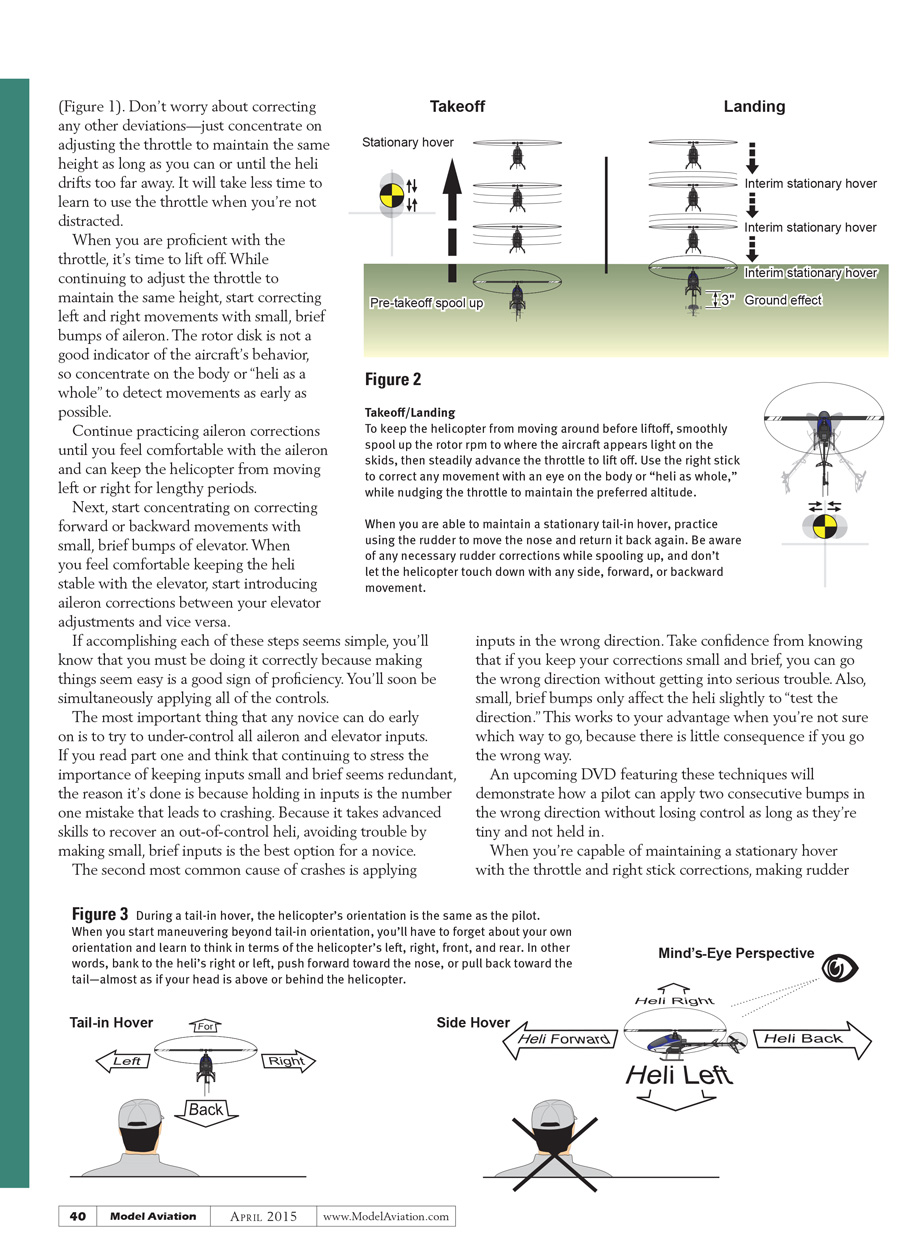
Start with the helicopter pointing away from you (tail in) so that its orientation matches your own as if you were sitting in the cockpit. Before lifting off, smoothly spool up the rotor RPM to the point where the heli appears light on the skids, then smoothly advance the throttle to lift off. Don’t advance the throttle all at once or the increasing torque of the rotor will jerk the heli around and make everything that follows more difficult.
Once aloft, the sole objective should be to practice adjusting the throttle to maintain a height of approximately 1 to 2 feet (Figure 1). Don’t worry about correcting any other deviations—just concentrate on adjusting the throttle to maintain the same height as long as you can or until the heli drifts too far away. It will take less time to learn to use the throttle when you’re not distracted.
When you are proficient with the throttle, start correcting left and right movements with small, brief bumps of aileron while continuing to maintain the same height. The rotor disk is not a good indicator of the aircraft’s behavior, so concentrate on the body or “heli as a whole” to detect movements as early as possible. Continue practicing aileron corrections until you feel comfortable and can keep the helicopter from moving left or right for lengthy periods.
Next, concentrate on correcting forward or backward movements with small, brief bumps of elevator. When you feel comfortable keeping the heli stable with the elevator, start introducing aileron corrections between your elevator adjustments and vice versa. If accomplishing each of these steps seems simple, you’ll know you’re doing it correctly—making things seem easy is a good sign of proficiency. You’ll soon be simultaneously applying all of the controls.
The most important thing a novice can do early on is to under-control aileron and elevator inputs. If you read part one and think continuing to stress the importance of keeping inputs small and brief seems redundant, the reason is that holding in inputs is the number-one mistake that leads to crashing. Because it takes advanced skills to recover an out-of-control heli, avoiding trouble by making small, brief inputs is the only practical option for a novice.
The second most common cause of crashes is applying inputs in the wrong direction. Take confidence from knowing that if you keep your corrections small and brief, you can go the wrong direction without getting into serious trouble. Small, brief bumps only affect the heli slightly and “test the direction.” This works to your advantage when you’re not sure which way to go, because there is little consequence if you go the wrong way.
An upcoming DVD featuring these techniques will demonstrate how a pilot can apply two consecutive bumps in the wrong direction without losing control as long as they’re tiny and not held in.
When you’re capable of maintaining a stationary hover with the throttle and right-stick corrections, making rudder inputs to move the nose and return it back again is the next step. Be aware of any necessary rudder corrections while spooling up, and don’t let the helicopter touch down with any side, forward, or backward movement.
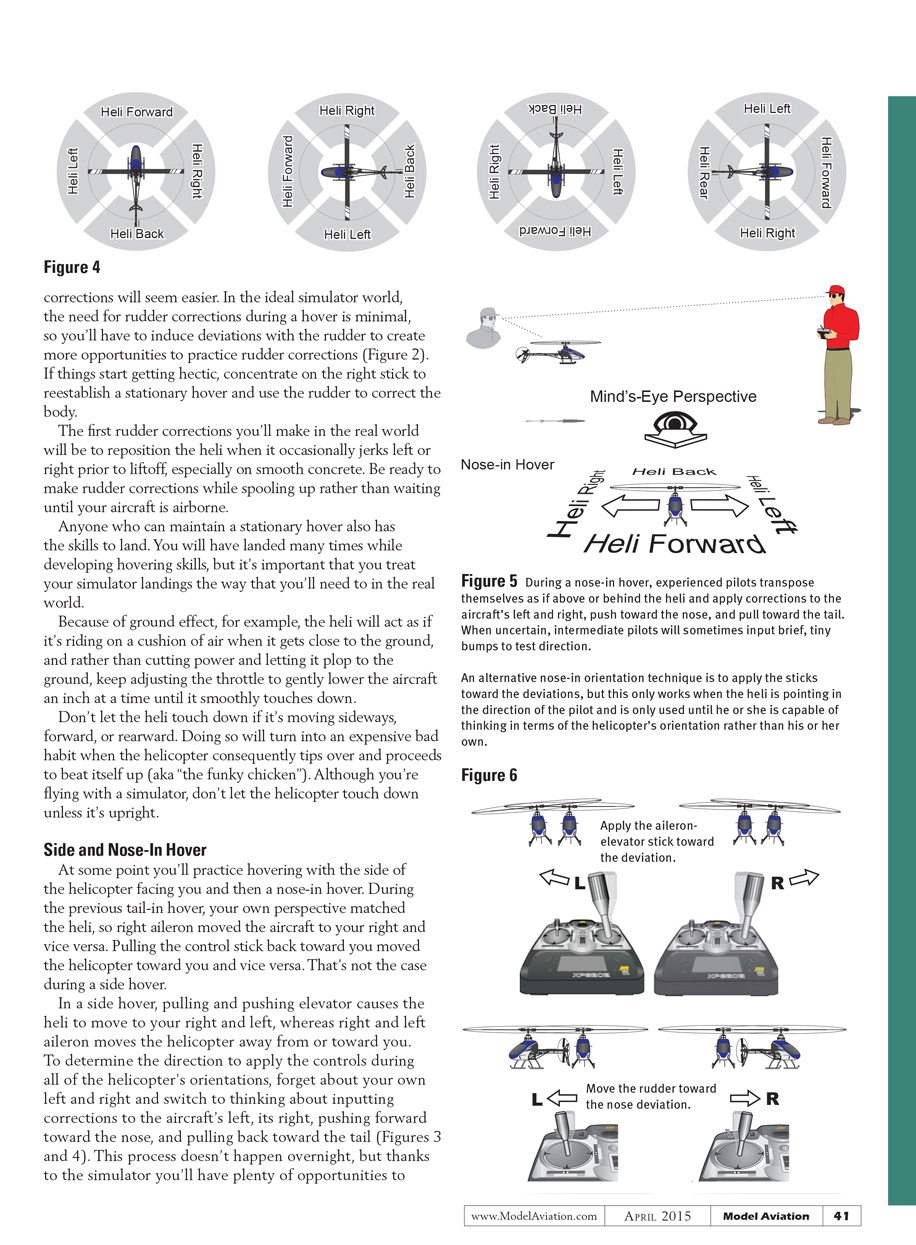
When you start maneuvering beyond tail-in orientation, you’ll have to forget about your own orientation and learn to think in terms of the helicopter’s left, right, front, and rear. In other words, bank to the heli’s right or left, push forward toward the nose, or pull back toward the tail—almost as if your head is above or behind the helicopter. Once you think in terms of the aircraft’s orientation rather than your own, corrections will seem easier.
In the ideal simulator world, the need for rudder corrections during a hover is minimal, so you'll have to induce deviations with the rudder to create more opportunities to practice rudder corrections (Figure 2). If things start getting hectic, concentrate on the right stick to reestablish a stationary hover and use the rudder to correct the body.
The first rudder corrections you'll make in the real world will be to reposition the heli when it occasionally jerks left or right prior to liftoff, especially on smooth concrete. Be ready to make rudder corrections while spooling up rather than waiting until your aircraft is airborne.
Anyone who can maintain a stationary hover also has the skills to land. You will have landed many times while developing hovering skills, but it's important that you treat your simulator landings as you would in the real world. Because of ground effect, the heli will act as if it's riding on a cushion of air when it gets close to the ground. Rather than cutting power and letting it plop to the ground, keep adjusting the throttle to gently lower the aircraft an inch at a time until it smoothly touches down.
Don't let the heli touch down if it's moving sideways, forward, or rearward. Doing so will become an expensive bad habit when the helicopter tips over and proceeds to beat itself up (aka "the funky chicken"). Even in a simulator, don't let the helicopter touch down unless it's upright.
Side and Nose-In Hover
At some point you'll practice hovering with the side of the helicopter facing you and then a nose-in hover. During the previous tail-in hover, your own perspective matched the heli, so right aileron moved the aircraft to your right and vice versa. Pulling the control stick back toward you moved the helicopter toward you and vice versa. That's not the case during a side hover.
In a side hover, pulling and pushing elevator causes the heli to move to your right and left, whereas right and left aileron moves the helicopter away from or toward you. To determine the direction to apply the controls during all of the helicopter's orientations, forget about your own left and right and switch to thinking about inputting corrections to the aircraft's left, its right, pushing forward toward the nose, and pulling back toward the tail (Figures 3 and 4). This process doesn't happen overnight, but thanks to the simulator you'll have plenty of opportunities to practice.
An alternative nose-in orientation technique is to apply the sticks toward the deviation. This only works when the heli is pointing in the direction of the pilot and is used only until the pilot is capable of thinking in terms of the helicopter's orientation rather than his or her own. Use this technique for practice before flying in the real world.
When you become reasonably proficient at hovering with the side facing you, it’s time to practice nose-in hovering (Figures 5 and 6). The most efficient process for learning to hover in a nose-in orientation is to return to the start of this program and repeat each step with the nose in.
Stationary Pirouettes
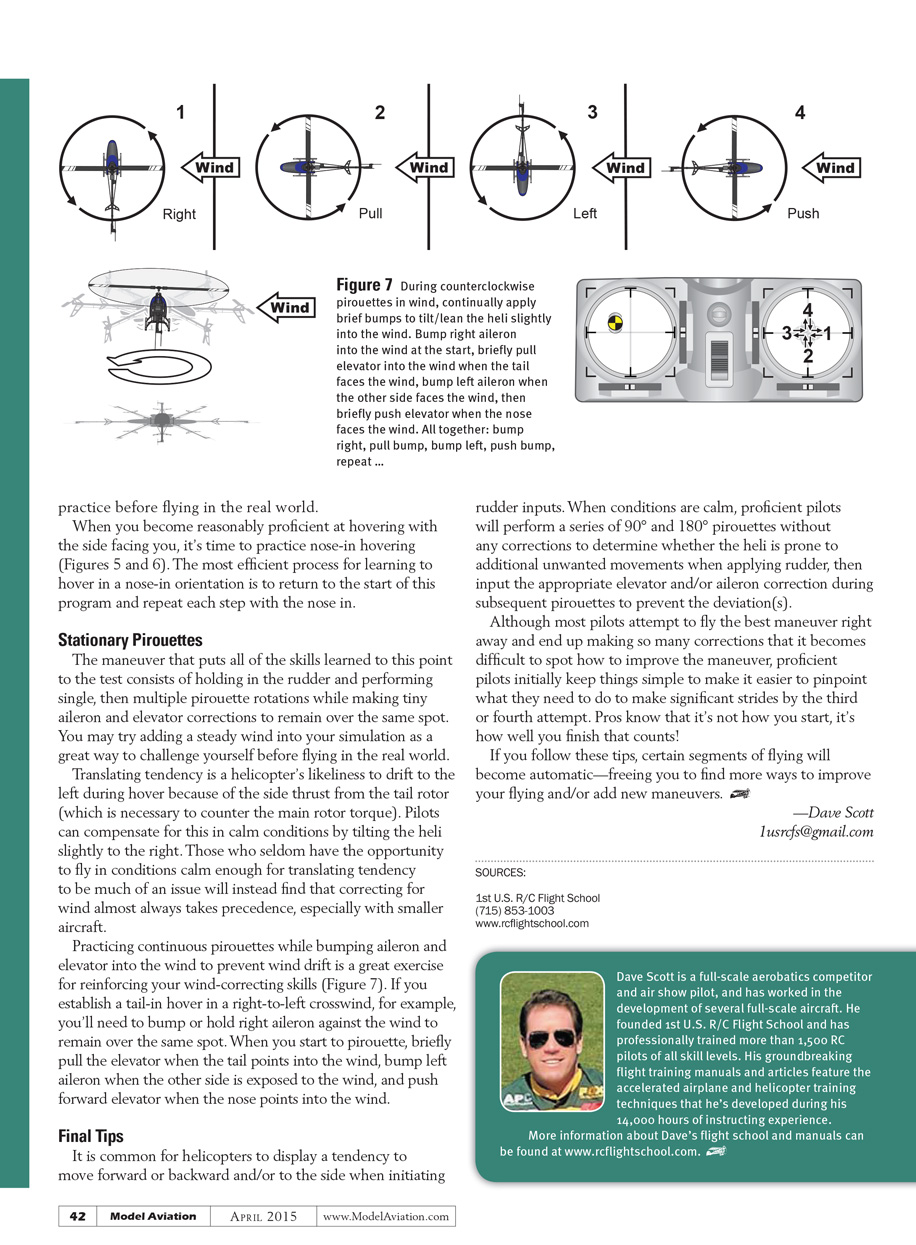
The maneuver that puts all of the skills learned to this point to the test consists of holding in the rudder and performing single then multiple pirouette rotations while making tiny aileron and elevator corrections to remain over the same spot. You may try adding a steady wind into your simulation as a great way to challenge yourself before flying in the real world.
Translating tendency is a helicopter’s likeliness to drift to the left during hover because of the side thrust from the tail rotor (which is necessary to counter the main rotor torque). Pilots can compensate for this in calm conditions by tilting the heli slightly to the right. Those who seldom have the opportunity to fly in calm conditions will instead find that correcting for wind almost always takes precedence, especially with smaller aircraft.
Practicing continuous pirouettes while bumping aileron and elevator into the wind to prevent wind drift is a great exercise for reinforcing your wind-correcting skills (Figure 7). If you establish a tail-in hover in a right-to-left crosswind, for example, you’ll need to bump or hold right aileron against the wind to remain over the same spot. When you start to pirouette, briefly pull the elevator when the tail points into the wind, bump left aileron when the other side is exposed to the wind, and push forward elevator when the nose points into the wind.
Final Tips
- It is common for helicopters to display a tendency to move forward or backward and/or to the side when initiating rudder inputs. When conditions are calm, perform a series of 90° and 180° pirouettes without corrections to determine whether the heli is prone to unwanted movements when applying rudder. Then input the appropriate elevator and/or aileron correction during subsequent pirouettes to prevent the deviations.
- Although most pilots attempt to fly the best maneuver right away and end up making so many corrections that it becomes difficult to see how to improve, proficient pilots initially keep things simple. This makes it easier to pinpoint what needs changing and to make significant strides by the third or fourth attempt. Pros know that it’s not how you start; it’s how well you finish that counts.
- If you follow these tips, certain segments of flying will become automatic—freeing you to find more ways to improve your flying and to add new maneuvers.
—Dave Scott [email protected]
SOURCES:
- 1st U.S. R/C Flight School
(715) 853-1003 www.rcflightschool.com
Dave Scott is a full-scale aerobatics competitor and air show pilot, and has worked in the development of several full-scale aircraft. He founded 1st U.S. R/C Flight School and has professionally trained more than 1,500 RC pilots of all skill levels. His groundbreaking flight training manuals and articles feature accelerated airplane and helicopter training techniques he developed during his 14,000 hours of instructing experience. More information about Dave’s flight school and manuals can be found at www.rcflightschool.com.
Transcribed from original scans by AI. Minor OCR errors may remain.

