
HITEC WEEKENDER F4U CORSAIR
Terry Dunn [email protected]
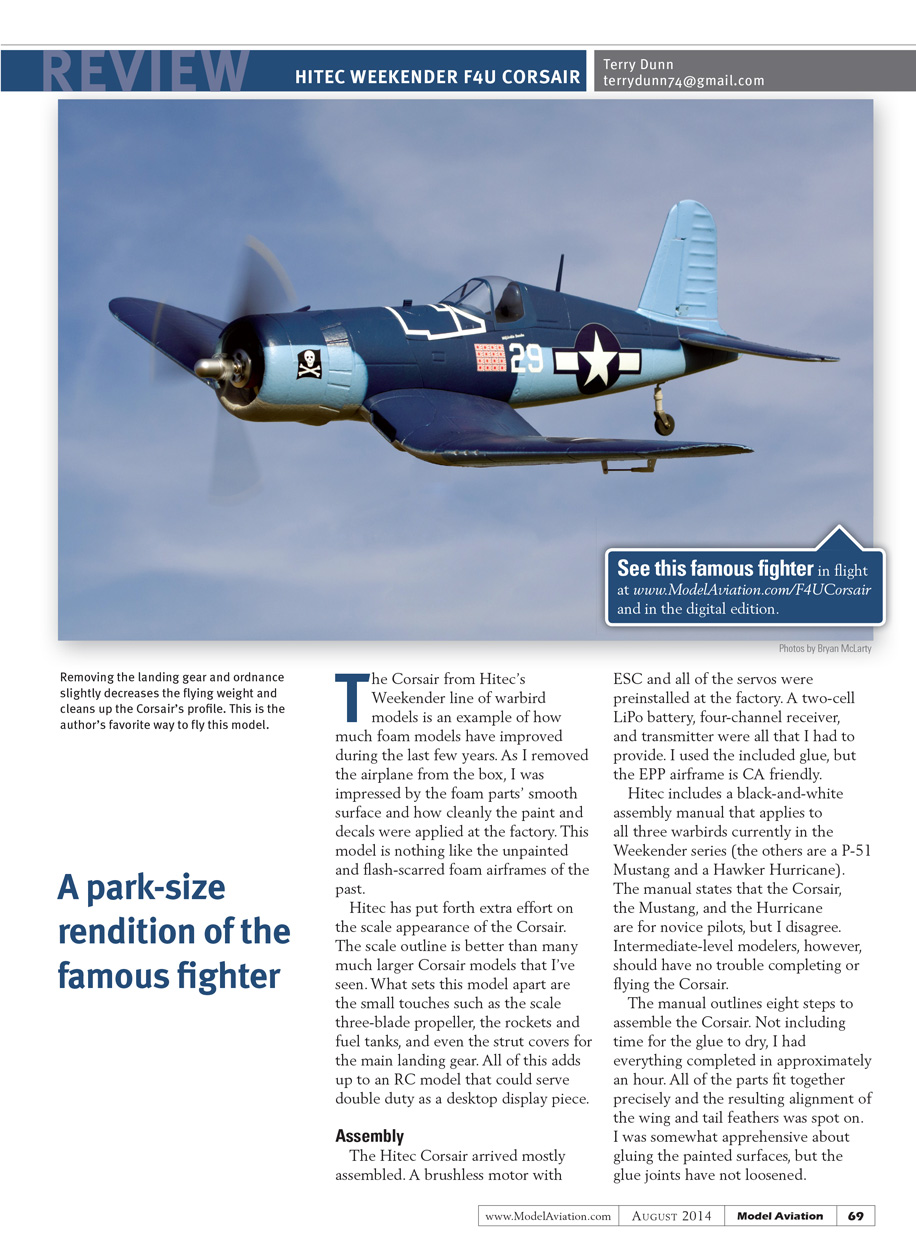
A park-size rendition of the famous fighter
The Corsair from Hitec’s Weekender line of warbird models is an example of how much foam models have improved during the last few years. As I removed the airplane from the box, I was impressed by the foam parts’ smooth surface and how cleanly the paint and decals were applied at the factory. This model is nothing like the unpainted and flash-scarred foam airframes of the past.
Hitec has put forth extra effort on the scale appearance of the Corsair. The scale outline is better than many much larger Corsair models that I’ve seen. What sets this model apart are the small touches such as the scale three-blade propeller, the rockets and fuel tanks, and even the strut covers for the main landing gear. All of this adds up to an RC model that could serve double duty as a desktop display piece.
Assembly
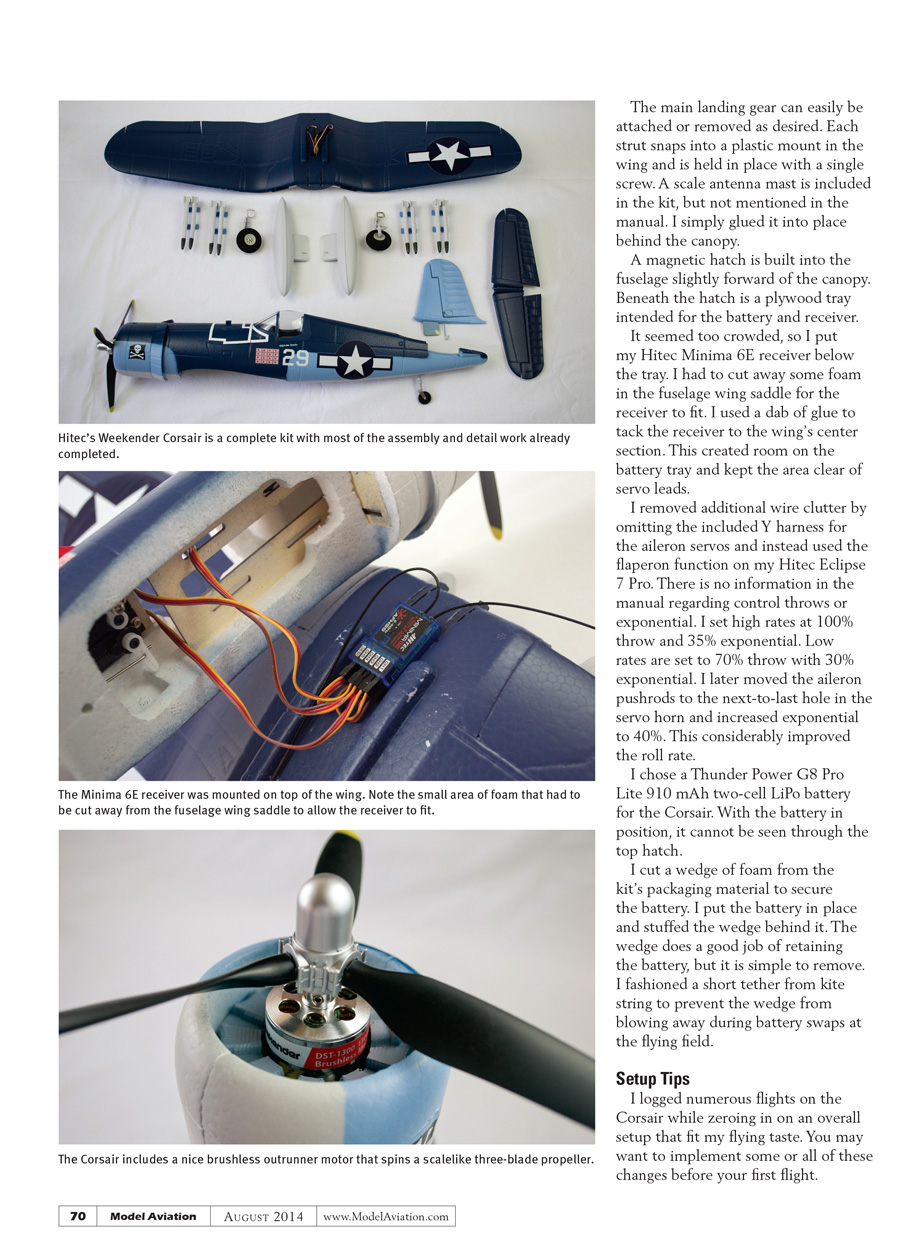
The Hitec Corsair arrived mostly assembled. A brushless motor with ESC and all of the servos were preinstalled at the factory. A two-cell LiPo battery, four-channel receiver, and transmitter were all that I had to provide. I used the included glue, but the EPP airframe is CA friendly.
Hitec includes a black-and-white assembly manual that applies to all three warbirds currently in the Weekender series (the others are a P-51 Mustang and a Hawker Hurricane). The manual states that the Corsair, the Mustang, and the Hurricane are for novice pilots, but I disagree. Intermediate-level modelers, however, should have no trouble completing or flying the Corsair.
The manual outlines eight steps to assemble the Corsair. Not including time for the glue to dry, I had everything completed in approximately an hour. All of the parts fit together precisely and the resulting alignment of the wing and tail feathers was spot on. I was somewhat apprehensive about gluing the painted surfaces, but the glue joints have not loosened.
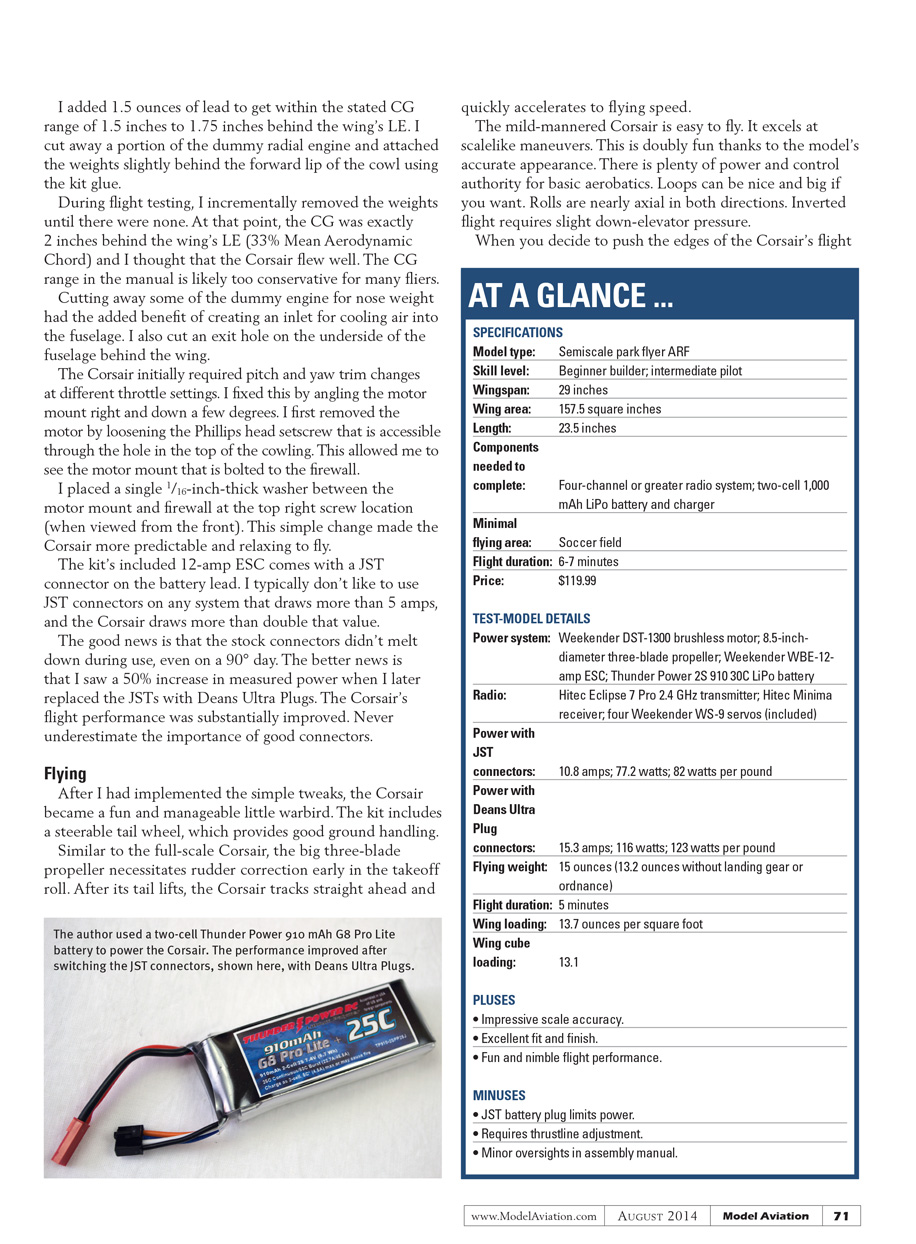
The main landing gear can easily be attached or removed as desired. Each strut snaps into a plastic mount in the wing and is held in place with a single screw. A scale antenna mast is included in the kit, but not mentioned in the manual. I simply glued it into place behind the canopy. A magnetic hatch is built into the fuselage just forward of the canopy. Beneath the hatch is a plywood tray intended for the battery and receiver. It seemed a bit too crowded, so I located my Hitec Minima 6E receiver below the tray. I had to cut away a little bit of foam in the fuselage wing saddle for the receiver to fit. I used a dab of glue to tack the receiver to the wing center section. This opened up a lot of room on the battery tray and kept the area clear of servo leads.
I removed additional wire clutter by omitting the included Y harness for the aileron servos and instead used the flaperon function on my Hitec Eclipse 7 Pro. There is no information in the manual regarding control throws or exponential. I set high rates at 100% throw and 35% exponential. Low rates are set to 70% throw with 30% exponential. I later moved the aileron pushrods to the next-to-last hole in the servo horn and increased exponential to 40%. This considerably improved the roll rate.
I chose a Thunder Power G8 Pro Lite 910 mAh two-cell LiPo battery for the Corsair. With the battery in position, it cannot be seen through the top hatch.
I cut a wedge of foam from the kit’s packaging material to secure the battery. I put the battery in place and stuffed the wedge behind it. The wedge does a good job of retaining the battery, but it is simple to remove. I fashioned a short tether from kite string to prevent the wedge from blowing away during battery swaps at the flying field.
Setup Tips
I logged numerous flights on the Corsair while zeroing in on an overall setup that fit my flying taste. You may want to implement some or all of these changes before your first flight.
I added 1.5 ounces of lead to get within the stated CG range of 1.5 inches to 1.75 inches behind the wing’s LE. I cut away a portion of the dummy radial engine and attached the weights slightly behind the forward lip of the cowl using the kit glue.
During flight testing, I incrementally removed the weights until there were none. At that point, the CG was exactly 2 inches behind the wing’s LE (33% Mean Aerodynamic Chord) and I thought that the Corsair flew well. The CG range in the manual is likely too conservative for many fliers.
Cutting away some of the dummy engine for nose weight had the added benefit of creating an inlet for cooling air into the fuselage. I also cut an exit hole on the underside of the fuselage behind the wing.
The Corsair initially required pitch and yaw trim changes at different throttle settings. I fixed this by angling the motor mount right and down a few degrees. I first removed the motor by loosening the Phillips-head setscrew that is accessible through the hole in the top of the cowling. This allowed me to see the motor mount that is bolted to the firewall.
I placed a single 1/16-inch-thick washer between the motor mount and firewall at the top-right screw location (when viewed from the front). This simple change made the Corsair more predictable and relaxing to fly.
The kit’s included 12-amp ESC comes with a JST connector on the battery lead. I typically don’t like to use JST connectors on any system that draws more than 5 amps, and the Corsair draws more than double that value.
The good news is that the stock connectors didn’t melt down during use, even on a 90° day. The better news is that I saw a 50% increase in measured power when I later replaced the JSTs with Deans Ultra Plugs. The Corsair’s flight performance was substantially improved. Never underestimate the importance of good connectors.
Flying
After I had implemented the simple tweaks, the Corsair became a fun and manageable little warbird. The kit includes a steerable tail wheel, which provides good ground handling.
Similar to the full-scale Corsair, the big three-blade propeller necessitates rudder correction early in the takeoff roll. After its tail lifts, the Corsair tracks straight ahead and quickly accelerates to flying speed.
The mild-mannered Corsair is easy to fly. It excels at scalelike maneuvers. This is doubly fun thanks to the model’s accurate appearance. There is plenty of power and control authority for basic aerobatics. Loops can be nice and big if you want. Rolls are nearly axial in both directions. Inverted flight requires slight down-elevator pressure.
When you decide to push the edges of the Corsair’s flight envelope, it requires more attention and experience. The rudder has strong authority, but it comes with roll coupling. Keep that in mind when setting up for a knife-edge pass or stall turn and be ready to correct it with aileron input.
Also remember that yanking back on the elevator will cause a snap roll. It's a great maneuver ... as long as you're doing it on purpose!
Stalls quickly develop into a spin that ceases as soon as you release elevator pressure. This behavior existed even when the CG was within the recommended range.
When landing, keep a little bit of speed until you are ready to flare. You should be rewarded with a no-bounce, three-point landing.
I have flown the Corsair with and without the dummy ordnance. I can't tell much difference in performance because of its lighter weight without the tanks and rockets (roughly an ounce). The Corsair does seem to hold energy better without the drag of these embellishments and I prefer the cleaner look with the ordnance removed.
I have also removed the main landing gear for several flights. Shedding the landing gear lightens the load by nearly an ounce and further cleans up the profile. This gives a superb scale appearance for those full-throttle photo passes.
Maybe that's what makes this my favorite configuration to fly the Corsair. It only requires a firm underhand toss with full throttle to get going.
AT A GLANCE ...
SPECIFICATIONS
- Model type: Semiscale park flyer ARF
- Skill level: Beginner builder; intermediate pilot
- Wingspan: 29 inches
- Wing area: 157.5 square inches
- Length: 23.5 inches
- Components needed to complete: Four-channel or greater radio system; two-cell 1,000 mAh LiPo battery and charger
- Minimal flying area: Soccer field
- Flight duration: 6-7 minutes
- Price: $119.99
TEST-MODEL DETAILS
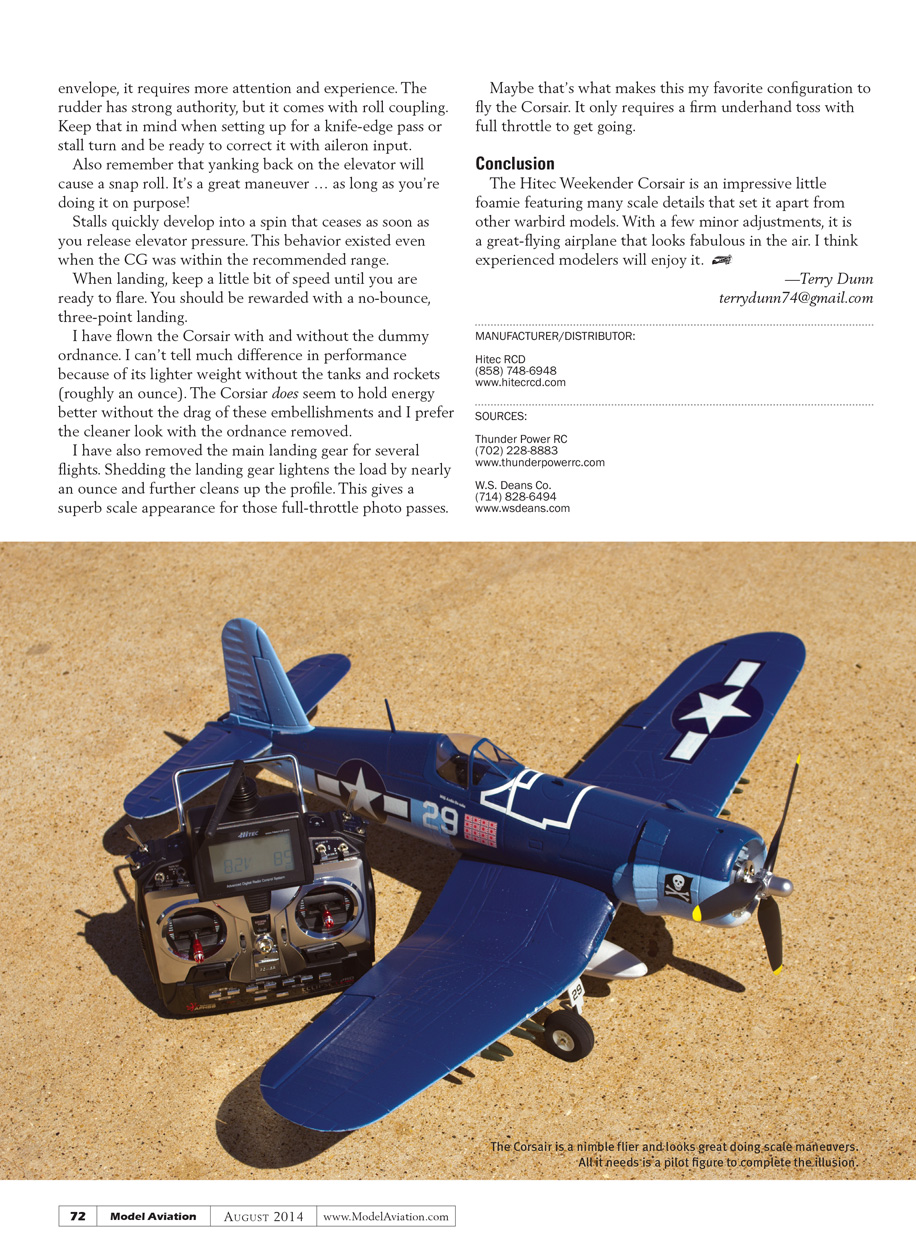
- Power system: Weekender DST-1300 brushless motor; 8.5-inch-diameter three-blade propeller; Weekender WBE-12-amp ESC; Thunder Power 2S 910 30C LiPo battery
- Radio: Hitec Eclipse 7 Pro 2.4 GHz transmitter; Hitec Minima receiver; four Weekender WS-9 servos (included)
- Power with JST connectors: 10.8 amps; 77.2 watts; 82 watts per pound
- Power with Deans Ultra Plug connectors: 15.3 amps; 116 watts; 123 watts per pound
- Flying weight: 15 ounces (13.2 ounces without landing gear or ordnance)
- Flight duration: 5 minutes
- Wing loading: 13.7 ounces per square foot
- Wing cube loading: 13.1
Pluses
- Impressive scale accuracy.
- Excellent fit and finish.
- Fun and nimble flight performance.
Minuses
- JST battery plug limits power.
- Requires thrustline adjustment.
- Minor oversights in assembly manual.
Conclusion
The Hitec Weekender Corsair is an impressive little foamie featuring many scale details that set it apart from other warbird models. With a few minor adjustments, it is a great-flying airplane that looks fabulous in the air. I think experienced modelers will enjoy it.
—Terry Dunn [email protected]
MANUFACTURER/DISTRIBUTOR
Hitec RCD (858) 748-6948 www.hitecrcd.com
SOURCES
Thunder Power RC (702) 228-8883 www.thunderpowerrc.com
W.S. Deans Co. (714) 828-6494 www.wsdeans.com
Transcribed from original scans by AI. Minor OCR errors may remain.

