

Fabulous Fuel Filler
by Jerry Smith
Many of us have different needs and wants when it comes to model-airplane ground-support equipment. Some are satisfied with the bare essentials, and others want first-class gear. When choosing the latter, you usually end up with more reliable equipment — you get what you pay for most of the time.
Affordability and justifying a purchase keep the market full of options to satisfy different needs. My good friend Fred Glance of Alpharetta, Georgia, falls into the “gotta have first-class” category. He does a lot of research looking for the best products; he’ll pay the price if he thinks it’s the best. In fact, he usually buys two — one as a backup.
Fred recently brought his latest ground-support item to the flying field: a fuel container that was the envy of all who saw it. I asked him some questions and thought it was interesting enough to pass on. I named it the “Fabulous Fuel Filler” (FFF).
Fred’s goals for the FFF were simple: be completely reliable, not leak if accidentally tipped over, pump fuel quickly into the tank, and provide convenient fueling features — provided the battery is kept fully charged.
Fuel container and pump selection
Fred chose a 2½-gallon fuel container from The Home Depot or Lowe’s. Capacity and form were prime considerations: larger airplanes with bigger fuel tanks require more fuel, and a wider base improves stability.
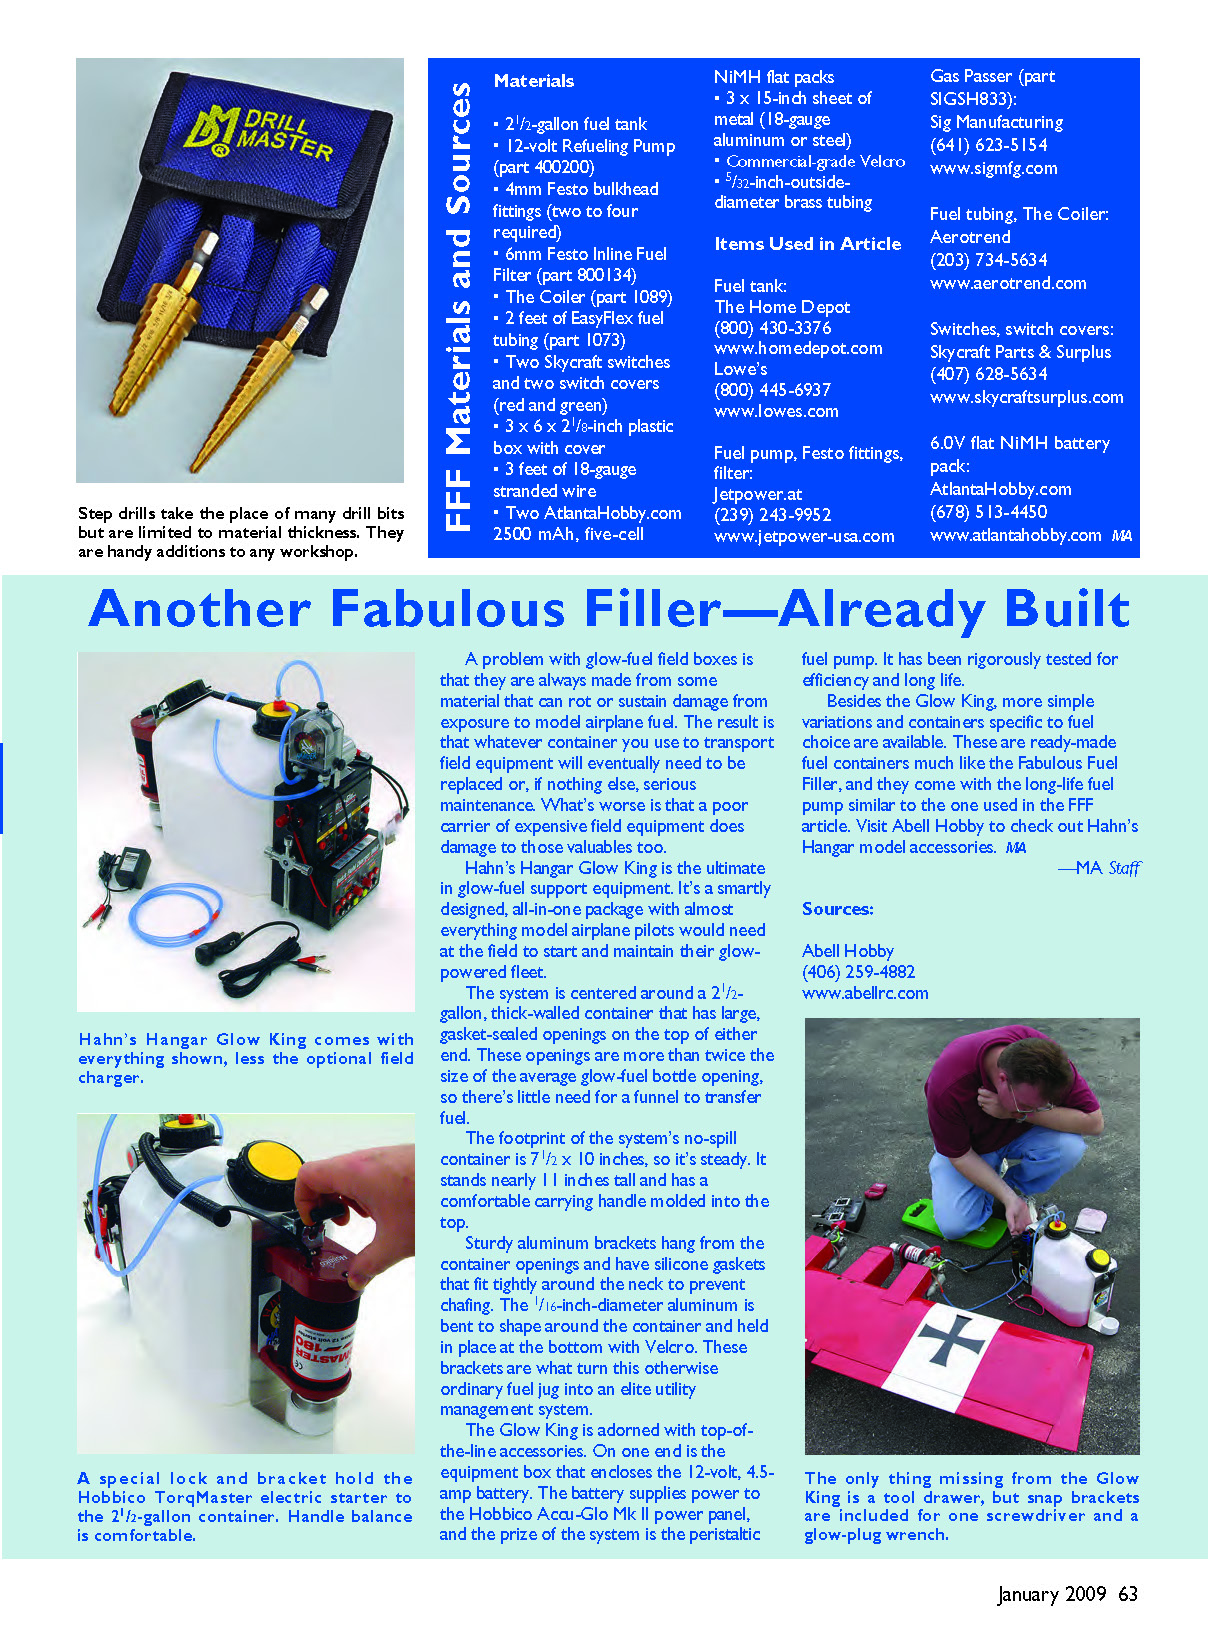
For the heart of the FFF — the pump — Fred selected a Jetpower-USA Jersey Modeler gear pump, Model PQ-12 DC. The PQ-12 weighs only 10 ounces and, along with the PQ-24, performs impressively compared to larger, more expensive gear pumps. The PQ series comes with either a 12-volt DC or 24-volt DC motor. The motor (with heat-radiating fins) drives a chemical-resistant liquid pump. Materials that contact the liquid are a molded Delrin pump body, stainless-steel shafting, a Teflon diaphragm, and a rubber elastomer seal.
A variety of elastomers are available (Buna-N, AFLAS, EPDM, and Viton). With the Viton seal in place, the PQ can be used with glow, gas, or jet fuel. It pumps about 78 ounces per minute.
Power and controls
To power the pump, Fred used two Sanyo 6.0V (five-cell), 2500 mAh NiMH flat packs (from AtlantaHobby.com) wired in series to provide 12 volts and about 2.5 Ah capacity. The batteries are mounted in a plastic box with a metal lid purchased from a local electronics store.
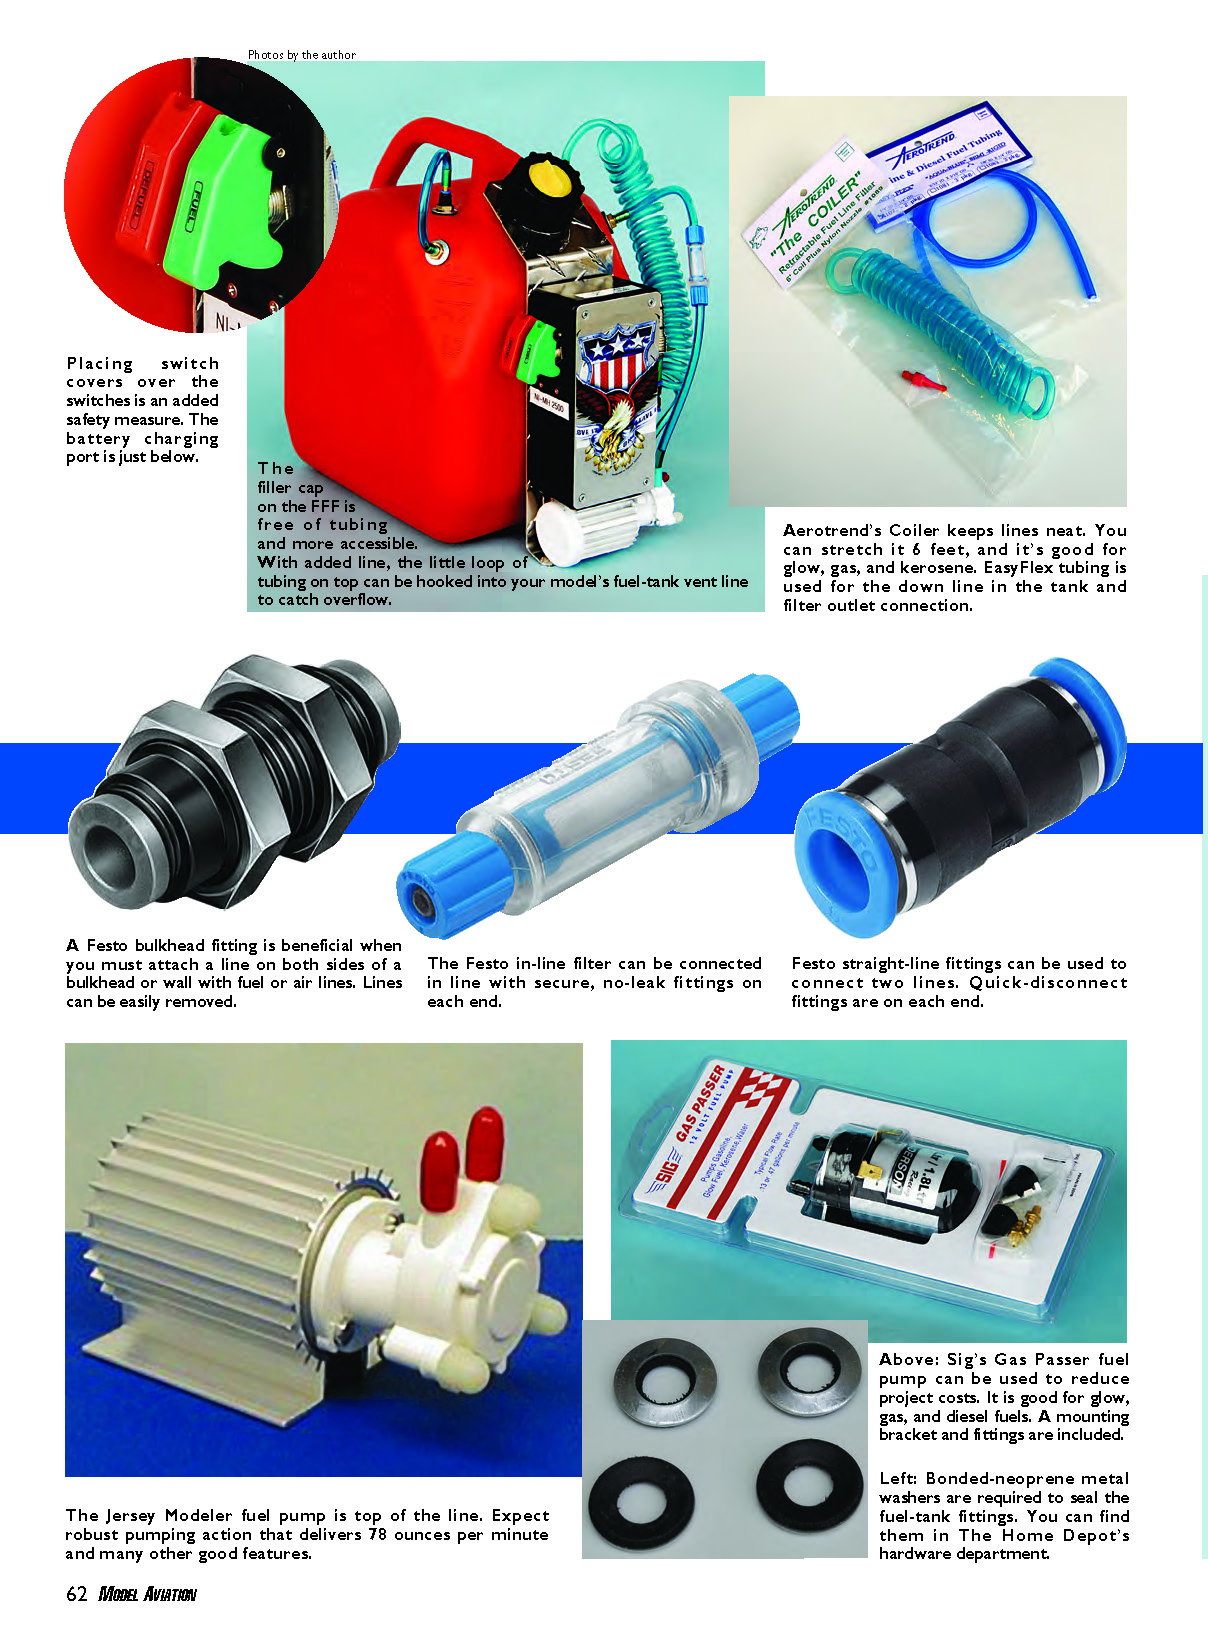
He built a charging port into the side of the box to rejuvenate the batteries and installed two single-pole, single-throw switches (one for fueling and the other for defueling) with different-color covers to identify their purposes. The covers also protect the switches from accidental activation. The switches and covers were sourced from Skycraft Parts & Surplus.
Fred later found that a double-throw, double-pole switch (push up to fuel, push down to defuel, off in the center) simplified the wiring and improved convenience.
Fuel line, fittings, and filters
Fred used Aerotrend fuel line throughout: The Coiler (for a 6-foot coil setup), EasyFlex 6mm fuel line, and a 6mm Festo inline fuel filter. Festo fittings and bulkhead fittings make tubing connection and removal from the model tank quick and convenient. When using Festo bulkhead fittings on the tank, use bonded-neoprene/metal washers (available at The Home Depot) to seal them. Festo fittings are commonly used in turbine-powered model jets and are available from Jetpower-USA.
Although market-ready battery-powered fuel cans are available and come fully fitted with lines and filters, they are expensive. Building the FFF saves money and yields high-quality components, great performance, and the satisfaction of doing it yourself.
I had been using a 1-gallon fuel can with a Du-Bro hand-crank pump. Now I have something better and more convenient.
Construction
If the FFF looks like something you want, gather all the required parts before you begin so you can assemble the project start-to-finish without stopping to hunt for items.
- Choose the fuel container
- Select a 2½-gallon capacity can (or comparable size). Look for a wider base for better stability.
- Remove the filler cap and locate holes for the Festo bulkhead fittings so they are close to and accessible through the pouring-spout opening.
- Make the holes
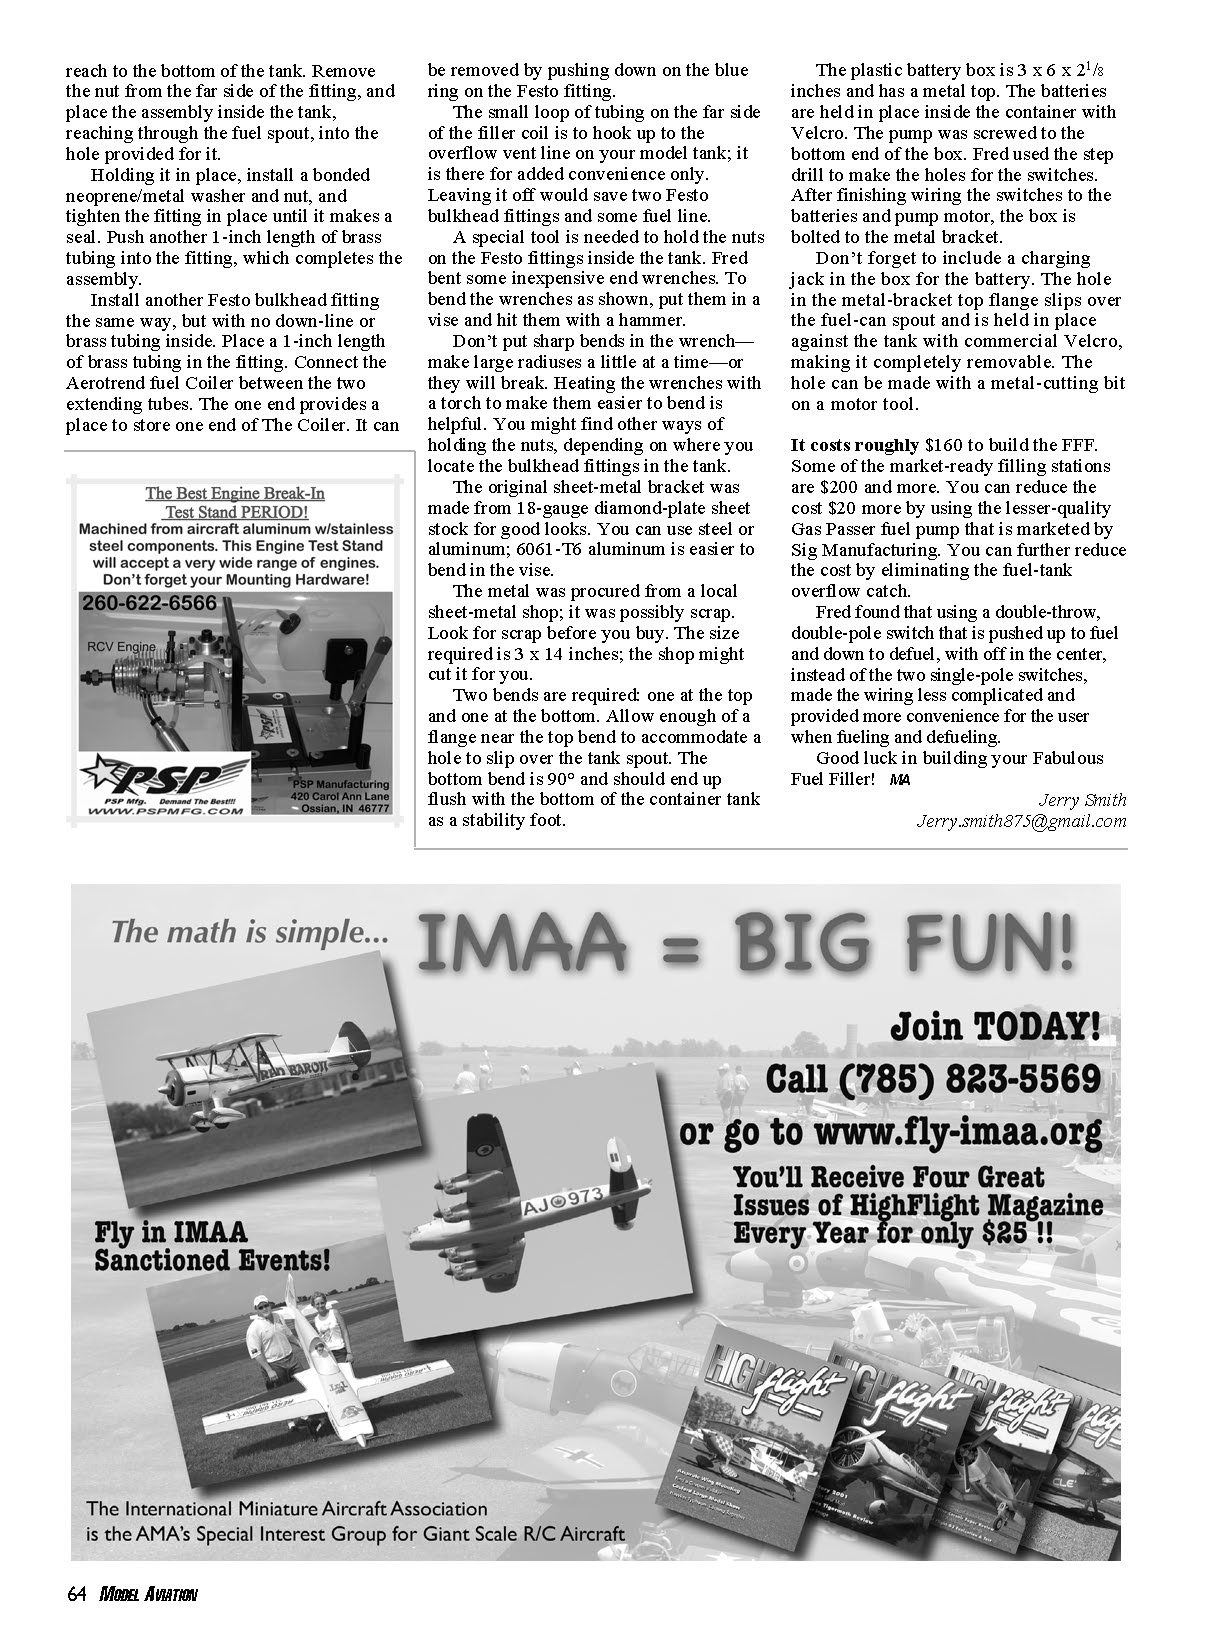
- Use a step drill (an inverted Christmas-tree-shaped drill bit that progressively increases hole size) to make the holes for the bulkhead fittings. It works well on thin sheet metal and plastic.
- Assemble the internal pickup
- Insert a 1-inch length of 5/32-inch-diameter brass tubing into one end of a Festo bulkhead fitting. Place a length of fuel line on the brass tube, with a weighted clunk on the other end, long enough to reach to the bottom of the tank.
- Remove the nut from the far side of the fitting and place the assembly inside the tank through the fuel spout into the hole provided.
- Holding it in place, install a bonded neoprene/metal washer and nut on the outside of the tank and tighten until it seals.
- Push another 1-inch length of brass tubing into the fitting (outside) to complete the assembly.
- Install the outlet and coil
- Install another Festo bulkhead fitting the same way, but without a down-line or internal brass tubing.
- Place a 1-inch length of brass tubing in that fitting on the outside.
- Connect the Aerotrend fuel Coiler between the two extending tubes. One end of the Coiler provides a place to store the free end of the coil; it can be removed by pushing down on the blue ring of the Festo fitting.
- The small loop of tubing on the far side of the filler coil can be hooked to the overflow vent line on your model tank for added convenience. Leaving it off will save two Festo bulkhead fittings and some fuel line.
- Special tools and fittings
- A special tool is useful to hold the nuts on the Festo fittings inside the tank. Fred bent inexpensive wrenches to the appropriate shape by placing them in a vise and carefully hammering them to form large-radius bends a little at a time. Heating the wrenches with a torch makes them easier to bend. Avoid sharp bends, which can break the wrench.
- You may find other ways of holding the nuts depending on bulkhead fitting locations.
- Fabricate the mounting bracket
- The original bracket was made from 18-gauge diamond-plate sheet stock for looks. Use steel or aluminum (6061-T6 aluminum is easier to bend).
- Size required: about 3 x 14 inches (a local sheet-metal shop may cut this for you; check scrap first).
- Make two bends: one at the top and one at the bottom. Allow enough of a flange near the top bend to accommodate a hole that slips over the tank spout. The bottom bend should be 90° and act as a stability foot, ending flush with the bottom of the container.
- Battery box and pump mounting
- Use a 3 x 6 x 2 1/8-inch plastic box with a metal top as the battery enclosure.
- Hold the batteries in place inside the box with commercial-grade Velcro. Screw the pump to the bottom end of the box.
- Use the step drill to make holes for the switches. Wire the switches between the batteries and the pump motor, and include a charging jack in the box for the battery.
- Bolt the battery box to the metal bracket. The hole in the bracket’s top flange slips over the fuel-can spout and is held in place against the tank with commercial Velcro, making the whole assembly removable. The hole can be made with a metal-cutting bit on a motor tool.
- Final notes
- The Coiler makes storing and deploying the fuel hose neat and quick. The Festo fittings allow easy coupling and uncoupling of fuel lines to the model tank.
- If desired, substitute a Gas Passer pump to reduce cost (see Parts & Sources). Omitting the fuel-tank overflow catch reduces cost further.
It costs roughly $160 to build the FFF. Some market-ready filling stations are $200 and up.
Good luck in building your Fabulous Fuel Filler!
MA
Jerry Smith [email protected]
FFF Materials and Sources
Materials
- 2½-gallon fuel tank
- 12-volt refueling pump (Jetpower-USA Jersey Modeler, part 400200)
- 4mm Festo bulkhead fittings (two to four required)
- 6mm Festo inline fuel filter (part 800134)
- The Coiler (part 1089)
- 2 feet of EasyFlex fuel tubing (part 1073)
- Two Skycraft switches and two switch covers (red and green)
- 3 x 6 x 2 1/8-inch plastic box with cover (metal-top)
- 3 feet of 18-gauge stranded wire
- Two AtlantaHobby.com 2500 mAh, five-cell NiMH flat packs (6.0V each)
- 3 x 15-inch sheet of metal (18-gauge aluminum or steel) for the bracket
- Commercial-grade Velcro
- 5/32-inch outside-diameter brass tubing
- Bonded neoprene/metal washers for Festo bulkhead fittings
- Weighted clunk for fuel pickup
Items and sources
- Fuel tank: The Home Depot (800) 430-3376 www.homedepot.com; Lowe’s (800) 445-6937 www.lowes.com
- Fuel pump, Festo fittings, filter: Jetpower-USA (239) 243-9952 www.jetpower-usa.com
- Fuel tubing, The Coiler: Aerotrend (203) 734-5636 www.aerotrend.com
- Gas Passer (alternative pump, part SIGSH833): Sig Manufacturing (641) 623-5154 www.sigmfg.com
- Switches, switch covers: Skycraft Parts & Surplus (407) 628-5634 www.skycraftsurplus.com
- 6.0V flat NiMH battery pack: AtlantaHobby.com (678) 513-4450 www.atlantahobby.com
Notes:
- Using Viton elastomer seals allows pumping glow, gas, or jet fuel.
- The PQ pump pumps approximately 78 ounces per minute.
- You can reduce cost by selecting lower-cost pump options and by eliminating optional overflow fittings.
Transcribed from original scans by AI. Minor OCR errors may remain.

