
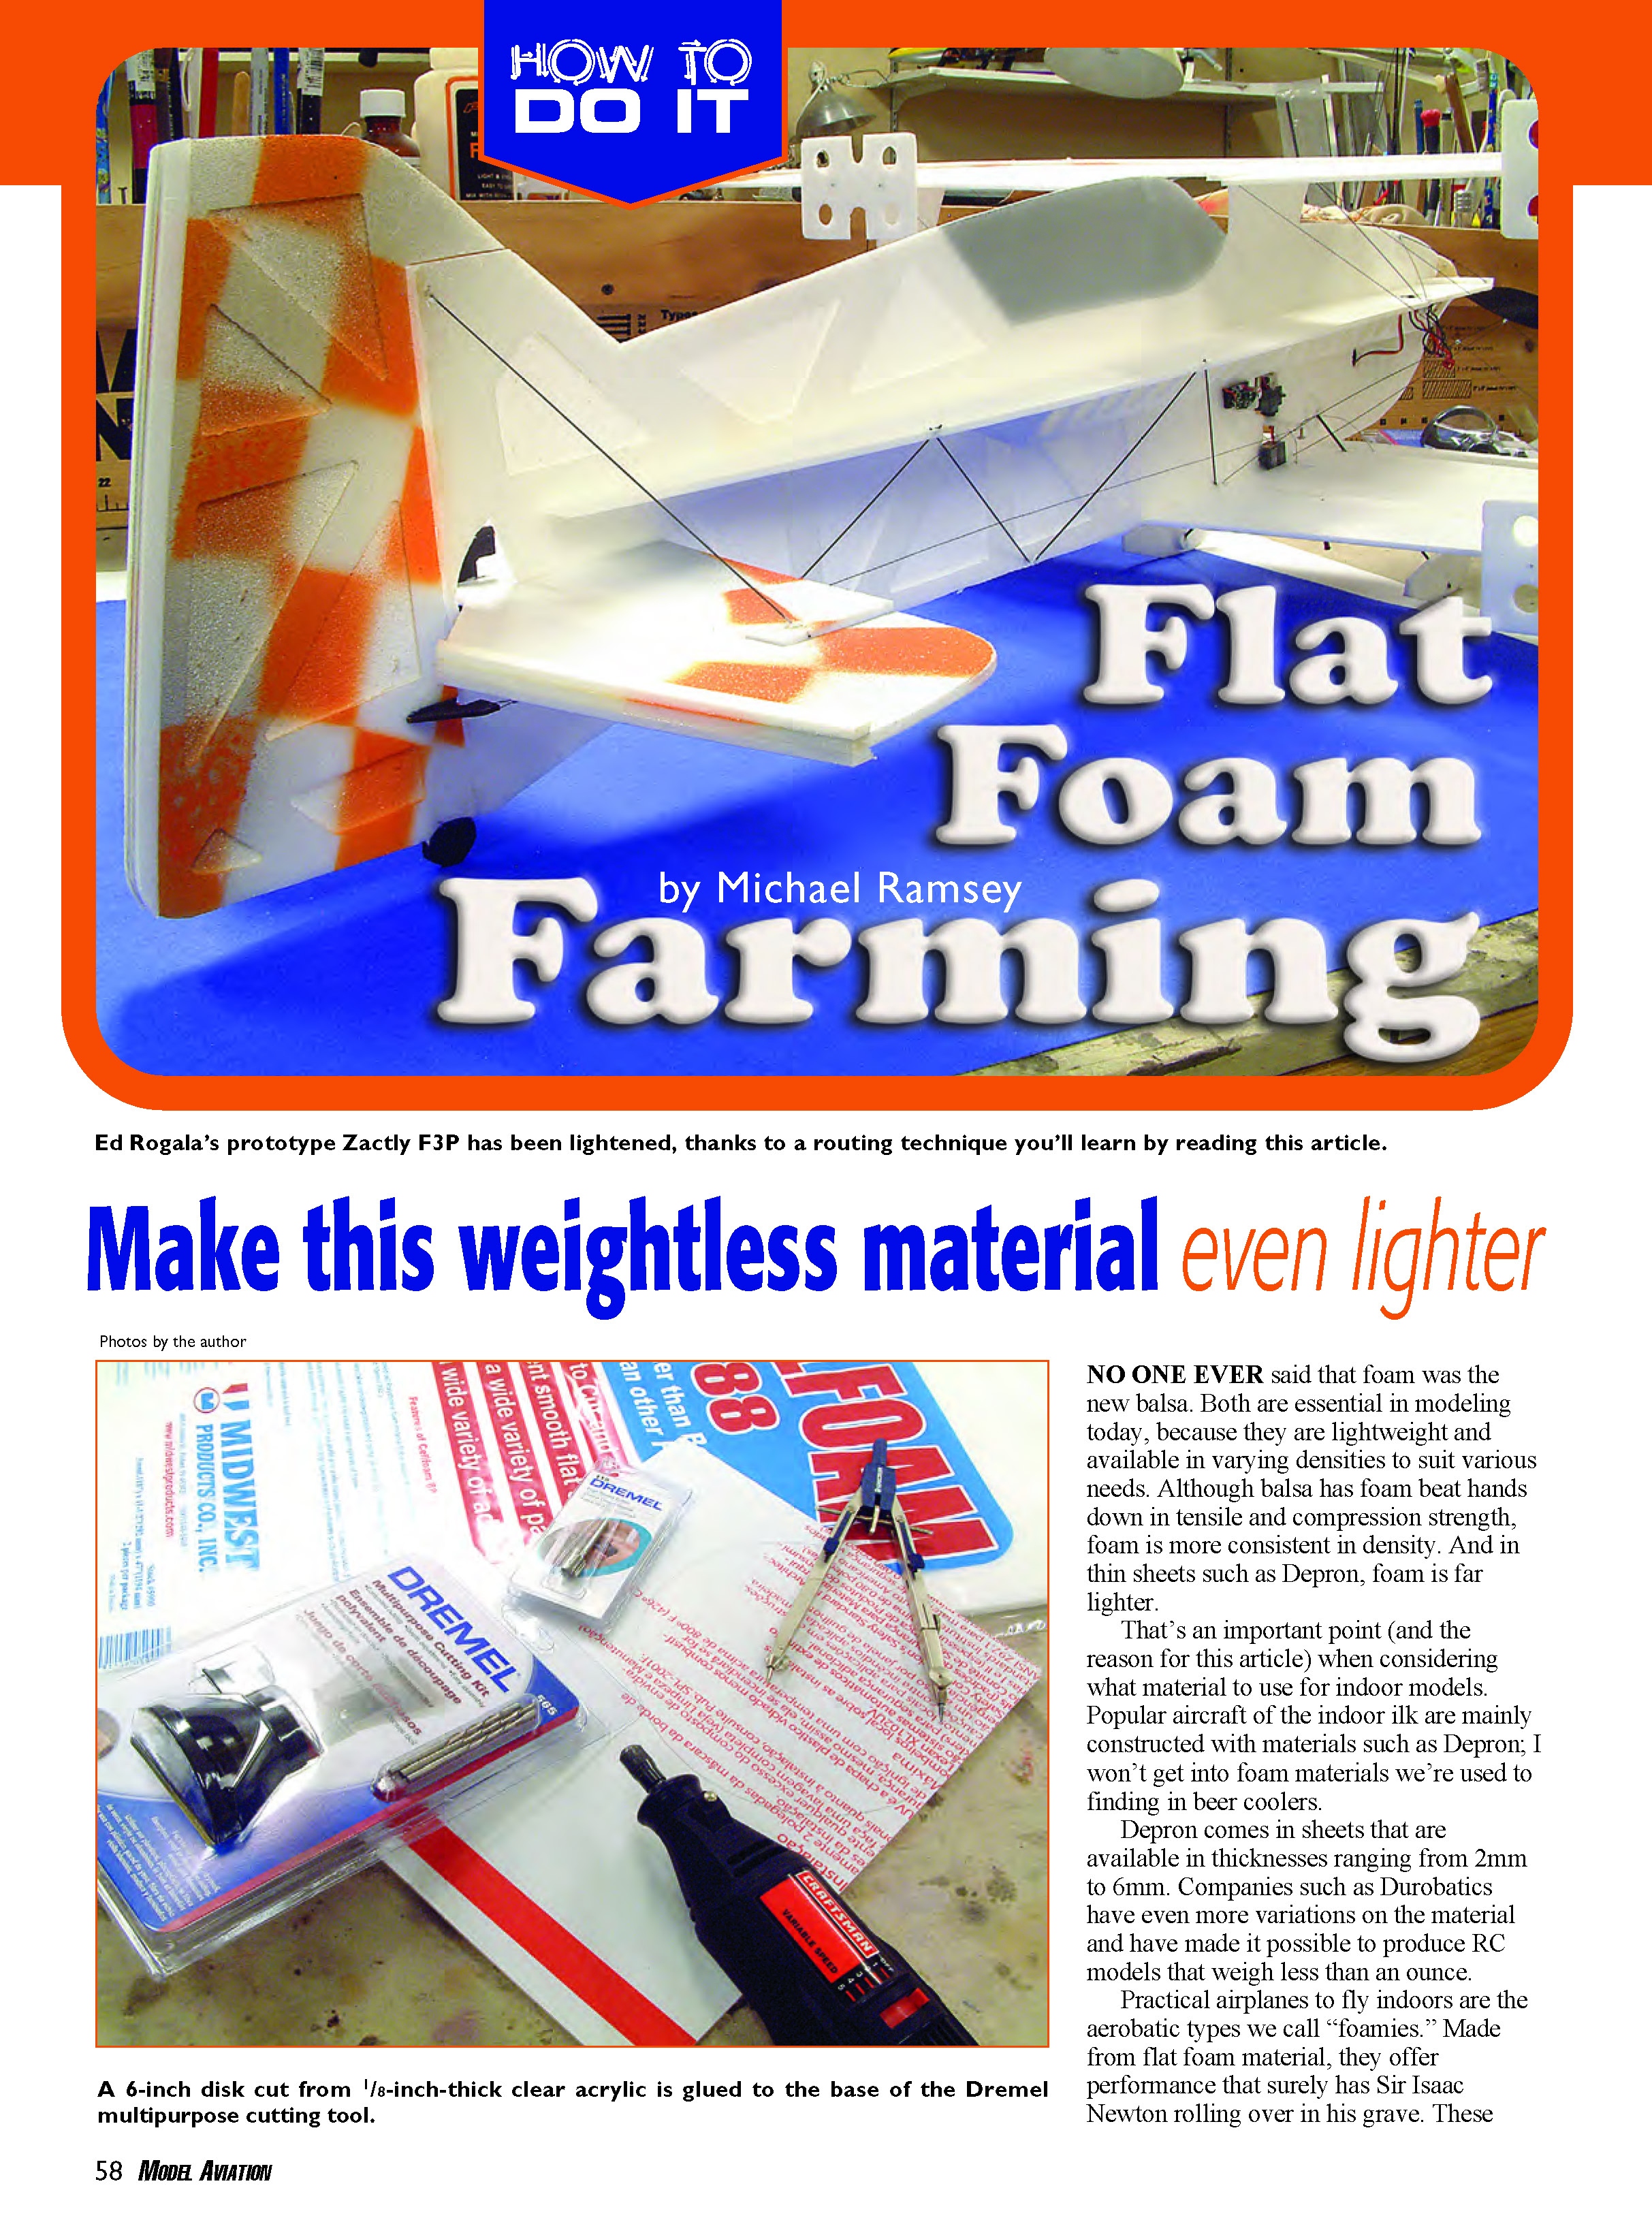
Flat Foam Farming
by Michael Ramsey
No one ever said that foam was the new balsa. Both are essential in modeling today because they are lightweight and available in varying densities to suit various needs. Although balsa has foam beat hands down in tensile and compression strength, foam is more consistent in density. And in thin sheets such as Depron, foam is far lighter.
That's an important point when considering what material to use for indoor models. Popular indoor aircraft are mainly constructed with materials such as Depron; I won't get into the foam materials we're used to finding in beer coolers.
Depron comes in sheets available in thicknesses ranging from 2 mm to 6 mm. Companies such as Durobatics have even more variations on the material and have made it possible to produce RC models that weigh less than an ounce.
Practical airplanes to fly indoors are the aerobatic types we call "foamies." Made from flat foam material, they offer performance that can seem to defy the laws of physics, thanks not only to modern electric power and battery systems (power-to-weight ratio), but also to their light wing loadings.
Lately I've been scratch-building my foamies from a material that Midwest Products distributes called Cellfoam 88. It's offered in conveniently sized two-sheet sets that consist of pieces 11.5 x 47 inches in dimension and come in 3 mm, 5 mm, and 10 mm thicknesses. Cellfoam 88 is slightly heavier than Depron, but it seems less brittle and has a smoother surface texture. Its bright white color is extremely pleasing.
Ed Rogala of Midwest and I have been experimenting with Cellfoam. Much of what you read about in this article is a collaboration of our ideas, but Ed's materials are shown in the photos; he let me borrow them so we could present this feature to you.
Sheet foam material is incredibly easy to work with. As easy as building a paper airplane, almost anything you can think up that has wings and a properly located CG will fly. How it flies is up to the creator, but changes and new prototypes are possible with just an evening's worth of work in the workshop.
Roughly a year ago, Jason Noll showed up at the JR Indoor Electric Festival with one of his Vrolet biplanes. Its 3 mm sheet material was routed out in key areas, leaving a practically paper-thin layer on the opposite side. The material that was not ground away left a warren-truss-looking structure. FancyFoam.com made the kit and did all the precision machining on CNC equipment. That's too much work for the average modeler, I thought at the time.
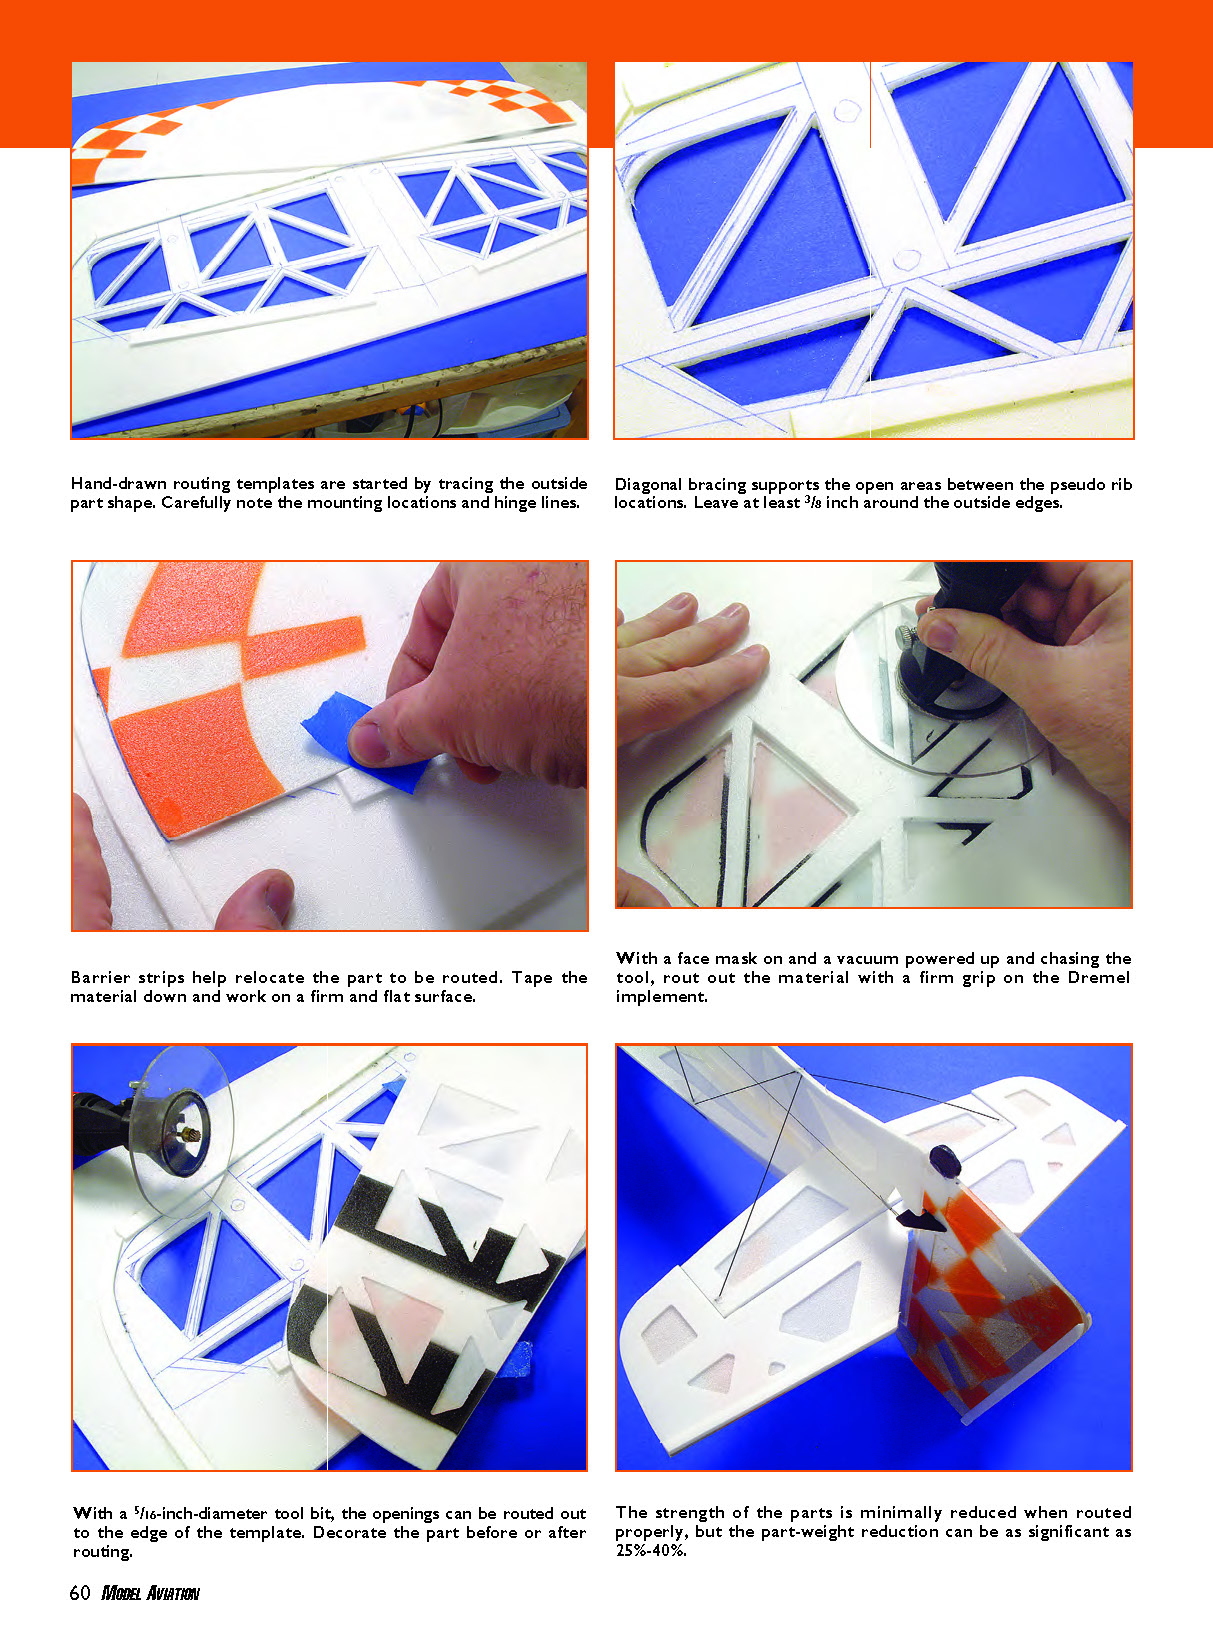
A few months later, at E-Fest, several modelers had homemade foamies with routed-out components. This trick was getting done at home, and it seemed to make a difference—not only in the airplanes' weight, but also in promoting airframe drag that aids in flying the model more slowly.
Experiment with this idea for yourself, and always exercise shop safety.
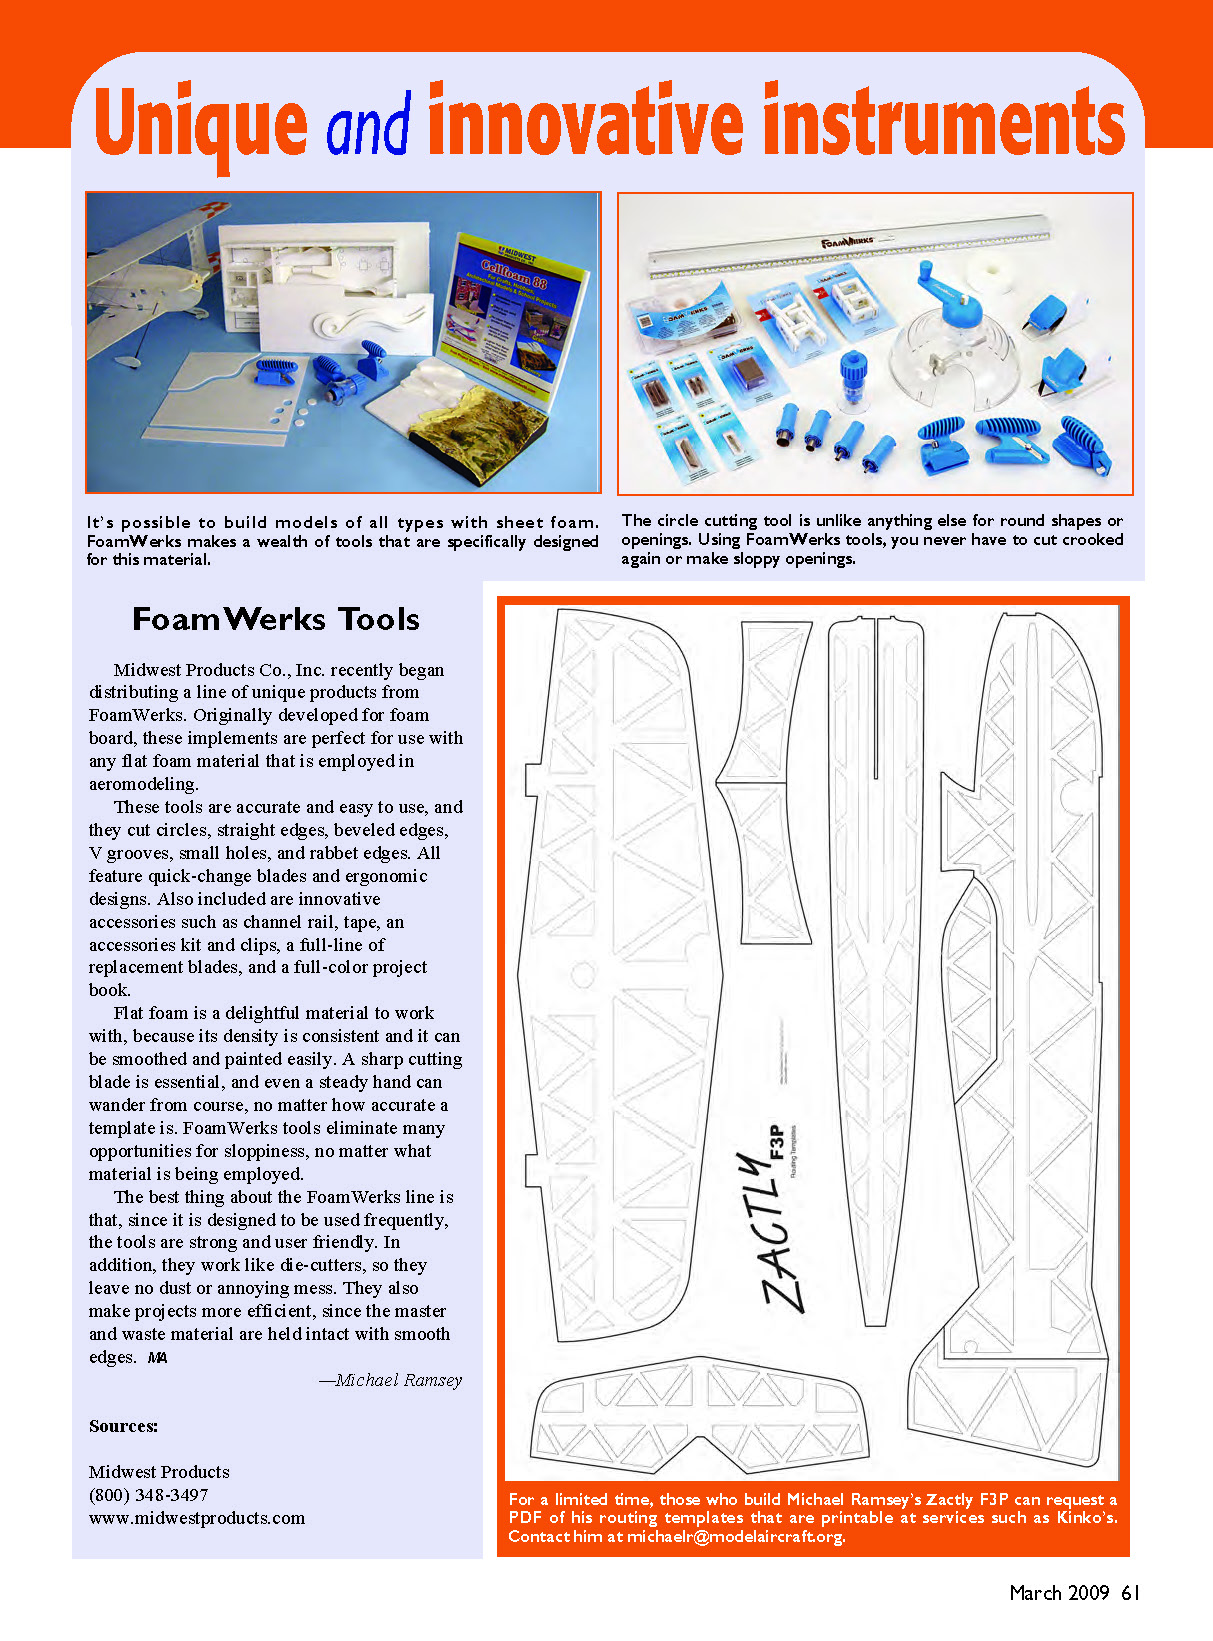
FoamWerks Tools
Midwest Products Co., Inc. recently began distributing a line of unique products from FoamWerks. Originally developed for foam board, these implements are perfect for use with any flat foam material that is employed in aeromodeling.
These tools are accurate and easy to use, and they cut circles, straight edges, beveled edges, V grooves, small holes, and rabbet edges. All feature quick-change blades and ergonomic designs. Also included are innovative accessories such as channel rail, tape, an accessories kit and clips, a full line of replacement blades, and a full-color project book.
Flat foam is a delightful material to work with because its density is consistent and it can be smoothed and painted easily. A sharp cutting blade is essential, and even a steady hand can wander from course, no matter how accurate a template is. FoamWerks tools eliminate many opportunities for sloppiness, no matter what material is being employed.
The best thing about the FoamWerks line is that, since it is designed to be used frequently, the tools are strong and user friendly. In addition, they work like die-cutters, so they leave no dust or annoying mess. They also make projects more efficient, since the master and waste material are held intact with smooth edges.
—Michael Ramsey
Routing and Weight Reduction
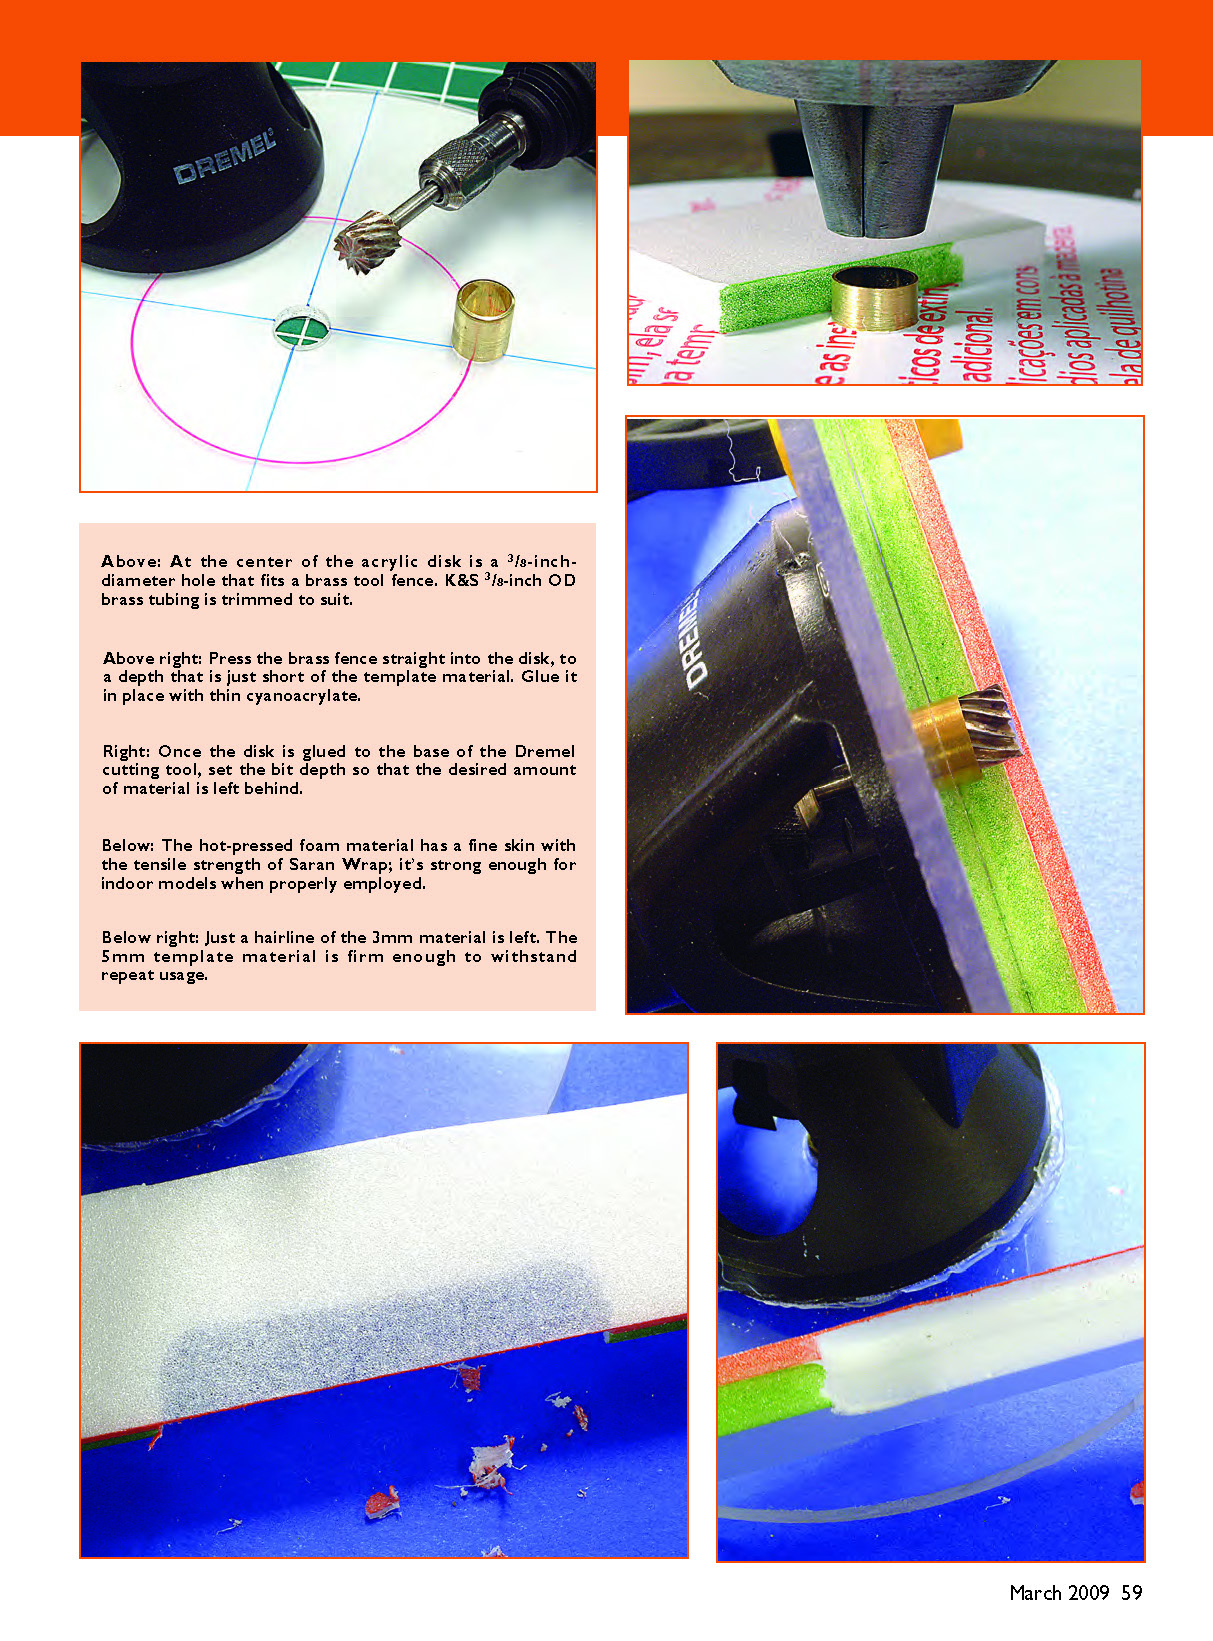
Ed got to work and found that Dremel had the right tool for the job; only a slight modification was necessary to do what we needed. However, the process is extraordinarily messy.
This is the part where we remind you about shop safety. There’s no better way to create a mess of dust than to take a high-speed tool equipped with a carbide tip to a material that can be made almost as light as air. When sanding or routing foam, wear a face mask and ventilate the workshop as well as possible. A shop vacuum with a brush attachment following the router helps tremendously, but it’s still a mess.
Foam sheet originates from a roll and is made into sheets through a heating and compression process that gives the material a crisp skin. We can rout out the foam material practically to the depth of that "skin," which is as thin as Mylar. A model modified to this extent is more fragile, but there’s no such thing as too light for indoor aerobatics. The amount of weight that can be saved is up to the user, and custom templates must be made for a particular part.
Modifying the Dremel Router Attachment
The Dremel Multipurpose Cutting Kit was modified with a widened base made from 1/8-inch clear acrylic (window-pane material). Midwest sells .118-inch-thick Clear Polyester Super Sheets (item 703-06) with dimensions of 7.6 x 11 inches.
The acrylic was cut into a 6-inch disk, and a 3/8-inch-diameter hole was drilled in its center. A 3/8-inch-long, 3/8-inch-OD brass tube is pressed and glued in place in the center of the disk. The tube acts as a fence around the 5/16-inch high-speed Dremel cutter bit that is chucked into the Dremel tool.
Zap-A-Goo adhesive is used to glue the acrylic plate to the router attachment’s fiber-reinforced nylon. Sanding the base of the router attachment improves the glue bond. If you want to return the attachment to its stock form, leave the material smooth and the joint can be separated fairly easily.
The depth of the tool bit depends on the template and working material. I used 5 mm Cellfoam 88. The 3/8-inch brass sleeve should be set to a depth that matches the routing template. The tool bit’s shank should be set as deep as possible into the motor-tool collet while still extending far enough to remove the selected amount of material from the foam.
The corners will have a 3/16-inch radius because of the brass sleeve that shields the 5/16-inch tool bit. You could add 1/32 inch to the opening’s overall perimeter to allow for the space between the brass sleeve and tool bit; I typically don’t worry about that variance.
The cutout areas shouldn’t be wider than half the thickness of the acrylic baseplate; in this case, that’s about 3 inches. Whenever possible, the routed surfaces should be on the bottom. Which side of the fuselage is routed is up to the builder; I chose the starboard side.
Templates and Routing Technique
The easiest method for making templates is to trace the part onto the template material and mark the critical areas where the part should remain stock thickness. Areas such as hinge lines, outside edges, and butt joints are important places to leave material. Leave approximately 1/4–1/2 inch of material around hinge lines and the perimeter. Ribs and crossmembers should be 3/8–1/2 inch wide.
Once the template is laid out, remove the cutout area with an X-Acto knife. Reference the location of the part on the backside of the template so it can be accurately positioned and temporarily secured with tape.
Be patient when routing the material. I’ve found that speed setting #1 on the Dremel tool is sufficient and doesn’t cause the material to overheat and bead at the edges. Start by removing/routing the outline material, not pressing hard enough against the template to dent the edges. Make a second pass, removing more material toward the inside. After roughly three passes all the way around, start plowing out the center. It’s like mowing the lawn.
Rout out the planned materials one by one. Check the tool setting periodically to make sure that it hasn’t shifted.
I suppose it would be possible to apply this routing technique to balsa; as a matter of fact, I’m sure it is. If anything, this method shows how far sheet foam can be pushed to suit our modeling needs.
MAINTAIN SHOP SAFETY: When sanding or routing foam, always wear a face mask, ventilate the shop, and use a vacuum to catch dust. Foam dust is messy and can be hazardous if inhaled.
Michael Ramsey [email protected]
Sources:
- Midwest Products — (800) 348-3497, www.midwestproducts.com
- RCFOAM (sells Depron) — (404) 556-9117, www.rcfoam.com
- Durobatics — (315) 264-2064, www.durobatics.com
- Dremel — (800) 437-3635, www.dremel.com
Materials List:
- Dremel Multipurpose Cutting Kit (item 565)
- Dremel high-speed bit (item 115)
- 1/8-inch clear acrylic (or .118-inch Clear Polyester Super Sheet, item 703-06)
- Zap-A-Goo adhesive
- 3/8-inch OD brass tube (3/8 inch long)
- Template material (chipboard or foam sheet)
Transcribed from original scans by AI. Minor OCR errors may remain.

