
Mastering Straight Lines and Course Adjustments
BETTER CONTROL WITH LESS INPUT
by Dave Scott
INTRODUCTION
When most people learn to drive a car, they work hard at keeping the car going straight. This is mostly because they hold steering-wheel corrections too long and try to "steer" the car straight.
After a while, we keep the car straight with little effort because we learn that most deviations can be corrected with a simple little nudge of the wheel, and we know that if one nudge doesn't do the job, we can always apply another. Applying small nudges produces straighter lines and reduces the number of corrections we have to make.
Small, brief (not held in) bumps of aileron or rudder have precisely the same effect in aircraft: they help us fly straighter lines and make small course changes without overcontrolling.
Bump Applications
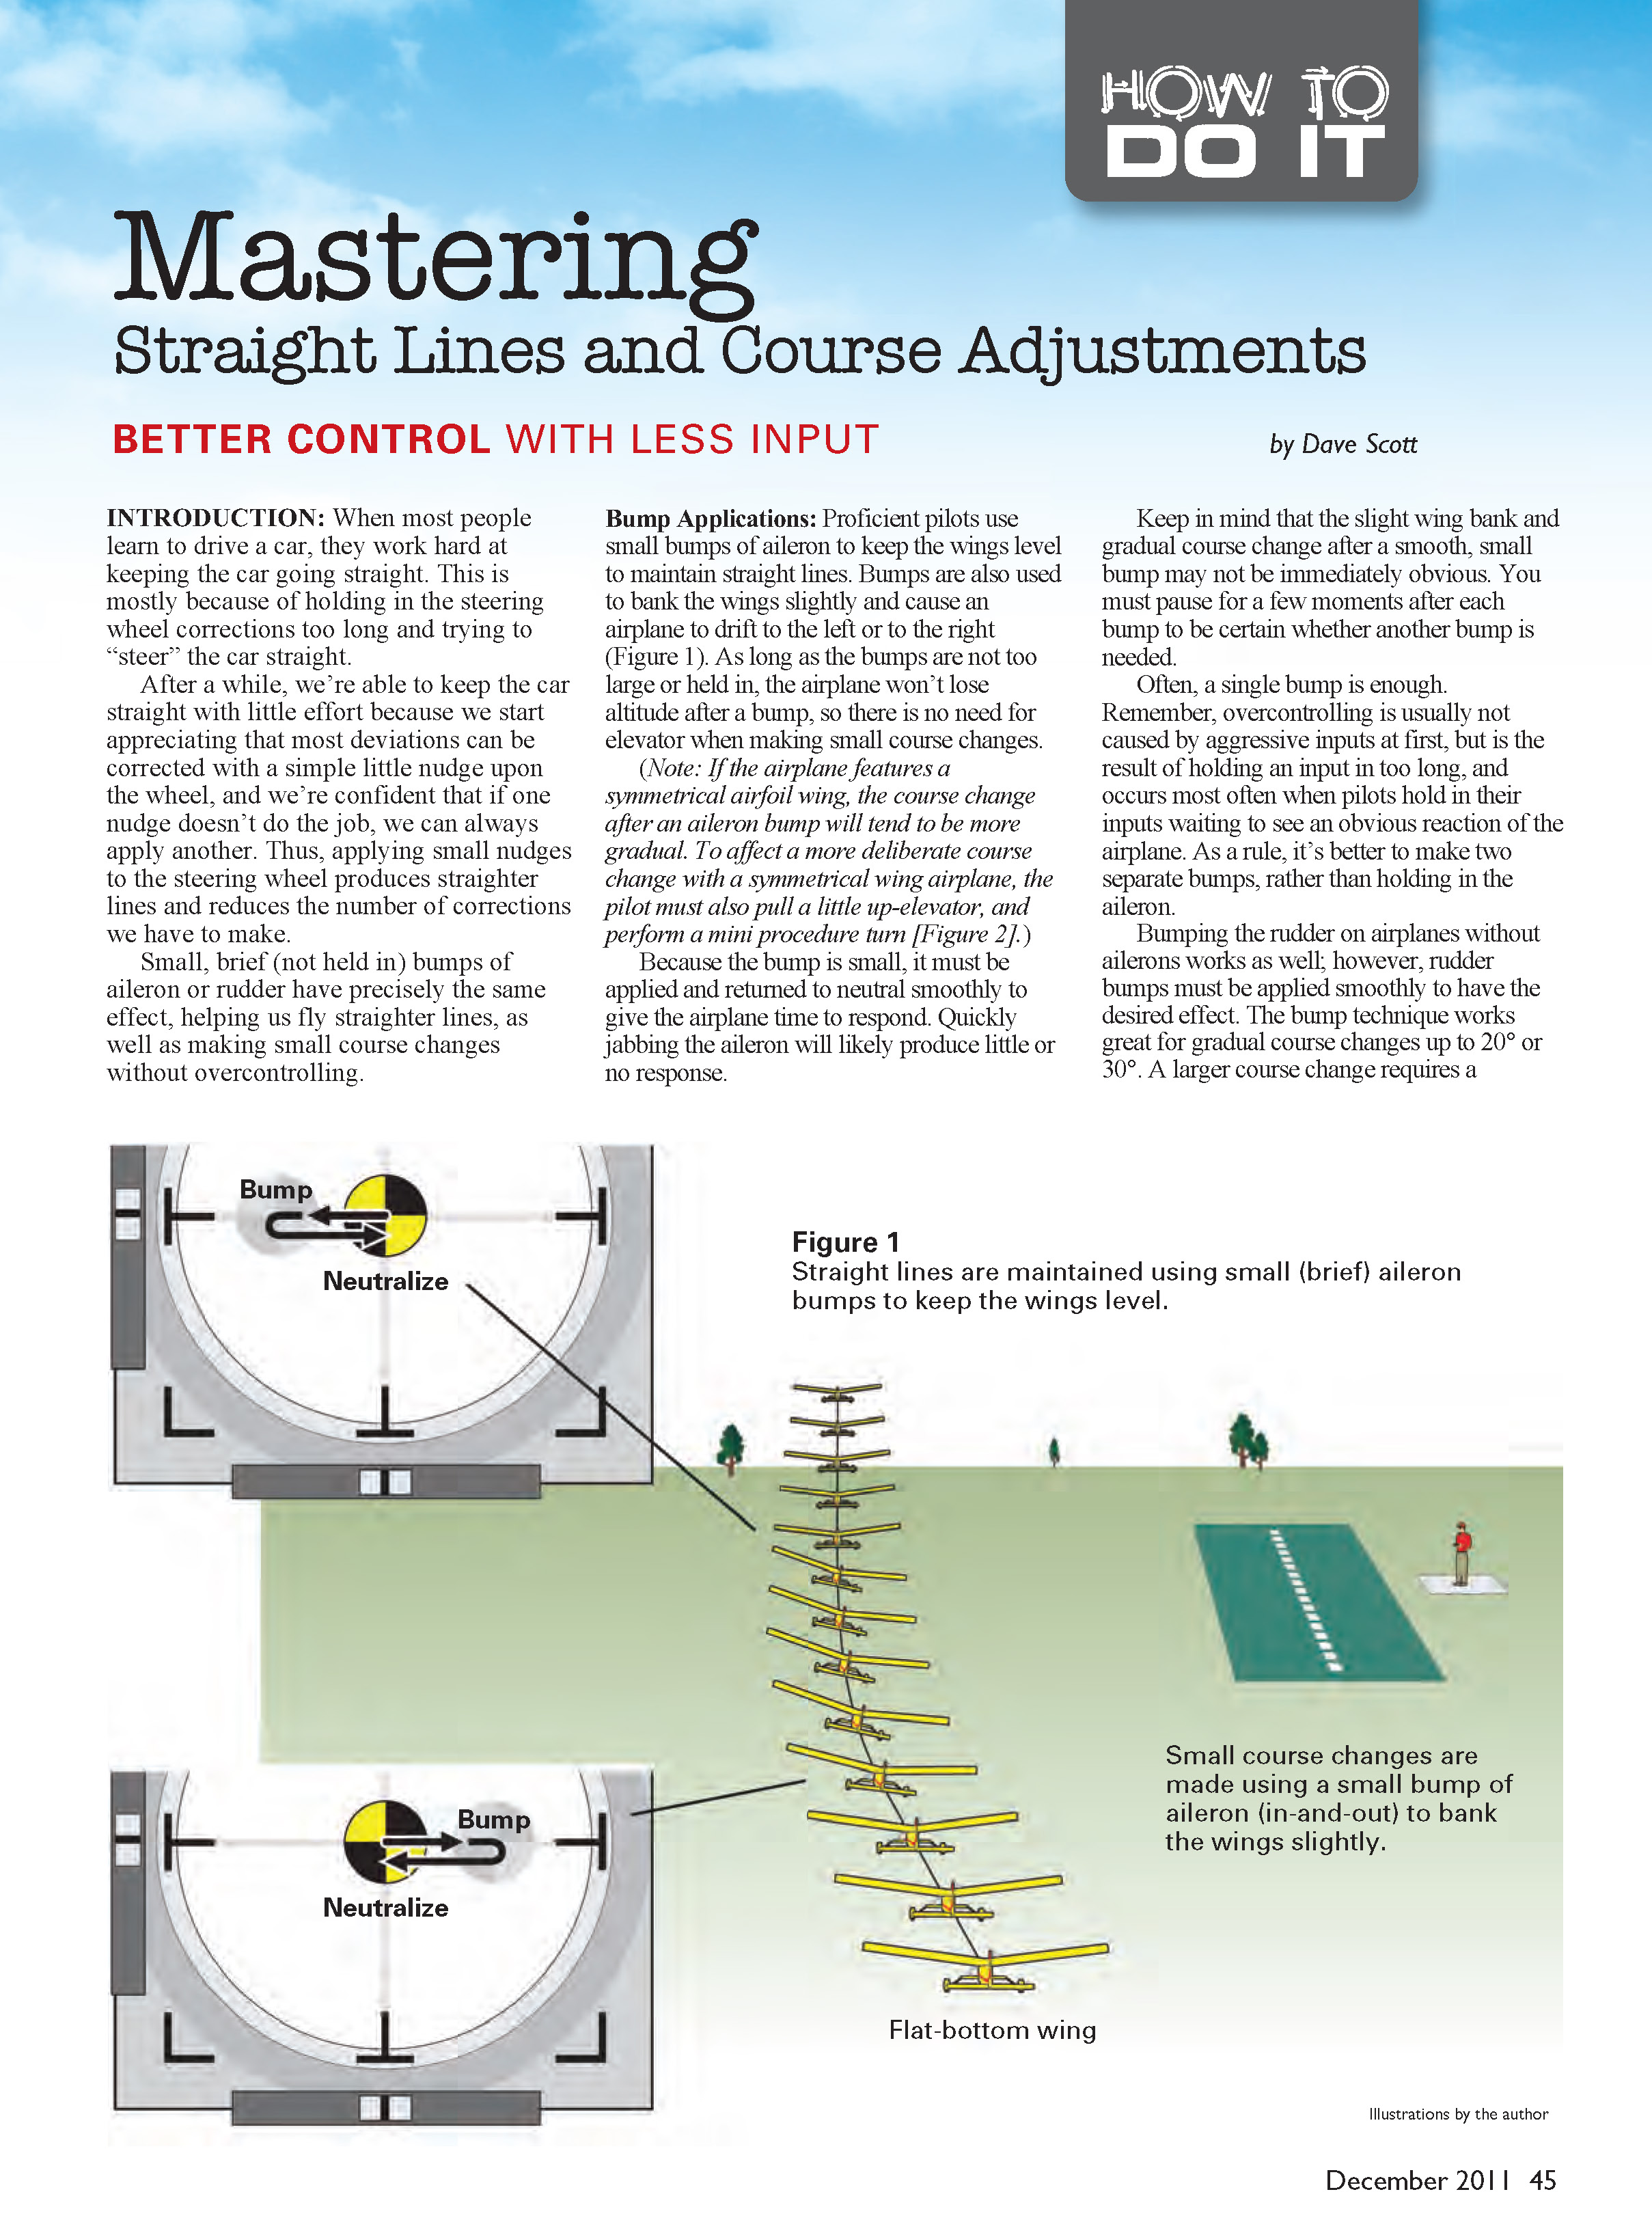
Proficient pilots use small bumps of aileron to keep the wings level and maintain straight lines. Bumps are also used to bank the wings slightly and cause an airplane to drift left or right (Figure 1). As long as the bumps are not too large or held in, the airplane won't lose altitude after a bump, so there is no need for elevator when making small course changes.
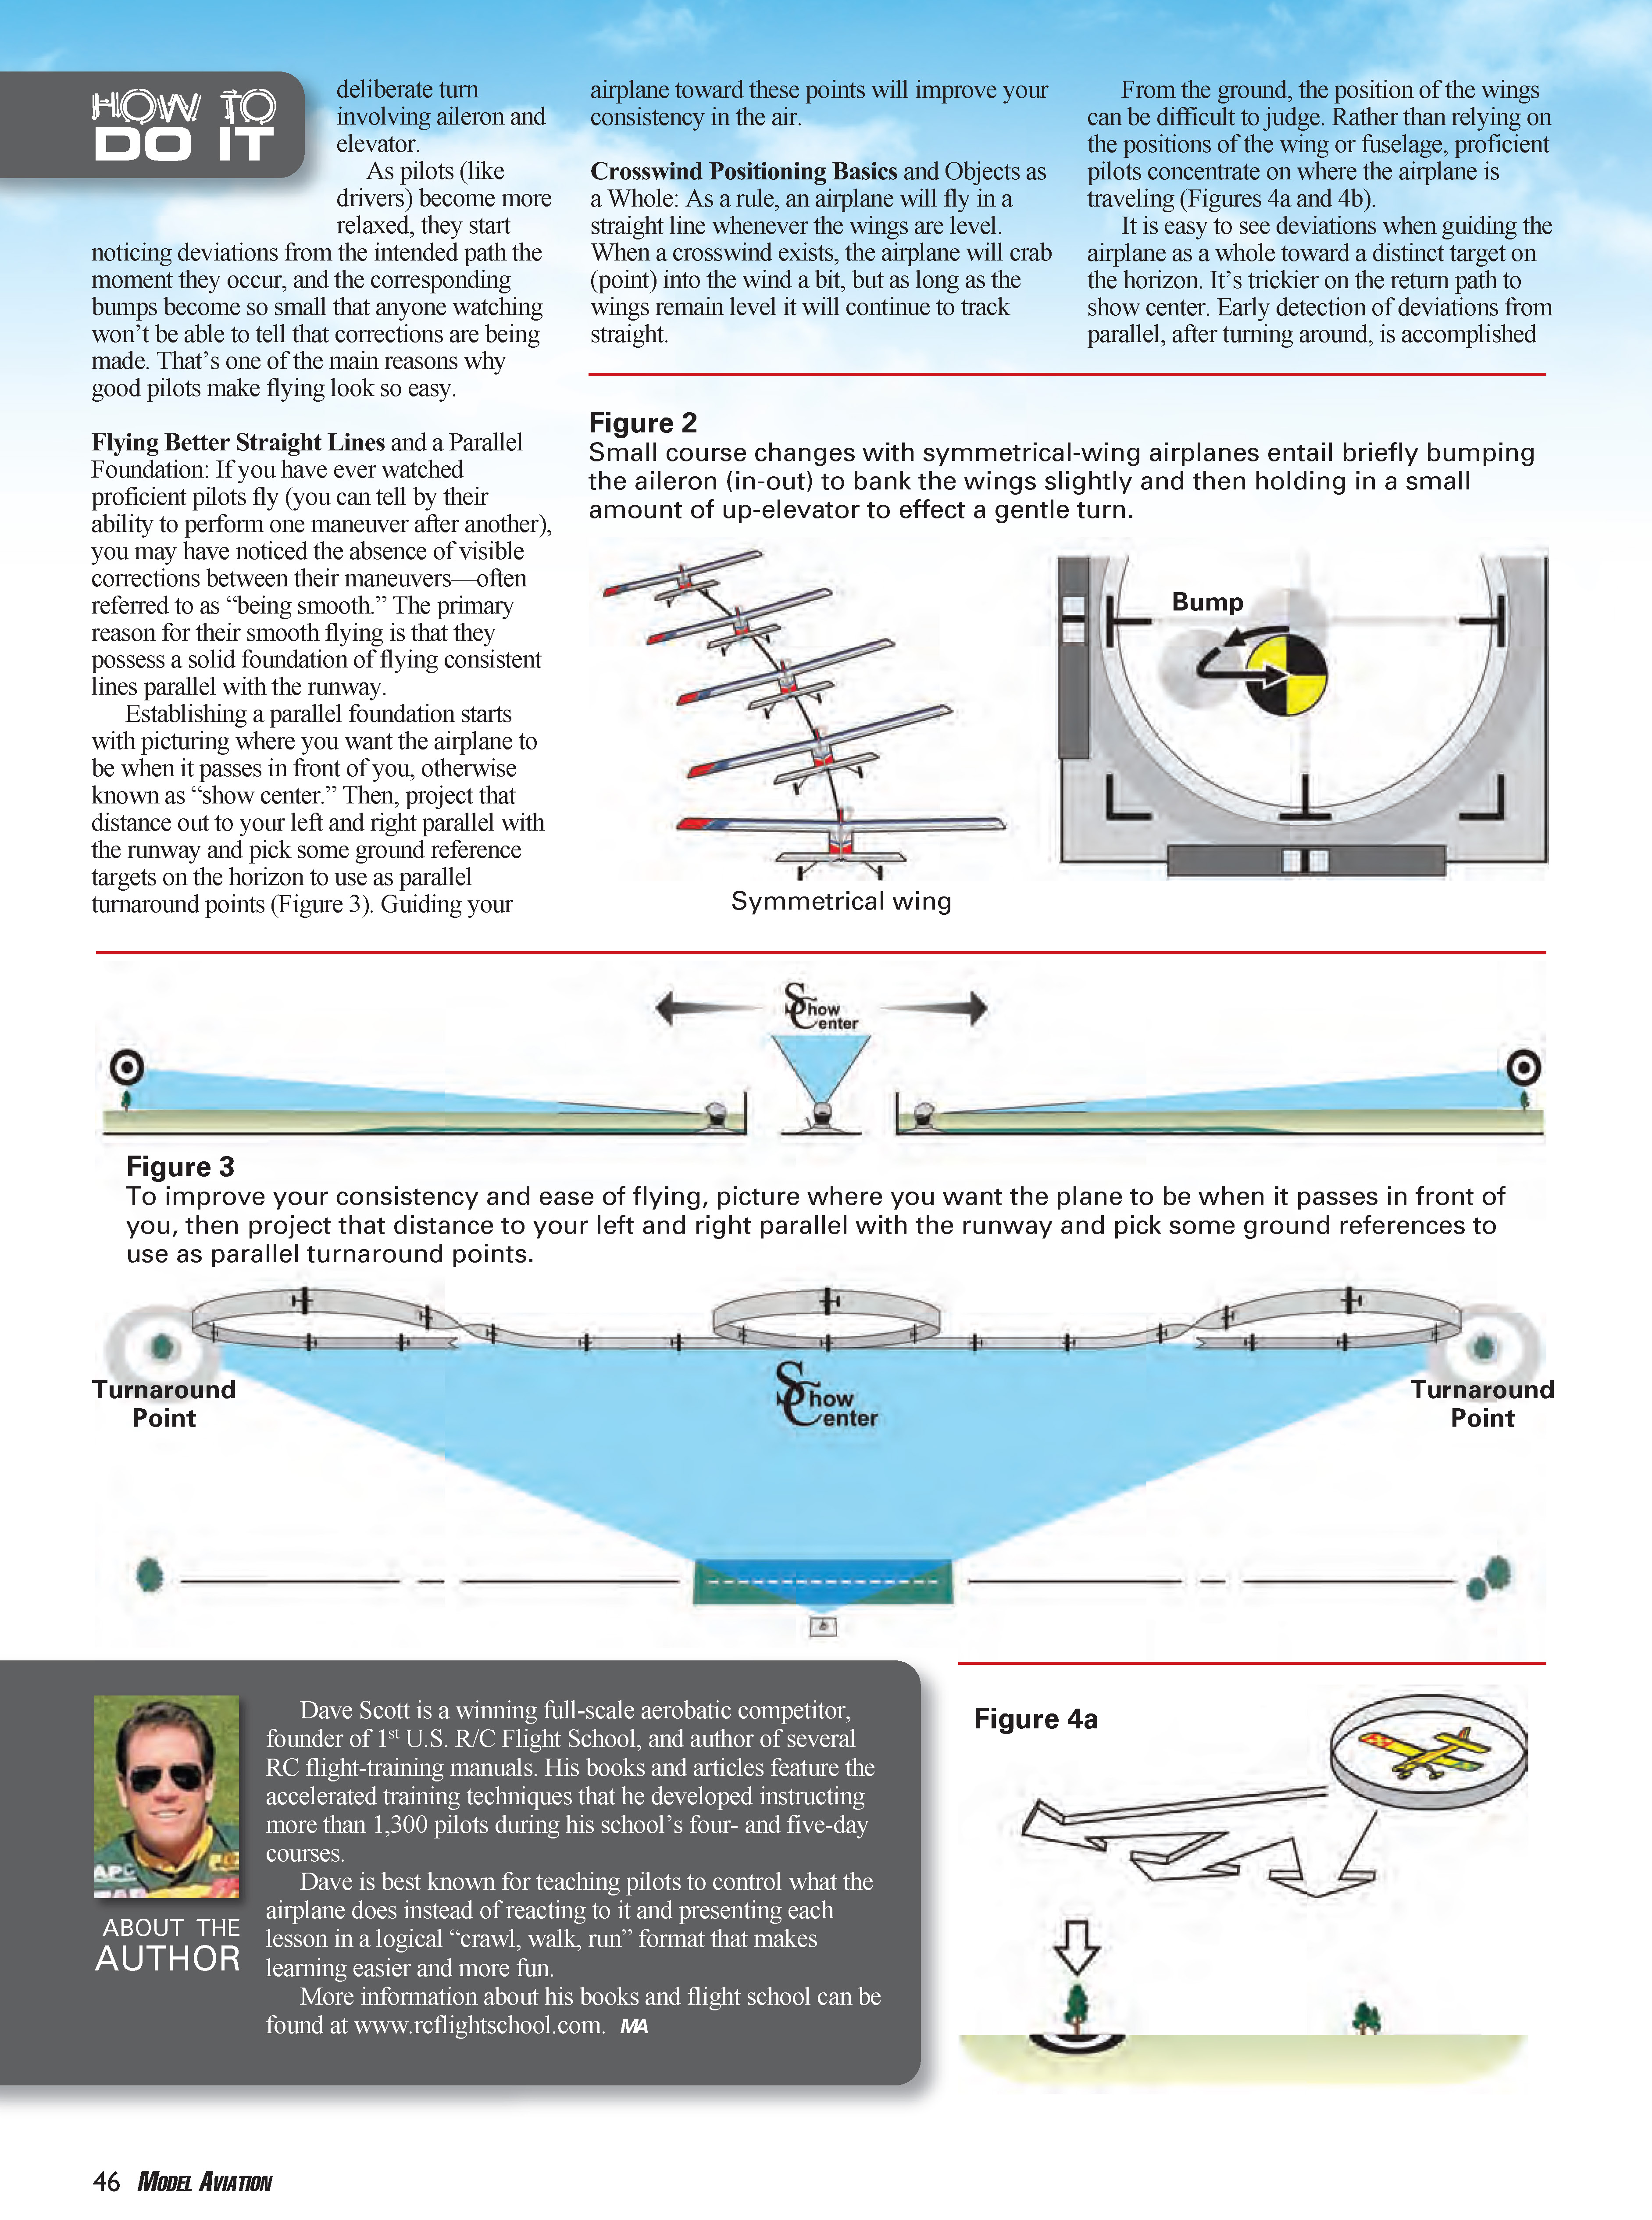
Note: If the airplane has a symmetrical airfoil wing, the course change after an aileron bump will tend to be more gradual. To affect a more deliberate course change with a symmetrical-wing airplane, the pilot must also pull a little up-elevator and perform a mini procedure turn (Figure 2).
Because the bump is small, it must be applied and returned to neutral smoothly to give the airplane time to respond. Quickly jabbing the aileron will likely produce little or no response.
Keep in mind that the slight wing bank and gradual course change after a smooth, small bump may not be immediately obvious. Pause for a few moments after each bump to be certain whether another bump is needed. Often a single bump is enough. Remember: overcontrolling is usually not caused by aggressive inputs at first, but by holding an input in too long. It occurs most often when pilots hold inputs while waiting to see an obvious reaction from the airplane. As a rule, it's better to make two separate bumps rather than holding in the aileron.
Bumping the rudder on airplanes without ailerons works as well; however, rudder bumps must be applied smoothly to have the desired effect. The bump technique works well for gradual course changes up to 20° or 30°. A larger course change requires a deliberate turn involving aileron and elevator.
As pilots (like drivers) become more relaxed, they start noticing deviations from the intended path the moment they occur, and the corresponding bumps become so small that anyone watching won't be able to tell corrections are being made. That's one of the main reasons good pilots make flying look so easy.
Flying Better Straight Lines and a Parallel Foundation
If you have ever watched proficient pilots fly (you can tell by their ability to perform one maneuver after another), you may have noticed the absence of visible corrections between maneuvers—often referred to as "being smooth." The primary reason for their smooth flying is a solid foundation of flying consistent lines parallel with the runway.
Establishing a parallel foundation starts with picturing where you want the airplane to be when it passes in front of you, otherwise known as "show center." Then project that distance out to your left and right parallel with the runway and pick ground reference targets on the horizon to use as parallel turnaround points (Figure 3). Guiding your airplane toward these points will improve your consistency in the air.
Crosswind Positioning Basics and Objects as a Whole
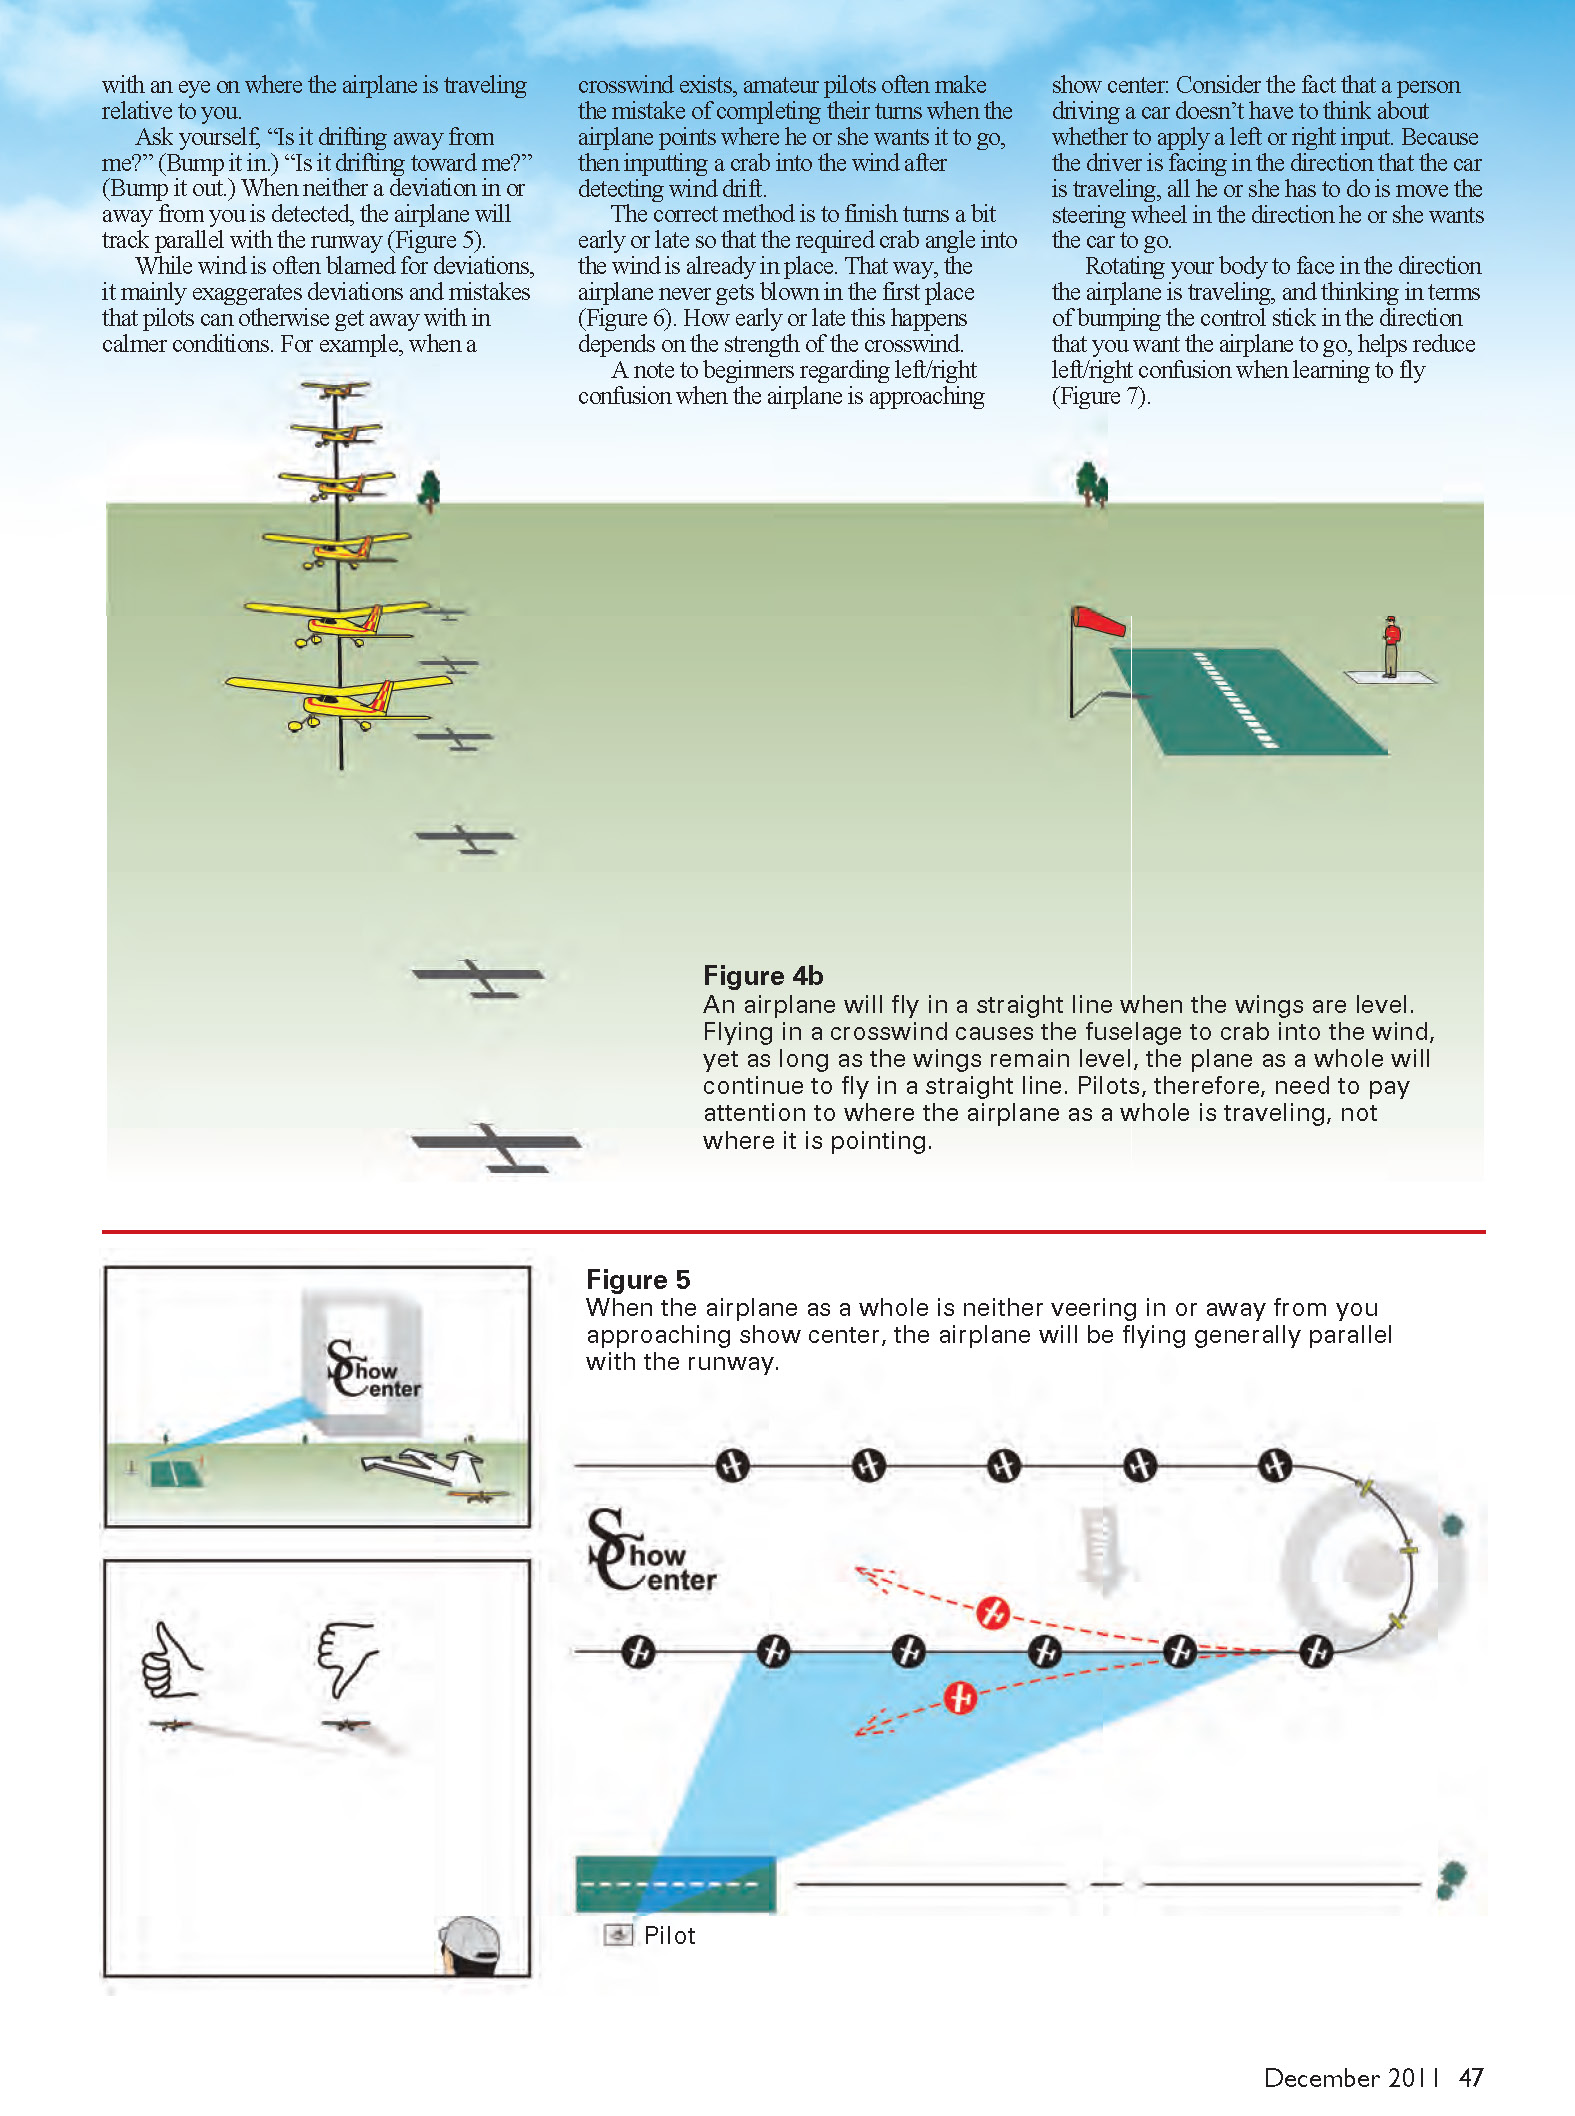
As a rule, an airplane will fly in a straight line whenever the wings are level. When a crosswind exists, the airplane will crab (point) into the wind a bit, but as long as the wings remain level it will continue to track straight.
From the ground, the position of the wings can be difficult to judge. Rather than relying on wing or fuselage position, proficient pilots concentrate on where the airplane is traveling (Figures 4a and 4b).
It is easy to see deviations when guiding the airplane as a whole toward a distinct target on the horizon. Early detection of deviations from parallel, after turning around, is accomplished with an eye on where the airplane is traveling relative to you.
Ask yourself, "Is it drifting away from me?" (Bump it in.) "Is it drifting toward me?" (Bump it out.) When neither a deviation away from nor toward you is detected, the airplane will track parallel with the runway (Figure 5).
While wind is often blamed for deviations, it mainly exaggerates deviations and mistakes that pilots can otherwise get away with in calmer conditions. For example, when a crosswind exists, amateur pilots often make the mistake of completing their turns when the airplane points where they want it to go, then inputting a crab into the wind after detecting wind drift.
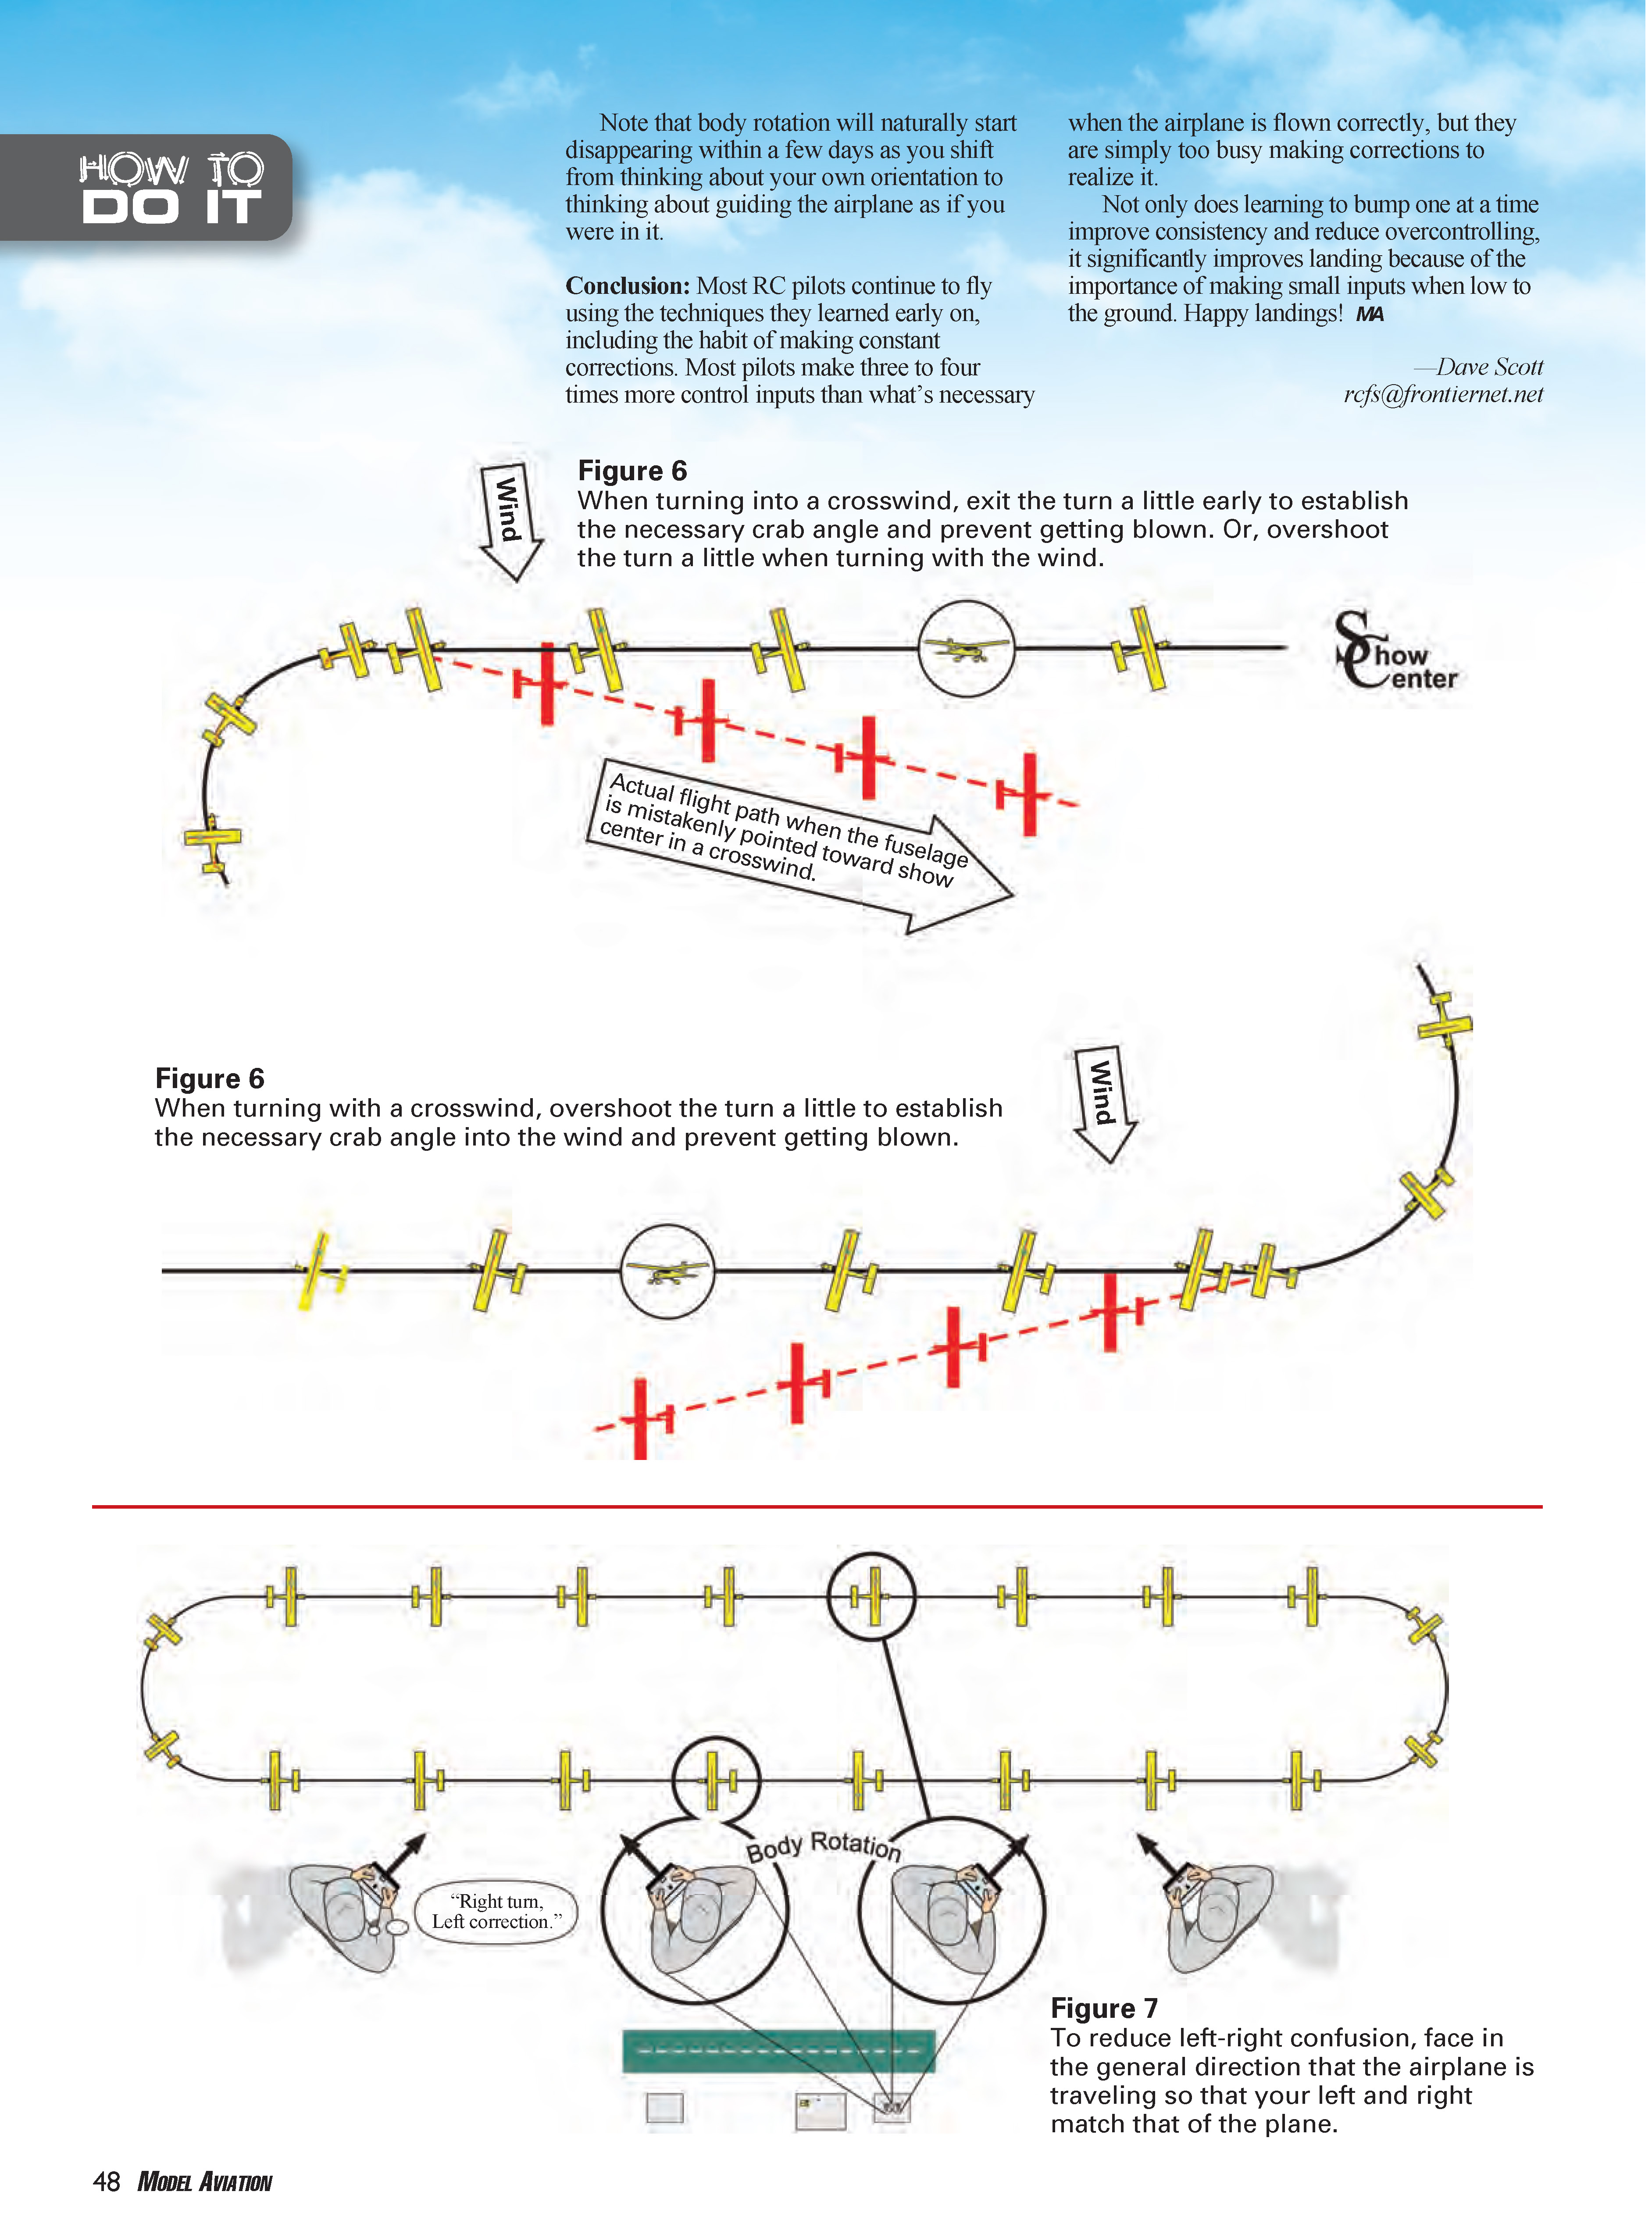
The correct method is to finish turns a bit early or late so that the required crab angle into the wind is already in place. That way, the airplane never gets blown in the first place (Figure 6). How early or late this happens depends on the strength of the crosswind.
A note to beginners regarding left/right confusion when the airplane is approaching show center: consider that a person driving a car doesn't have to think about whether to apply a left or right input. Because the driver faces the direction the car is traveling, all they have to do is move the steering wheel in the direction they want the car to go.
Rotate your body to face the direction the airplane is traveling, and think in terms of bumping the control stick in the direction you want the airplane to go. This helps reduce left/right confusion when learning to fly (Figure 7). Note that body rotation will naturally start disappearing within a few days as you shift from thinking about your own orientation to thinking about guiding the airplane as if you were in it.
Conclusion
Most RC pilots continue to fly using the techniques they learned early on, including the habit of making constant corrections. Many pilots make three to four times more control inputs than necessary when the airplane is flown correctly, but they are simply too busy making corrections to realize it.
Learning to bump one input at a time improves consistency and reduces overcontrolling. It also significantly improves landings because small inputs are especially important when low to the ground. Happy landings!
ABOUT THE AUTHOR
Dave Scott is a winning full-scale aerobatic competitor, founder of 1st U.S. R/C Flight School, and author of several RC flight-training manuals. His books and articles feature accelerated training techniques that he developed while instructing more than 1,300 pilots during his school's four- and five-day courses.
Dave is best known for teaching pilots to control what the airplane does instead of reacting to it, and for presenting each lesson in a logical "crawl, walk, run" format that makes learning easier and more fun.
More information about his books and flight school can be found at www.rcflightschool.com.
—Dave Scott [email protected]
Transcribed from original scans by AI. Minor OCR errors may remain.

