
A fun weekend with Civil Air Patrol Cadets
Dean Pappas | [email protected]
IF IT FLIES, I'm interested in it! Sometimes it's easy to forget that fliers in other corners of the far-flung model-airplane galaxy are having a blast all the time because there just aren't enough hours in a day for me to try all the things that sound like fun. I wonder about others, though.
I can remember driving to a contest at 5 a.m. just a few Saturdays ago; there were very few of us on the road at that hour, and driving along I found myself thinking, "If these people aren't going to a model-airplane contest, then what on earth are they doing on the road at this hour?" I'll cut the fishermen out there a break, but at dark-thirty on a weekend morning it was obvious that this model-airplane thing must be special. Normal people probably think we toy-airplane types are special too!
The first thing that occurs to people who are involved in an activity they think is the greatest thing since sliced bread is to show it off and then try to convert the world. This bit of understandable psychology is a perfect mate to the part of AMA's mission statement that describes how we are organized, in part, to promote and educate with regard to aeromodeling activities. You can find the mission statement by clicking on the "About AMA" tab on the Academy's web site.
I had the good fortune to be included in such an event recently. AMA and the Civil Air Patrol (CAP) have jointly created a pilot program of model-flying-instruction weekends. The youngsters—I mean Cadets!—under the command of Captain Ulric Gordon-Lewis were on a weekend-long camp that was ambitiously aimed at getting them soloed in one weekend. It was an audacious plan, and several shifts of us instructors barely managed to keep up with these young men for two full days of training flights.
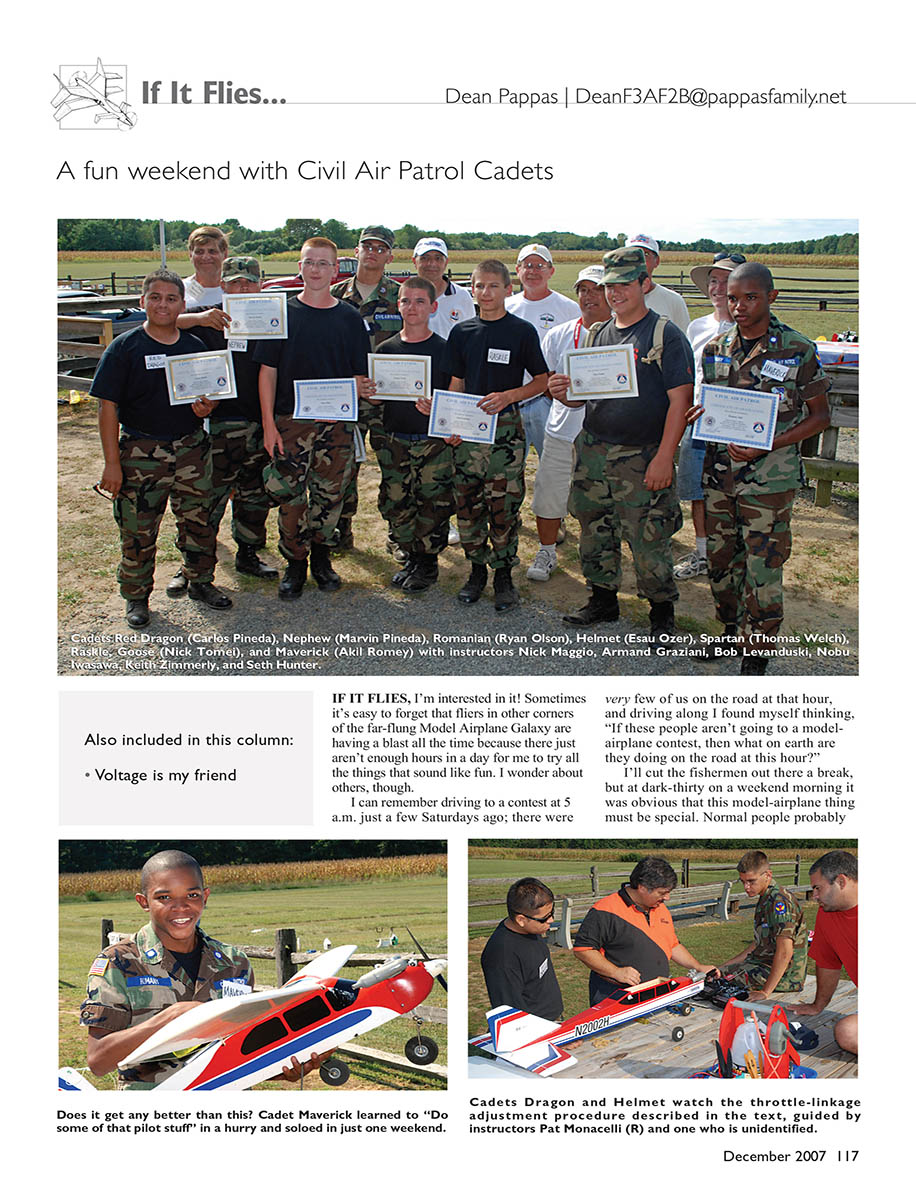
The Cadets' energy and enthusiasm were almost boundless. They slept when they got home; after all, they are young! This column includes a photo of the entire group of Cadets and a caption that includes their names and call signs. Yes, call signs! There was even a Goose and a Maverick in the group. Wait a minute—didn't Goose die in Top Gun? I'll bet the young man in question didn't think that through. Many of us went all weekend without learning the Cadets' real names. But for a weekend steeped in fighter-pilot training (the course included some basic aerobatics), call signs were better than mere names.
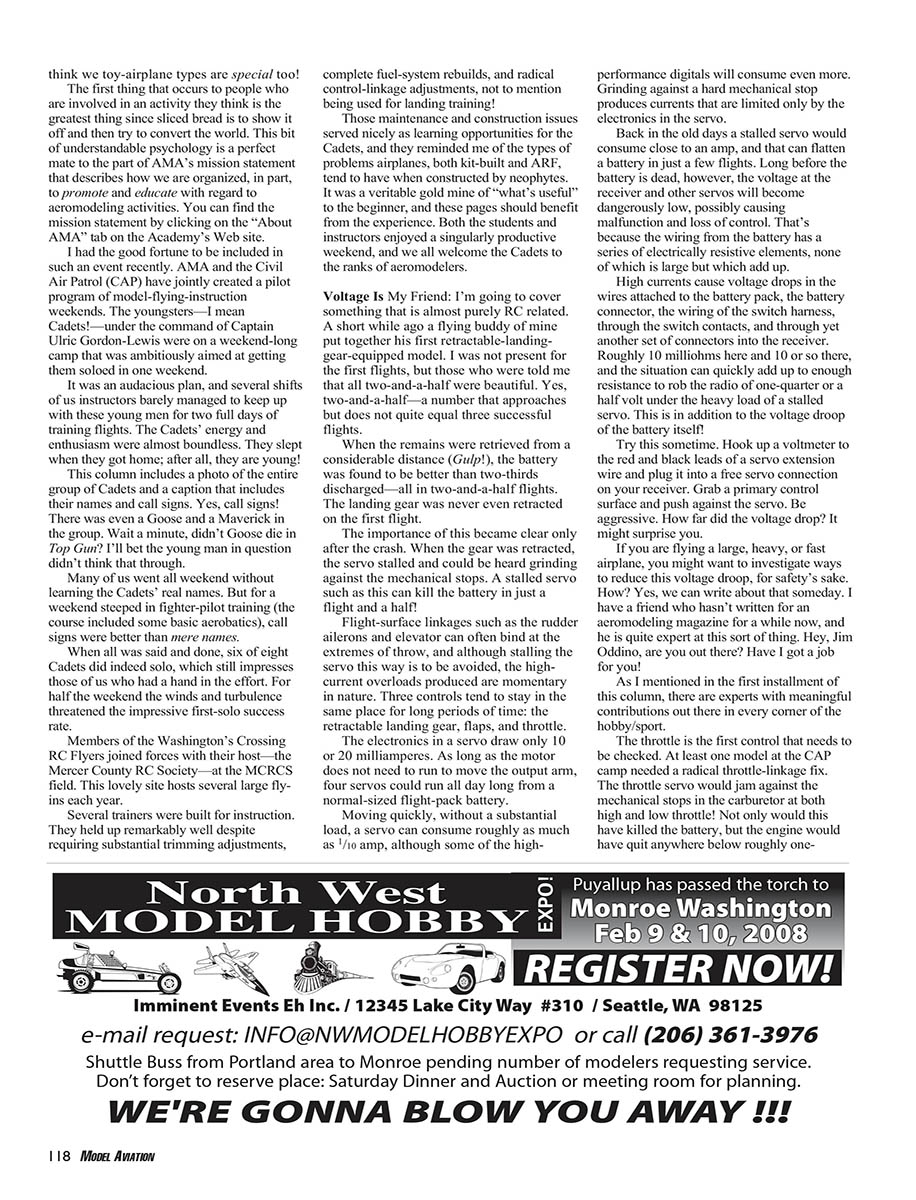
When all was said and done, six of eight Cadets did indeed solo, which still impresses those of us who had a hand in the effort. For half the weekend the winds and turbulence threatened the impressive first-solo success rate.
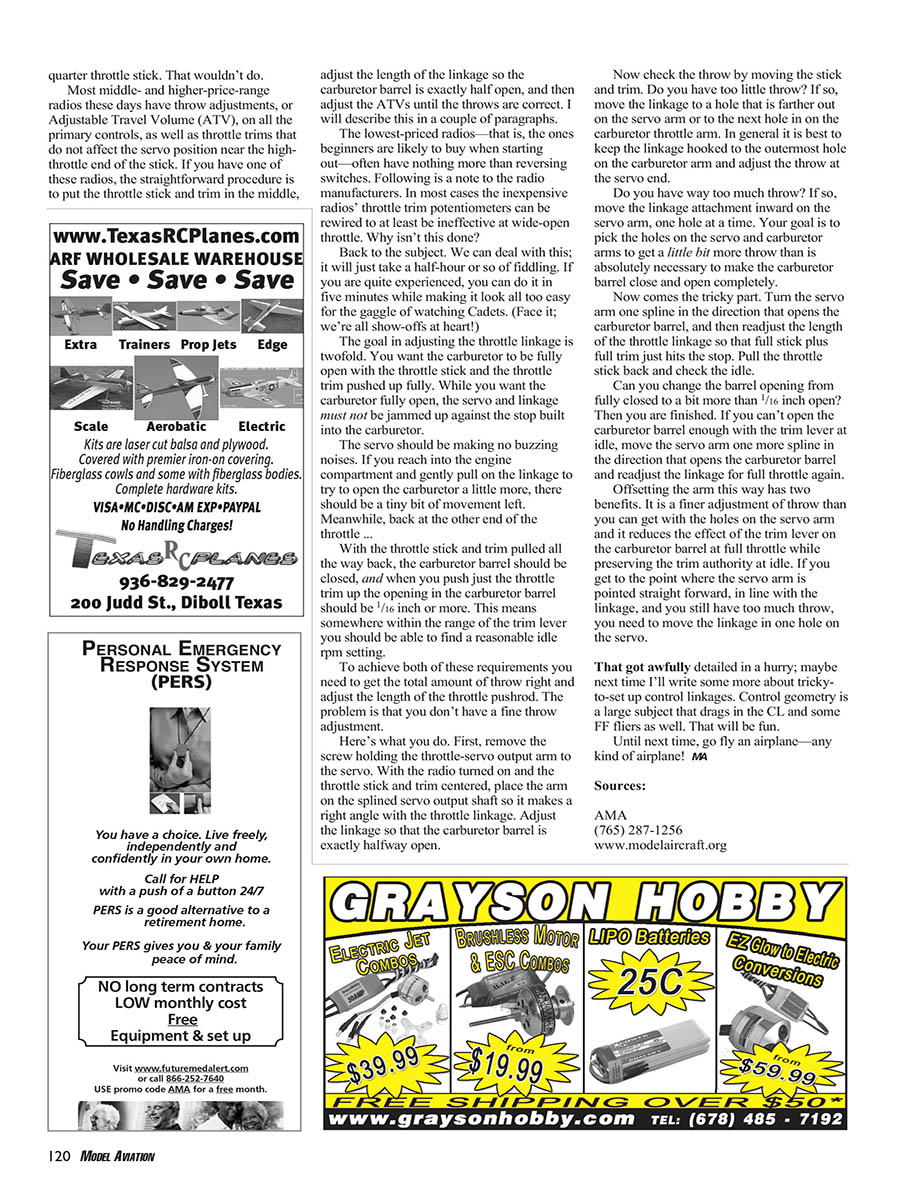
Members of the Washington's Crossing RC Flyers joined forces with their host—the Mercer County RC Society—at the MCRCS field. This lovely site hosts several large fly-ins each year. Several trainers were built for instruction. They held up remarkably well despite requiring substantial trimming adjustments, complete fuel-system rebuilds, and radical control-linkage adjustments, not to mention being used for landing training!
Those maintenance and construction issues served nicely as learning opportunities for the Cadets, and they reminded me of the types of problems airplanes, both kit-built and ARF, tend to have when constructed by neophytes. It was a veritable gold mine of "what's useful" to the beginner, and these experiences should benefit readers. Both the students and the instructors enjoyed a singularly productive weekend, and we all welcome the Cadets to the ranks of aeromodelers.
Voltage Is My Friend:
I'm going to cover something that is almost purely RC related. A short while ago a flying buddy of mine put together his first retractable-landing-gear-equipped model. I was not present for the first flights, but those who were told me that all two-and-a-half were beautiful. Yes, two-and-a-half — a number that approaches but does not quite equal three successful flights.
When the remains were retrieved from a considerable distance (gulp!), the battery was found to be better than two-thirds discharged — all in two-and-a-half flights. The landing gear was never even retracted on the first flight.
The importance of this became clear only after the crash. When the gear was retracted, the servo stalled and could be heard grinding against the mechanical stops. A stalled servo such as this can kill the battery in just a flight and a half!
Flight-surface linkages such as the rudder, ailerons, and elevator can often bind at the extremes of throw, and although stalling the servo this way is to be avoided, the high-current overloads produced are momentary in nature. Three controls tend to stay in the same place for long periods of time: the retractable landing gear, flaps, and throttle.
The electronics in a servo draw only 10 to 20 milliamperes. As long as the motor does not need to run to move the output arm, four servos could run all day long from a normal-sized flight-pack battery. Moving quickly, without a substantial load, a servo can consume roughly as much as 0.1 amp, although some of the high-performance digitals will consume even more. Grinding against a hard mechanical stop produces currents that are limited only by the electronics in the servo.
Back in the old days a stalled servo would consume close to an amp, and that can flatten a battery in just a few flights. Long before the battery is dead, however, the voltage at the receiver and other servos will become dangerously low, possibly causing malfunction and loss of control. That's because the wiring from the battery has a series of resistive elements, none of which is large but which add up.
High currents cause voltage drops in the wires attached to the battery pack, the battery connector, the wiring of the switch harness, through the switch contacts, and through yet another set of connectors into the receiver. Roughly 10 milliohms here and 10 or so there, and the situation can quickly add up to enough resistance to rob the radio of one-quarter or a half volt under the heavy load of a stalled servo. This is in addition to the voltage drop of the battery itself!
Try this sometime: hook up a voltmeter to the red and black leads of a servo extension wire and plug it into a free servo connection on your receiver. Grab a primary control surface and push against the servo. Be aggressive. How far did the voltage drop? It might surprise you.
If you are flying a large, heavy, or fast airplane, you might want to investigate ways to reduce this voltage drop, for safety's sake. How? Yes, we can write about that someday. I have a friend who hasn't written for an aeromodeling magazine for a while now, and he is quite expert at this sort of thing. Hey, Jim Oddino, are you out there? Have I got a job for you!
As I mentioned in the first installment of this column, there are experts with meaningful contributions out there in every corner of the hobby/sport.
The throttle is the first control that needs to be checked. At least one model at the CAP camp needed a radical throttle-linkage fix. The throttle servo would jam against the mechanical stops in the carburetor at both high and low throttle! Not only would this have killed the battery, but the engine would have quit anywhere below roughly one-half throttle — at about quarter-throttle stick. That wouldn't do.
Most mid- and higher-price-range radios these days have two throw adjustments, or Adjustable Travel Volume (ATV), on all the primary controls, as well as throttle trims that do not affect the servo position near the high-throttle end of the stick. If you have one of these radios, the straightforward procedure is to put the throttle stick and trim in the middle, adjust the length of the linkage so the carburetor barrel is exactly half open, and then adjust the ATVs until the throws are correct.
The lowest-priced radios—the ones beginners are likely to buy when starting out—often have nothing more than reversing switches. A note to the radio manufacturers: in most cases the inexpensive radios' throttle-trim potentiometers can be rewired to at least be effective at wide-open throttle. Why isn't this done?
Back to the subject. We can deal with this: it will just take a half-hour or so of fiddling. If you are quite experienced, you can do it in five minutes while making it look all too easy for the gaggle of watching Cadets. (Face it; we're all show-offs at heart!)
The goal in adjusting the throttle linkage is twofold:
- You want the carburetor to be fully open with the throttle stick and the throttle trim pushed up fully.
- While the carburetor must be fully open at full throttle, the servo and linkage must not be jammed against the stop built into the carburetor.
The servo should be making no buzzing noises. If you reach into the engine compartment and gently pull on the linkage to try to open the carburetor a little more, there should be a tiny bit of movement there. Meanwhile, with the throttle stick and trim pulled all the way back, the carburetor barrel should be closed, and when you push just the throttle trim up the opening in the carburetor barrel should be 1/16 inch or more. This means somewhere within the range of the trim lever you should be able to find a reasonable idle rpm setting.
To achieve both of these requirements you need to get the total amount of throw right and adjust the length of the throttle pushrod. The problem is that you don't have a fine throw adjustment. Here's what you do:
- Remove the screw holding the throttle-servo output arm to the servo.
- Turn the radio on and center the throttle stick and trim.
- Place the arm on the splined servo output shaft so it makes a right angle with the throttle linkage.
- Adjust the linkage so that the carburetor barrel is exactly halfway open.
- Move the stick and trim to check the throw:
- If you have too little throw, move the linkage to a hole that is farther out on the servo arm or to the next hole in the carburetor throttle arm. In general it is best to keep the linkage hooked to the outermost hole on the carburetor arm and adjust the throw at the servo end.
- If you have too much throw, move the linkage attachment inward on the servo arm, one hole at a time. Your goal is to pick the holes on the servo and carburetor arms to get a little bit more throw than absolutely necessary to make the carburetor barrel close and open completely.
- Now turn the servo arm one spline in the direction that opens the carburetor barrel, and then readjust the length of the throttle linkage so that full trim just hits the stop.
- Pull the throttle stick back and check the idle. Can you change the barrel opening from fully closed to a bit more than 1/16 inch open? If yes, you are finished.
- If you can't open the carburetor barrel enough with the trim lever at idle, move the servo arm one more spline in the direction that opens the carburetor barrel and readjust the linkage for full throttle again.
Offsetting the arm this way has two benefits: it provides a finer adjustment of throw than you can get with the holes on the servo arm, and it reduces the effect of the trim lever on the carburetor barrel at full throttle while preserving trim authority at idle. If you get to the point where the servo arm is pointed straight forward, in line with the linkage, and you still have too much throw, you need to move the linkage in one hole on the servo.
That got awfully detailed in a hurry; maybe next time I'll write some more about tricky-to-set-up control linkages. Control geometry is a large subject that drags in the CL and some FF fliers as well. That will be fun.
Until next time, go fly an airplane—any kind of airplane!
MA
Sources:
- AMA
- (765) 287-1256
- www.modelaircraft.org
Transcribed from original scans by AI. Minor OCR errors may remain.

