
How to be a model aircraft test pilot
Also included in this column:
- Understanding roll problems
- Proverse and adverse yaw
- Use aileron differential correctly
Hi, gang. It’s time to get back to what I described several months ago as our Walter Mitty urge to become a test pilot. Aeromodeling can, if you let it, fully engage the thrill of being a test pilot: taking up a radical new prototype for the first time.
You don’t need the silk scarf and helmet or the “pocketa-pocketa-queep” of the engine in the background. All you need to do is design and create it yourself. Then all that excitement (and nervousness!) can be yours.
For many of us, the thrill and nervousness of test-flying a new airplane is there even though the designs we fly come from proven kits. What you do for the first 20 or so flights with your new model is similar to what most full-scale test pilots do. They repeatedly check the airplane in a methodical manner to evaluate whether or not it could be improved by making a small change.
A few months ago, the subject was downthrust and flight-testing you do to adjust it properly. Before that, I wrote about the same topic for right thrust and the “cross-trim” problem.
I spent a fair bit of the last year covering pitch stability and what goes into fore and aft balance-point location. Although I went into detail about the effect that CG placement has on stability, I did not write much about flight-testing. I’ll fix that in these next few months.
Testing and Adjusting a Model’s Roll Control
I don’t think it’s an exaggeration that nearly half of the airplanes sitting on the flightline at the field on a sunny Sunday afternoon could be substantially improved by a few adjustments to the ailerons.
Getting solid aileron control at all flyable airspeeds is not always trivial. Many years ago, I remember an airplane of my dad’s that would roll the wrong way with aileron control if it were near stall, as in a steep climb after takeoff.
Does anybody out there remember a design called the “Regulas”? I think it was an old Royal kit. If you put the nose down and gained a bit of speed, everything worked normally. As I remember, one of our more experienced clubmates fixed the problem with some tape stretched across the aileron hinge gap.
Many airplanes have what is called “adverse yaw” at low speeds and high angles of attack. This messes up clean roll control where it counts most: during takeoff and landing.
Combine this with poor right-thrust adjustment, and your aircraft turns left over the pits and spectators on takeoff, even though you have gobs of right aileron control cranked in. Sound familiar? I’ll bet!
I have heard about and seen all kinds of cures for this problem, including packing up and going home when the wind blows in the wrong direction down the runway. But the two primary causes are inadequate right thrust and severe adverse yaw with aileron application.
What is adverse yaw? Let’s say your model is climbing steeply, just after takeoff, and you push right aileron to start a turn. The left aileron goes down, lifting the left wing, and the right aileron goes up, dropping the right wing.
That’s what’s supposed to happen. Lifting is work, and even though wingtips aren’t that heavy, to bank to the right we are asking the left wing to do more work and the right wing to do less work.
The energy needed to do this work comes from the creation of drag. It means that the left wingtip, which is being raised, creates more drag than the right wing, which is being lowered. That drag imbalance tries to yaw the airplane—but in the wrong direction.
This problem is fundamental. Its cause is buried in the physics of flight, and we must deal with it.
There are three ways to take care of this. The first is piloting technique. We can, and ought to, do as the full-scale pilots do: use rudder with aileron all the time. It’s called coordinated aileron and rudder, and it is a basic flying skill.
Most RC pilots would do well to develop the skill of flying coordinated aileron and rudder, but good airplane setup can alleviate the worst of the problem immediately.
Clearly asking for coordinated rudder use would be asking too much of the student RC pilot, but a dedicated teacher would be doing his or her students the greatest favor by teaching it from the beginning.
The second thing we can do is couple the ailerons into the rudder, using the control-coupling features found in many, but not all, radios. This is simply asking the radio to do, for you, what the full-scale pilots do. You can do this mechanically too, though you’ll hardly ever see it.
If you fly Scale, you will probably want to make sure that your next radio has control coupling. There are also add-on control mixers available for a moderate price, such as the Futaba MSA-10 and the JR MatchBox.
Full aileron throw typically requires only approximately one-quarter rudder or less. I will use the Dutch roll test to check and adjust the amount of coupling needed.
The third, and most commonly used, method is aileron differential. Some coordinated rudder might be necessary during the steepest climbs, but with most airplanes it’s fairly easy to find a differential setting that works well enough throughout the entire flight.
What is this aileron differential? It’s simple to describe but requires effort to set up.
When you move the aileron stick, the aileron that goes up must travel farther, in degrees, than the aileron that goes down.
This is true with both left and right aileron throw. The trick is to offset the linkages in clever ways to achieve this.
Modern radios also allow for this to be programmed, provided that you use a separate servo for each aileron. The add-on mixers I mentioned could also be used for this if you have a radio without that feature.
Let’s go flying to see if and how much adverse yaw I have. I’ll keep adjusting until the problem goes away, using the Dutch roll test.
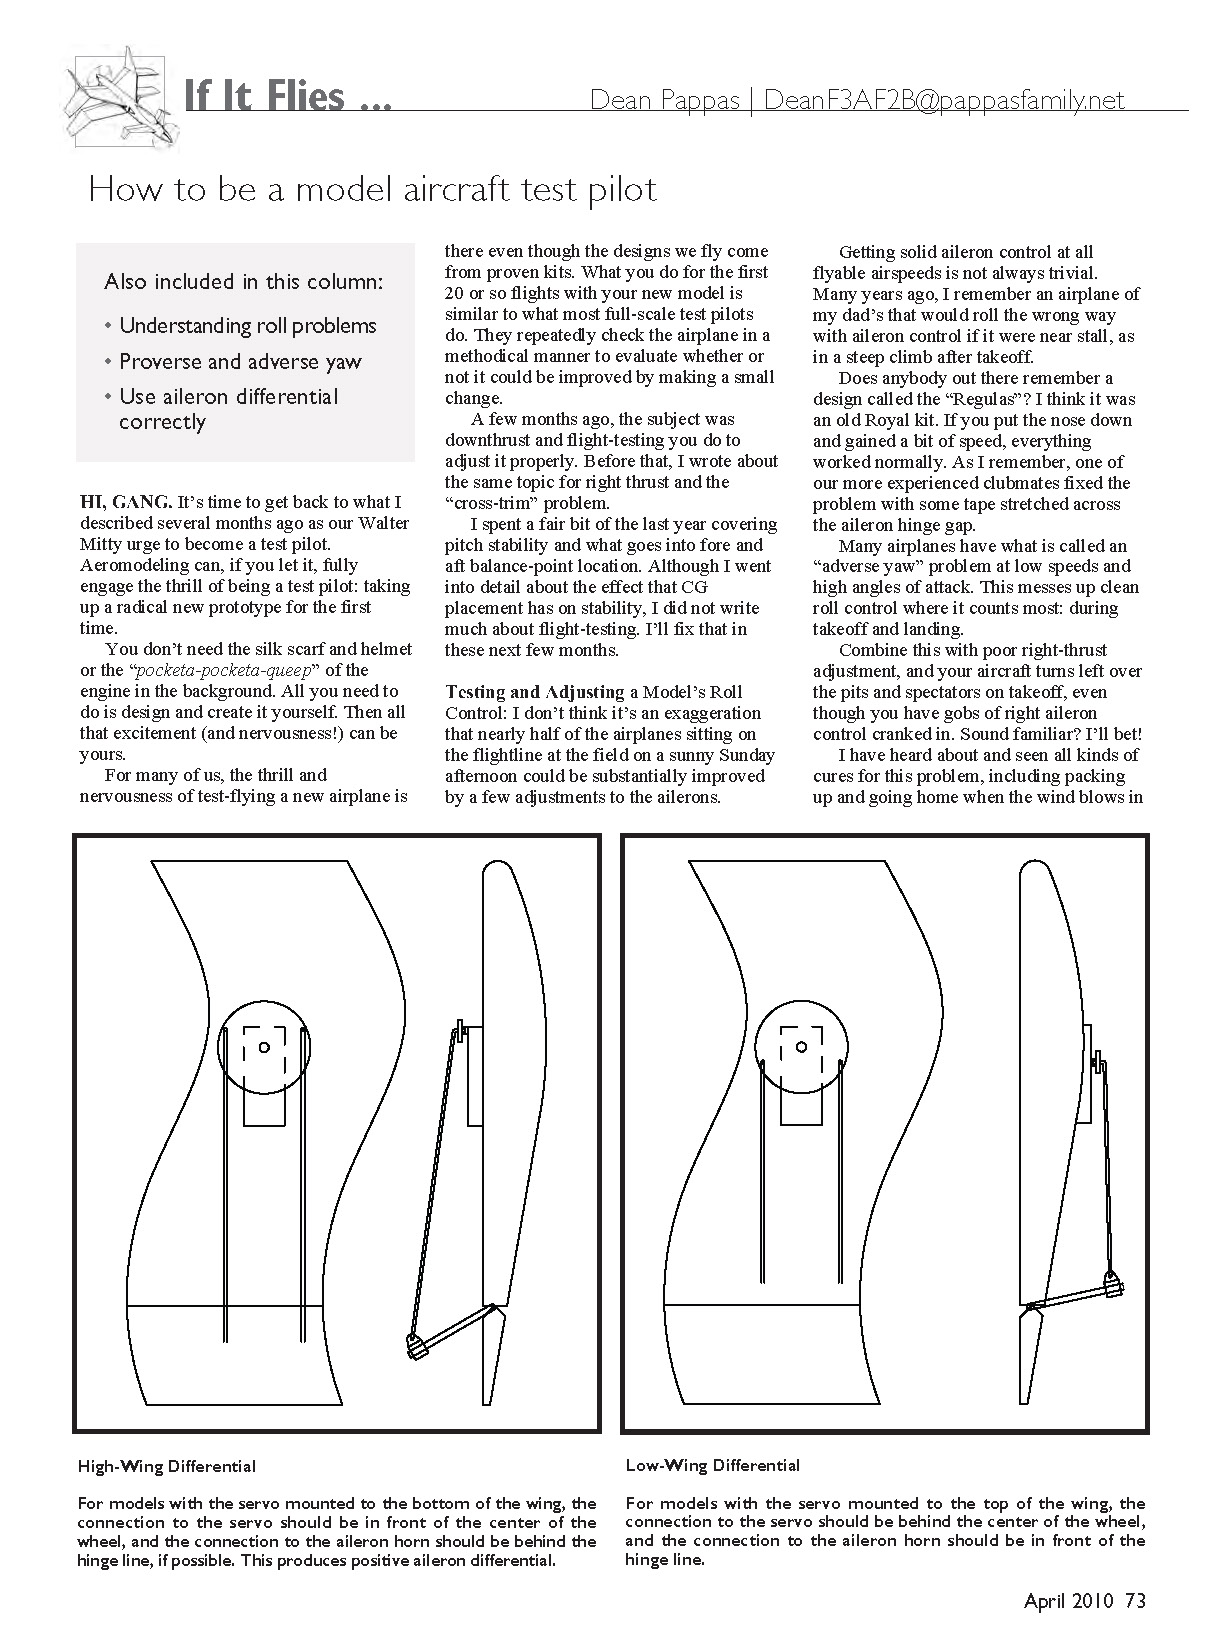
High-Wing Differential
For models with the servo mounted to the bottom of the wing, the connection to the servo should be in front of the center of the wheel, and the connection to the aileron horn should be behind the hinge line, if possible. This produces positive aileron differential.
Low-Wing Differential
For models with the servo mounted to the top of the wing, the connection to the servo should be behind the center of the wheel, and the connection to the aileron horn should be in front of the hinge line.
At the Field: Let’s look at the Dutch Roll method
This test is also a flying skill builder.
Fly a straight line away from yourself, at a safe but low altitude. Then smoothly, but quickly, rock the aileron stick back and forth, so that the model banks 45° one way and then the other way. Use as much aileron throw as you can, while comfortably keeping up with the airplane. Ideally, the rhythm will be roughly a half second in one direction and the same in the other direction. One of three things will happen.
In the first case, the aircraft will roll back and forth and the tail will point straight at you and not wiggle at all. The airplane will appear to roll as if on a string. This means that the differential is perfect for level flight.
In the second case we see adverse yaw. That’s what we expect because of the physics of flight. The model “duckwalks,” meaning that as it rolls right, the tail wiggles right. Then as it rolls left, the tail wiggles left.
That indicates that the nose is going in the direction opposite the roll. This means you need to add differential and/or more aileron-into-rudder coupling.
Proverse yaw seldom happens. It's where the nose wiggles the same way as the bank. You'll see the tail swing out of the Dutch roll in what looks like the beginning of a snap roll.
If you are interested in aerobatics, this is bad; but it is perfectly acceptable for training. It adds controllability during all positive-G flight.
A moderate amount of proverse yaw actually helps make a stable model such as a trainer more controllable. If you want to get rid of proverse yaw, you must reduce the differential or the aileron-into-rudder coupling.
Adverse yaw is worst at low airspeeds and high angles of attack, such as in a climb. You'll want to repeat the Dutch roll test in a climb, pointed directly away from you. Put the model in the steepest climb angle you normally expect to use. The corrective actions are the same as with the level-flight Dutch roll test.
If you fly heavy, slow, or short-tailed Scale airplanes, you will benefit tremendously from optimizing their differential for the takeoff climb out. This is because good roll authority, especially to the right, is necessary to help counteract torque during takeoff and climbout. It would help to revisit the right-thrust discussion in the December 2009 "If It Flies ..." column.
Sometimes the climbing differential test will indicate that the airplane requires a great deal of differential. Rather than go crazy adjusting linkages, consider one of the following approaches:
- Learn to move the rudder stick in unison with the ailerons during takeoff and landing, when it is needed most.
- Use coupled aileron-into-rudder (CAR).
- Install two aileron servos, to get more differential adjustment. Don't be surprised if some airplanes need twice as much throw on the rising aileron as on the dropping one.
Mechanically Adjusting Aileron Differential
If your radio allows you to electronically adjust the differential, and uses separate aileron servos in each wing, ignore the next couple of paragraphs.
If your airplane has the servo(s) and control horns on the bottom of the wing, the proper differential happens if the aileron horns are behind the hinge line and/or the connections to the servo wheel are in front of the center of the wheel. This is typically the situation on a high-wing airplane.
If your aircraft has the servo(s) and control horns on top of the wing, the aileron horns need to be angled forward, and/or the connections to the servo wheel need to be behind the center of the wheel. This is usually the situation on a single-servo low-winger.
It's that simple. That's how you put in differential.
Since this requires a bit of shop time, you want to leave the workshop with the differential set to a good guess, for starters. Your typical low-wing sport model is usually happy when the rising aileron goes up close to 20% more than the other aileron goes down. All of these amounts are for throw angles, in degrees.
A high-wing trainer would like roughly two-to-one, but the mechanical method shown above will get you in the neighborhood of only one-and-a-half-to-one.
With high-wing strip aileron linkages, it is best that you use a fitting that does not move the clevis pin forward of the heavy-wire aileron horn. The plastic part that is included in most kits moves the clevis pin more than one-quarter of an inch forward of the bent-wire horn, and that produces backward differential.
Instead, use an ideal piece of hardware that both Nelson Hobby Specialties (Rocket City) and Sonic-Tronics make. These products place the clevis pin in the middle of the music-wire aileron horn. It is part SOT115 on the Sonic-Tronics web site.
The recommendation for how much differential to put into a trainer may seem to be a lot, but a full-scale Cessna 150 has a one-and-a-half-to-one differential; that is, the up-moving aileron moves 15° while the other aileron drops 10°. But a 150 still requires coordinated rudder to make it respond properly.
If you cannot put more differential into your model's linkages but think your high-wing airplane needs more, I have something for you to try. Most flat-bottom-airfoil trainers have more lift than they need and tend to float on landing. If that is so, lengthen both aileron linkages equally so that both ailerons are trailed up no more than 5°.
This will reduce adverse yaw a meaningful amount near neutral, and it will kill off some of that "float" feeling on landing. I do not recommend this for high-performance sport planes.
I've run out of space, but we will get together soon and continue our feet-on-the-ground test-pilot school. Until then, have fun, and do take care of yourself.
DP
Sources:
- Sonic-Tronics — (888) 721-0128
- http://sonictronics.com
Transcribed from original scans by AI. Minor OCR errors may remain.

