
Challenge the wind and win
Dean Pappas | [email protected]
Introduction
Hi, gang. Where I live, wind has dominated the weather these last few weeks. Around here it's called spring: a handful of gorgeous days interspersed with high winds and rain. It put some backyard lawn furniture into orbit and shattered the neighbor's glass-topped picnic table into his pool. Ouch!
Wind is part of the landscape, so get used to it. When the trees are bending, you might as well leave the airplane in the workshop or drive to the flying field, leave the model in the car, and join the hand-flying session. My club keeps a few kites in the maintenance shed, and they often come out on those too-windy-to-fly days.
Maybe you are so eager to fly that you consider risking your aircraft anyway. Hopefully, and I think this is the best-case scenario, you feel the fresh breeze in your face and look forward to the challenge it presents.
Yes, wind-flying is a challenge that offers the finest sense of accomplishment. A howling gale isn't required. Even a 5 or 10 mph crosswind will provide a nice challenge during landing.
Nailing a three-pointer in these conditions is worth more than 20 great landings in easy conditions—and your flying buddies notice. Simply flying figure eights above the runway and compensating for a considerable breeze so that all crossovers are in the same place will help you call the wind your friend.
There are three big challenges when flying in the wind. Landing is the biggest, despite the fact that taking off is the first one you'll face. Once in the air, planning your turns so your model ends up where you intended it to be will help create the impression of complete control.
Takeoff
Let's start with that takeoff. If the wind is blowing straight down the runway, things are going to be much easier than if there is a crosswind. But there are still precautions we should take to maintain positive control.
Airspeed is your friend. Repeat this newfound mantra to yourself several times.
Okay, now that this all-important principle is fresh in your mind, it's time to look at the nature of the wind itself. Sometimes it is steady, but that is the exception rather than the rule. The wind varies, sometimes suddenly, and it is wise to plan for these gusts.
If the wind suddenly dies off during takeoff, for a moment you will have that much less airspeed. The model will recover its normal climbing airspeed in a second or two, but if you were climbing steeply, that momentary loss of airspeed could lead to a partial loss of control or even a stall.
One hates to harp on the subject of safety, but takeoffs generally happen close to people, so any loss of good control authority during takeoff constitutes something of a safety hazard. I learned this the hard way when I was maybe 13.
It was the kind of day I described earlier in this column: windy, gusty, and almost directly down the runway. My trusty T-45, a great-flying 40-sized sport/RC Aerobatics (Pattern) aircraft that probably qualifies for one of the Nostalgia Pattern events these days, climbed steeply as I commanded as is only possible in such a headwind.
When only 40 or so feet from the ground, the wind stopped. The airplane stalled and immediately did a half snap roll, and then headed straight for the ground. The pullout would have been complete at minus 2 feet. The crash occurred on the runway, and some of the pieces came to rest not all that far from the other pilots' feet.
Sobered by the experience (after all, those feet belonged to my friends and they weren't too bashful to let me know that I had been stupid) and annoyed at losing a good aircraft at the beginning of the flying season, I went back to the workshop to build my third T-45.
So the first lesson is to keep plenty of airspeed immediately after takeoff and until you have plenty of altitude. That means full throttle and a moderate climb angle.
Crosswind technique
A crosswind adds another element to the task. Airspeed is still your friend, because it helps you maintain control. That control will help you preclude the wind from "getting under" the windward wingtip.
Once the wind has rolled a model such as the T-45, immediate correction is needed to prevent it from becoming a kite instead. Therefore, on days with a fair bit of crosswind you should begin the takeoff roll already holding the aileron control partway into the wind.
Keep the airplane straight on the runway with the rudder, as usual, so that the momentum of the aircraft is in the direction of the runway. Gradually reduce upwind aileron control so it is almost gone at the instant the model leaves the ground.
The airplane’s momentum will tend to keep it headed straight down the runway for a second or two afterward, and as long as the wings are level, the aircraft’s yaw stability will “weathervane” it so that it flies straight compared to the relative wind. Yes, the model will naturally assume the correct crab angle for climbout, provided it was headed straight just before liftoff and the wings are kept level (or briefly upwind wingtip low) throughout the process.
Some of you may have noticed that one thing not mentioned in the preceding is the idea of continuously holding rudder control into the wind. It’s not desirable and not helpful. The airplane flies best when it is flying coordinated; that is, neither slipping nor skidding sideways.
When an airplane is slipping or skidding, it is drag gier than normal and responds to changes in wind and airspeed in different and often undesirable ways. A good example is a snap roll resulting from a stall that occurs while the pilot is holding some rudder control.
There is one time when a sideslip is useful in crosswind conditions: during landing. I will go into that later, but a proper sideslipped crosswind landing is an advanced flying technique that few ever master.
Another useful technique is an intentional sideslip used to make the airplane drag gier, temporarily, so that altitude can be dumped without speeding up undesirably. Here, care and practice are needed to avoid the stall/snap roll/spin scenario that can result.
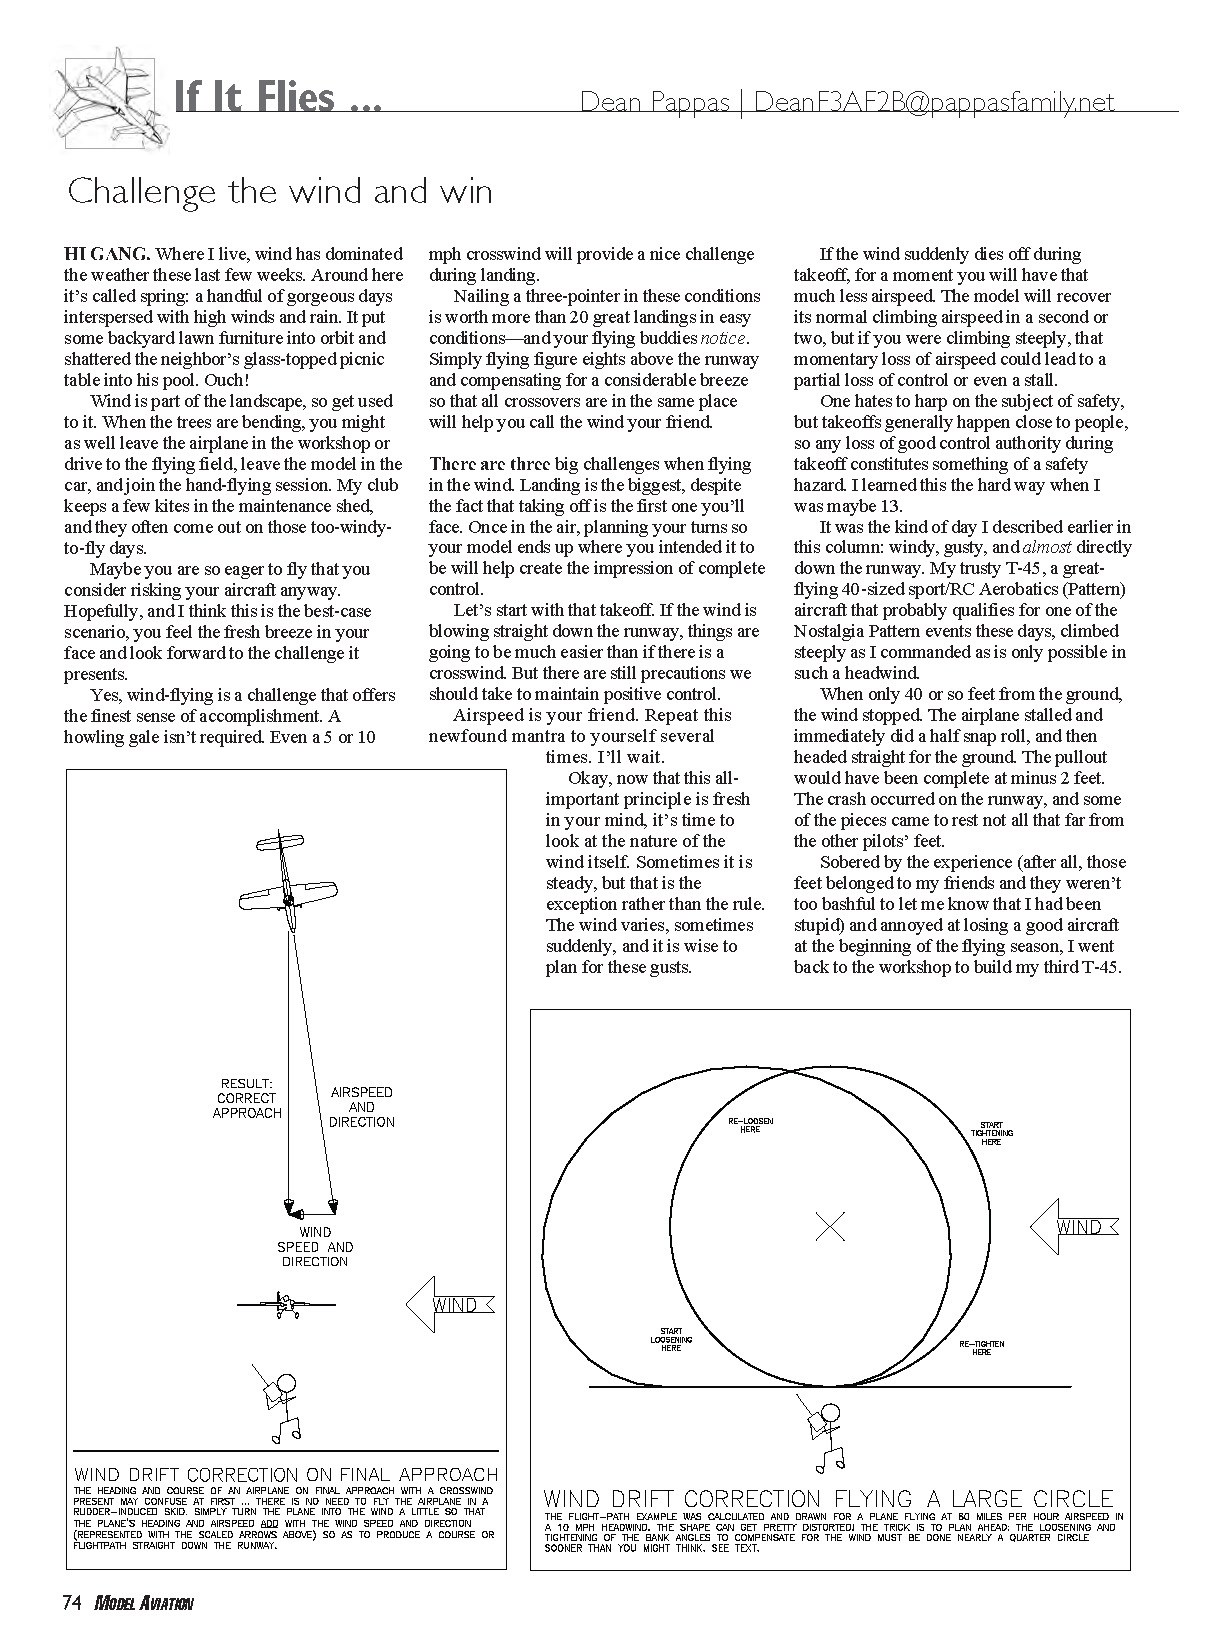
When taking off or landing, whether there is a crosswind or not, the general rule is to fly the airplane coordinated. Wind or no, if the model is drifting to one side as you try to fly along the runway, you don’t fix it by standing on the rudder or intentionally missetting the rudder trim; you turn the model until it’s headed the right way. That’s almost too obvious, isn’t it?
A few months ago, we spent a fair bit of time figuring out how to trim the ailerons and rudder so that the aircraft is flying straight and clean, so why mess that up? The trick is in the subtle difference between “pointed” and “headed.”
Did you ever row a boat across a river? The same is true when you are flying around. It helps to plan the exits of your turns; exit a few degrees early or late, so you can point the airplane into the sidewind a bit when the turn is done.
With a bit of practice you will learn to hit the angle close enough that the fine-correction turns will be hardly noticeable—just shallow, banked turns to nail those last few degrees.
Landing
Come to think of it, this is good preparation before setting up for landing on a windy day. Fly your approach at a comfortable flying-around altitude, with the intent of flying directly above the center of the runway. Finish the turn to the runway heading in your customary place, level the wings, and keep them level while carefully watching what develops. Does the model drift in toward the flightline or out away from it? How quickly can you detect it?
If the aircraft needs to be turned to get it headed in the right direction, don’t be shy about it. Execute a turn the way you always do: bank, pull, and level. The sooner you catch it, the more shallow-banked turn can be used to correct it before the airplane travels far in the wrong direction.
Ninety-nine percent of all crosswind landings with RC models are flown down the runway with the course correction(s) that counteract the effect of the crosswind. The important thing is to be alert and not allow a gust of wind to bank the aircraft downwind. If it is drifting with the wind, turn it toward the wind a little—okay, maybe a lot!
Once you feel like you have mastered this technique, it is time to add a refinement. As you are set to touchdown with the airplane, bank it slightly into the wind and straighten it to the runway with rudder input in the “with the wind” direction.
The goals are:
- To do this just enough that the wheels contact the ground rolling straight instead of scrubbing sideways on the runway.
- To do this so low to the ground that when you bank the aircraft into the wind, the upwind wheel touches down immediately.
That’s how most full-scale airliners are landed these days. That’s what works consistently and minimizes the beating that the airplane and landing gear would take from contacting the runway at an angle.
The advanced technique is closer to what is used when flying full-scale lightplanes. The “bank into the wind and rudder the airplane straight at the last moment” technique I described is exaggerated so that your model is flying banked into the wind for the last two or three seconds of the landing approach, while opposite rudder is used to keep the nose pointed directly along the runway.
Do it right and it looks great, but don’t be surprised by how ugly the first few attempts may look. Just remember not to let the wind get under the upwind wingtip.
Remember what I wrote about the desirability of a bit of extra airspeed after takeoff? It applies before landing too. A sudden gust or sudden lull in wind can wreak havoc close to the ground unless you have good roll control. If your model maintains good roll control authority down to as slow as it will fly, you might not need to carry much extra airspeed.
Practice exercises
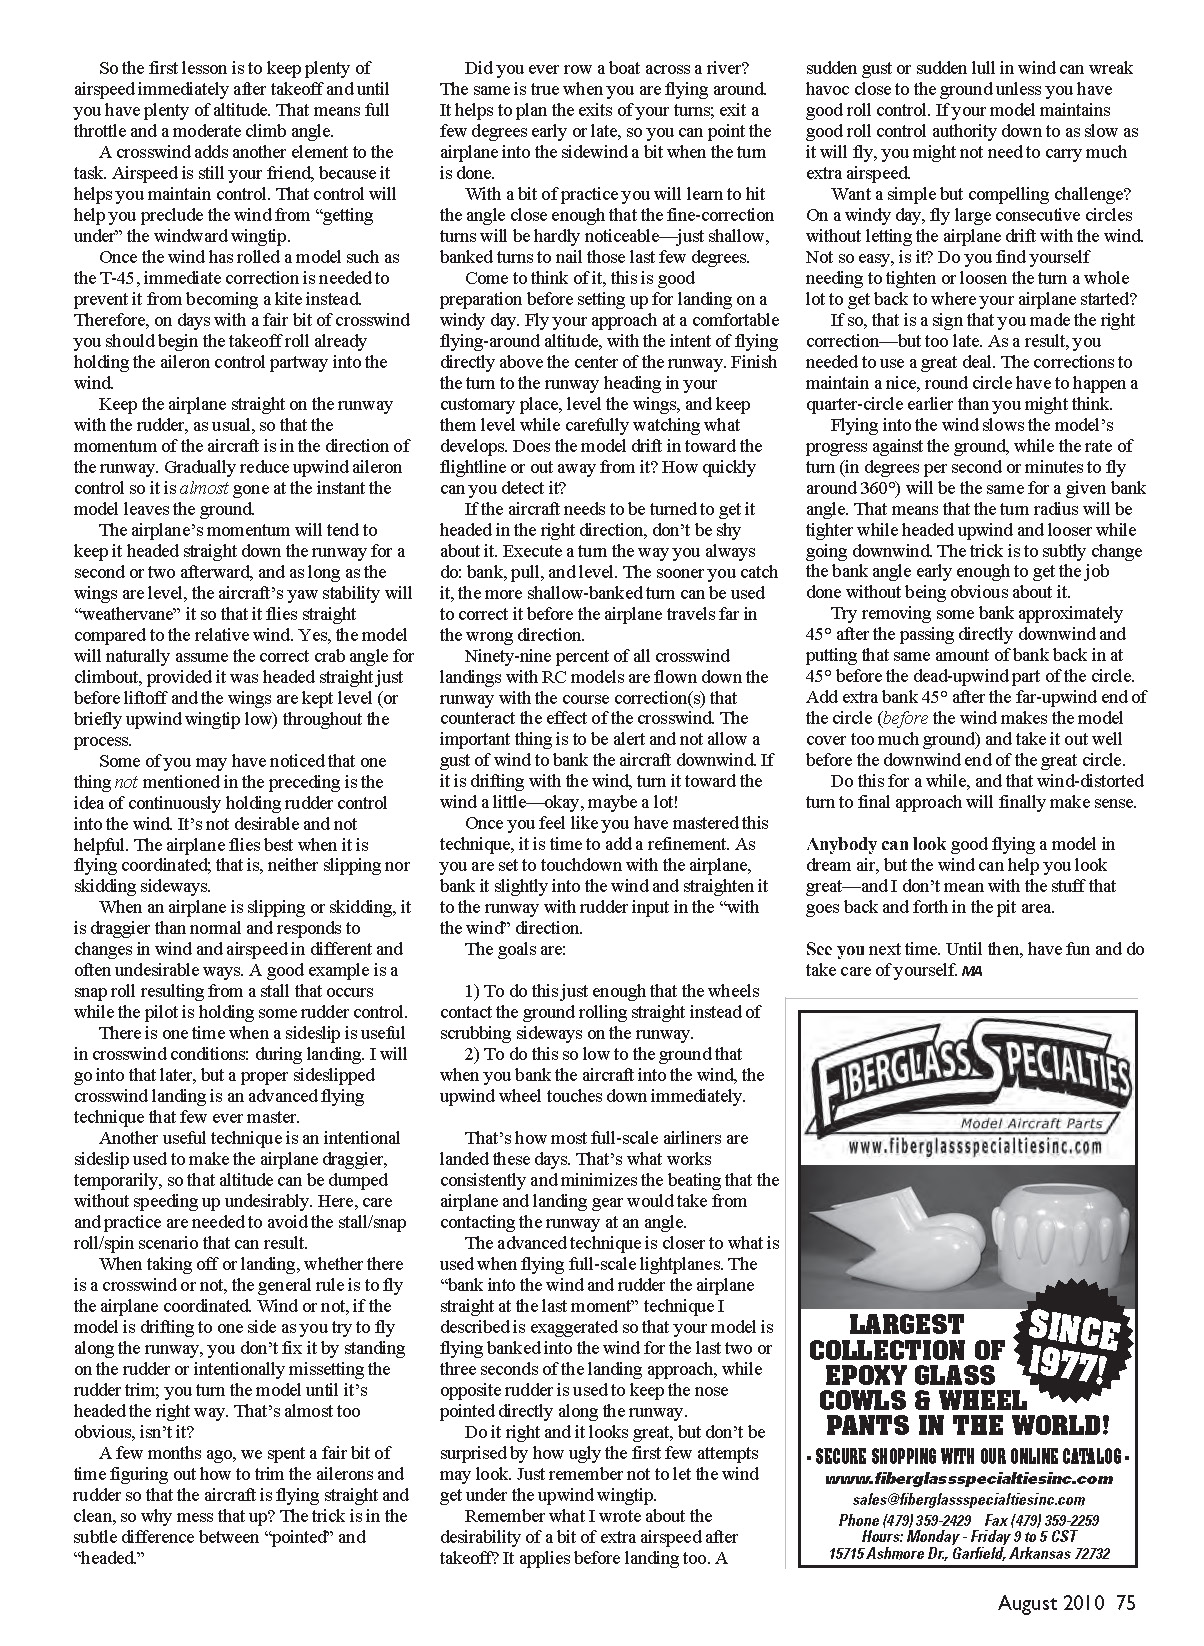
Want a simple but compelling challenge? On a windy day, fly large consecutive circles without letting the airplane drift with the wind. Not so easy, is it? Do you find yourself needing to tighten or loosen the turn a whole lot to get back to where your airplane started?
If so, that is a sign that you made the right correction—but too late. As a result, you needed to use a great deal. The corrections to maintain a nice, round circle have to happen a quarter-circle earlier than you might think.
Flying into the wind slows the model’s progress against the ground, while the rate of turn (in degrees per second or minutes to fly around 360°) will be the same for a given bank angle. That means that the turn radius will be tighter while headed upwind and looser while going downwind. The trick is to subtly change the bank angle early enough to get the job done without being obvious about it.
Try removing some bank approximately 45° after the passing directly downwind and putting that same amount of bank back in at 45° before the dead-upwind part of the circle. Add extra bank 45° after the far-upwind end of the circle (before the wind makes the model cover too much ground) and take it out well before the downwind end of the great circle.
Do this for a while, and that wind-distorted turn to final approach will finally make sense.
Conclusion
Anybody can look good flying a model in calm air, but the wind can help you look great—and I don’t mean with the stuff that goes back and forth in the pit area.
See you next time. Until then, have fun and do take care of yourself. MA
Transcribed from original scans by AI. Minor OCR errors may remain.

