


Introduction to Electric Power
Bob Aberle
At this point the series will begin to split off into the specialty areas of model aviation. Radio Control (RC), as noted in past months, takes up the major portion of interest. However, equally important to many modelers are non-RC aircraft such as Free Flight, Control Line, Hand‑Launched Gliders, rubber‑powered models, and more. As the months go by, this series will "spin off" into all of these fascinating areas.
From a primary‑power standpoint, the most popular for model aviation today involves glow‑fueled engines. To a lesser degree, but just as important, are gasoline‑fueled engines as employed in larger models (quarter scale and the like). The third power category is electric, and this has become increasingly popular in recent years because of many technological improvements in motors and batteries.
Guest‑author experts will soon be writing about glow and gasoline power. Electric has been my specialty for some years; it is the only power source I use today. Read on over the next few months as I explain electric power and take you through assembling, installing power in, and flying an electric‑powered model.
What is electric power? Electric power uses energy supplied from batteries to operate motors without the need for "wet" fuels. When referring to fueled power plants we call them engines; when referring to electric power we call them motors.
Why try electric power, especially as a beginner? Two primary advantages of electric power are that it is clean and quiet. It's clean in the sense that you will not end up with fuel residue on your model after each flight. It's also clean because there is no fuel to accidentally spill on the ground and contaminate the water table. Electric power is quiet — probably the loudest sound you will get from an electric installation is propeller or airflow noise. Quiet operation lets you fly in urban areas without disturbing the public; you can even fly at sunrise in calm conditions without worrying about waking neighbors.
There are more subtle advantages. Without a piston and connecting rod pounding away, there is little vibration. This is easier on your radio‑system components, which need little isolation or padding. Electric motors are basically turned on by a switch or controller: you don't have to prime, flip a propeller, use a starter motor, or light a glow plug. This easy starting feature is especially convenient in cold weather — you can warm up in the car while the battery recharges, then go out to fly. When finished, you simply put the aircraft in your vehicle; no cleaning is necessary. With no fuel to affect finishes, paint and covering choices are less constrained.
Are there disadvantages? Yes. When you apply electricity from the battery to the motor, it starts instantly. If you fail to recognize this, you might accidentally connect a battery, have the motor start, and have it hit you or take off across your shop, wrecking everything in its path. Most modern speed controllers include safety features to help prevent this; I will discuss them in a moment.
Is electric power better than glow‑fuel power? I have used both over the past 50 years (30 years with electrics). I think there will always be a place in our hobby for fueled engines. Many modelers enjoy the sound and the process of fueling, starting, and tuning an engine.
On the other hand, a beginner has a lot to learn in a short time. Problems with starting and operating a fueled engine can consume much of the available time while trying to learn to fly. If not adjusted properly, the engine may stop in flight. With electric power, the motor typically starts reliably and will keep running as long as the battery has charge. Yes, a wire could break or a fuse could blow, but the motor generally runs more reliably. As the battery charge wears down during a flight, the model will fly noticeably slower — a clear warning to set up for landing. For these reasons, electric power is often the perfect choice for a beginner.
There are many things to learn: battery charging, wiring and connectors, installation practices, and safety. Since this is a beginners' series, I will gradually bring you up to speed. My first choice for an electric‑powered ARF (Almost Ready‑to‑Fly) model will not require soldering. Each power‑system component will be "plug and play": radio and electric power installations are handled with preassembled connectors. An entire electric‑power component package (which I will describe) will be available from Kirk Massey of New Creations R/C.
What does an electric power system consist of? The basic components are the motor, the propeller and any adapter required to attach the propeller to the motor shaft, an Electronic Speed Control (ESC) to control the motor, the battery pack to supply the energy, and the charger to recharge the battery.
For an electric model you must install the motor, ESC, and battery inside the aircraft and integrate them into your onboard RC system. The radio operates the ESC, which in turn controls the motor's speed in flight.
Your biggest initial concern is understanding and correctly charging the battery. A battery that is not fully charged is like a fueled model with only a partial tank.
Motors
The electric motor itself is of primary importance. There are different types: simple permanent‑magnet motors; more sophisticated cobalt (samarium‑cobalt) magnet motors; and highly efficient, long‑lasting, expensive brushless motors.
After selecting the motor type, your next concern is sizing it so it is capable of flying a model of a particular weight. For this project the choice has been made for you.
Another consideration is whether to run the motor direct drive (propeller attached directly to the motor shaft) or through a gear‑reduction drive. A gear drive can allow you to fly heavier models and/or extend endurance compared to direct drive.
Since this is a beginners' article I've selected a basic ferrite motor generically known as a Speed 400. These come in three different windings designated by voltage. This project will use the 6‑volt winding. The motor can be obtained from many sources.
This size motor is capable of flying a model with a total flying weight of roughly 10–18 ounces. It can do this using a direct‑drive propeller, so for this first try we will not use a gear‑drive assembly. Be advised that a gear drive can let you fly heavier‑weight models and/or extend flying time compared to direct drive.
I chose direct drive to keep the system simple and inexpensive. A Speed 400 motor costs approximately $15. It is a sealed can. When you eventually burn out the brushes, you replace the motor.
The motor will have two terminals, which are polarized (positive and negative). Most have a red dot or mark indicating the positive terminal. For our beginner's package, wires have already been attached to each terminal. The connectors applied to the wire ends are the Anderson Power Pole (APP) variety. There are many popular connectors available, but APPs are well suited for this application and have been attached for you.
Almost any brushed electric motor will generate some electrical noise which could feed back into the RC system. To suppress brush noise, bypass capacitors are generally added: one capacitor from each terminal to the case (ground). In this case, the selected motor has the capacitors installed inside the motor can, so nothing else is necessary.
When you start your motor for the first time, the propeller wash should blow toward the rear of the model. If it blows forward, the motor polarity has been reversed and the propeller is turning the wrong direction. That should not happen in this instance since the work has been done for you. In the future, if propwash blows forward, reverse or swap the motor terminal connections.
The motor shaft protrudes from the front of the motor. Some direct‑drive propellers are simply pressed onto the motor shaft; I'm not in favor of that approach, so I specified a propeller adapter. The adapter slips onto the motor shaft; a collet‑type device clamps the shaft as you tighten the adapter. I found the adapter already installed on my motor shaft; you may find the same.
Once the adapter is in place, put on the propeller, followed by a propeller washer and then the nut. Tighten the nut and you are set. The propeller chosen for this project is a Gunther 5 x 4 white plastic. You will likely have to drill the center hole slightly to fit the propeller adapter.
Next month I'll write about how to install this motor on your aircraft.
Electronic Speed Control (ESC)
The ESC is probably the heart of the electric power system. The ESC in electric flight takes the place of the throttle (or engine) servo on a fueled model.
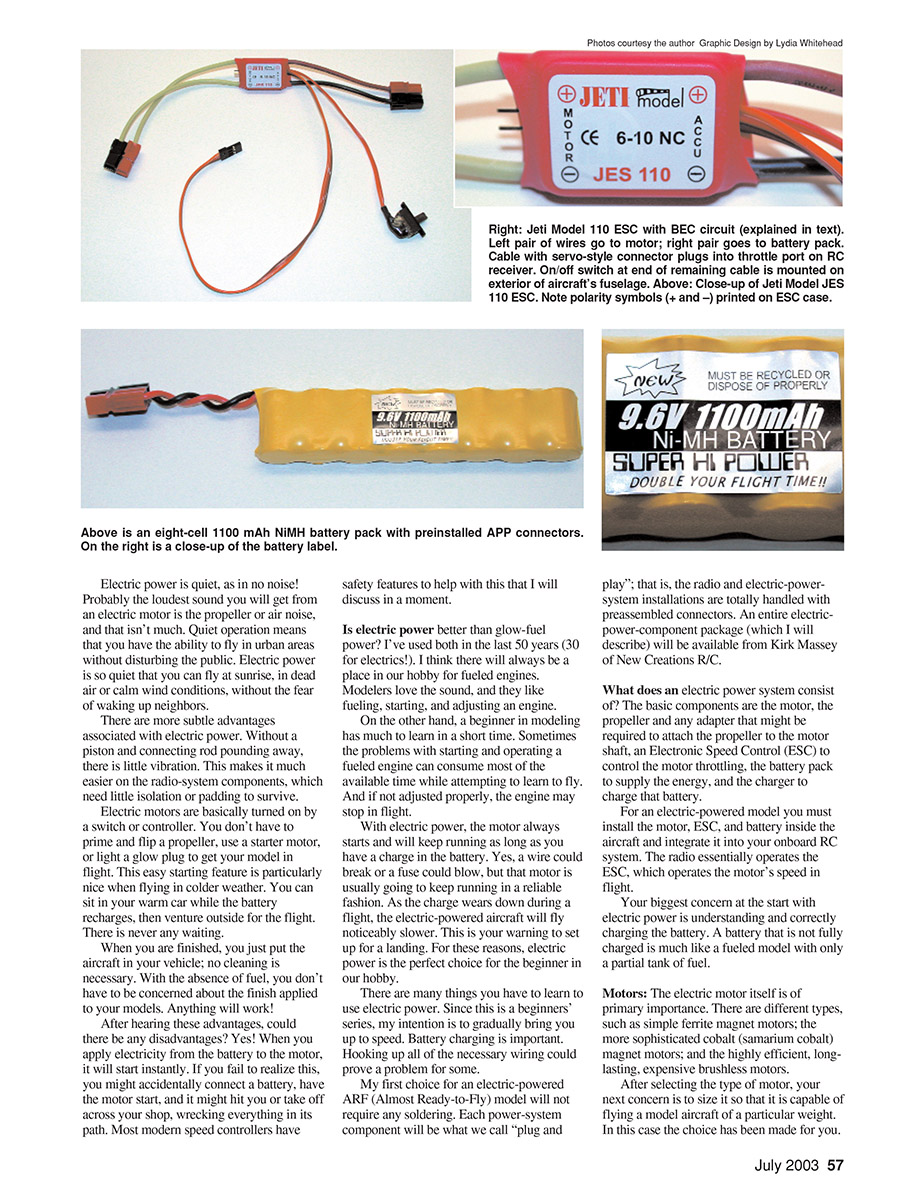
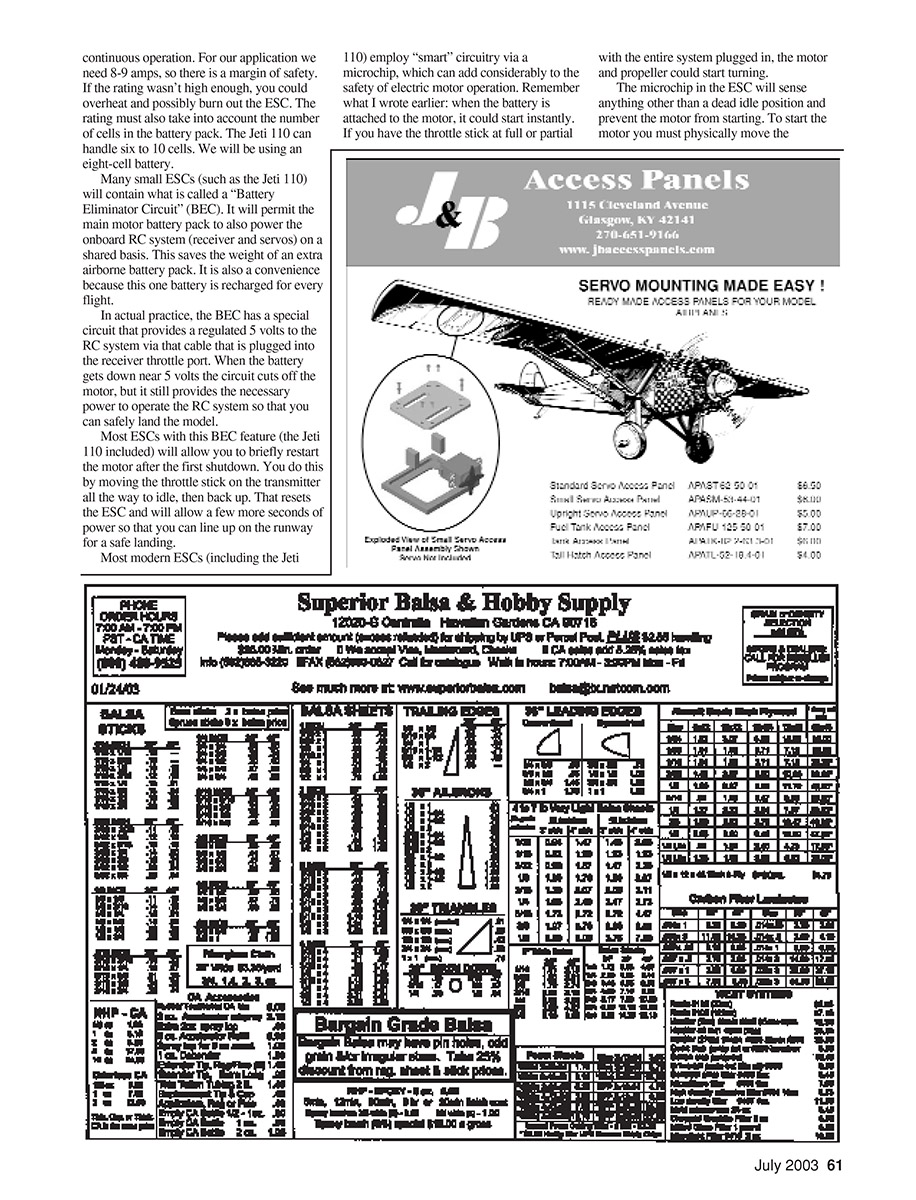
The ESC chosen for this project is compact (roughly 3/4 ounce) and has several cables: two power leads with APP connectors for the battery, two motor leads with APP connectors for the motor, and a servo‑type cable with a built‑in switch or a separate switch lead. The motor leads plug into the motor wires (red to red, black to black). The battery leads plug into the battery pack (observe polarity). The servo cable plugs into the throttle port (usually the number‑three position) on your RC receiver. A switch will be mounted on the fuselage and must be turned on to activate the electric system.
There are many ESCs on the hobby market. The one chosen here is the Jeti 110. The ESC is rated for current: in this case it is 11 amps continuous with a 15‑amp burst capacity. It will handle the power requirements of the chosen motor and continuous operation. For our application we need about 8–9 amps, so there is a margin of safety. If the ESC rating were too low, you could overheat or burn it out. The rating must also take into account the number of cells in the battery pack. The Jeti 110 can handle six to ten cells; we will be using an eight‑cell battery.
Many small ESCs (including the Jeti 110) contain a Battery Eliminator Circuit (BEC). The BEC permits the main motor battery pack to also power the onboard RC system (receiver and servos), saving the weight of an extra airborne battery pack and simplifying charging. The BEC provides a regulated 5 volts to the RC system via the cable plugged into the receiver throttle port. When the battery voltage drops near the BEC cutoff (around 5 volts), the circuit will cut off the motor while continuing to provide power to the RC system so you can safely land the model.
Most ESCs with this feature (the Jeti 110 included) allow you to briefly restart the motor after the first shutdown. You do this by moving the transmitter throttle stick to idle then back up; that resets the ESC and allows a few more seconds of power to line up for a safe landing.
Most modern ESCs employ "smart" circuitry via a microchip, which adds safety. Remember: when the battery is attached to the motor, the motor can start instantly. If you have the throttle stick at full or partial and then connect the battery while everything is plugged in, the motor and propeller could start turning. The microchip in the ESC senses anything other than a dead idle position and prevents the motor from starting. To start the motor you must move the transmitter throttle stick down to idle and then increase it; the motor will then start and its speed will be proportional to stick position.
The Battery
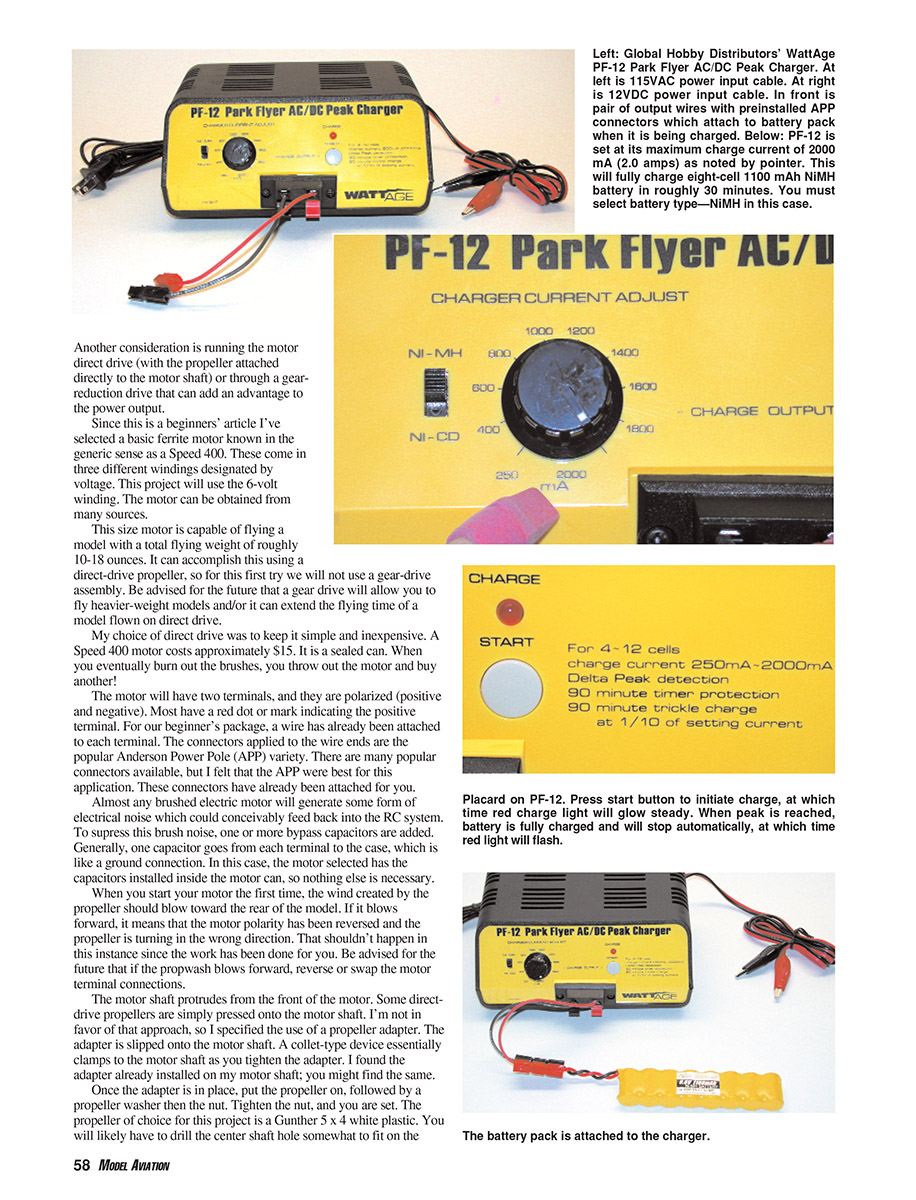
The battery is an important part of the electric power system. Batteries come in many types, sizes, weights, and capacities; your choices are critical to model performance. For this project the battery choice has been made for you: a Nickel‑Metal Hydride (NiMH) pack consisting of eight cells. Each cell has a capacity rating of 1100 milliampere‑hours (mAh). The meaning and implications of these ratings will be explained in later articles.
APP connectors have been attached to the battery leads. As with the motor connections, polarity is critical: positive to positive and negative to negative (commonly red to red and black to black, though not everyone follows the same color convention). Do not mix up connections between motor and battery. The connectors from the ESC to the motor are generally connected once during initial installation and not touched thereafter. Placing a bit of masking tape on each connector can remind you not to disturb them until transferring equipment to another aircraft.
Estimating that this direct‑drive Speed 400 motor will draw 8–9 amps, this battery pack should provide about six to seven minutes of electric power at full throttle. In practice you will throttle back considerably during training flights and have more flight time. Throttling back reduces motor current and increases flight time; with moderate throttling you can expect around 10 minutes. Owning more than one battery pack lets you fly on one while charging the other.
Charging
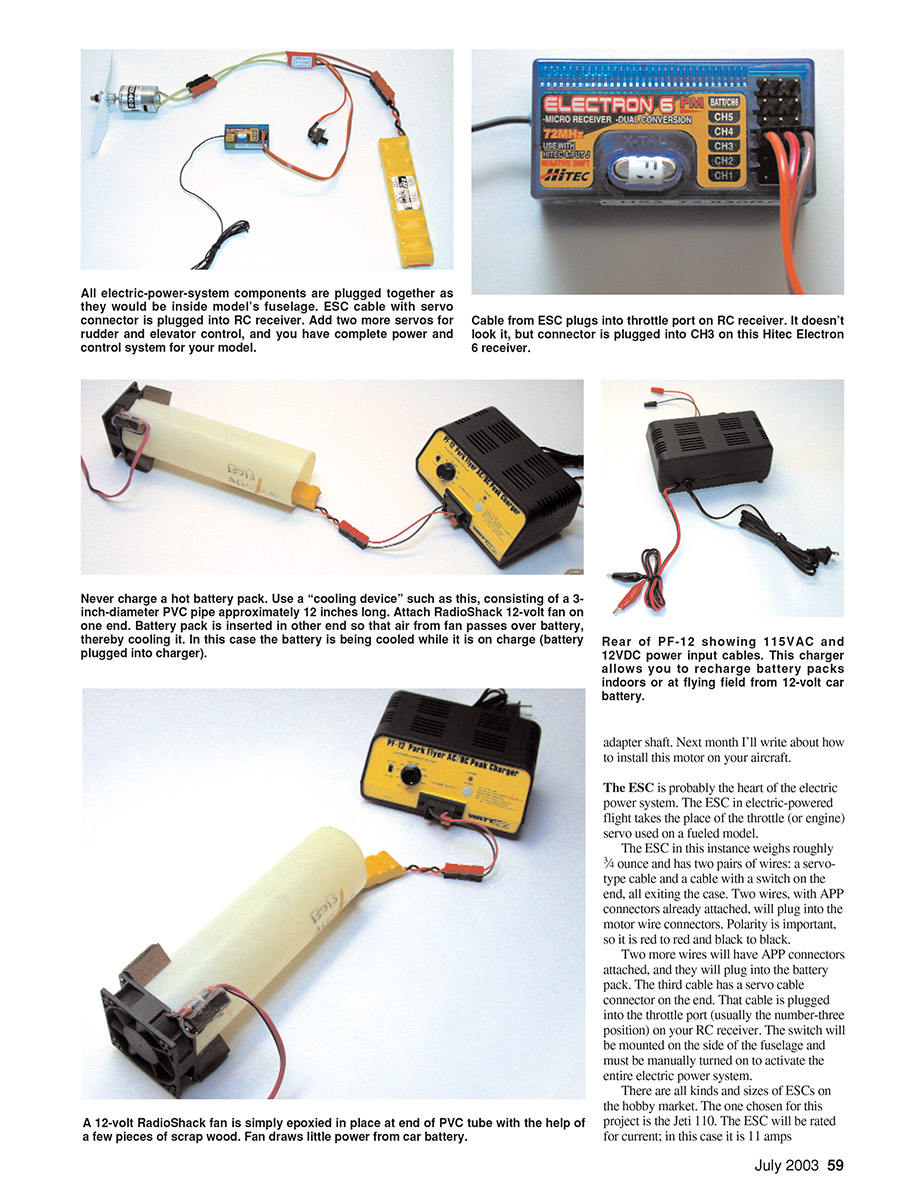
The final item in the electric power package is the essential battery charger. Chargers range from very simple to highly sophisticated. Kirk Massey's recommendation for a beginner is the Global (WattAge brand) PF‑12 Park Flyer AC/DC peak‑detect charger. The key words are "peak detect."
Some simple chargers use a timed crank or timer; you set the time (e.g., 15–20 minutes) and wait. The problem is they do not sense how much charge is already in the battery, which risks overcharging and overheating.
A peak‑detect charger is essentially automatic. All NiCd and NiMH batteries have a charging characteristic where the pack voltage increases until it reaches full charge, at which point the voltage peaks and then begins to drop slightly. A peak‑detect charger senses this peak and cuts off automatically. Because this is a sensing cutoff rather than a timed cutoff, only the necessary charge is applied.
You must manually tell the charger the charge current required. For NiMH batteries it is suggested to apply a charge current equal to two times the rated capacity of the battery, referred to as "2C." In this case the battery is rated at 1100 mAh (1.1 Ah). Multiply 2.0 by 1.1 A = 2.2 A. The Global charger has a maximum charge current of 2.0 A, so set it to its maximum. At approximately a 2C charge rate, a fully depleted NiMH pack will take roughly 30 minutes to reach full charge.
Each battery varies by the number of cells, cell type, and capacity. For this first setup I selected a charger that cannot overcharge the pack because its maximum current (2.0 A) is close to what this battery requires. The Global charger can handle four to 12 cells.
When purchasing a charger it is usually your responsibility to prepare a cable to connect the charger to your battery pack. Kirk Massey has prepared a cable with APP connectors to attach between the Global charger and our battery pack. Note the output connectors on the front of the Global charger: press down on each connector, insert the wire, then release. Do that for the positive (red) and negative (black) connectors.
There are more sophisticated, fully automatic chargers that sense parameters and set charging automatically via menus and computer control. These work well but are more complicated and cost more than the basic Global unit.
It is typically a good idea to remove the battery pack from the model when charging. Immediately after a flight the battery pack may be warm or hot. Never charge a hot battery; allow it to cool first. Do not cool a hot pack unevenly (for example, by placing it in a refrigerator). A better approach is to buy a small 12‑volt fan and mount it on a length of 3‑inch‑diameter PVC plumbing pipe. Power the fan from your 12‑volt car battery and place the hot battery pack at the other end of the PVC tube. The airflow will cool the pack in about five minutes to a safe level for charging. (A recommended fan is the RadioShack 12‑volt electric fan, part number 273‑243.)
The Global charger can be powered by 115 VAC for indoor use or from 12 V DC from your car battery. At the field, most of us raise the car hood and attach the charger input alligator clips to the car battery terminals. Observe polarity: red to positive (+), black to ground/negative (–). The Global charger also has a built‑in timer that cuts off after 90 minutes; if left unattended it will stop after 1½ hours.
That’s the complete electric power system for a beginner. This article has been prepared as a starting point for someone new to electric flight. There is a shopping list in the accompanying table that you can use to purchase all necessary equipment. You can purchase all items from Kirk Massey at New Creations R/C, Box 497, Willis TX 77378; Tel.: (936) 856‑4630. (Kirk prefers telephone calls to e‑mail.)
You can buy components from other sources; for simplicity I specified one supplier and the exact equipment necessary. The addition of connectors made this a custom order. If you are lucky enough to live near experienced electric modelers, solicit their help — it can save you time. However, the theme of this series is to get you going on your own with little or no help.
Next month I will start with a basic electric‑powered ARF trainer: the AeroCraft Pogo. It was specifically selected to use the electric power equipment I have described and the Hitec Neon three‑channel RC system, which I discussed in part two of this series (April 2003 Model Aviation, starting on page 54).
I expect to take the Pogo from the kit box to the flying field, including final assembly and installation of the electric power and RC system.
Bob Aberle
Sources
- Balsa Products
122 Jansen Ave. Iselin NJ 08830 (732) 634‑6131 www.balsapr.com
- Dymond Modelsports USA Ltd.
683 N. Main St. Oshkosh WI 54901 (920) 203‑1100 [email protected] www.rc-dymond.com
- Hobby Lobby International
5614 Franklin Pike Cir. Brentwood TN 37027 (615) 373‑1444 [email protected] www.hobby-lobby.com
- Maxx Products International
815 Oakwood Rd., Unit D Lake Zurich IL 60047 (847) 438‑2233 [email protected] www.maxxprod.com
- New Creations R/C
Box 496 Willis TX 77378 (936) 856‑4630 [email protected] www.newcreations-rc.com
- Northeast Sailplane Products
948 Hercules Dr., Suite 12 Colchester VT 05446 (802) 655‑7700 www.nesail.com
- Radical R/C
7046 Harshmanville Rd. Huber Heights OH 45424 (937) 237‑7889 [email protected] www.radicalrc.com
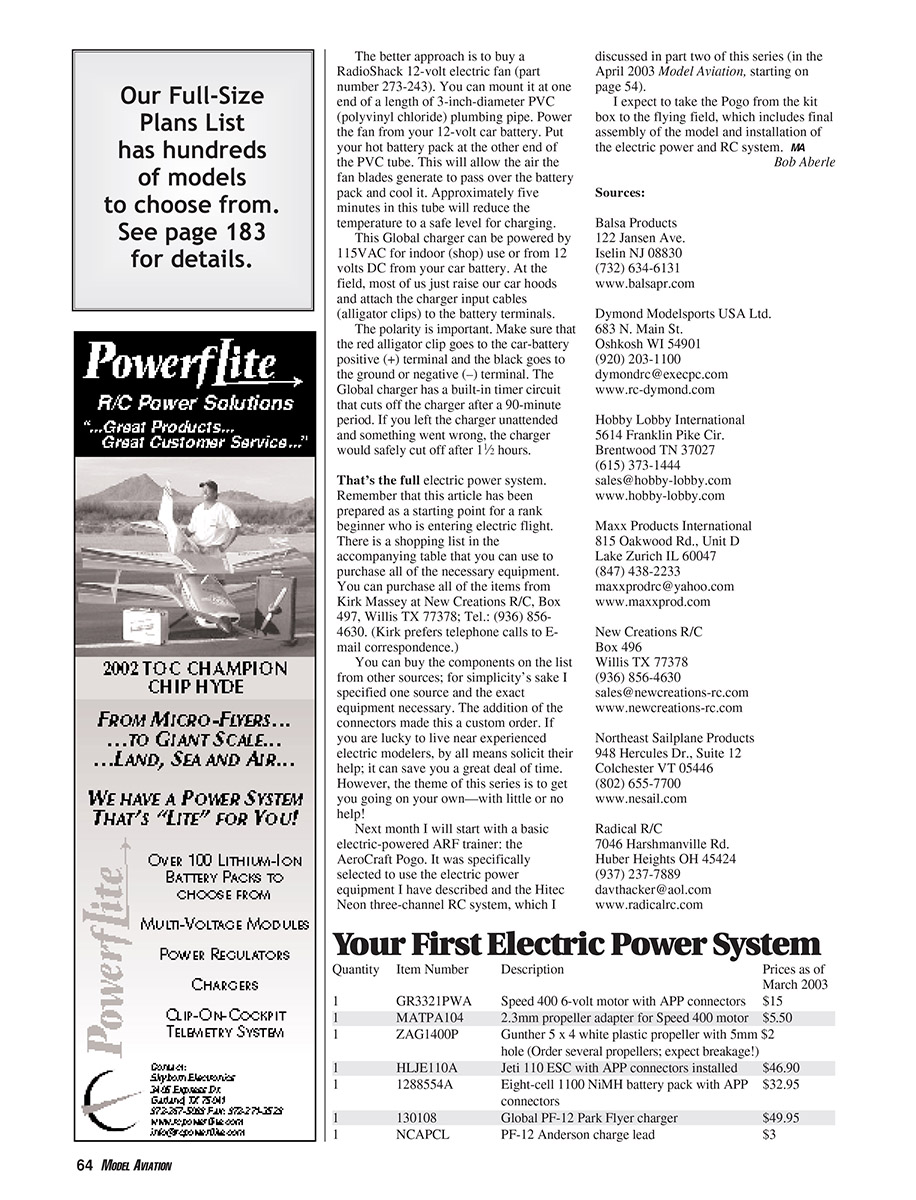
Your First Electric Power System
Prices as of March 2003
- Quantity: 1 Item Number: GR3321PWA Description: Speed 400 6‑volt motor with APP connectors Price: $15.00
- Quantity: 1 Item Number: MATPA104 Description: 2.3 mm propeller adapter for Speed 400 motor Price: $5.50
- Quantity: 1 Item Number: ZAG1400P Description: Gunther 5 x 4 white plastic propeller with 5 mm hole (Order several propellers; expect breakage!) Price: $2.00
- Quantity: 1 Item Number: HIJE110A Description: Jeti 110 ESC with APP connectors installed Price: $46.90
- Quantity: 1 Item Number: 1288554A Description: Eight‑cell 1100 NiMH battery pack with APP connectors Price: $32.95
- Quantity: 1 Item Number: 130108 Description: Global PF‑12 Park Flyer charger Price: $49.95
- Quantity: 1 Item Number: NCAPCL Description: PF‑12 Anderson charge lead Price: $3.00
Transcribed from original scans by AI. Minor OCR errors may remain.

