
Jeti Duplex DS-16 2.4 GHz Radio
Jay Smith
Get a more detailed look of the DS-16 with a video and bonus photos in this month's digital edition and at www.ModelAviation.com/Jetiduplexds-16.
This feature-rich radio will tell you all of the things you've been missing
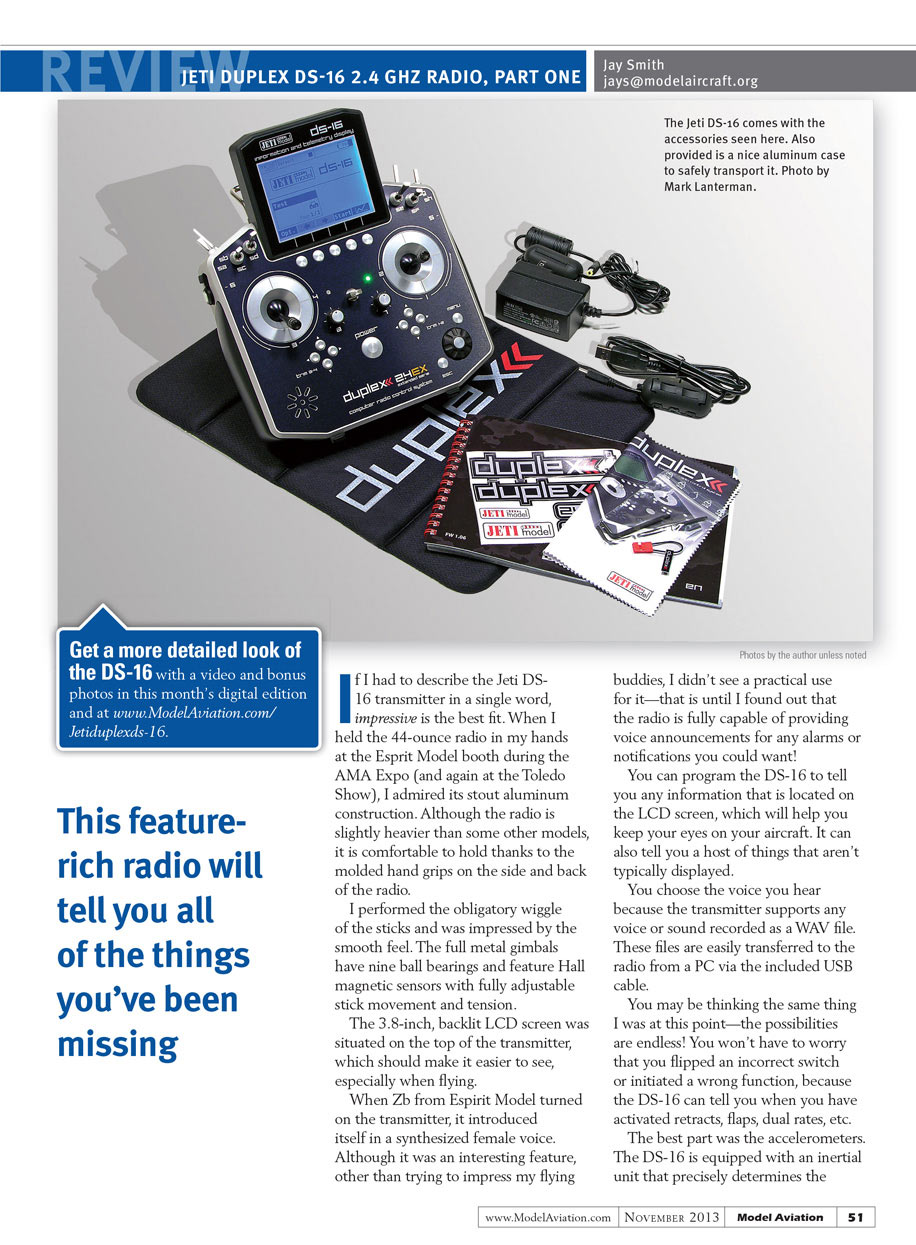
If I had to describe the Jeti DS-16 transmitter in a single word, impressive is the best fit. When I held the 44-ounce radio in my hands at the Esprit Model booth during the AMA Expo (and again at the Toledo Show), I admired its stout aluminum construction. Although the radio is slightly heavier than some other models, it is comfortable to hold thanks to the molded hand grips on the side and back of the radio.
I performed the obligatory wiggle of the sticks and was impressed by the smooth feel. The full metal gimbals have nine ball bearings and feature Hall magnetic sensors with fully adjustable stick movement and tension.
The 3.8-inch, backlit LCD screen was situated on the top of the transmitter, which should make it easier to see, especially when flying.
When Zb from Esprit Model turned on the transmitter, it introduced itself in a synthesized female voice. Although it was an interesting feature, other than trying to impress my flying buddies, I didn't see a practical use for it—that is until I found out that the radio is fully capable of providing voice announcements for any alarms or notifications you could want!
You can program the DS-16 to tell you any information that is located on the LCD screen, which will help you keep your eyes on your aircraft. It can also tell you a host of things that aren't typically displayed.
You choose the voice you hear because the transmitter supports any voice or sound recorded as a WAV file. These files are easily transferred to the radio from a PC via the included USB cable.
You may be thinking the same thing I was at this point—the possibilities are endless! You won't have to worry that you flipped an incorrect switch or initiated a wrong function, because the DS-16 can tell you when you have activated retracts, flaps, dual rates, etc.
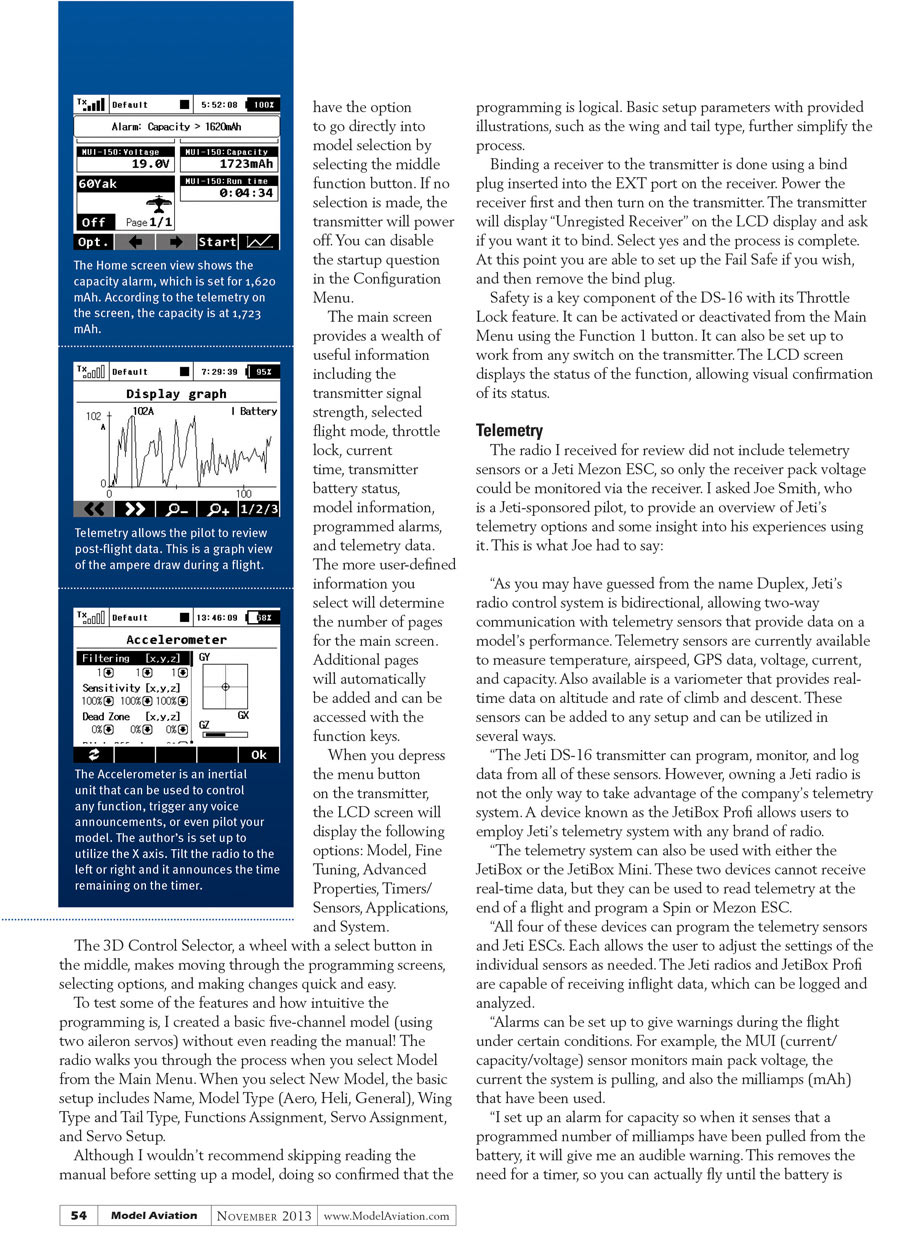
The best part was the accelerometers. The DS-16 is equipped with an inertial unit that precisely determines the orientation of the device in space. The unit consists of a three-axis gyroscope, three-axis accelerometer, and additional mathematic operations. You can use this inertial unit to control any function, trigger voice announcements, or even pilot your model.
The demonstration radio was set up to work on the X axis. Tilting the radio to the left or right provided an audible voice announcing the remaining time on the timer.
When the short demonstration was over, I reluctantly handed back the transmitter. I knew I was ready to step up to the talking transmitter and it can be used for so much more than just a gimmick!
Layout and Ergonomics
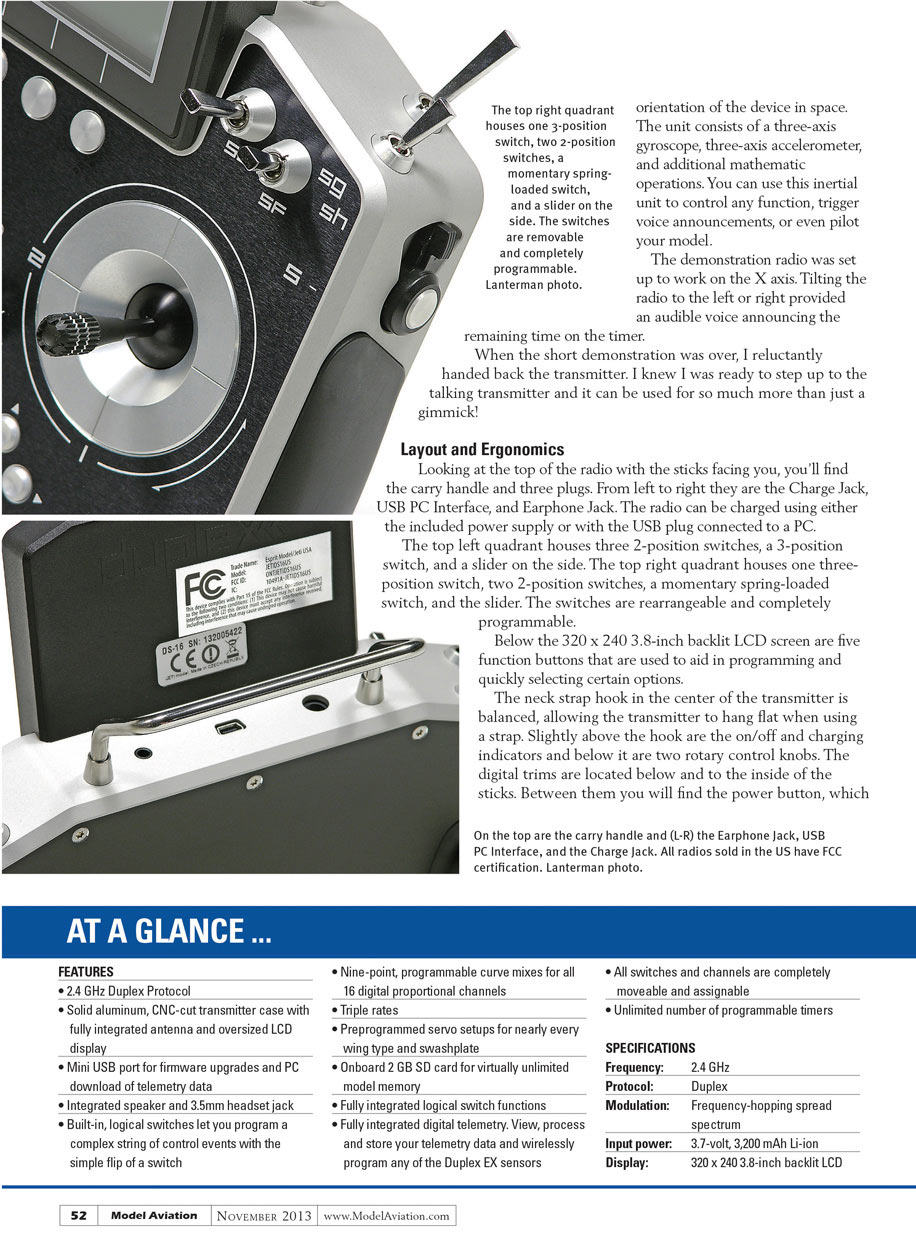
Looking at the top of the radio with the sticks facing you, you'll find the carry handle and three plugs. From left to right they are the Charge Jack, USB PC Interface, and Earphone Jack. The radio can be charged using either the included power supply or with the USB plug connected to a PC.
The top left quadrant houses three 2-position switches, a 3-position switch, and a slider on the side. The top right quadrant houses one three-position switch, two 2-position switches, a momentary spring-loaded switch, and the slider. The switches are rearrangeable and completely programmable.
Below the 320 x 240 3.8-inch backlit LCD screen are five function buttons that are used to aid in programming and quickly selecting certain options.
The neck strap hook in the center of the transmitter is balanced, allowing the transmitter to hang flat when using a strap. Slightly above the hook are the on/off and charging indicators and below it are two rotary control knobs. The digital trims are located below and to the inside of the sticks. Between them you will find the power button, which needs to be held for two seconds to power the transmitter.
On the bottom left of the DS-16 is the speaker and on the bottom right is the Menu button, 3D Control Selector, and ESC button used for programming.
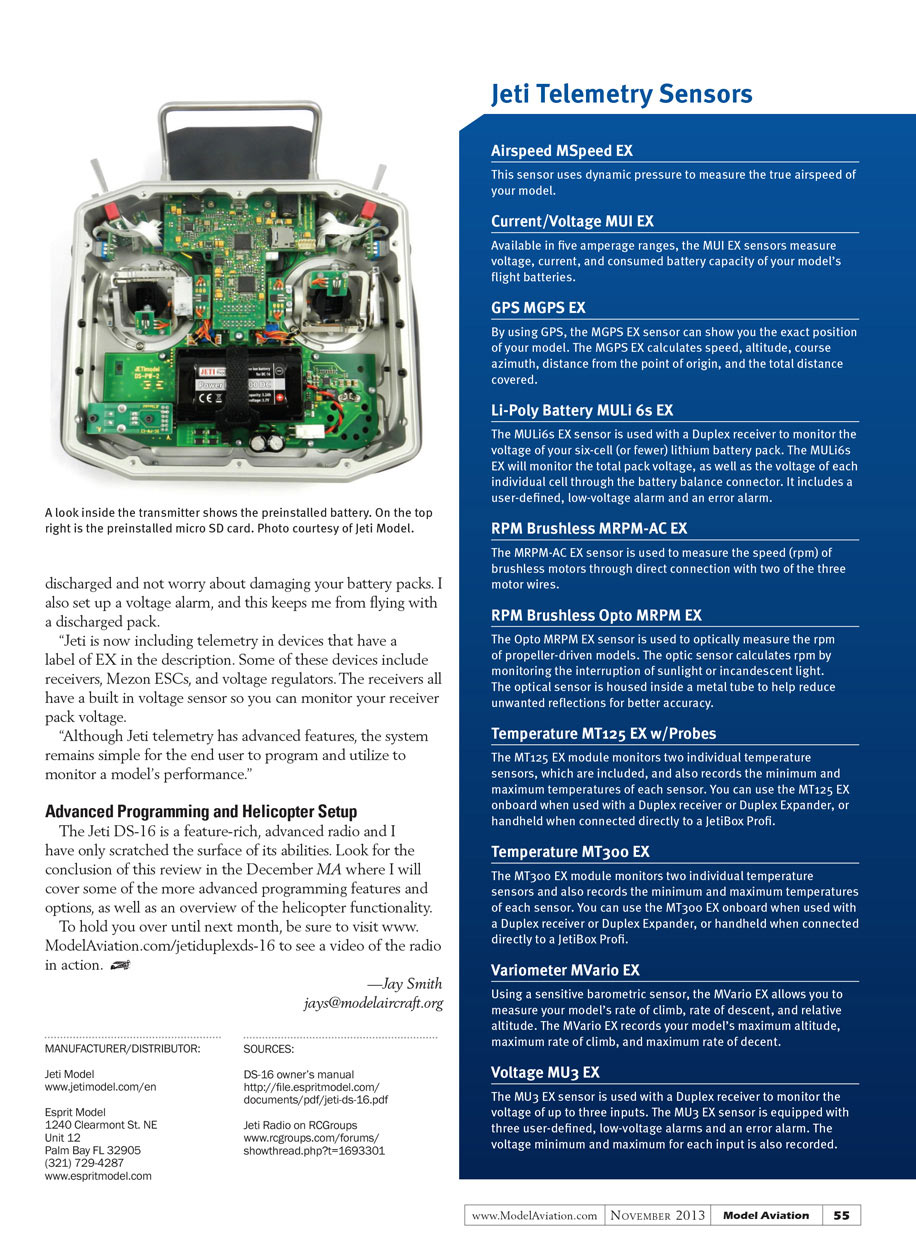
The left and right control sticks have adjustable lengths. By removing the eight screws on the back of the case, you can adjust the angle of the sticks, the control stick tension, and the ratchet tension. You can also adjust the throttle stick’s travel and change the radio’s mode.
When you remove the back cover of the radio, the radio should be turned off and not charging or connected via USB. When the cover is removed, immediately disconnect the battery by unplugging the connector prior to making any changes. If the battery is unplugged for more than a minute, the time and date (if set), will be deleted and need to be reset. No other settings will be affected.
Navigation and Basic Programming
The Jeti DS-16 is easy to navigate and programming is intuitive and straightforward. Although the manual provides an overview of using the radio and its programming, it doesn’t cover in-depth all of the advanced programming features. The manual is available online in PDF format and a link is listed in the “Sources” section.
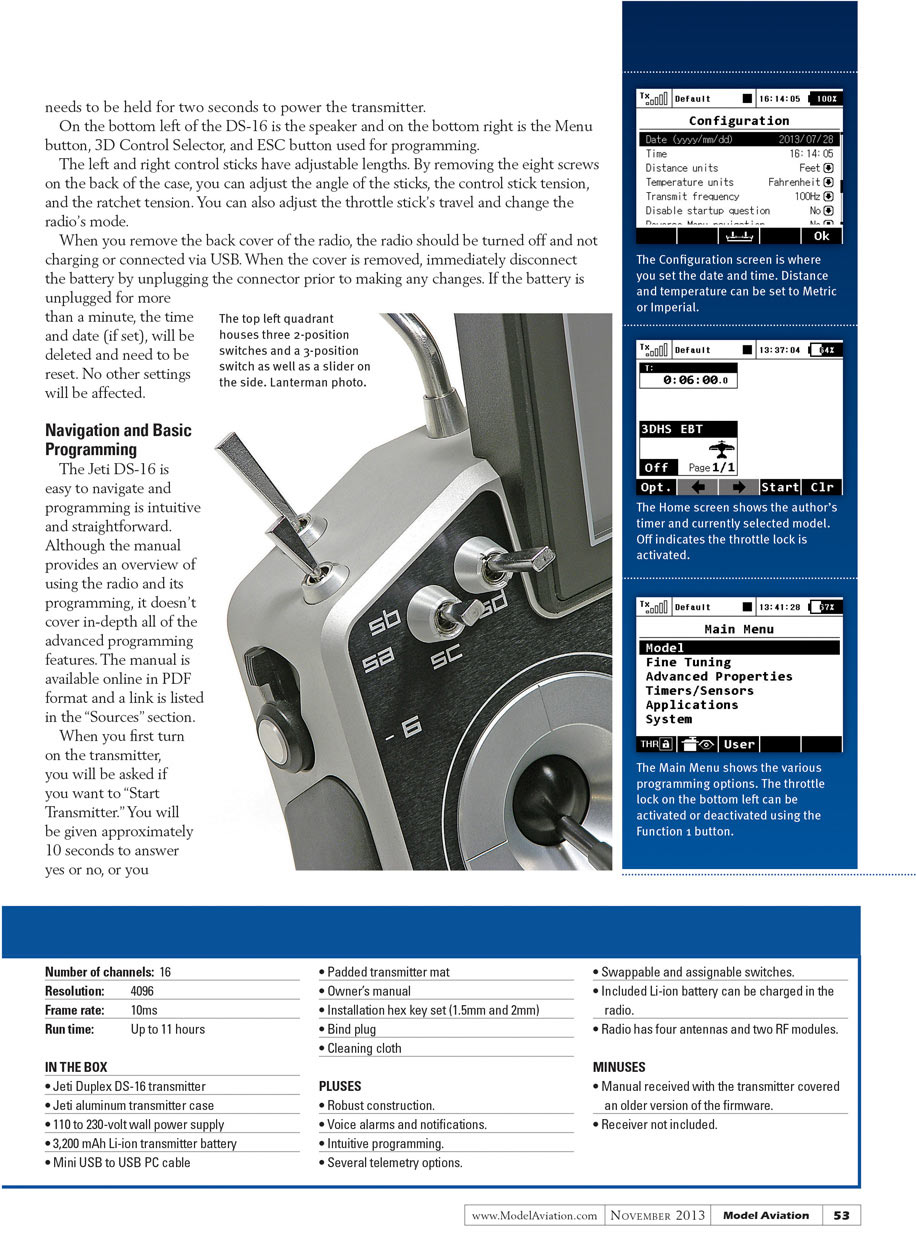
When you first turn on the transmitter, you will be asked if you want to “Start Transmitter.” You will be given approximately 10 seconds to answer yes or no, or you have the option to go directly into model selection by selecting the middle function button. If no selection is made, the transmitter will power off. You can disable the startup question in the Configuration Menu.
The main screen provides a wealth of useful information including the transmitter signal strength, selected flight mode, throttle lock, current time, transmitter battery status, model information, programmed alarms, and telemetry data. The more user-defined information you select will determine the number of pages for the main screen. Additional pages will automatically be added and can be accessed with the function keys.
When you depress the menu button on the transmitter, the LCD screen will display the following options: Model, Fine Tuning, Advanced Properties, Timers/Sensors, Applications, and System.
The 3D Control Selector, a wheel with a select button in the middle, makes moving through the programming screens, selecting options, and making changes quick and easy.
To test some of the features and how intuitive the programming is, I created a basic five-channel model (using two aileron servos) without even reading the manual! The radio walks you through the process when you select Model from the Main Menu. When you select New Model, the basic setup includes Name, Model Type (Aero, Heli, General), Wing Type and Tail Type, Functions Assignment, Servo Assignment, and Servo Setup.
Although I wouldn't recommend skipping reading the manual before setting up a model, doing so confirmed that the programming is logical. Basic setup parameters with provided illustrations, such as the wing and tail type, further simplify the process.
Binding a receiver to the transmitter is done using a bind plug inserted into the EXT port on the receiver. Power the receiver first and then turn on the transmitter. The transmitter will display "Unregistered Receiver" on the LCD display and ask if you want it to bind. Select yes and the process is complete. At this point you are able to set up the Fail Safe if you wish, and then remove the bind plug.
Safety is a key component of the DS-16 with its Throttle Lock feature. It can be activated or deactivated from the Main Menu using the Function 1 button. It can also be set up to work from any switch on the transmitter. The LCD screen displays the status of the function, allowing visual confirmation of its status.
AT A GLANCE ...
FEATURES
- 2.4 GHz Duplex Protocol
- Solid aluminum, CNC-cut transmitter case with fully integrated antenna and oversized LCD display
- Mini USB port for firmware upgrades and PC download of telemetry data
- Integrated speaker and 3.5mm headset jack
- Built-in, logical switches let you program a complex string of control events with the simple flip of a switch
- Nine-point, programmable curve mixes for all 16 digital proportional channels
- Triple rates
- Preprogrammed servo setups for nearly every wing type and swashplate
- Onboard 2 GB SD card for virtually unlimited model memory
- Fully integrated logical switch functions
- Fully integrated digital telemetry. View, process and store your telemetry data and wirelessly program any of the Duplex EX sensors
- All switches and channels are completely moveable and assignable
- Unlimited number of programmable timers
SPECIFICATIONS
Frequency: 2.4 GHz Protocol: Duplex Modulation: Frequency-hopping spread spectrum Input power: 3.7-volt, 3,200 mAh Li-ion Display: 320 x 240 3.8-inch backlit LCD Number of channels: 16 Resolution: 4096 Frame rate: 10ms Run time: Up to 11 hours
IN THE BOX
- Jeti Duplex DS-16 transmitter
- Jeti aluminum transmitter case
- 110 to 230-volt wall power supply
- 3,200 mAh Li-ion transmitter battery
- Mini USB to USB PC cable
- Padded transmitter mat
- Owner’s manual
- Installation hex key set (1.5mm and 2mm)
- Bind plug
- Cleaning cloth
- Swappable and assignable switches
- Included Li-ion battery can be charged in the radio
- Radio has four antennas and two RF modules
PLUSES
- Robust construction.
- Voice alarms and notifications.
- Intuitive programming.
- Several telemetry options.
MINUSES
- Manual received with the transmitter covered an older version of the firmware.
- Receiver not included.
The radio I received for review did not include telemetry sensors or a Jeti Mezon ESC, so only the receiver pack voltage could be monitored via the receiver. I asked Joe Smith, who is a Jeti-sponsored pilot, to provide an overview of Jeti's telemetry options and some insight into his experiences using it. This is what Joe had to say:
"As you may have guessed from the name Duplex, Jeti's radio control system is bidirectional, allowing two-way communication with telemetry sensors that provide data on a model's performance. Telemetry sensors are currently available to measure temperature, airspeed, GPS data, voltage, current, and capacity. Also available is a variometer that provides real-time data on altitude and rate of climb and descent. These sensors can be added to any setup and can be utilized in several ways.
"The Jeti DS-16 transmitter can program, monitor, and log data from all of these sensors. However, owning a Jeti radio is not the only way to take advantage of the company's telemetry system. A device known as the JetiBox Profi allows users to employ Jeti's telemetry system with any brand of radio.
"The telemetry system can also be used with either the JetiBox or the JetiBox Mini. These two devices cannot receive real-time data, but they can be used to read telemetry at the end of a flight and program a Spin or Mezon ESC.
"All four of these devices can program the telemetry sensors and Jeti ESCs. Each allows the user to adjust the settings of the individual sensors as needed. The Jeti radios and JetiBox Profi are capable of receiving inflight data, which can be logged and analyzed.
"Alarms can be set up to give warnings during the flight under certain conditions. For example, the MUI (current/ capacity/voltage) sensor monitors main pack voltage, the current the system is pulling, and also the milliamp (mAh) that have been used.
"I set up an alarm for capacity so when it senses that a programmed number of milliamps have been pulled from the battery, it will give me an audible warning. This removes the need for a timer, so you can actually fly until the battery is discharged and not worry about damaging your battery packs. I also set up a voltage alarm, and this keeps me from flying with a discharged pack.
"Jeti is now including telemetry in devices that have a label of EX in the description. Some of these devices include receivers, Mezon ESCs, and voltage regulators. The receivers all have a built in voltage sensor so you can monitor your receiver pack voltage.
"Although Jeti telemetry has advanced features, the system remains simple for the end user to program and utilize to monitor a model's performance."
Advanced Programming and Helicopter Setup
The Jeti DS-16 is a feature-rich, advanced radio and I have only scratched the surface of its abilities. Look for the conclusion of this review in the December MA where I will cover some of the more advanced programming features and options, as well as an overview of the helicopter functionality.
To hold you over until next month, be sure to visit www.ModelAviation.com/jetiduplexds-16 to see a video of the radio in action. ✈
— Jay Smith [email protected]
MANUFACTURER/DISTRIBUTOR: Jeti Model www.jetimodel.com/en
Esprit Model 1240 Clermont St. NE Unit 12 Palm Bay FL 32905 (321) 729-4287 www.espritmodel.com
SOURCES: DS-16 owner's manual http://file.espritmodel.com/documents/pdf/jeti-ds-16.pdf
Jeti Radio on RCGroups www.rcgroups.com/forums/showthread.php?t=1693301
Transcribed from original scans by AI. Minor OCR errors may remain.

