
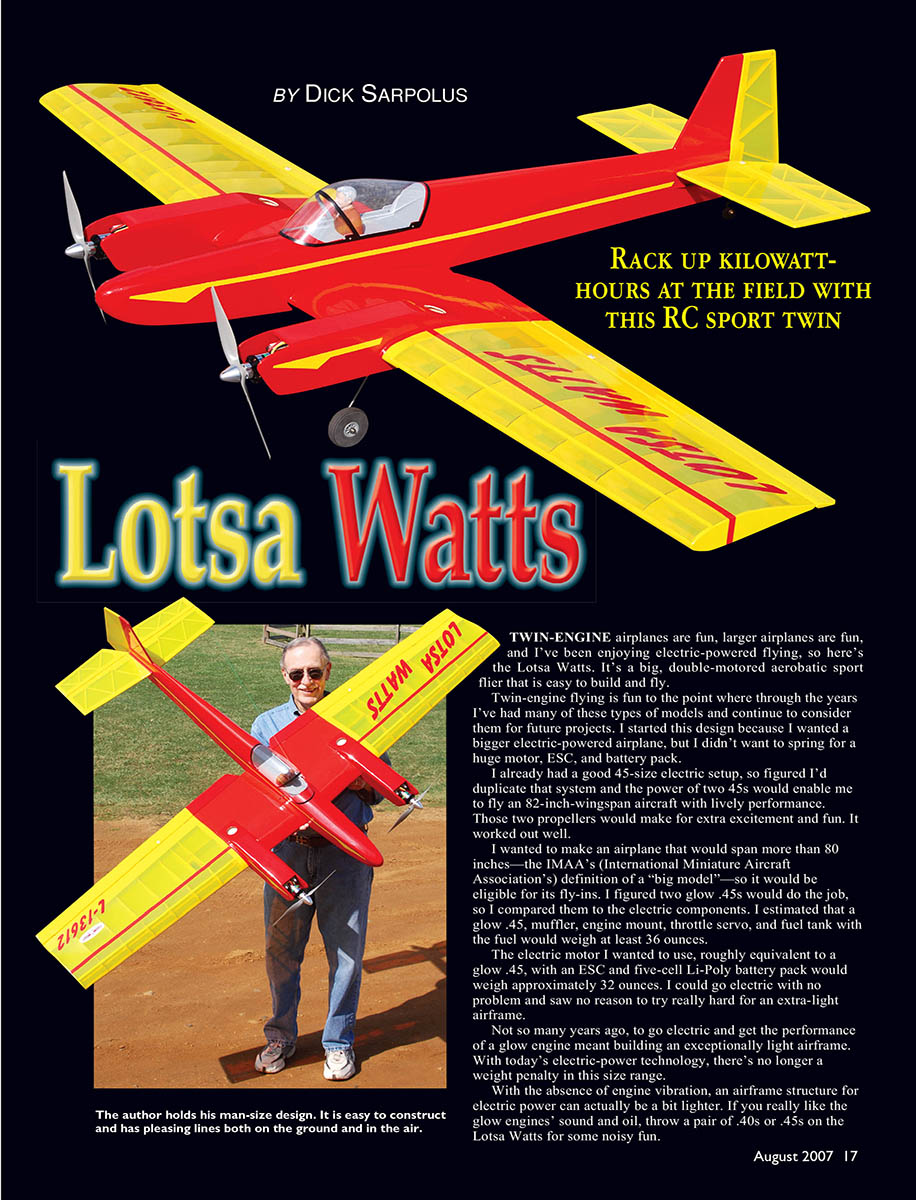
Lotsa Watts - 2007/08
BY DICK SARPOLUS
TWIN-ENGINE airplanes are fun, larger airplanes are fun, and I've been enjoying electric-powered flying, so here's the Lotsa Watts. It's a big, double-motored aerobatic sport flier that is easy to build and fly.
Twin-engine flying is fun to the point where, through the years, I've had many of these types of models and continue to consider them for future projects. I started this design because I wanted a bigger electric-powered airplane, but I didn't want to spring for a huge motor, ESC, and battery pack.
I already had a good .45-size electric setup, so I figured I'd duplicate that system; the power of two .45 equivalents would enable me to fly an 82-inch-wingspan aircraft with lively performance. Those two propellers would make for extra excitement and fun. It worked out well.
I wanted to make an airplane that would span more than 80 inches—the IMAA's (International Miniature Aircraft Association's) definition of a "big model"—so it would be eligible for its fly-ins. I figured two glow .45s would do the job, so I compared them to the electric components. I estimated that a glow .45, muffler, engine mount, throttle servo, and fuel tank with the fuel would weigh at least 36 ounces. The electric motor I wanted to use, roughly equivalent to a glow .45, with an ESC and a five-cell Li-Poly battery pack would weigh approximately 32 ounces. I could go electric with no problem and saw no reason to try really hard for an extra-light airframe.
Not so many years ago, to go electric and get the performance of a glow engine meant building an exceptionally light airframe. With today's electric-power technology, there's no longer a weight penalty in this size range. With the absence of engine vibration, an airframe structure for electric power can actually be a bit lighter. If you really like the glow engines' sound and oil, throw a pair of .40s or .45s on the Lotsa Watts for some noisy fun.
Twin Engine Dos!
When I rounded up pictures of the twin-engine aircraft projects I’ve done through the years, I was surprised to count 17 designs of my own and two I built from kits. I like twin-engine airplanes. Very few of my twins were true scale projects. I’ve always liked aerobatic capability in models, so most of my twins have been stand‑way‑off scale or original aerobatic designs. I have some tips for those of you who are going to tackle twin-engine projects:
- Use broken-in, well-adjusted, reliable engines.
- Electric power reduces much of the apprehension when it comes to twin-engine flying.
- Lightweight models with plenty of power are the way to safety if one engine dies.
If there’s any question about a twin’s single-engine flight capability, cut back the other engine and put down the nose for a landing if one power plant dies. Don’t try to stretch the approach.
I go after several things in a twin’s design:
- A fairly light wing loading.
- Plenty of power for the airplane’s size.
- Keeping the engines as close together as reasonably possible.
- The use of a large amount of fin and rudder area.
Most of my aerobatic twins are comfortable flying on one engine—either one. I’ve flown some on one power plant through loops, rolls, turns in either direction, and landing go-arounds, with no problems. Knowing that can be done reduces the worry about one engine dying.
Regardless of the risks, expense, and extra work involved in twin-engine projects, they’re so neat and so much fun I’m sure they will always be a popular part of our hobby. It’s the twin‑engine sound!
—Dick Sarpolus
Design Overview
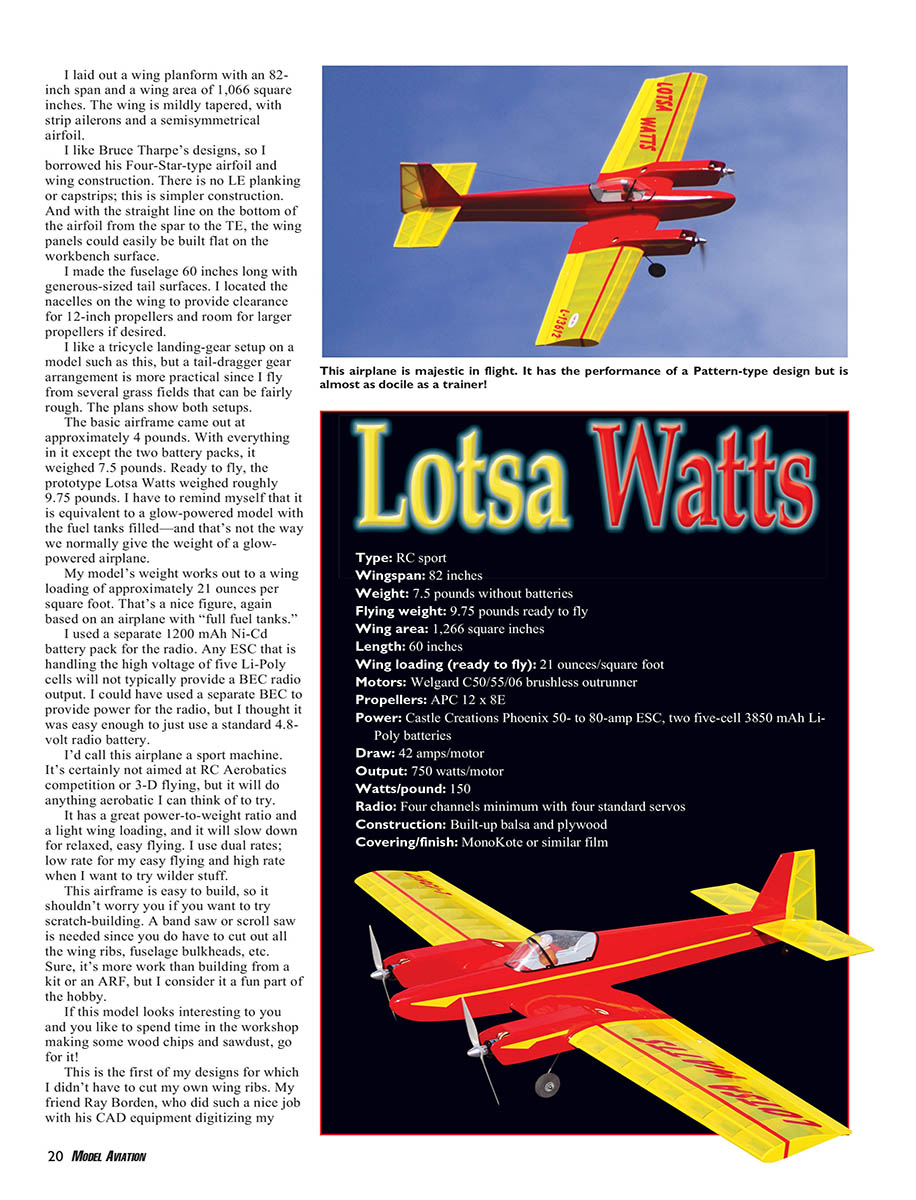
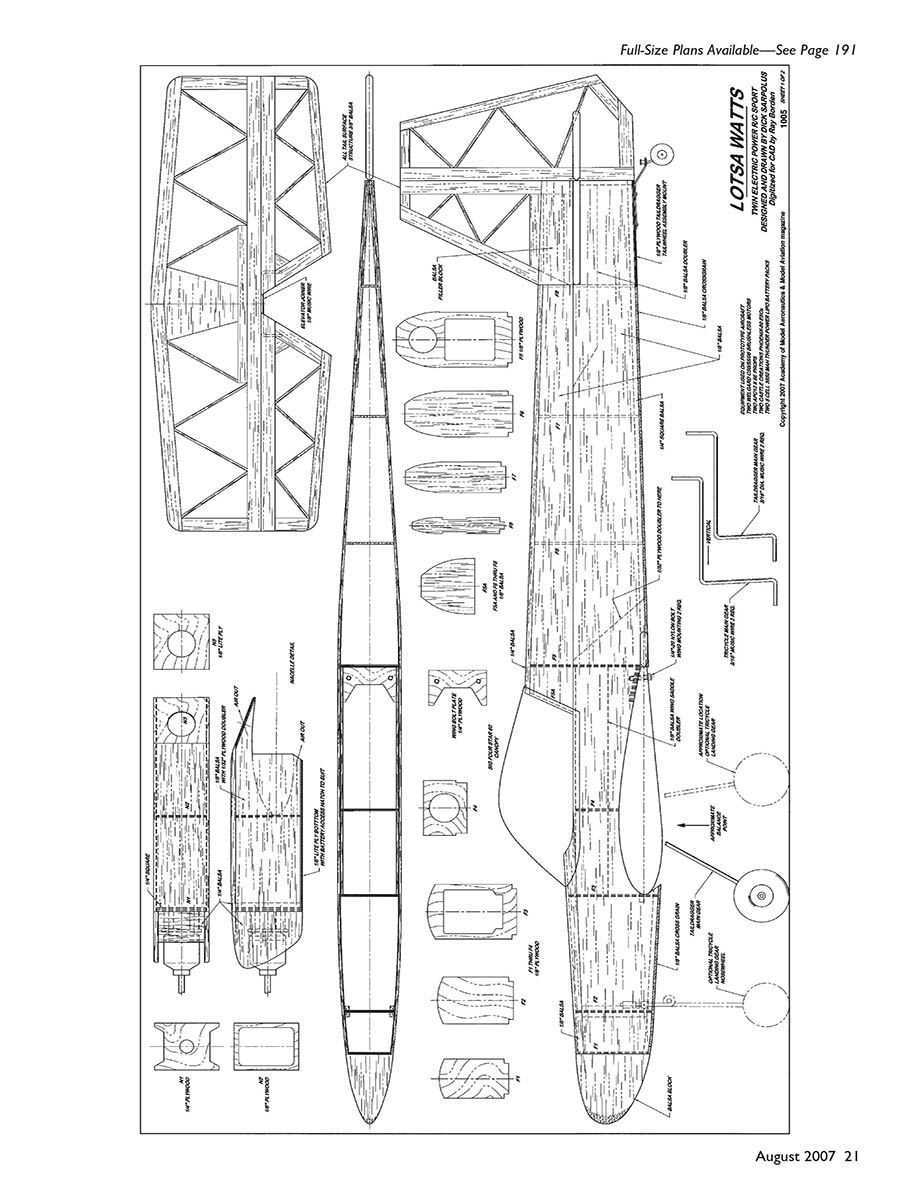
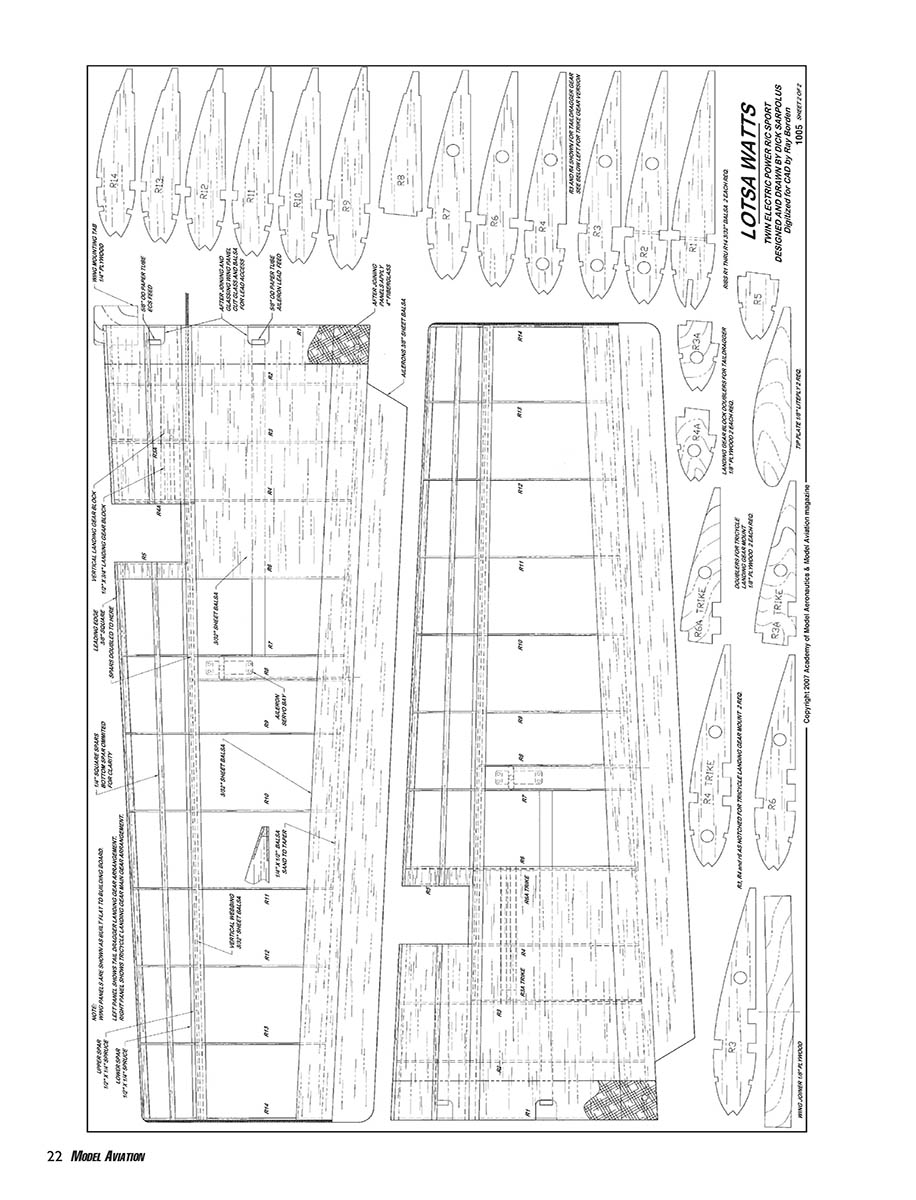
I laid out a wing planform with an 82-inch span and a wing area of 1,066 square inches. The wing is mildly tapered, with strip ailerons and a semi‑symmetrical airfoil.
I borrowed Bruce Tharpe's Four-Star-type airfoil and wing construction. There is no leading-edge planking or capstrips; this is simpler construction. With the straight line on the bottom of the airfoil from the spar to the trailing edge, the wing panels can easily be built flat on the workbench.
I made the fuselage 60 inches long with generous-sized tail surfaces. I located the nacelles on the wing to provide clearance for 12-inch propellers and room for larger propellers if desired.
I like a tricycle landing-gear setup on a model such as this, but a tail‑dragger gear arrangement is more practical since I fly from several grass fields that can be fairly rough. The plans show both setups.
The basic airframe came out at approximately 4 pounds. With everything in it except the two battery packs, it weighed 7.5 pounds. Ready to fly, the prototype Lotsa Watts weighed roughly 9.75 pounds. I have to remind myself that it is equivalent to a glow-powered model with the fuel tanks filled—and that's not the way we normally give the weight of a glow-powered airplane.
My model's weight works out to a wing loading of approximately 21 ounces per square foot. That's a nice figure, again based on an airplane with "full fuel tanks."
I used a separate 1200 mAh Ni-Cd battery pack for the radio. Any ESC that is handling the high voltage of five Li-Poly cells will not typically provide a BEC radio output. I could have used a separate BEC to provide power for the radio, but I thought it was easy enough to just use a standard 4.8-volt radio battery.
I'd call this airplane a sport machine. It's certainly not aimed at RC Aerobatics competition or 3‑D flying, but it will do anything aerobatic I can think of to try.
It has a great power-to-weight ratio and a light wing loading, and it will slow down for relaxed, easy flying. I use dual rates: low rate for easy flying and high rate when I want to try wilder stuff.
This airplane is easy to build, so it shouldn't worry you if you want to try scratch-building. A band saw or scroll saw is needed since you do have to cut out all the wing ribs, fuselage bulkheads, etc. Sure, it's more work than building from a kit or an ARF, but I consider it a fun part of the hobby. If this model looks interesting to you and you like to spend time in the workshop making some wood chips and sawdust, go for it!
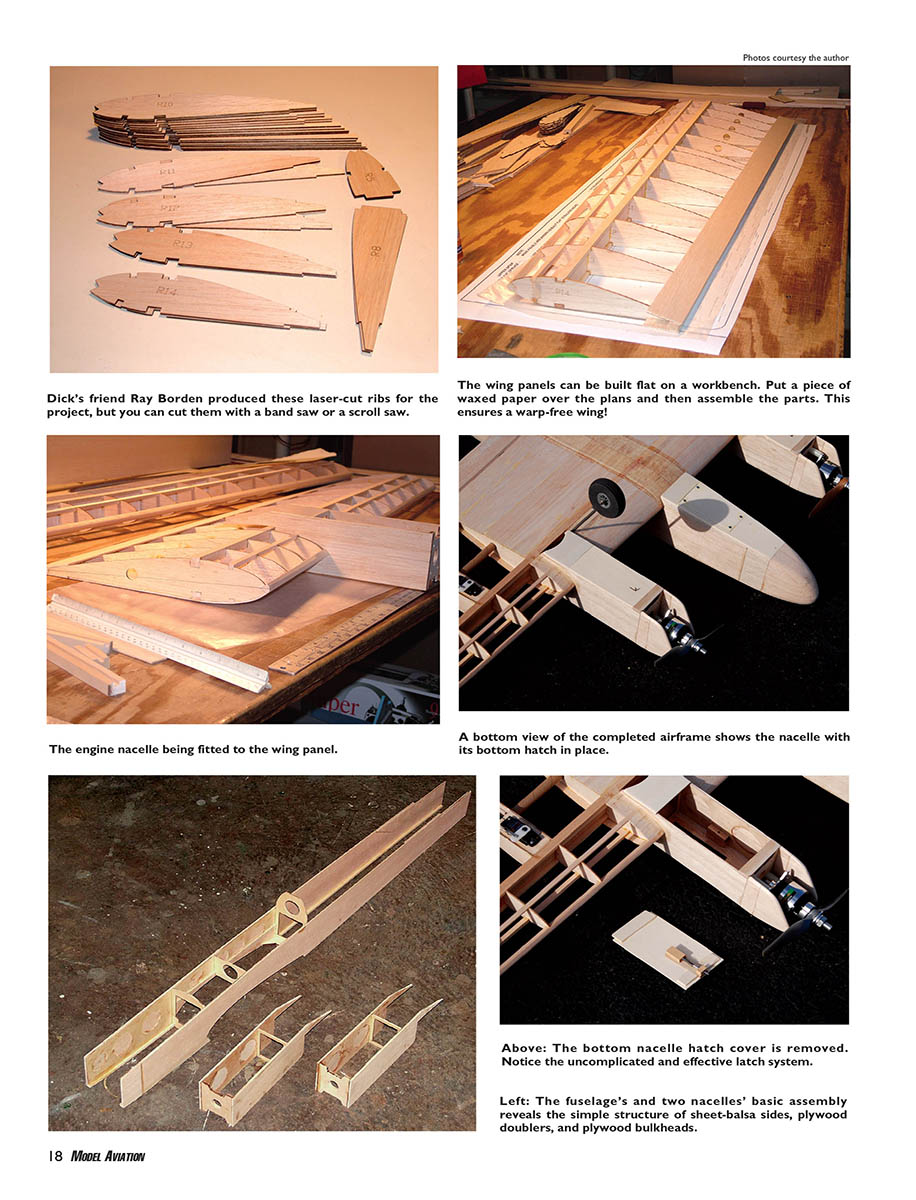
This is the first of my designs for which I didn't have to cut my own wing ribs. My friend Ray Borden, who did such a nice job with his CAD equipment digitizing my penciled plans, has a laser cutter. Since he had my plans in CAD, he laser-cut a set of ribs for me. With some work you can certainly saw-cut your own set of wing ribs, as I’ve done many times.
Ray also has a vinyl cutter, so he made the graphic airplane lettering for me. It’s nice to have a friend like that.
Equipment Used
I’ll cover the specific equipment I used that worked so well for me. There are certainly many hardware choices on the market, which makes it nice for modelers.
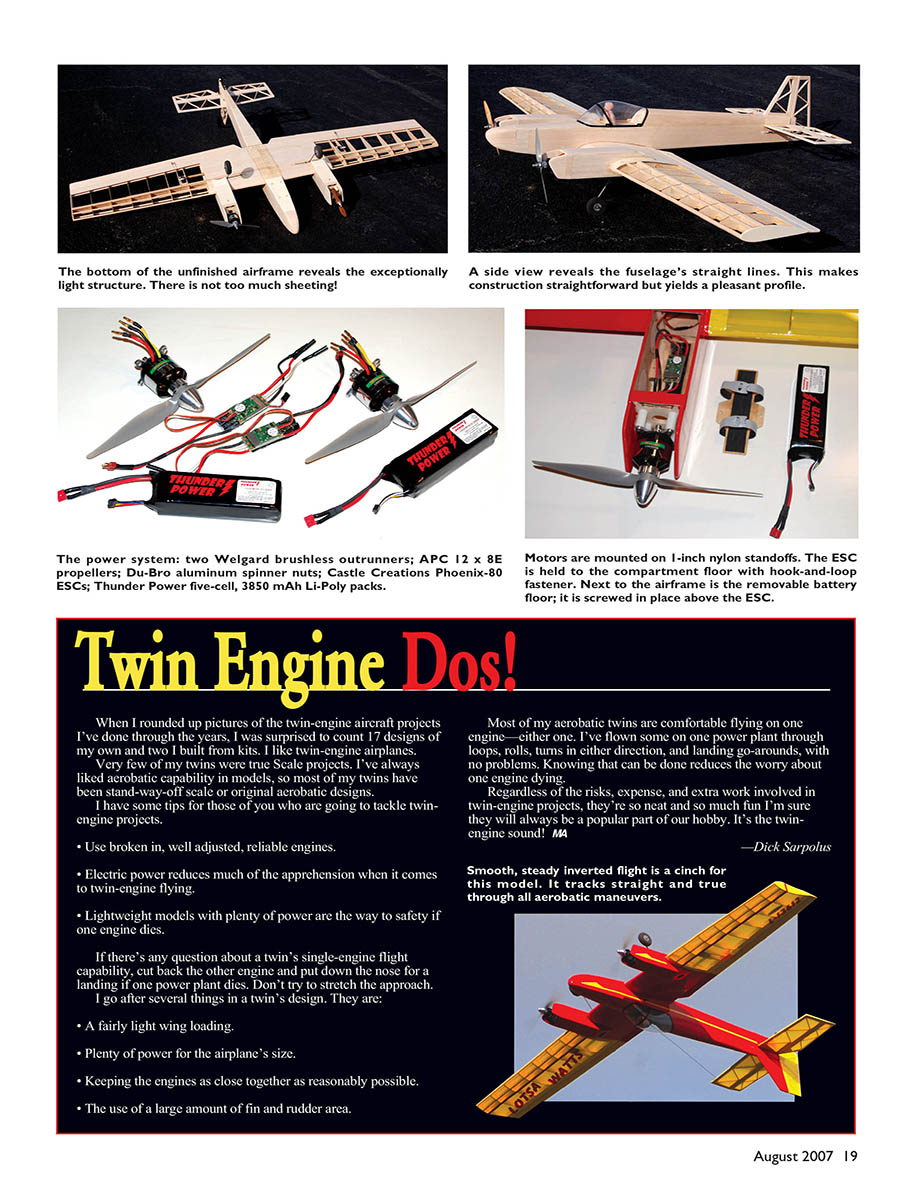
- Motors: Welgard C50/55/06 brushless outrunner motors (PB Hobbies). They look very well made; after using one in a Nitro Models Bobcat I knew it had plenty of power.
- Note: Welgard motors have unusually large propeller shafts, so you may need adapters. Bob Zambelli turned down prop‑shaft adapters and gave them 5/16-24 threads for my model. I used Du-Bro aluminum spinner nuts in front of the propellers.
- Propellers: APC 12 x 8E (I used these and will try other sizes for comparison).
- Motor mounts: 1-inch nylon spacers and 8-32 bolts; motors mounted with 1-inch nylon standoffs for easy access and cooling.
- ESCs: Castle Creations Phoenix-80s (80-amp). I used these even though 80 A is overkill because the 60 A units weren't in stock; weight difference negligible. I used Castle Link USB Programming Kit for adjustments.
- Batteries: Two five-cell (5S) Thunder Power 3850 mAh Li-Poly packs (25C continuous, 30C sustained, 50C short-burst).
- Radio battery: Separate 1200 mAh Ni-Cd pack for the receiver and servos, since 5S ESCs typically don't provide BEC.
- Connectors: Deans Ultra connectors (I drill a 1/16-inch hole in each and use snap-ring pliers to help disconnect them).
- Servos: Blue Bird BMS-631MG servos (69 oz‑in torque).
- Receiver: Berg 7P receiver (smallest I've used in something other than a park flyer-size airplane; works fine).
- Other: Du-Bro hardware, K&S music wire and tools, Sig plastic canopy (Four-Star 60), MonoKote covering.
I mounted the motors with nylon spacers and used APC 12 x 8E props. For ESCs I chose Phoenix-80s because of their small size and programmability. For Li-Poly packs I went with Thunder Power 3850 mAh 5S packs; I don't typically fly continuously at full throttle, so the capacity and discharge rating are more than adequate.
Construction
I suggest that you make a kit of the parts before you begin construction. I don’t have a wood list because I try to keep a good balsa and plywood supply on hand for building from scratch. Lone Star Balsa is where I buy my wood. After making a rough estimate of the wood I think I’ll need, I’ll order more than that. It will be needed later for repairs or the next project.
I get a second copy of the plans or make copies of the part drawings so I can cut paper patterns and trace them with a ballpoint pen onto the balsa or plywood. It may be old-fashioned, but it works. I cut everything out with a band saw or scroll saw. If the cutting is inaccurate, a sanding block will get the parts in shape. The accuracy is up to you.
Wing
- Use waxed paper over the plans on a flat, smooth worktable.
- With this airfoil section, the bottom of the ribs from the lower spar to the TE is straight, so with the lower spar, lower TE sheeting, and center-section bottom sheeting positioned over the panels, you can locate, pin, and glue the ribs in place.
- Make your own tapered TE stock using a small, sharp block plane and a sanding block; glue the TE and upper TE sheeting in place.
- Before adding the upper spar, cut the vertical-grain spar webbing to fit. This webbing is a pain because each piece is different for the tapered wing, but it adds great strength. Cut and block-sand each piece to fit.
- Add the top spar, the leading edge, and the front spar. Add the top and bottom LE sheeting and the top center-section sheeting after removing the wing panels from the building surface.
- Use plywood rib doublers to accept the grooved landing-gear blocks for the trike or tail‑dragger gear.
- Put cardboard tubes through the ribs for the aileron-servo leads and ESC leads before adding the upper sheeting.
- Cut a vertical slot between the spars in the two inner ribs so the plywood dihedral joiner can be inserted.
- Glue plywood cap ribs on the wingtips. Wrap the center joint with 4-inch-wide fiberglass cloth and epoxy; scrape excess epoxy for a smooth appearance.
- Glue a plywood mounting tab through the LE and center ribs to position the wing in the fuselage.
- Ailerons: made from 3/8-inch balsa sheet; LE beveled and TE sanded round.
Tail Surfaces
- Build horizontal stabilizer, elevators, fin, and rudder over the plans from 1/8-inch balsa stock.
- Bevel elevator and rudder LEs, sand outer edges round.
- Join the two elevators with a bent piece of 1/8-inch music wire epoxied in place.
- Use pinned nylon hinges; I use Du-Bro tools to cut the slots. Fit hinges and epoxy them in place later, after covering.
Fuselage and Nacelles
- Glue plywood doublers to the balsa side pieces. Put lightening holes in the plywood doublers with a hole saw in a small drill press.
- Glue wing-saddle pieces, stabilizer-saddle doubler, and lower edge strips to the fuselage sides before assembly.
- Glue bulkheads F3, F4, and F5 to one fuselage side, then add the other side. Keep fuselage sides parallel above the wing for easy alignment; pull in nose and tail sections and add remaining bulkheads.
- The upper rear side pieces are cut oversize and beveled on the lower edges to mate with the main fuselage sides. Glue in place, block-sand upper edges flat in line with bulkhead tops, then add the 1/4-inch balsa top piece and sand smooth and round.
- Curve and glue the forward-fuselage top sheet over the bulkhead tops. Add fuselage bottom sheeting later, after tail-surface linkages are installed.
- Make a removable hatch in the forward-fuselage bottom section for access to the battery compartment and ESC.
- Install a nose-block for the radio battery pack and nose-gear steering (if using tricycle gear). If a large balsa block is unavailable, make the nose block by laminating thinner material together.
Nacelles:
- Built like the fuselage: glue plywood doublers to balsa sides, join sides with plywood motor-mounting bulkhead and rear bulkhead, add balsa top pieces and round them off.
- Drill motor-mounting holes in the plywood bulkhead before assembly.
- Epoxy in place balsa motor-cowling side pieces and round their edges.
- Nacelles fit in place on the wing panels between the two plywood partial ribs and are epoxied in place.
- Motor-mount bulkheads have top and bottom spaces to admit cooling air to pass over the ESCs and Li-Poly batteries. Cooling air can exit through holes in the rear upper nacelle sheeting and the opening in the lower rear of the nacelle.
- I used removable plywood hatches on the bottom of the nacelles for access to the ESCs and Li‑Poly packs, with spring-loaded quick-release latches.
- ESCs mounted to the compartment floor with hook-and-loop fastener; removable plywood plates are screwed in place to accept the Li‑Poly packs, which are also held with hook-and-loop fastener. There's plenty of room for cooling air.
Landing gear:
- Bent from 1/16-inch music wire using a heavy-duty K&S bender. Decide during construction whether to use trike gear or tail‑dragger setup.
- I used 3-inch light foam wheels to handle grass fields.
- I like leaf-spring-type tail-wheel assemblies, with the steering arm connected to the rudder by small coil springs.
Final Assembly
- Fit the fuselage to the wing, align it, and bolt it in place.
- Sand or shim the bulkhead at the wing LE for a good fit of the wing-mounting tab; sand the fuselage wing-saddle opening for a good fit to the wing.
- With the wing held in place, drill through the wing into the fuselage mounting plate for tapped holes to accept the nylon wing-mounting bolts.
- Add the horizontal stabilizer and glue it into the fuselage once alignment with the wing is confirmed. Add the vertical fin last.
- With all control surfaces hinged and in place, add the control horns and linkages from the servos.
- I prefer fiberglass-tube pushrods or flexible nylon-tube linkages. Plywood aileron servo mounts are glued in place between the closely spaced ribs in the wing panels.
- I used a Sig Four-Star 60 canopy and covered the model with MonoKote.
For final balancing I positioned the Li‑Poly battery packs toward the rear of the space in the nacelles and positioned the radio battery just ahead of the wing. I have the balance point almost on the bottom of the spar location at the fuselage side. As I get more flight time I may move the balance point for finer tuning.
Set control-surface throws to suit the pilot:
- Rudder: as much throw as possible without interfering with the elevators.
- Elevators: approximately 2 inches of throw at the TE; low rate set at 50%.
- Ailerons: roughly 1 inch.
Control‑surface travel, dual-rate settings, exponential, and airplane response should be set to suit the pilot. Preferences vary widely.
Performance and Handling
I'm happy with Lotsa Watts. It was easy to build, it's big but not too big, it's capable of any kind of flying I want to do, and it is simple to fly.
The plus is those twin motors. There is the excitement of a twin, with electrics and without the worry of one motor stopping at a bad time. Good stuff!
MA
Dick Sarpolus [email protected]
Specifications
- Type: RC sport
- Wingspan: 82 inches
- Weight: 7.5 pounds without batteries
- Flying weight: 9.75 pounds ready to fly
- Wing area: 1,266 square inches
- Length: 60 inches
- Wing loading (ready to fly): 21 ounces/square foot
- Motors: Welgard C50/55/06 brushless outrunner
- Propellers: APC 12 x 8E
- Power: Castle Creations Phoenix 50- to 80-amp ESCs; two five-cell 3850 mAh Li-Poly batteries
- Draw: 42 amps/motor
- Output: 750 watts/motor
- Watts/pound: 150
- Radio: Four channels minimum with four standard servos
- Construction: Built-up balsa and plywood
- Covering/finish: MonoKote or similar film
Sources
- Welgard motors:
- BP Hobbies
- 140 Ethel Rd. W., Suite J, Piscataway, NJ 08854
- (732) 287-3933
- www.bphobbies.com
- Phoenix ESC, Berg 7P receiver:
- Castle Creations
- 235 S. Kansas Ave., Olathe, KS 66061
- (913) 390-6939
- www.castlecreations.com
- Li-Poly batteries:
- Thunder Power
- 4720 W. University Ave., Las Vegas, NV 89103
- (702) 228-8883
- www.thunderpower-batteries.com
- Ultra connectors:
- W.S. Deans Co.
- 10875 Portal Dr., Los Alamitos, CA 90720
- (714) 828-6494
- www.wsdeans.com
- Balsa, building materials:
- Lone Star Balsa
- 115 Industrial, Lancaster, TX 75134
- (972) 218-9663
- www.lonestar-models.com
- Hardware, accessories:
- Du-Bro
- Box 815, Wauconda, IL 60084
- (800) 848-9411
- http://dubro.com
- Music wire, tools:
- K&S Engineering
- 6917 W. 59th St., Chicago, IL 60638
- (773) 586-8503
- www.ksmetals.com
- Clear canopy:
- Sig Manufacturing
- Box 520, Montezuma, IA 50171
- (641) 623-5154
- www.sigmfg.com
- Top Flite MonoKote covering:
- Great Planes Model Distributors
- Box 9021, Champaign, IL 61826
- (217) 398-8970
- www.monokote.com
Transcribed from original scans by AI. Minor OCR errors may remain.

