

Making Model-Show Displays
by Bob Balsie
A problem we face in trying to recruit new people into the sport of aeromodeling is that many of them think model airplanes are too complicated to understand. As a result, they are reluctant to become involved in the hobby. To help people overcome this roadblock, I built a few display items a number of years ago that were used during our club’s annual model-airplane show. These exhibits illustrate RC and CL airplanes’ operating features and give laypeople insight into how these models are operated and flown.
Making such display items is not difficult. I suggest your club come up with similar display pieces to use during your next public model show. I have made six small exhibits on wood bases: an RC control system, a simple CL system, a throttle-control system for CL airplanes, various types of propellers, a mock-up of an engine and fuel system, and a CL aerobatics engine disassembled to show all the working parts. The following describes the materials and techniques I used to make these displays.
Preparing the Base
- Use plywood for the base, covered with an attractive wood-grain Con-Tact paper (vinyl). Thickness can vary from 1/4" to 3/4", depending on the display and available wood.
- Cut the base to size. Cut a piece of Con-Tact paper large enough to wrap the edges and overlap onto the bottom by at least 1".
- Remove the backing and lay the paper adhesive-side up. Place the base in the middle of the vinyl, turn it over so the vinyl sticks to the wood, and press the material down starting from the center and working outward to remove trapped air.
- At the edges, cut the vinyl and fold the sides down. Overlap seams at the corners so shrinking with age won’t reveal the plywood underneath.
- Fold the vinyl over onto the bottom and press well. The result should look attractive and professional.
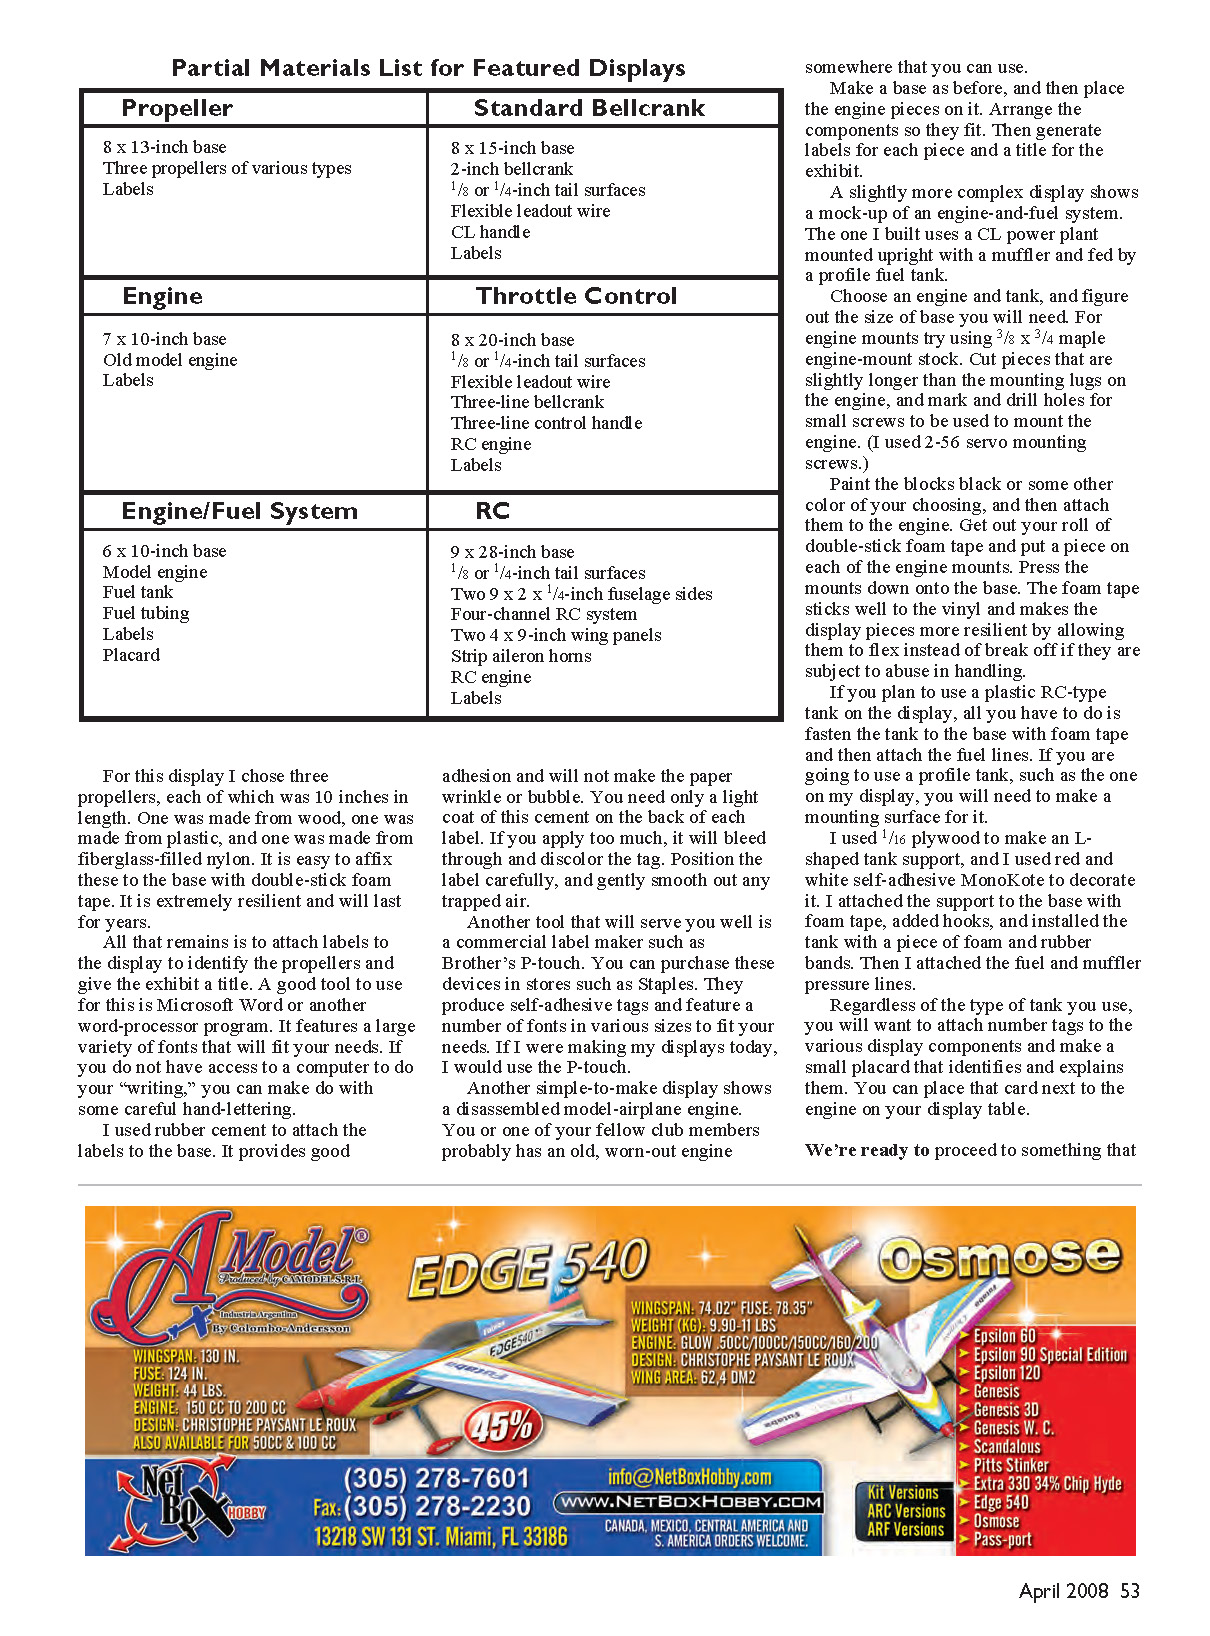
Partial Materials List for Featured Displays
Propeller
- 8 x 13-inch base
- Three propellers of various types
- Labels
Standard Bellcrank (CL control system)
- 8 x 15-inch base
- 2-inch bellcrank
- 1/8" or 1/4" tail surfaces
- Flexible leadout wire
- CL handle
- Labels
Engine (disassembled engine display)
- 7 x 10-inch base
- Old model engine (disassembled)
- Labels
Throttle Control (CL throttle-control system)
- 8 x 20-inch base
- 1/8" or 1/4" tail surfaces
- Flexible leadout wire
- Three-line bellcrank
- Three-line control handle
- RC engine
- Labels
Engine/Fuel System (mock-up)
- 6 x 10-inch base
- Model engine
- Fuel tank (RC or profile)
- Fuel tubing
- Labels
- Small placard
RC (RC internal-workings display)
- 9 x 28-inch base
- 1/8" or 1/4" tail surfaces
- Two 9 x 2 x 1/4-inch fuselage sides
- Four-channel RC system (servos, receiver)
- Two 4 x 9-inch wing panels
- Strip aileron horns
- RC engine
- Labels
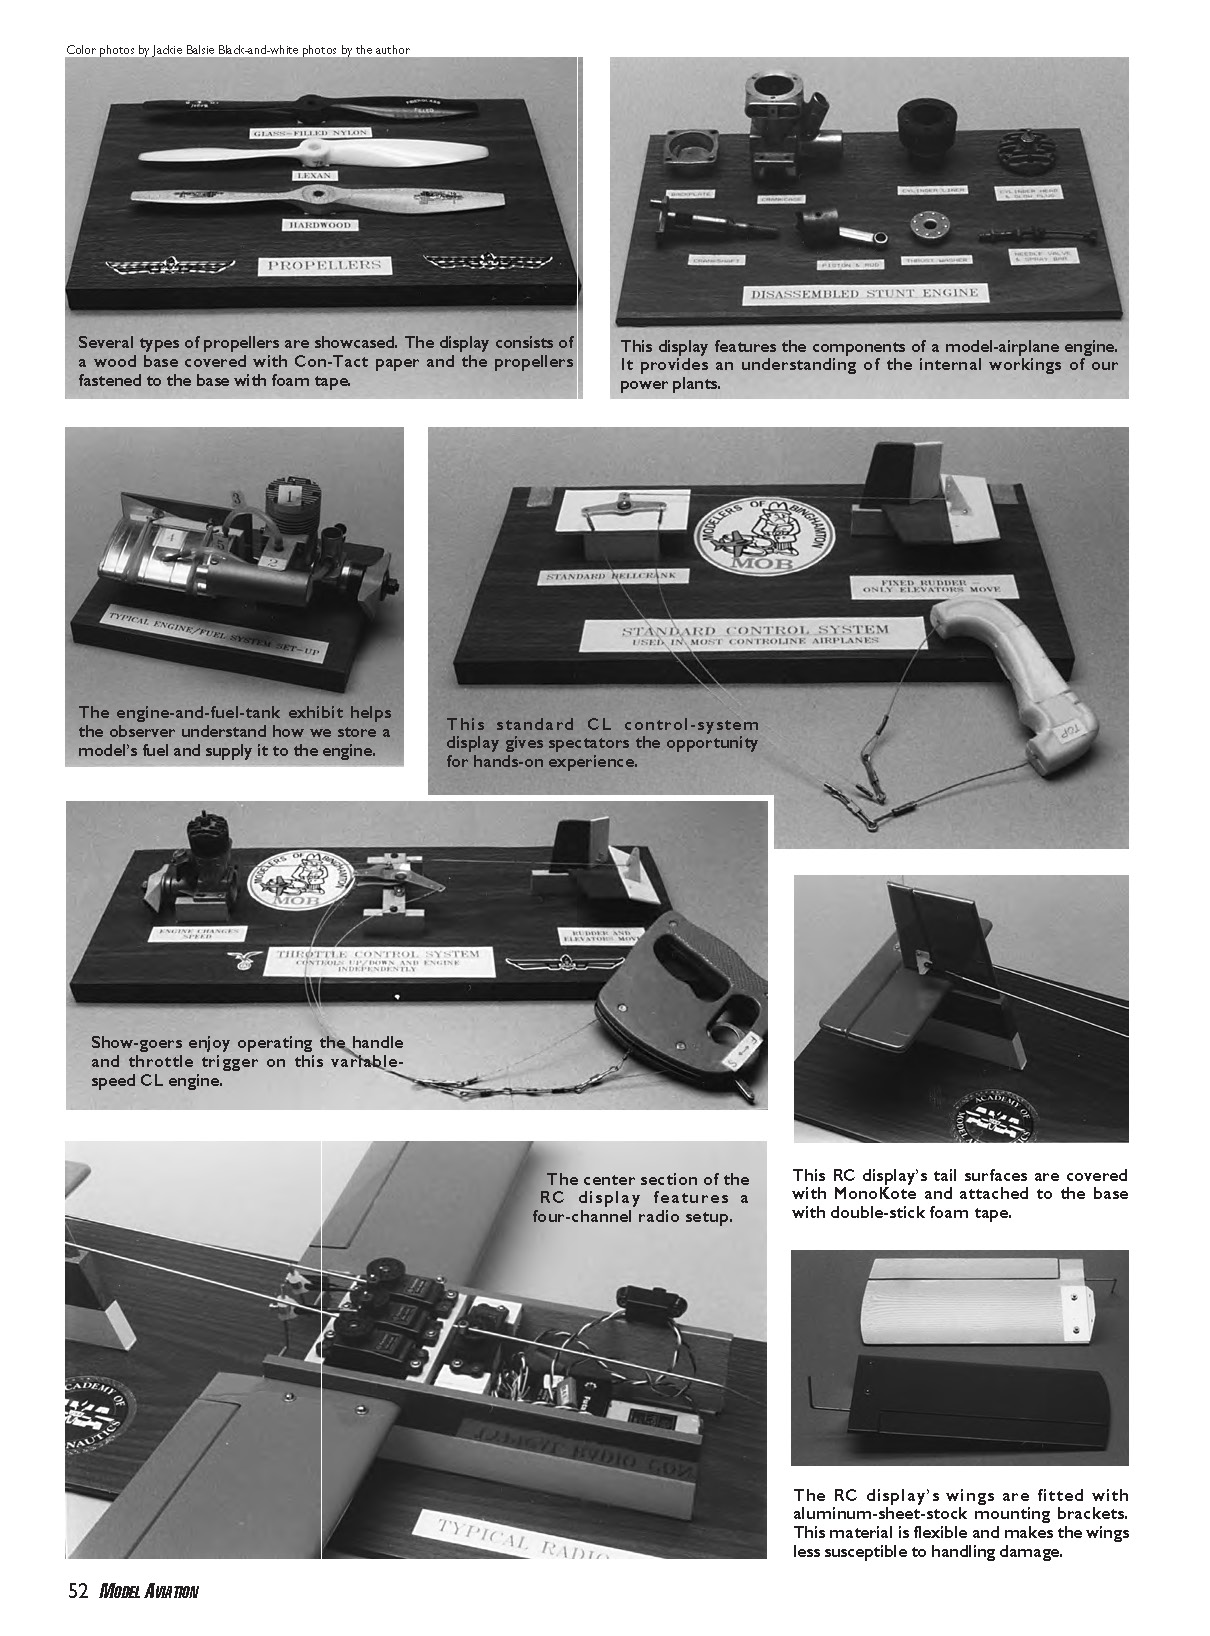
Propeller Display
- I used three 10" propellers: one wood, one plastic, and one fiberglass-filled nylon.
- Affix propellers to the base with double-stick foam tape — it’s resilient and lasts for years.
- Attach labels identifying each propeller and give the exhibit a title. Use a word processor for printing labels or hand-letter carefully.
- I used rubber cement to affix labels (light coat only to avoid bleed). A commercial label maker (e.g., Brother P‑Touch) is a convenient alternative and produces self-adhesive tags.
Disassembled Engine Display
- Use an old, worn-out engine from a club member.
- Make a base and arrange the engine pieces so they fit neatly.
- Generate labels for each piece and a title placard for the exhibit.
Engine-and-Fuel-System Display
- This exhibit helps observers understand how fuel is stored and fed to the engine.
- Use a CL power plant mounted upright with a muffler and fed by a profile fuel tank or an RC tank.
- For engine mounts, try 3/8" x 3/4" maple engine-mount stock. Cut pieces slightly longer than the engine mounting lugs and mark/drill holes for small screws (I used 2-56 servo mounting screws).
- Paint the mount blocks, attach them to the engine, and use double-stick foam tape on the mounts to secure them to the base. Foam tape adds resilience and allows the pieces to flex under handling.
- For a plastic RC tank: fasten the tank to the base with foam tape and attach the fuel lines.
- For a profile tank: make an L-shaped support from 1/16" plywood, decorate with self-adhesive MonoKote, attach with foam tape, add hooks, and secure the tank with foam and rubber bands. Attach fuel and muffler pressure lines.
- Add numbered tags to components and a small explanatory placard to place beside the engine.
CL Control-System Display (simple, moving parts)
- Make two assemblies: a bellcrank and mount, and a mock-up of the airplane’s tail surfaces.
- Construct the bellcrank mount from 1/16" or 1/8" plywood attached to 3/8" x 3/4" maple stock.
- Use a locknut or Loctite on the bellcrank mounting screw to keep it from loosening during heavy use.
- Make tail surfaces from 1/8" or 1/4" balsa. Fasten the elevator to the stabilizer with Sig Easy Hinges or similar.
- Mount the control horn on top of the elevator where it’s easy to see. Glue the rudder to the fin with a slight right offset, as in a real CL model.
- Cement the completed tail assembly to a piece of maple stock and attach both bellcrank and tail assemblies to the base with foam tape.
- Install a pushrod made from 1/32" or 1/16" wire and connect a control handle to the bellcrank with heavy-gauge stranded wire.
- If you use this display, have at least one CL model available for demonstration.
CL Throttle-Control Display (more complex)
- This display includes a special bellcrank and an RC engine.
- Fabricate the bellcrank mount from 1/16" plywood and attach to maple mounts. Hinge both the rudder and elevators for this display.
- Mount the RC engine as in the fuel-system display.
- Use 1/32" wire pushrods for both rudder and engine controls; they can be installed in the same hole in the bellcrank’s moving arm.
- Choose a suitable wire size for the elevator pushrod.
- Use a three-line control handle and three heavy-gauge flexible wires of the same length: attach the two outer wires to the bellcrank and the center wire to the movable arm.
RC Internal-Workings Display (most complex)
- This exhibit illustrates an RC airplane’s internal workings: four servos, a receiver, a battery pack, and removable wings.
- Fabricate engine mounts and tail surfaces as previously described.
- Mount the tail on a piece of 1/2" balsa covered with MonoKote to simulate the aft fuselage.
- The middle fuselage portion: use 1/4" hard balsa with hard-balsa beams for servo mounts. Make this section long enough to contain servos, receiver, and battery.
- For wings, use preshaped airfoil stock from the hobby shop. Cut, round tips, and finish the airfoil. Cut ailerons and hinge with Easy Hinges.
- Make wing-mounting brackets from thin aluminum sheet (e.g., K&S stock). The flexibility helps protect wings from handling damage.
- Attach wings to brackets with two 4-40 screws and nuts per panel, then attach panels to the fuselage with short sheet-metal screws for easy removal during packing.
- Power up the exhibit; when a person moves the transmitter sticks, the display’s control surfaces will move in unison, demonstrating in-flight controls.
Securing and Finishing the Displays
- Foam tape is an excellent way to secure displays to tabletops:
- Affix three or four 1" pieces of foam tape to the bottom of each display.
- Stick the display to the tabletop. The tape is strong but allows removal at the end of the show. Remove remaining tape residue from the table.
- Use labels and small placards to identify components and explain their functions. Commercial label makers (Brother P‑Touch) are useful for neat, self-adhesive tags.
Other Exhibits and Show Enhancements
- You aren’t limited to airplane displays. Model-boat and car enthusiasts can make exhibits to demonstrate how their models operate. Boats are especially good for safe indoor demonstrations (for example, around a mall fountain).
- Include a personal computer running a flight simulator (e.g., RealFlight). This is consistently one of the most popular parts of a show.
- Consider a small TV with DVD/VCR to show model-flying videos. AMA and several manufacturers supply videos.
- The Academy (AMA) has a loanable display: a large photo board, a video, and brochures available free through your AMA district representative.
- Have a sign-up sheet so interested people can request more information about flying or joining your club.
Show Setup and Staffing
- Pick an accessible area with enough room so displays are not crowded.
- RC exhibits contain expensive components and CL displays will be handled by the public, so secure them to tables and staff the booth.
- Staff with knowledgeable, patient modelers who enjoy explaining the hobby. These exhibits generate many questions, especially from young people; volunteers should be prepared for basic questions and to engage visitors.
- Be ready to listen and engage: scale models often prompt personal stories from visitors, which can be a rich part of the interaction.
Conclusion
Model shows are an excellent way for the public to glimpse our hobby. Whether the models educate or intimidate depends largely on the type of show you present. Displays that help people understand the hobby and make them want to get involved are powerful tools to recruit a good crop of new modelers.
Transcribed from original scans by AI. Minor OCR errors may remain.

