


Making Static Scale Propellers
Add a scale look to your model
by Lawrence E. Klingberg
When showing off a static model at a contest, the first thing a judge sees is the propeller, so it had better be a knockout! Making what I call a "show propeller" is not difficult, and it only takes a short time to carve out a masterpiece to install on your airplane. I will describe how to make a 24-inch laminated propeller for use on a 1/4-scale Travel Air biplane.
Tools and materials
- Band saw (to cut the propeller outline)
- Circular saw (to cut lumber to length and rip strips)
- Rotary rasp for drill motor
- Belt sander (optional)
- Large sanding stick with #40-grit sandpaper (homemade or commercial)
- Assorted finer grit sandpaper up to #400
- C-clamps
- Paintbrush
- Titebond wood glue
- Rust-Oleum Varathane Crystal Clear Fast-Drying Polyurethane (semigloss)
- Testors gold paint and silver paint
- Cardboard for templates
- Wood dowel and 1/16-inch tubing (for making the hole tool)
- Toothpicks
- Aluminum disk for propeller hub
- #35 drill bit
- 6-32 threaded rod (cut into eight 1/2-inch pieces)
- 6-32 nuts (drilled for safety wire)
- Hamilton Standard logo decals (optional)
Making the Blank
- Go to the lumberyard and select two 6-foot pieces of 1x4-inch wood—one redwood and one pine. Choose lightweight, straight-grained wood without knots or other imperfections.
- Cut the stock into 2-foot lengths.
- Using the circular saw, rip the pieces into 3/16-inch strips.
- If available, sand all of the wood pieces with a belt sander (optional).
- Select your best pieces of wood: three strips of redwood and four strips of pine are needed. Stack the blank so that pine is on the top and bottom of the stack.
- Liberally coat the mating faces with Titebond wood glue using a paintbrush. Clamp the blank with plenty of C-clamps and clean off any excess glue that oozes out.
- Let the blank dry for a couple of days to ensure a good bond.
Shaping the Propeller
- After the blank has fully dried, select the propeller outline from your plans or a three-view drawing.
- Make a cardboard template of the outline.
- Trace the template onto the blank and use a band saw to cut out the propeller shape.
- At this stage the blank should resemble the rough propeller outline.
Now the Fun Begins
It helps to have a commercial propeller to compare to, but it is not essential. Begin by carefully removing large amounts of material from the front face and rear portions of the blades. Remove stock conservatively—it's better to take off too little than to cut too deep and ruin the blank.
Use the rotary rasp in the drill to remove a lot of stock quickly. The rotary rasp and a large sanding stick with #40-grit sandpaper are the main shaping tools. Constantly check different locations on the blades for correct pitch and angle as you shape. As you near the finished shape, switch to progressively finer sandpaper to avoid scoring the blades. Shaping is time-consuming and requires patience—keep sanding and checking until you are satisfied with the appearance.
Finishing the Propeller
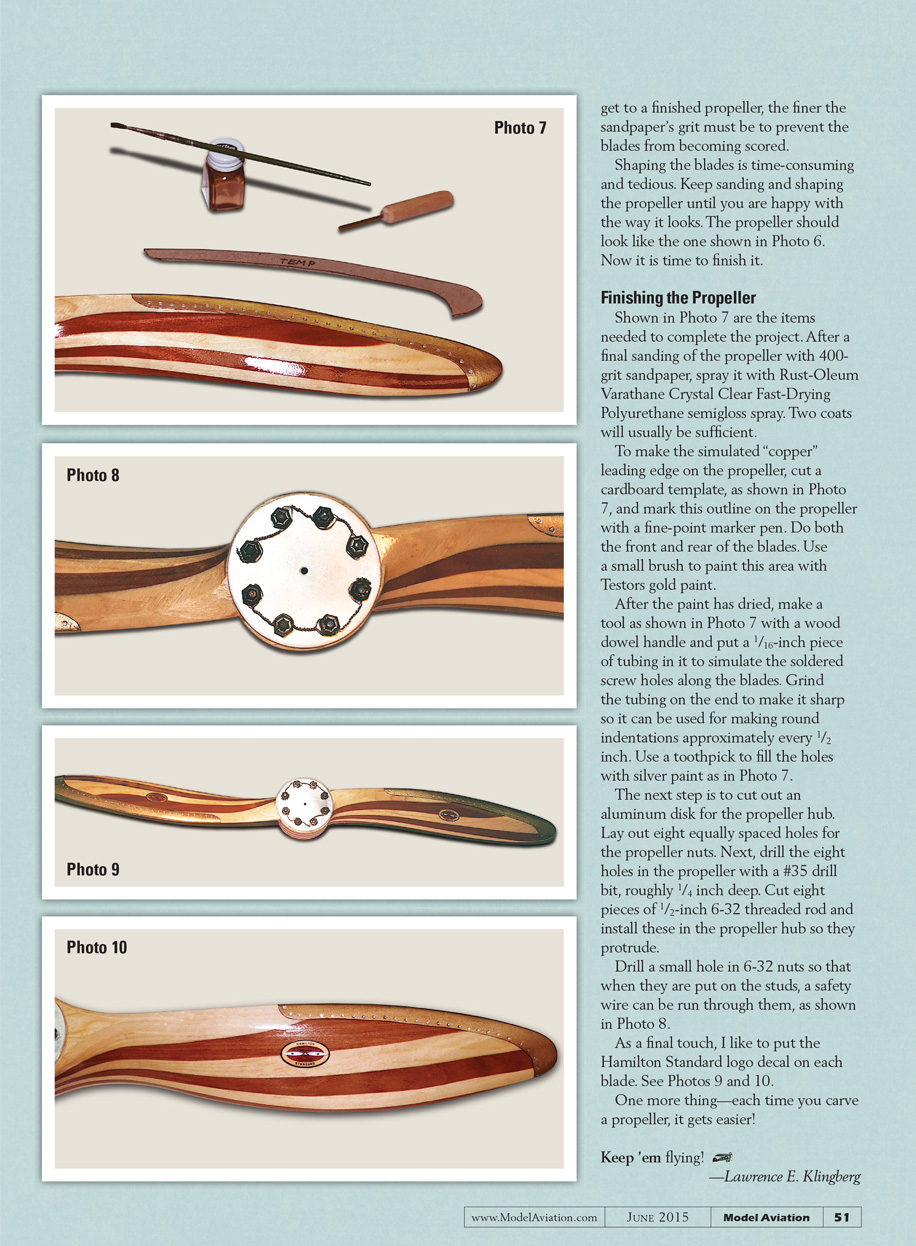
- Perform a final sanding with #400-grit sandpaper.
- Spray the propeller with Rust-Oleum Varathane Crystal Clear Fast-Drying Polyurethane (semigloss). Two coats are usually sufficient.
To simulate a copper leading edge:
- Cut a cardboard template for the leading-edge profile and mark the outline on both the front and rear of each blade with a fine-point marker.
- Use a small brush to paint the marked area with Testors gold paint.
To simulate soldered screw holes along the blades:
- Make a hole tool from a wood dowel handle with a 1/16-inch piece of tubing inserted in the end. Grind the tubing to a sharp edge so it can make round indentations about every 1/2 inch along the leading edge.
- Use a toothpick to fill each indentation with silver paint.
Propeller hub and hardware:
- Cut an aluminum disk for the propeller hub.
- Lay out eight equally spaced holes for the propeller studs.
- Drill the eight holes in the propeller with a #35 drill bit to a depth of roughly 1/4 inch.
- Cut eight pieces of 6-32 threaded rod, each 1/2 inch long, and install these in the propeller hub so they protrude.
- Drill a small hole in each 6-32 nut so a safety wire can be run through them when they are installed on the studs.
Final touches:
- Apply a Hamilton Standard logo decal to each blade, if desired.
- Each time you carve a propeller it gets easier.
Keep 'em flying! — Lawrence E. Klingberg
Transcribed from original scans by AI. Minor OCR errors may remain.

