
MASTERING THE LOOP
by Dave Scott
Lessons in proactive vs reactive flying
Rather than rehashing the ideal loop scenario, this article is intended to crawl/walk/run pilots through the stages required to routinely perform exceptional loops while enhancing practice effectiveness by focusing your attention on controlling the airplane rather than reacting to it.
Most fliers look to enter their maneuvers and then react to deviations as they happen. Because of the compound effect that a deviation can have on the rest of the maneuver, people who react are typically so busy making corrections that there is little time left to diagnose what’s causing the deviations and whether there’s anything that they can do to prevent them.
Consequently, reactive fliers need great amounts of practice to progress. Good aerobatic pilots don’t need to make many corrections to fly well. Good pilots execute each maneuver so that few, if any, adjustments are needed.
Basic Loop
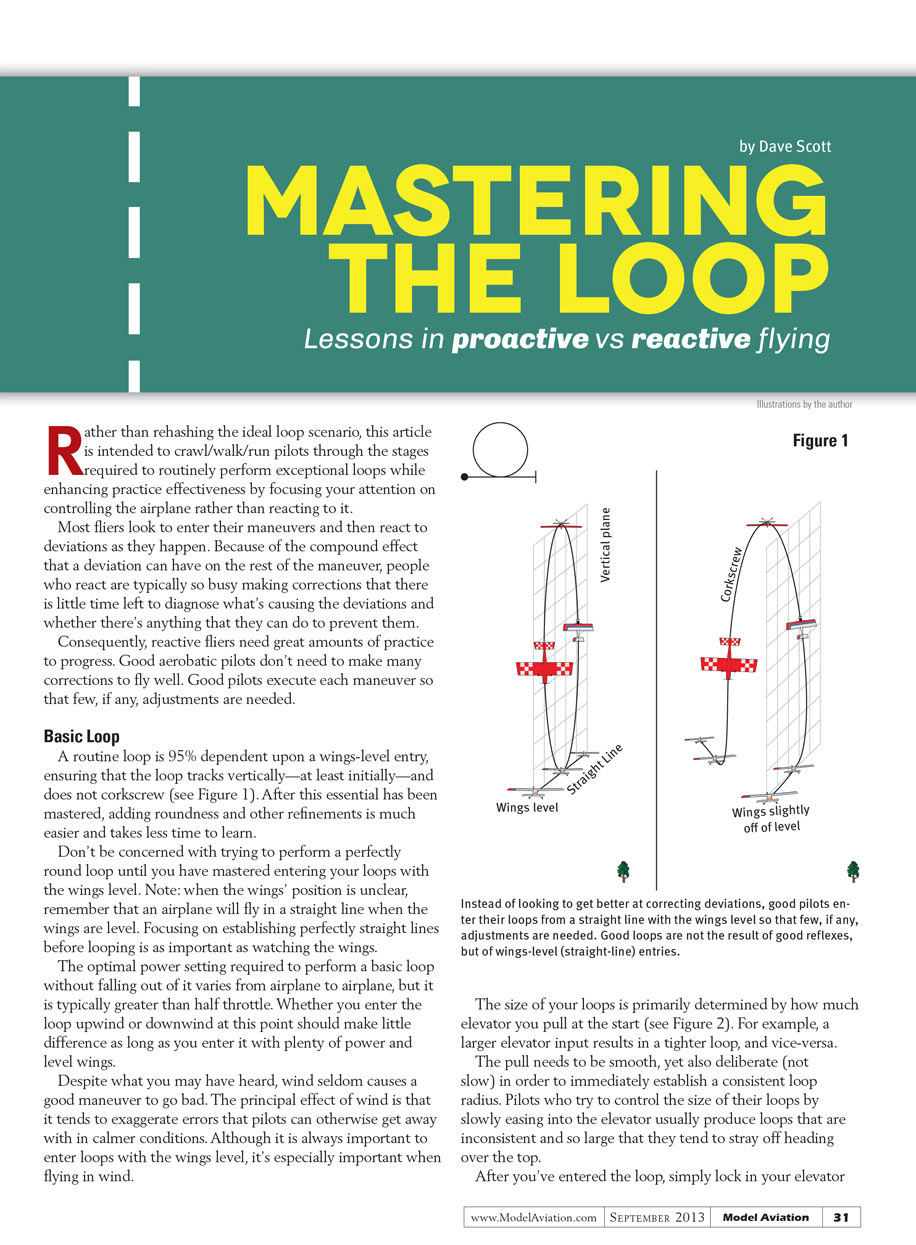
A routine loop is 95% dependent upon a wings-level entry, ensuring that the loop tracks vertically—at least initially—and does not corkscrew (see Figure 1). After this essential has been mastered, adding roundness and other refinements is much easier and takes less time to learn.
Don’t be concerned with trying to perform a perfectly round loop until you have mastered entering your loops with the wings level. Note: when the wings’ position is unclear, remember that an airplane will fly in a straight line when the wings are level. Focusing on establishing perfectly straight lines before looping is as important as watching the wings.
The optimal power setting required to perform a basic loop without falling out of it varies from airplane to airplane, but it is typically greater than half throttle. Whether you enter the loop upwind or downwind at this point should make little difference as long as you enter it with plenty of power and level wings.
Despite what you may have heard, wind seldom causes a good maneuver to go bad. The principal effect of wind is that it tends to exaggerate errors that pilots can otherwise get away with in calmer conditions. Although it is always important to enter loops with the wings level, it’s especially important when flying in wind.
Instead of looking to get better at correcting deviations, good pilots enter their loops from a straight line with the wings level so that few, if any, adjustments are needed. Good loops are not the result of good reflexes, but of wings-level (straight-line) entries.
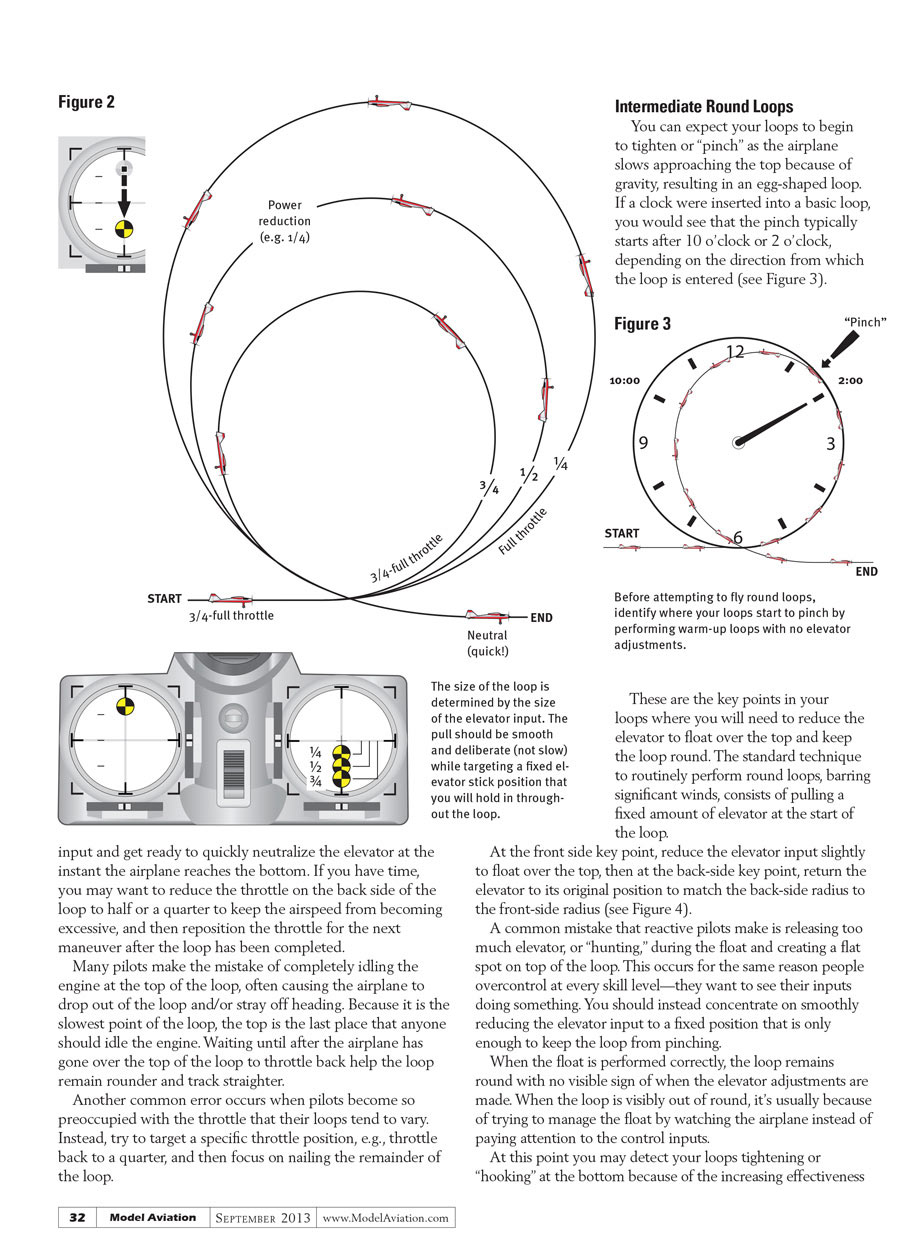
The size of your loops is primarily determined by how much elevator you pull at the start (see Figure 2). For example, a larger elevator input results in a tighter loop, and vice-versa.
The pull needs to be smooth, yet also deliberate (not slow) in order to immediately establish a consistent loop radius. Pilots who try to control the size of their loops by slowly easing into the elevator usually produce loops that are inconsistent and so large that they tend to stray off heading over the top.
After you’ve entered the loop, simply lock in your elevator input and get ready to quickly neutralize the elevator at the instant the airplane reaches the bottom. If you have time, you may want to reduce the throttle on the back side of the loop to half or a quarter to keep the airspeed from becoming excessive, and then reposition the throttle for the next maneuver after the loop has been completed.
Many pilots make the mistake of completely idling the engine at the top of the loop, often causing the airplane to drop out of the loop and/or stray off heading. Because it is the slowest point of the loop, the top is the last place that anyone should idle the engine. Waiting until after the airplane has gone over the top of the loop to throttle back help the loop remain rounder and track straighter.
Another common error occurs when pilots become so preoccupied with the throttle that their loops tend to vary. Instead, try to target a specific throttle position, e.g., throttle back to a quarter, and then focus on nailing the remainder of the loop.
Intermediate Round Loops
You can expect your loops to begin to tighten or "pinch" as the airplane slows approaching the top because of gravity, resulting in an egg-shaped loop. If a clock were inserted into a basic loop, you would see that the pinch typically starts after 10 o'clock or 2 o'clock, depending on the direction from which the loop is entered (see Figure 3).
Before attempting to fly round loops, identify where your loops start to pinch by performing warm-up loops with no elevator adjustments.
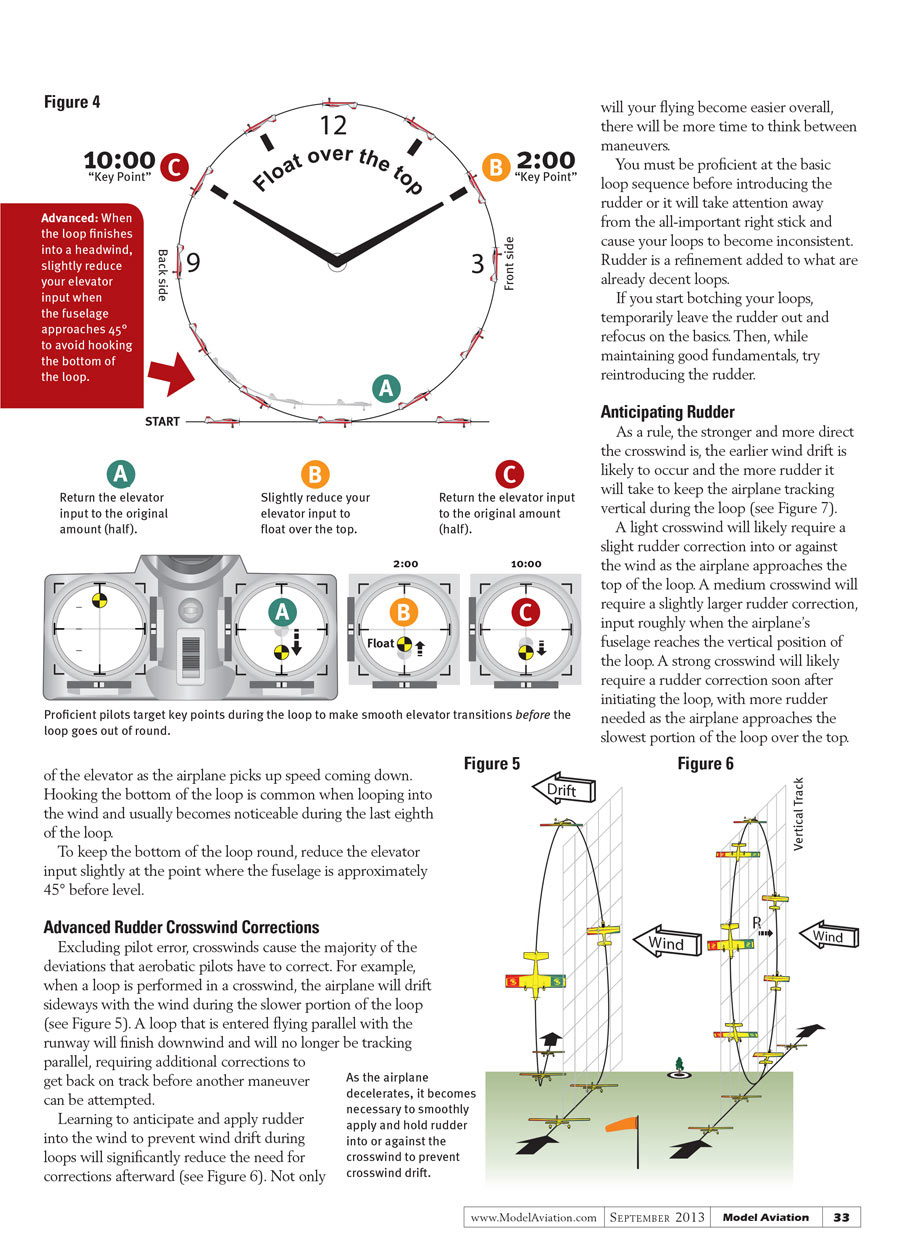
These are the key points in your loops where you will need to reduce the elevator to float over the top and keep the loop round. The standard technique to routinely perform round loops, barring significant winds, consists of pulling a fixed amount of elevator at the start of the loop.
At the front side key point, reduce the elevator input slightly to float over the top, then at the back-side key point, return the elevator to its original position to match the back-side radius to the front-side radius (see Figure 4).
A common mistake that reactive pilots make is releasing too much elevator, or "hunting," during the float and creating a flat spot on top of the loop. This occurs for the same reason people overcontrol at every skill level—they want to see their inputs doing something. You should instead concentrate on smoothly reducing the elevator input to a fixed position that is only enough to keep the loop from pinching.
When the float is performed correctly, the loop remains round with no visible sign of when the elevator adjustments are made. When the loop is visibly out of round, it's usually because of trying to manage the float by watching the airplane instead of paying attention to the control inputs.
At this point you may detect your loops tightening or "hooking" at the bottom because of the increasing effectiveness of the elevator as airspeed increases. To keep the bottom of the loop round, reduce the elevator input slightly at the point where the fuselage is approximately 45° before level.
Advanced Rudder Crosswind Corrections
Excluding pilot error, crosswinds cause the majority of the deviations that aerobatic pilots have to correct. For example, when a loop is performed in a crosswind, the airplane will drift sideways with the wind during the slower portion of the loop (see Figure 5). A loop that is entered flying parallel with the runway will finish downwind and will no longer be tracking parallel, requiring additional corrections to get back on track before another maneuver can be attempted.
Learning to anticipate and apply rudder into the wind to prevent wind drift during loops will significantly reduce the need for corrections afterward (see Figure 6). Not only will your flying become easier overall, there will be more time to think between maneuvers.
Anticipating Rudder
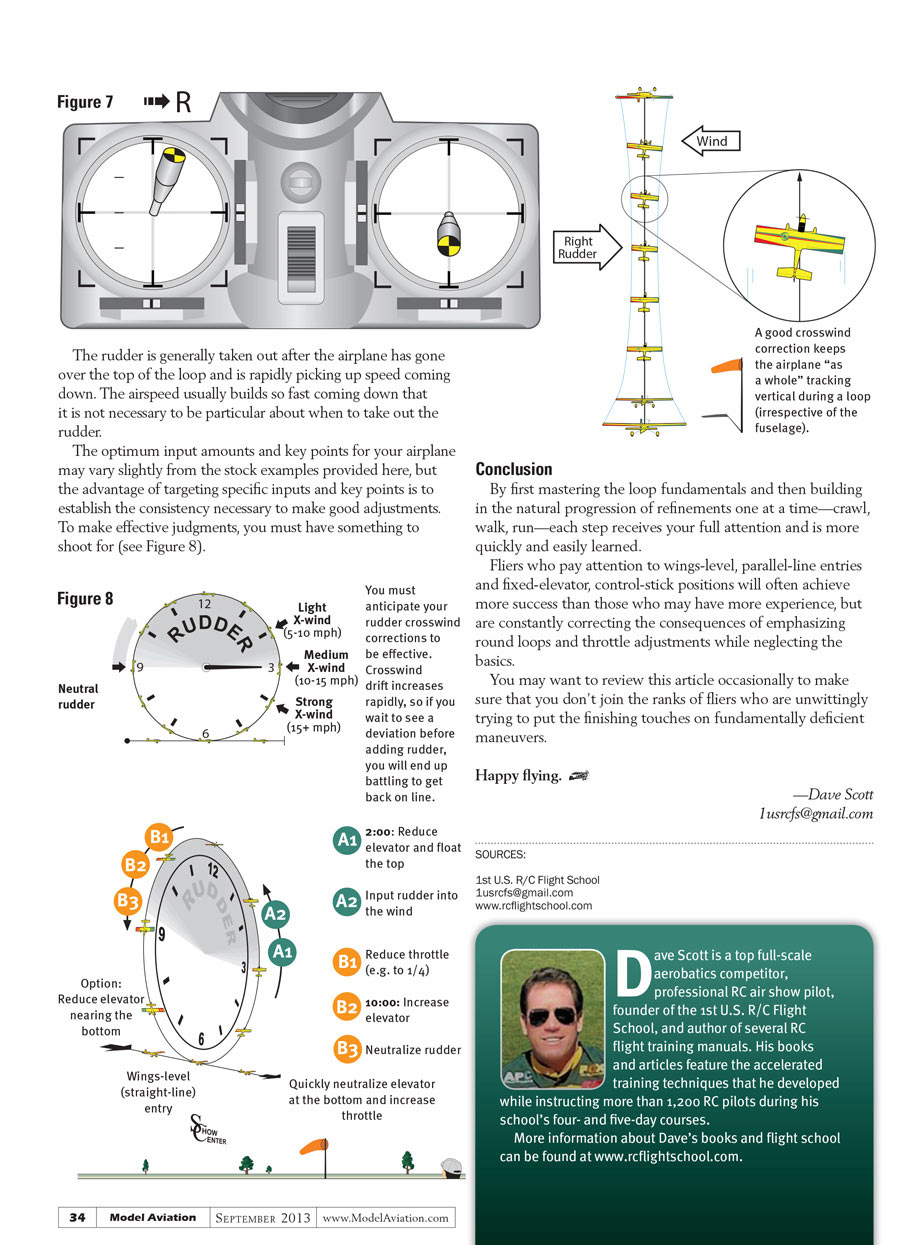
As a rule, the stronger and more direct the crosswind is, the earlier wind drift is likely to occur and the more rudder it will take to keep the airplane tracking vertical during the loop (see Figure 7).
A light crosswind will likely require a slight rudder correction into or against the wind as the airplane approaches the top of the loop. A medium crosswind will require a slightly larger rudder correction, input roughly when the airplane's fuselage reaches the vertical position of the loop. A strong crosswind will likely require a rudder correction soon after initiating the loop, with more rudder needed as the airplane approaches the slowest portion of the loop over the top. The rudder is generally taken out after the airplane has gone over the top of the loop and is rapidly picking up speed coming down. The airspeed usually builds so fast coming down that it is not necessary to be particular about when to take out the rudder.
The optimum input amounts and key points for your airplane may vary slightly from the stock examples provided here, but the advantage of targeting specific inputs and key points is to establish the consistency necessary to make good adjustments. To make effective judgments, you must have something to shoot for (see Figure 8).
Conclusion
By first mastering the loop fundamentals and then building in the natural progression of refinements, one at a time—crawl, walk, run—each step receives your full attention and is more quickly and easily learned.
Fliers who pay attention to wings-level, parallel-line entries and fixed-elevator, control-stick positions will often achieve more success than those who may have more experience, but are constantly correcting the consequences of emphasizing round loops and throttle adjustments while neglecting the basics.
You may want to review this article occasionally to make sure that you don't join the ranks of fliers who are unwittingly trying to put the finishing touches on fundamentally deficient maneuvers.
Happy flying. ✈
—Dave Scott <REDACTED>
SOURCES: 1st U.S. R/C Flight School <REDACTED> www.rcflightschool.com
Dave Scott is a top full-scale aerobatics competitor, professional RC air show pilot, founder of the 1st U.S. R/C Flight School, and author of several RC flight training manuals. His books and articles feature the accelerated training techniques that he developed while instructing more than 1,200 RC pilots during his school’s four- and five-day courses. More information about Dave’s books and flight school can be found at www.rcflightschool.com.
Transcribed from original scans by AI. Minor OCR errors may remain.

