
Mastering Procedure and Rudder Turns
By Dave Scott
If you've ever watched proficient pilots fly (you can tell by the mirror-image good landings), you might have noticed how their general flying appears routine. They make flying look easy because their control of the airplane has become mostly automatic.
Rather than reacting to the airplane each time they perform a turn, expert pilots repeat consistent control inputs and the airplane predictably follows. If a novice focuses on controlling the model and repeating control inputs instead of reacting to the airplane, he or she can achieve the same reliable turn results as a veteran flier.
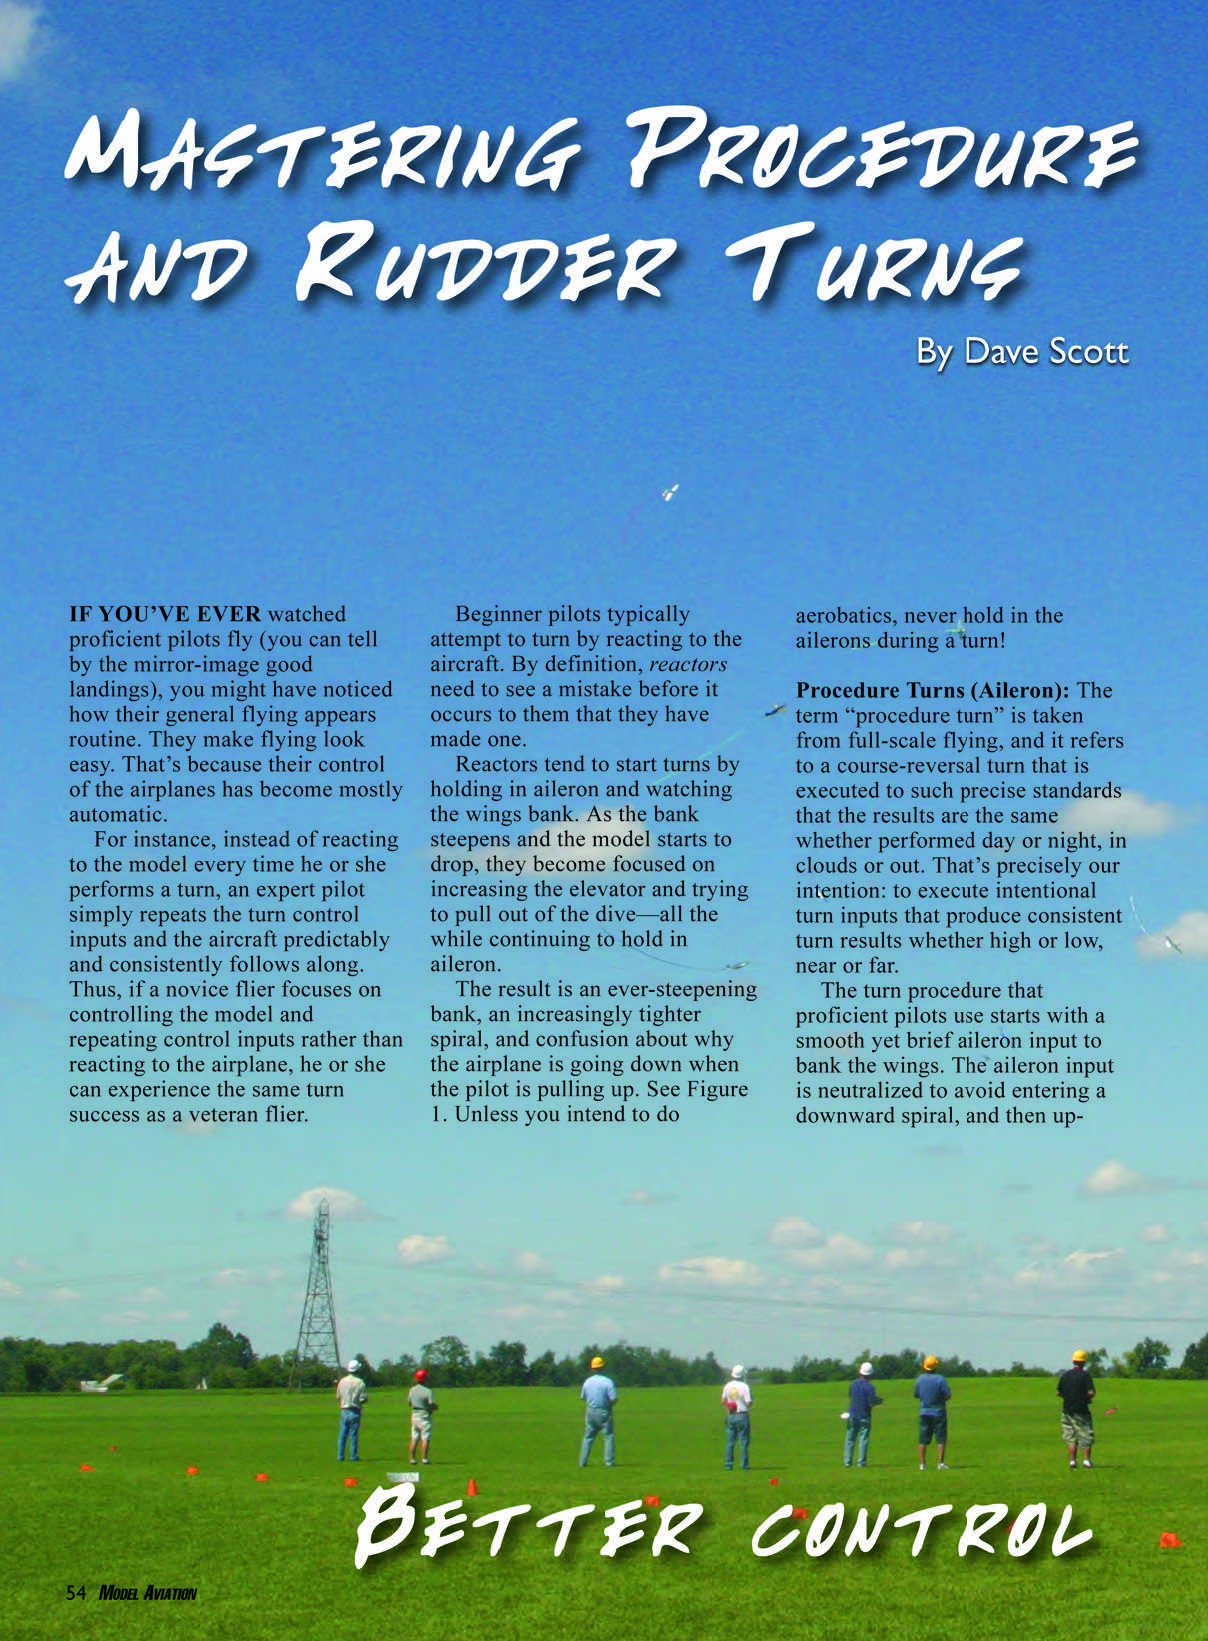
Beginner pilots typically attempt to turn by reacting to the aircraft. By definition, reactors need to see a mistake before they recognize they've made one. Reactors tend to start turns by holding in aileron and watching the wings bank. As the bank steepens and the airplane starts to drop, they concentrate on increasing elevator and trying to pull out of the dive—all the while continuing to hold aileron. The result is an ever-steepening bank, an increasingly tight spiral, and confusion about why the airplane is going down when the pilot is pulling up. Unless you intend to do aerobatics, never hold in the ailerons during a turn!
Procedure Turns (Aileron)
The term "procedure turn" comes from full-scale flying and refers to a course-reversal turn executed to precise, repeatable standards. Our goal is the same: intentional turn inputs that produce consistent results whether high or low, near or far.
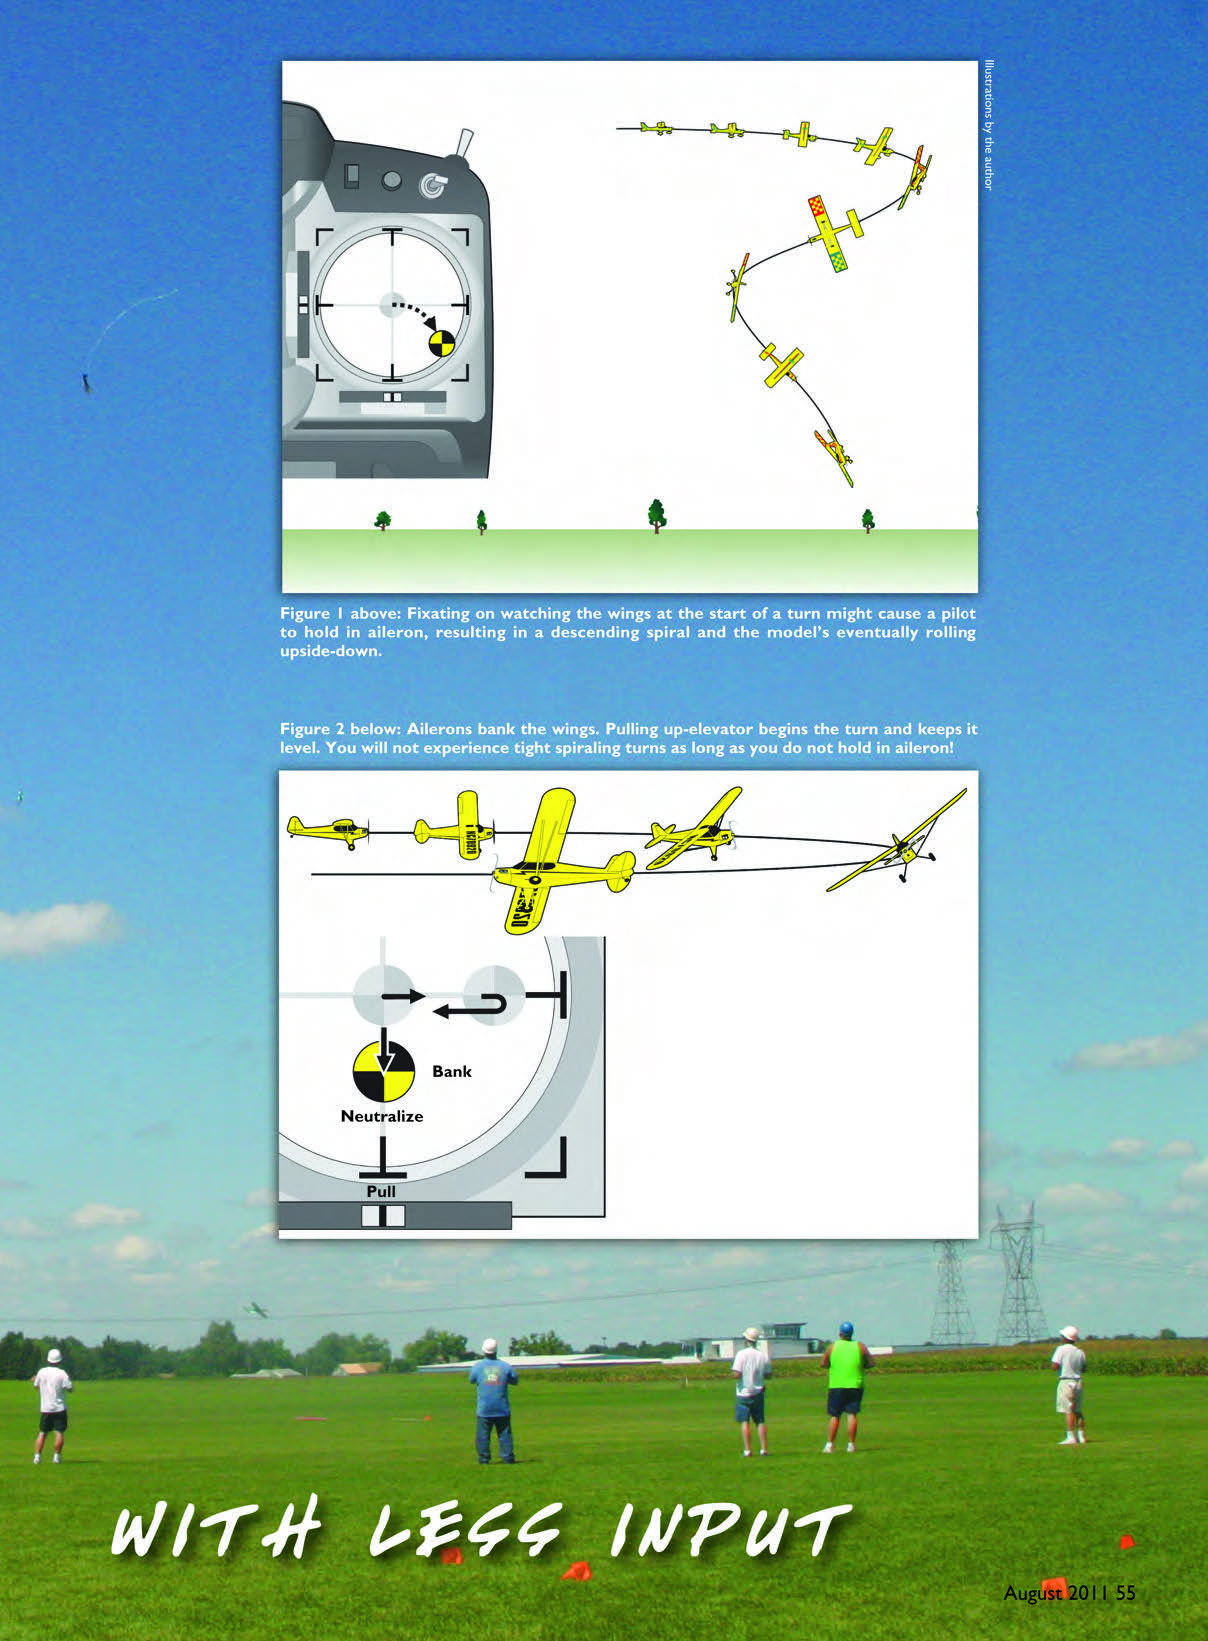
Basic procedure-turn technique:
- Give a smooth, brief aileron input to establish the desired bank.
- Neutralize the aileron to avoid entering a downward spiral.
- Apply up-elevator to pull the nose into the turn and keep the turn level.
The size of the aileron input determines the degree of bank (and thus the radius/rate of the turn) and how much elevator is needed to keep the turn level. A smaller aileron input produces a shallower bank and a wider turn; a larger aileron input produces a steeper bank and a tighter turn. The objective is to find the aileron input that consistently produces the degree of bank you want, then determine the correct amount of elevator to hold each time to keep the turn level.
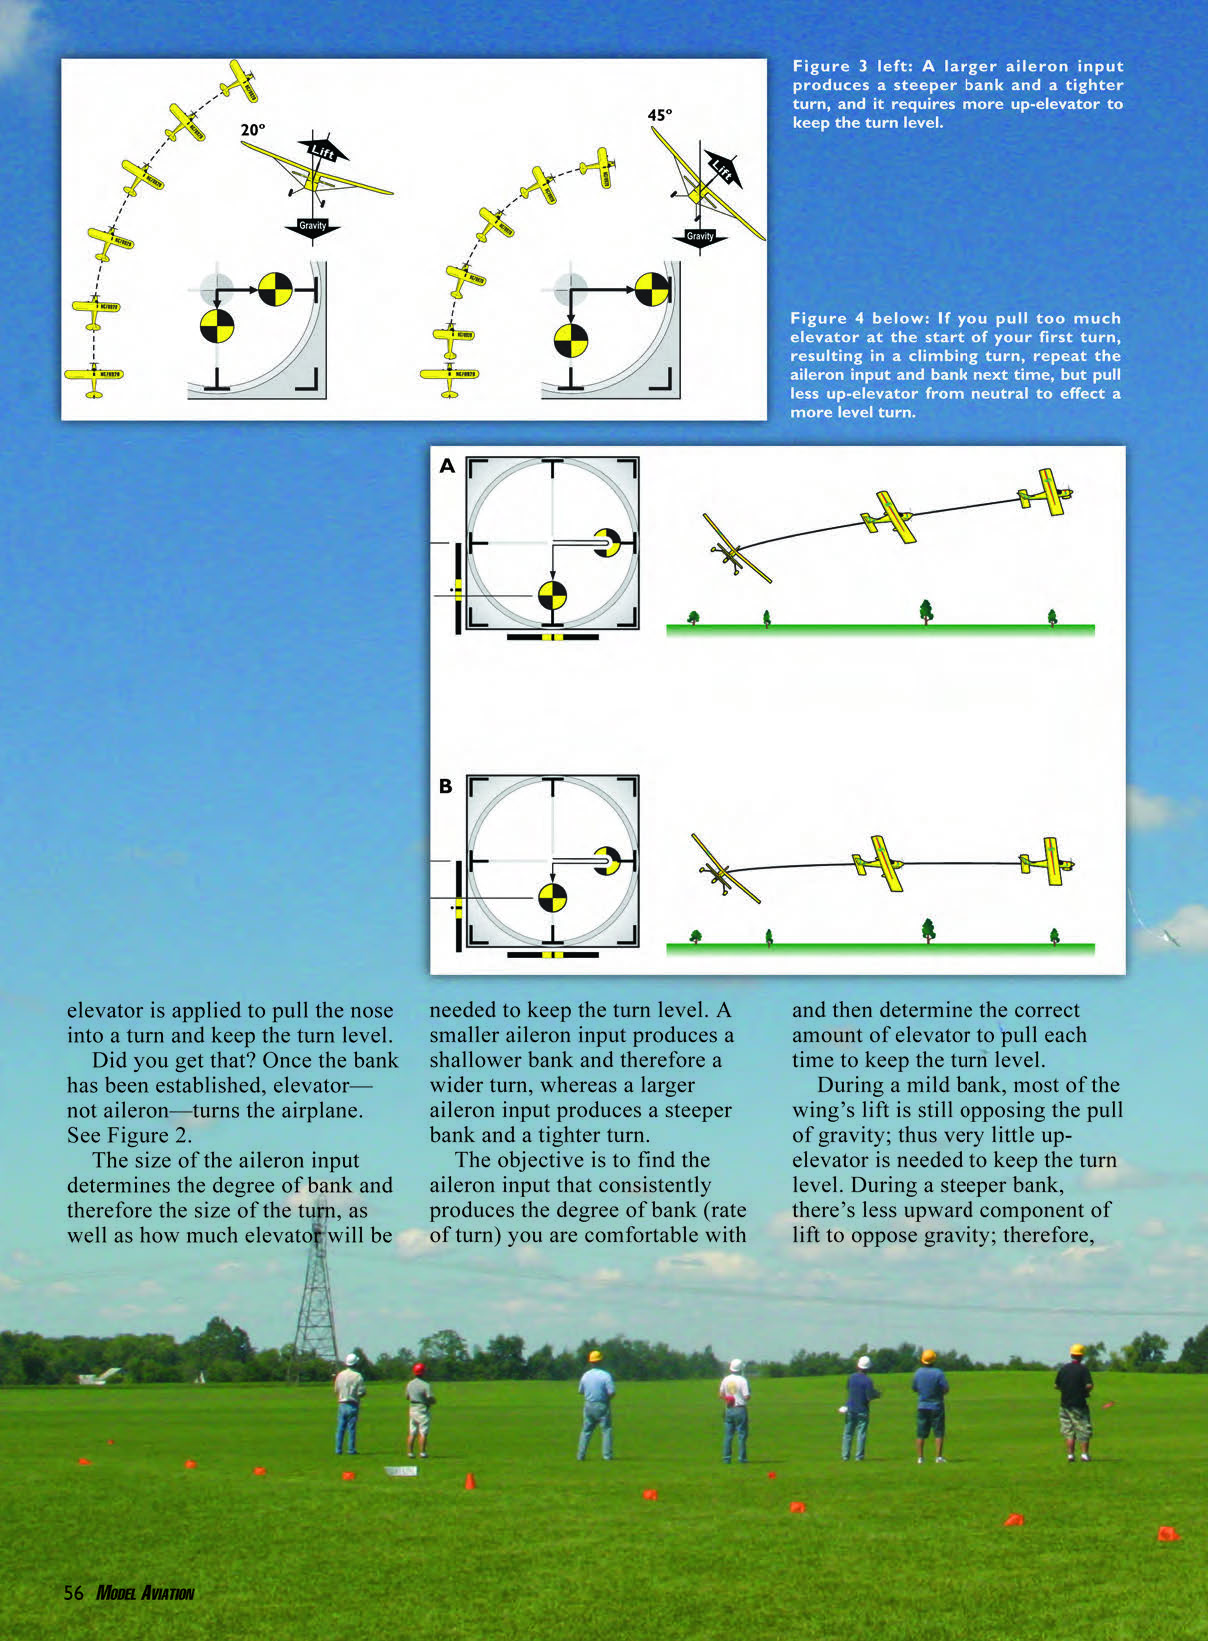
During a mild bank, most of the wing's lift still opposes gravity, so very little up-elevator is needed. During a steeper bank, there's less upward lift component opposing gravity; therefore, more up-elevator is required to keep the turn level. See Figure 3.
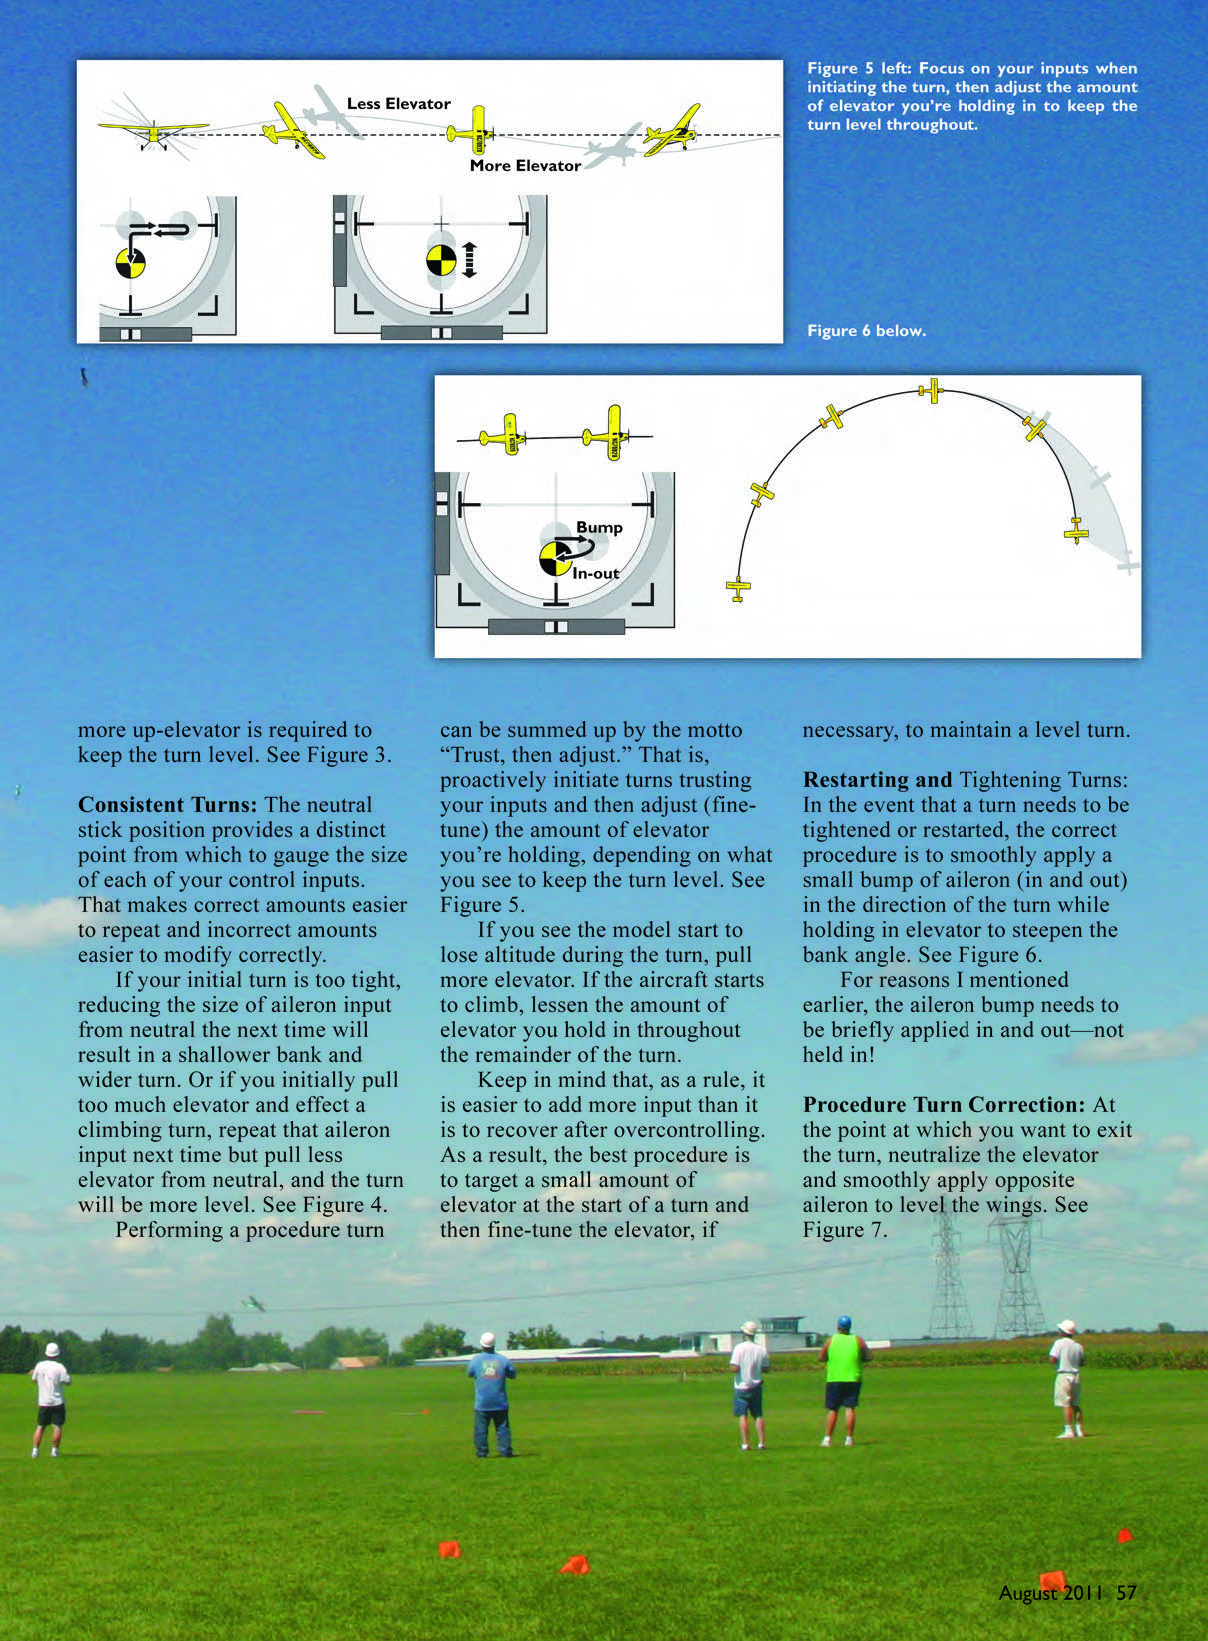
This can be summed up by the motto: Trust, then adjust. That is, proactively initiate turns trusting your inputs and then fine-tune the amount of elevator you hold, depending on what you see, to keep the turn level. If the model starts to lose altitude during the turn, pull more elevator. If the aircraft starts to climb, lessen the amount of elevator throughout the remainder of the turn.
Keep in mind that it is generally easier to add more input than to recover after overcontrolling. Start with a small amount of elevator at the beginning of a turn and then adjust as necessary to maintain a level turn.
Consistent Turns
The neutral-stick position provides a clear reference point from which to gauge each control input. That makes correct amounts easier to repeat and incorrect amounts easier to modify. If your initial turn is too tight, reduce the aileron input the next time and you will get a shallower bank and wider turn. If you initially pull too much elevator and the turn climbs, repeat the aileron input but pull less elevator from neutral to level the turn. See Figure 4.
Restarting and Tightening Turns
If a turn needs to be tightened or restarted, smoothly apply a small bump of aileron (in and out) in the direction of the turn while holding in elevator to steepen the bank. The aileron bump should be brief — apply it in and then immediately release it, not held in. See Figure 6.
Procedure Turn Correction
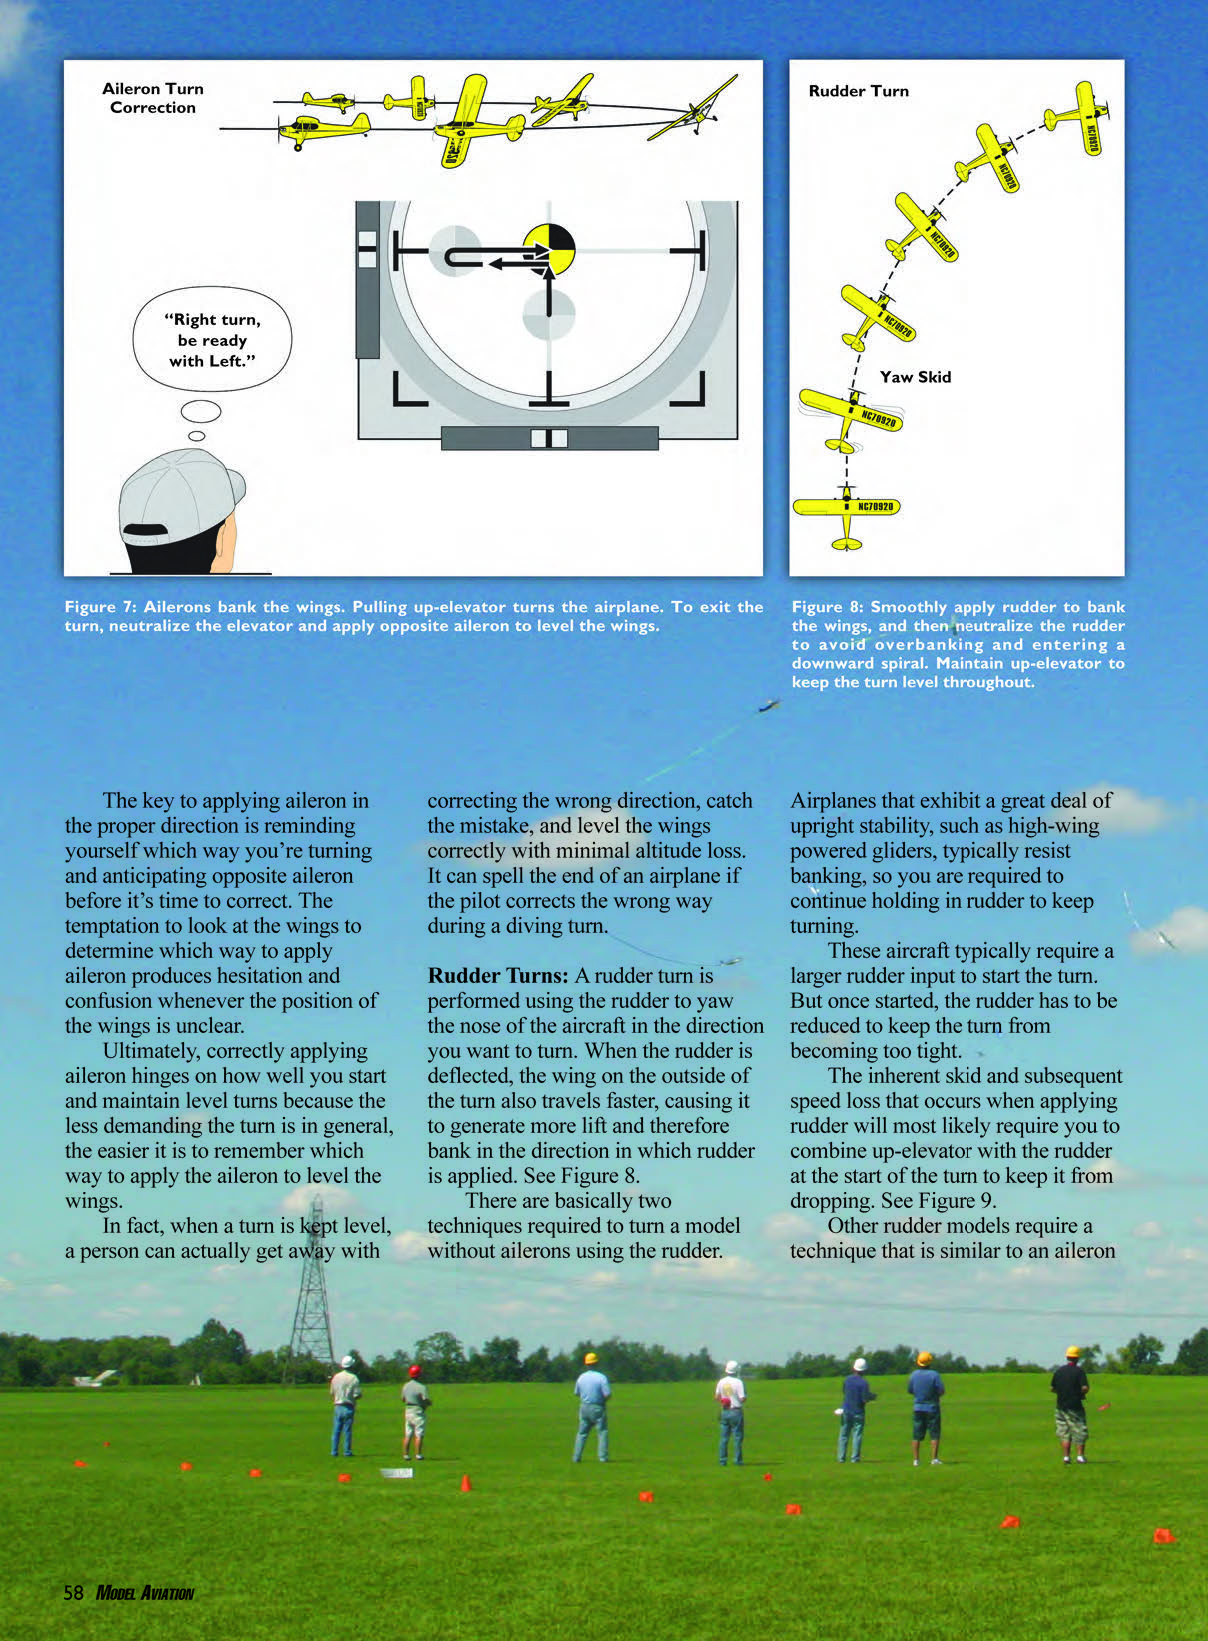
To exit the turn, neutralize the elevator and smoothly apply opposite aileron to level the wings. The key is to anticipate which way to apply opposite aileron rather than hesitating and looking at the wings for confirmation. The temptation to look at the wings can produce hesitation and confusion whenever wing position is unclear.
When a turn is kept level, small mistakes are easier to correct. In a diving turn, however, correcting the wrong way can be catastrophic.
Rudder Turns
A rudder turn uses rudder to yaw the nose in the desired direction. When rudder is deflected, the outside wing travels faster and generates more lift, causing the airplane to bank in the direction of the rudder. See Figure 8.
There are basically two rudder-turn techniques:
- High-stability airplanes (e.g., high-wing powered gliders):
- These aircraft resist banking and often require continuous rudder to keep turning.
- They usually need a larger rudder input to start the turn, then a reduction to prevent over-tightening.
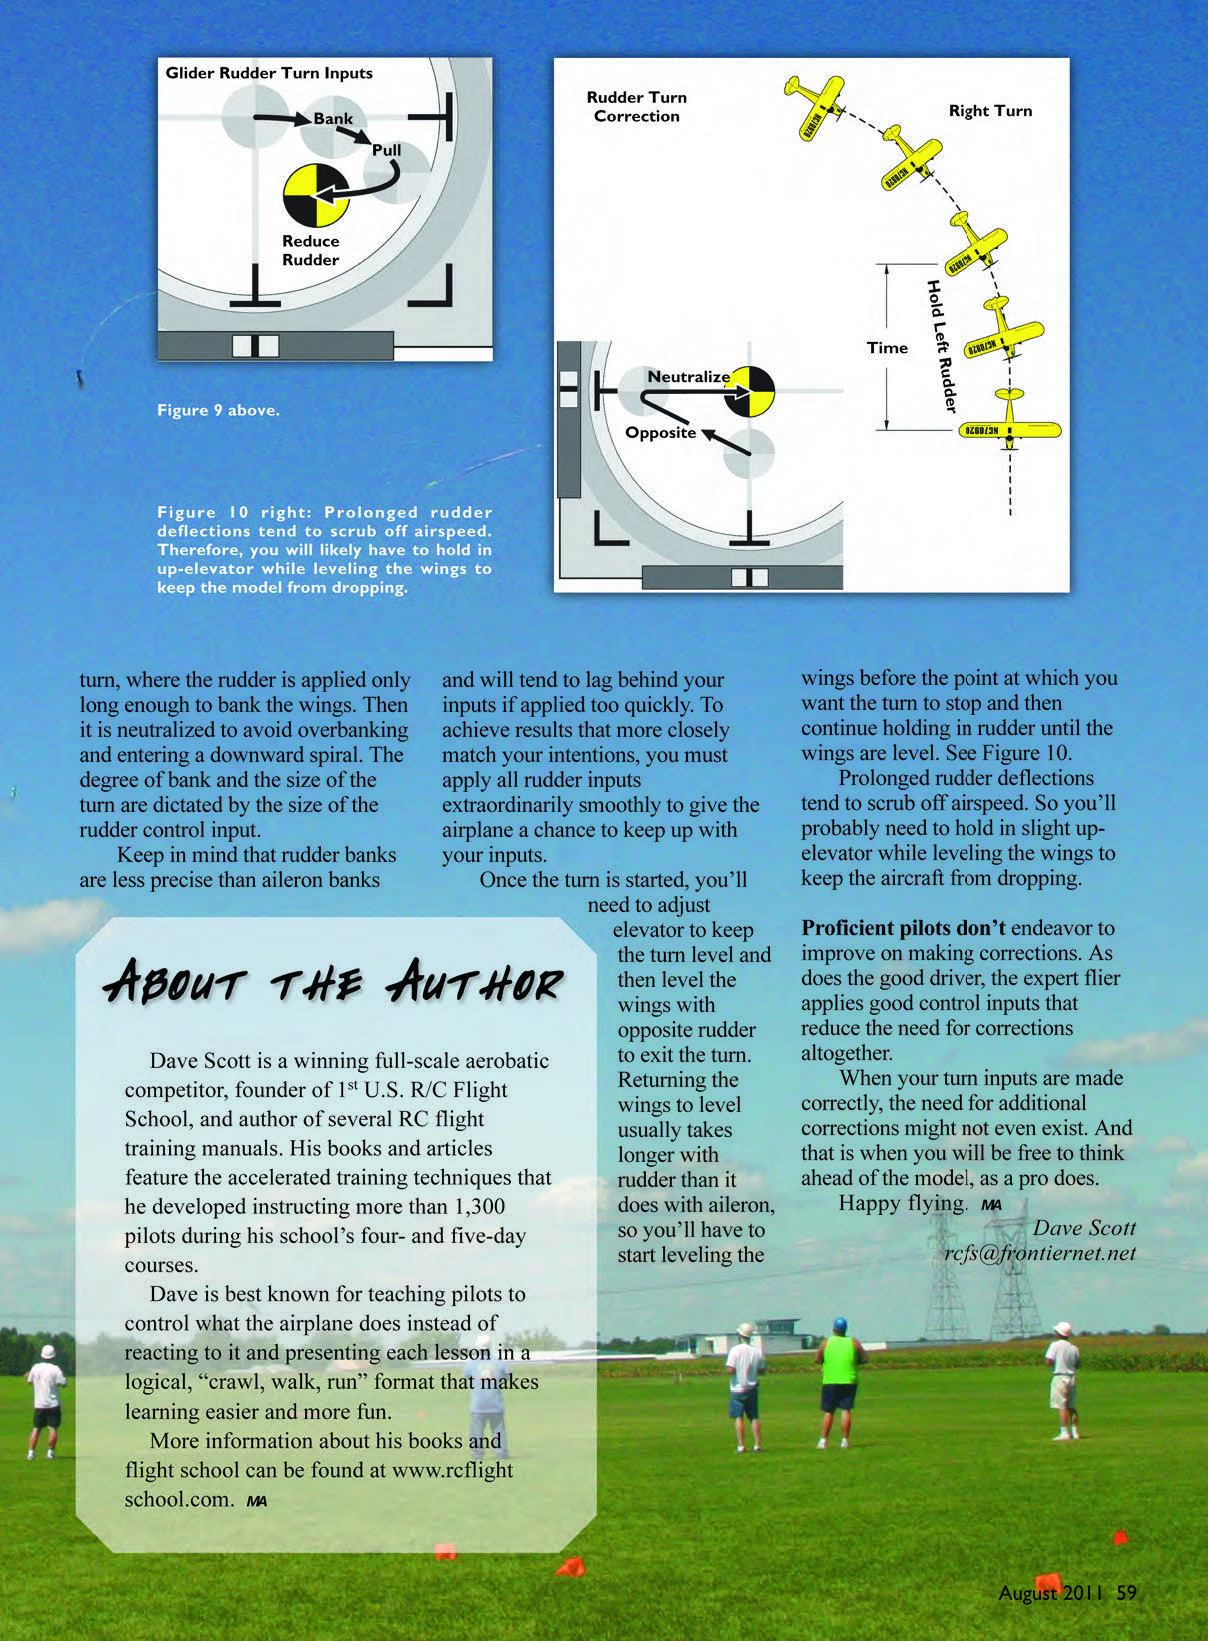
- The skid and speed loss from rudder application often require combining up-elevator with rudder at the start of the turn to prevent dropping. See Figure 9.
- Models that respond more like aileron turns:
- Apply rudder only long enough to bank the wings, then neutralize to avoid overbanking and spiraling.
- The degree of bank and turn size are dictated by the size of the rudder input.
Rudder banks are less precise than aileron banks and can lag behind quick inputs. Apply rudder very smoothly to let the airplane keep up. Once the turn is started, adjust elevator to keep the turn level and level the wings with opposite rudder to exit. Returning the wings to level usually takes longer with rudder than with aileron, so begin the leveling input before the point where you want the turn to stop and continue holding rudder until the wings are level.
Prolonged rudder deflection tends to scrub airspeed, so you will probably need to hold slight up-elevator while leveling the wings to prevent a drop.
Proficient pilots don't rely on making lots of corrections. Like a good driver, an expert flier applies good initial control inputs that reduce the need for corrections. When your turn inputs are made correctly, the need for additional corrections may not exist — and that is when you can think ahead of the model like a pro.
Happy flying.
Dave Scott [email protected]
About the Author
Dave Scott is a winning full-scale aerobatic competitor, founder of 1st U.S. R/C Flight School, and author of several RC flight training manuals. His books and articles feature the accelerated training techniques he developed while instructing more than 1,300 pilots during his school's four- and five-day courses.
Dave is best known for teaching pilots to control what the airplane does instead of reacting to it, and for presenting each lesson in a logical "crawl, walk, run" format that makes learning easier and more fun.
More information about his books and flight school can be found at www.rcflightschool.com.
Transcribed from original scans by AI. Minor OCR errors may remain.

