
MAXFORD USA ANTONOV AN-2
Greg Gimlick [email protected]
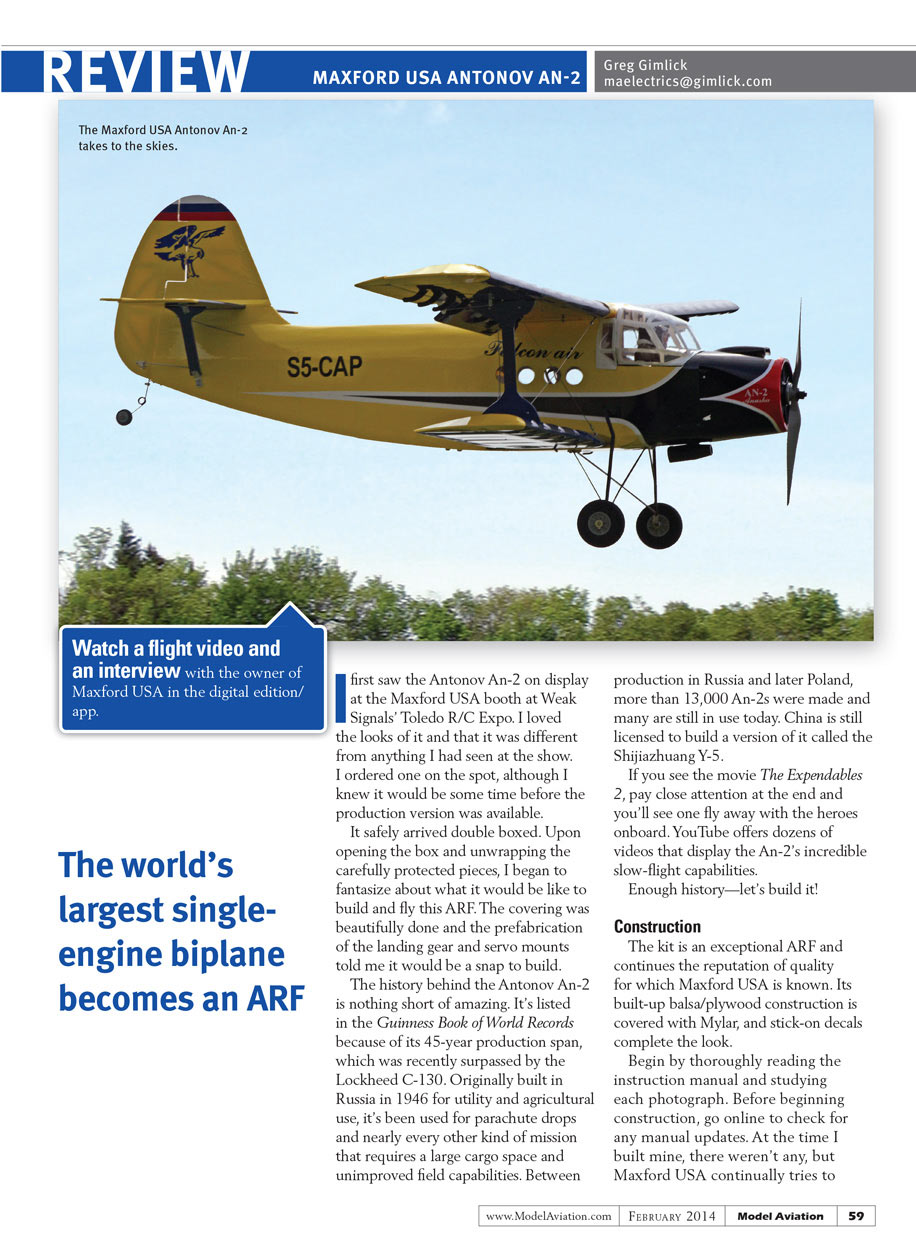
The world's largest single-engine biplane becomes an ARF
I first saw the Antonov An-2 on display at the Maxford USA booth at Weak Signals' Toledo R/C Expo. I loved the looks of it and that it was different from anything I had seen at the show. I ordered one on the spot, although I knew it would be some time before the production version was available.
It safely arrived double boxed. Upon opening the box and unwrapping the carefully protected pieces, I began to fantasize about what it would be like to build and fly this ARF. The covering was beautifully done and the prefabrication of the landing gear and servo mounts told me it would be a snap to build.
The history behind the Antonov An-2 is nothing short of amazing. It's listed in the Guinness Book of World Records because of its 45-year production span, which was recently surpassed by the Lockheed C-130. Originally built in Russia in 1946 for utility and agricultural use, it's been used for parachute drops and nearly every other kind of mission that requires a large cargo space and unimproved field capabilities. Between production in Russia and later Poland, more than 13,000 An-2s were made and many are still in use today. China is still licensed to build a version of it called the Shijiazhuang Y-5.
If you see the movie The Expendables 2, pay close attention at the end and you'll see one fly away with the heroes onboard. YouTube offers dozens of videos that display the An-2's incredible slow-flight capabilities.
Enough history—let's build it!
Construction
The kit is an exceptional ARF and continues the reputation of quality for which Maxford USA is known. Its built-up balsa/plywood construction is covered with Mylar, and stick-on decals complete the look.
Begin by thoroughly reading the instruction manual and studying each photograph. Before beginning construction, go online to check for any manual updates. At the time I built mine, there weren't any, but Maxford USA continually tries to improve its products, so it's prudent to check.
This ARF has a straightforward assembly, but it is not a model for beginners. Because it is a biplane, it incorporates a wing-mounting system that is innovative and new, so attention to detail is required. The motor is mounted as one of the first steps in the assembly using a well-designed motor box that slides into a mating compartment in the nose of the fuselage. This allows you to accommodate many motors and make adjustments so that the cowl perfectly fits.
The landing gear is fitted next and it is simple. The gear is prebent and slides into provided holes, and retained with brackets and wheel collars. I can remove the gear and replace it with the float system in approximately 10 minutes.
Assembly continues with the installation of the bottom wing and it's here that you will find a Maxlok system. This is an ingenious method of retaining the wing with a metal pin that is held in place by a rare earth magnet. When the wing is slid into place, the predrilled tab aligns with a hole in the mating surface and the pin goes through the wing and tab to mate with the magnet. It's simple and ingenious.
I will note here that a friend of mine, AMA Model Aviation Hall of Fame member Ken Myers, built the Antonov An-2 at the same time and he had one tab out of four that required further work because the hole had been drilled in an incorrect position. Mine was perfect, but production runs can vary in quality. We had different building experiences with it.
The tail surfaces are typical and will bring no surprises. The only problem I ran into was that the servo mounts in the fuselage were too low for the arms to properly align with the control tubes. I shimmed up the servos to relieve any stress from misaligned control rods. Ken's kit had the same problem, so you can expect to run into this issue.
The top wing is next and there are no surprises there either. Servos are mounted to wing-hatch covers in the usual fashion and all control surfaces are held in place with CA hinges. The instructions say to glue the control horns in place, but I chose to bolt them. Don't glue control horns to Mylar-covered surfaces under any circumstance.
After the top wing is assembled, the construction steps take a different turn from what you might be accustomed to. There is an outer wing strut with metal brackets that glues into precut slots, but there is no inner strut on the An-2. For easy transport, a pair of removable struts is held in place with rubber bands. When they are in place, the Maxlok pins are removed and the wing panels slide off as a complete assembly. This makes removal easy and transporting the model a snap.
All of the wing rigging stays in place so you simply slide it back onto the wing rods, insert the Maxlok pins, and remove the temporary strut. Both of our kits had transport struts that were too long to be vertically installed. These are difficult to install, so we cut ours to fit vertically at the base of the wings.
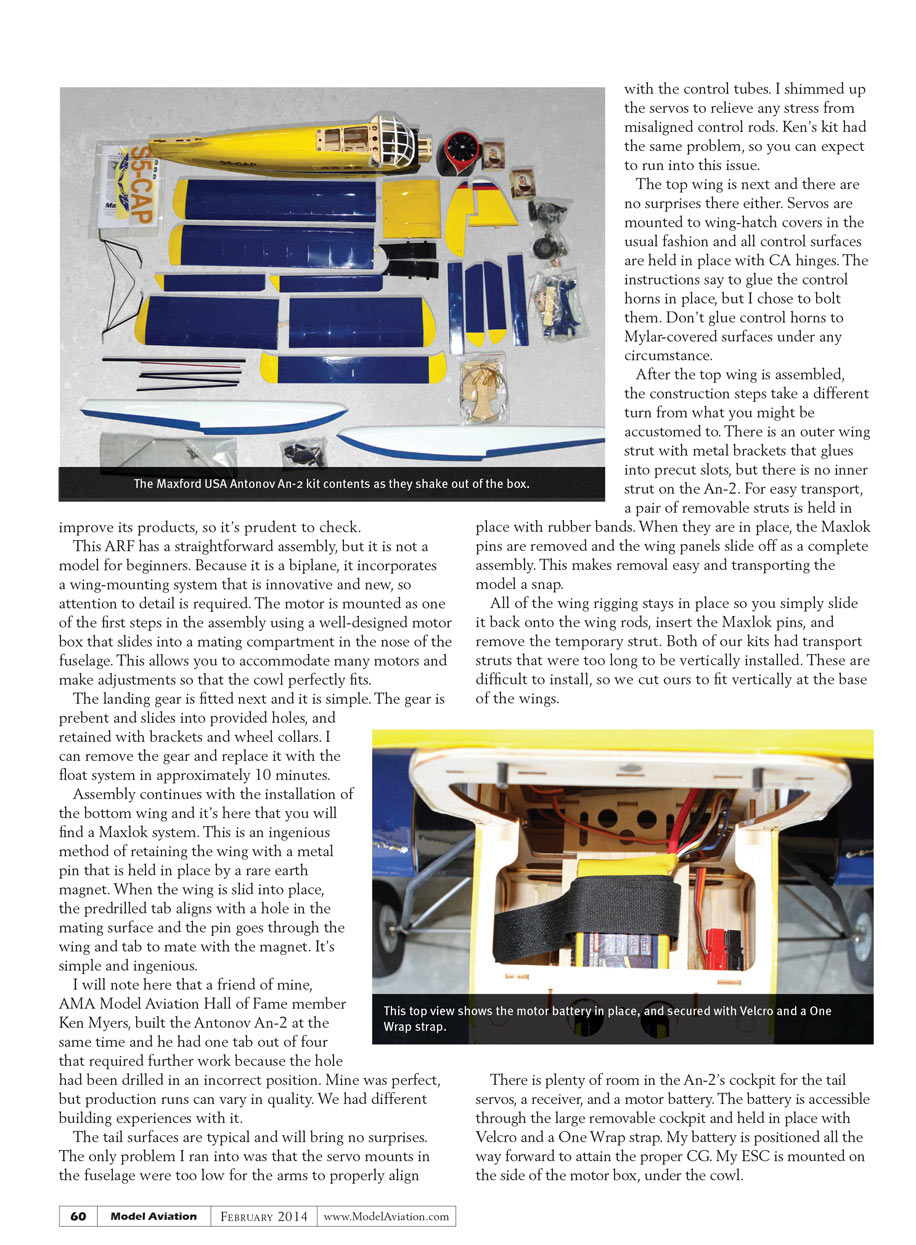
There is plenty of room in the An-2's cockpit for the tail servos, a receiver, and a motor battery. The battery is accessible through the large removable cockpit and held in place with Velcro and a One Wrap strap. My battery is positioned all the way forward to attain the proper CG. My ESC is mounted on the side of the motor box, under the cowl.
Control Throws and CG
I used the recommended throws and CG. The motor I chose was considerably larger and heavier than the Uranus motor from Maxford USA, but I still needed to run the motor box out as far as possible and add a couple ounces of weight for balance.
When configured with the floats, I had to add roughly two more ounces to the nose. I began with the suggested CG and moved mine forward roughly 1/4 inch, but it wasn't uncontrollable at the listed CG. I preferred it slightly forward, but your mileage may vary depending on your flying style.
Flying
Controls were set for the recommended high rates and I chose 60% for the low setting. I used my standard 20% exponential on high and low rates, which worked for me. I flew it using the high-rate settings, but it could be made quite docile with the low rates. Controllability remains good as long as you've kept your CG at or forward of the recommended position. After a few flights, I increased my elevator throw on high rate.
Ground handling was fine and the takeoff roll was easily controlled with rudder. The airplane lifted off and climbed out with ease at a nice, scale angle of ascent. Subsequent flights with the large motor showed that steep, unscale-like climbs also were possible. I chose the large motor because I knew I would be adding roughly 2 pounds with the float configuration and wanted to know that I had sufficient power.
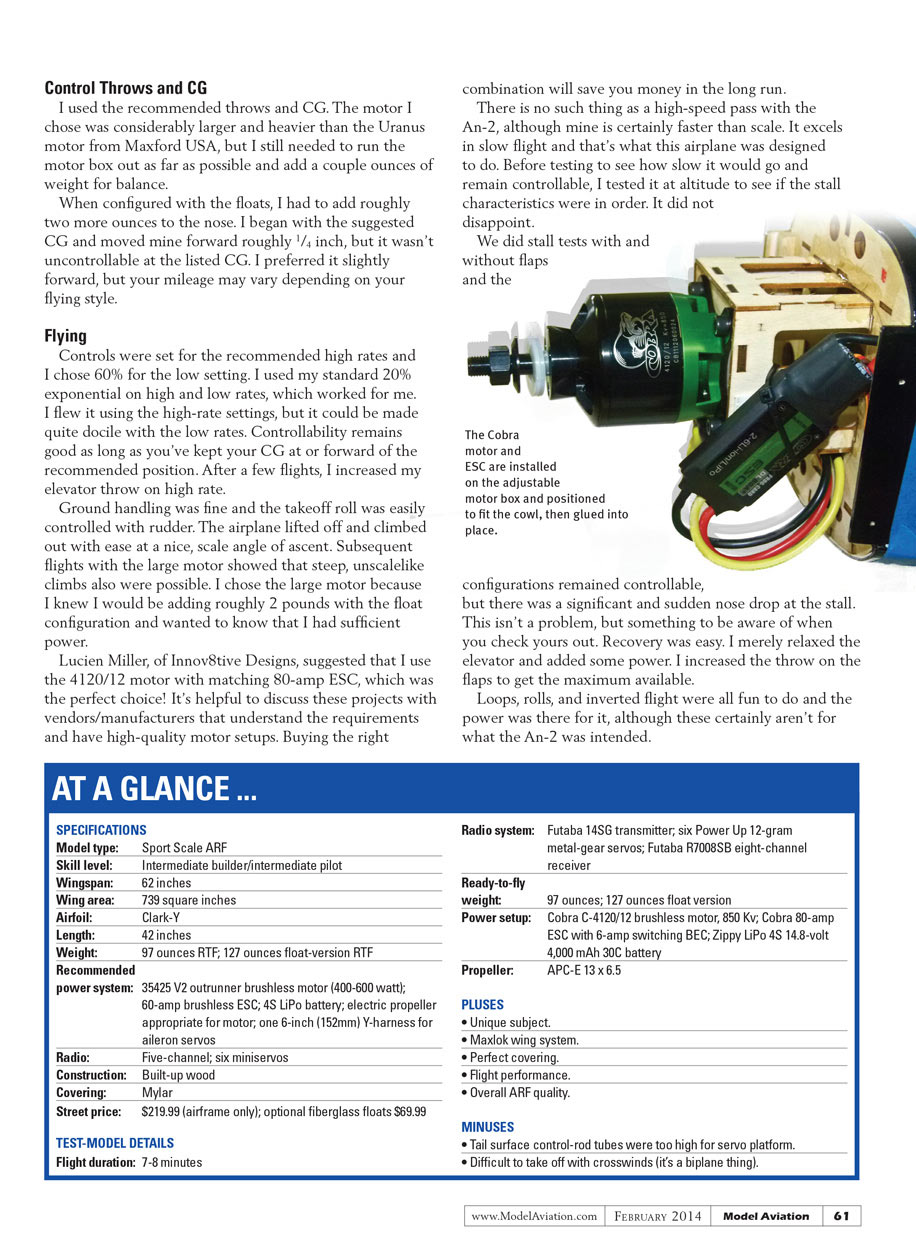
Lucien Miller, of Innov8tive Designs, suggested that I use the 4120/12 motor with matching 80-amp ESC, which was the perfect choice! It's helpful to discuss these projects with vendors/manufacturers that understand the requirements and have high-quality motor setups. Buying the right combination will save you money in the long run.
There is no such thing as a high-speed pass with the An-2, although mine is certainly faster than scale. It excels in slow flight and that's what this airplane was designed to do. Before testing to see how slow it would go and remain controllable, I tested it at altitude to see if the stall characteristics were in order. It did not disappoint.
We did stall tests with and without flaps and the configurations remained controllable, but there was a significant and sudden nose drop at the stall. This isn't a problem, but something to be aware of when you check yours out. Recovery was easy. I merely relaxed the elevator and added some power. I increased the throw on the flaps to get the maximum available.
Loops, rolls, and inverted flight were all fun to do and the power was there for it, although these certainly aren't what the An-2 was intended for.
AT A GLANCE ...
SPECIFICATIONS
- Model type: Sport Scale ARF
- Skill level: Intermediate builder / intermediate pilot
- Wingspan: 62 inches
- Wing area: 739 square inches
- Airfoil: Clark-Y
- Length: 42 inches
- Weight: 97 ounces RTF; 127 ounces float-version RTF
- Recommended power system: 35425 V2 outrunner brushless motor (400–600 watt); 60-amp brushless ESC; 4S LiPo battery; electric propeller appropriate for motor; one 6-inch (152 mm) Y-harness for aileron servos
- Radio: Five-channel; six mini servos
- Construction: Built-up wood
- Covering: Mylar
- Street price: $219.99 (airframe only); optional fiberglass floats $69.99
TEST-MODEL DETAILS
- Flight duration: 7–8 minutes
- Radio system: Futaba 14SG transmitter; six Power Up 12-gram metal-gear servos; Futaba R7008SB eight-channel receiver
- Ready-to-fly weight: 97 ounces; 127 ounces float version
- Power setup: Cobra C-4120/12 brushless motor, 850 Kv; Cobra 80-amp ESC with 6-amp switching BEC; Zippy LiPo 4S 14.8-volt 4,000 mAh 30C battery
- Propeller: APC-E 13 x 6.5
PLUSES
- Unique subject
- Maxlok wing system
- Perfect covering
- Flight performance
- Overall ARF quality
MINUSES
- Tail surface control-rod tubes were too high for servo platform
- Difficult to take off with crosswinds (it's a biplane thing)
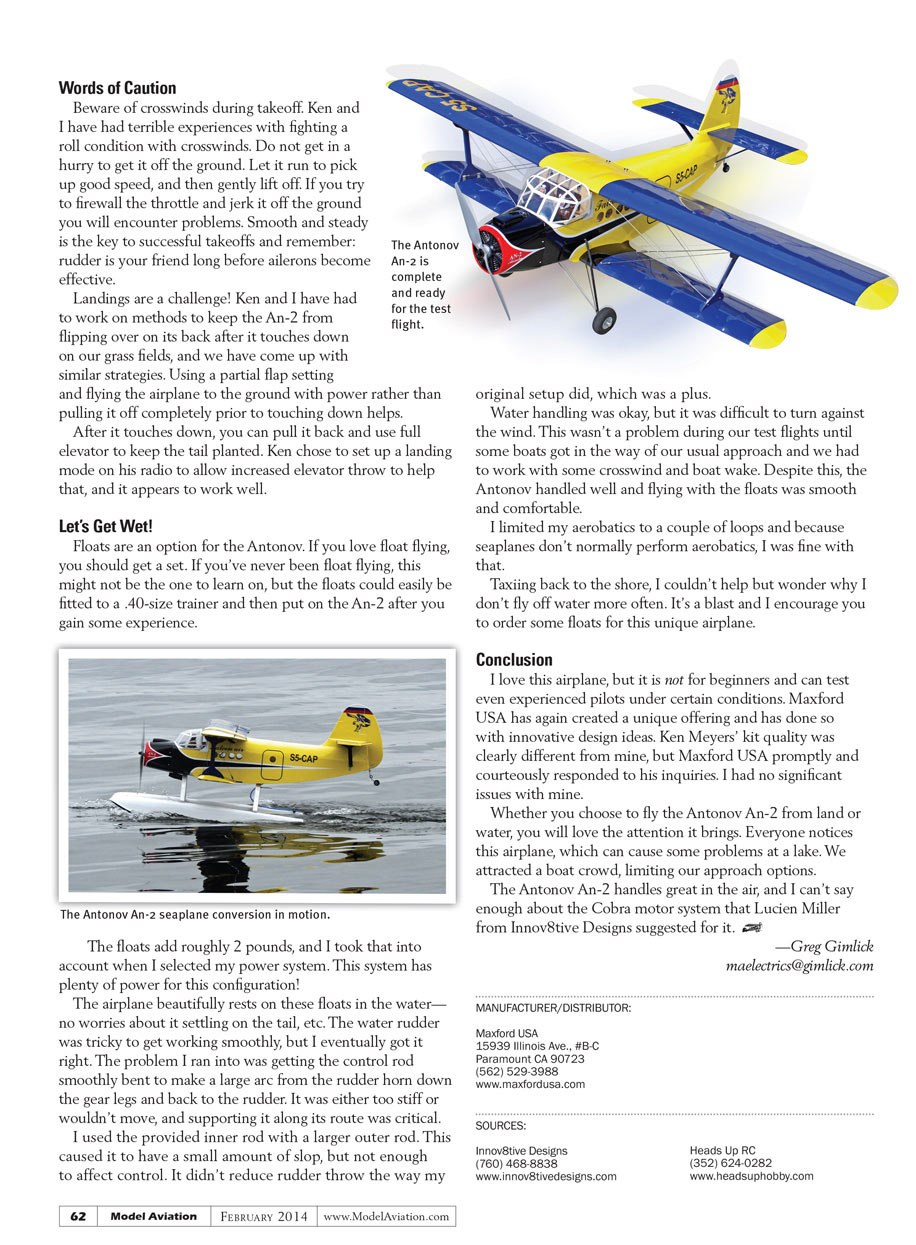
Words of Caution
Beware of crosswinds during takeoff. Ken and I have had terrible experiences with fighting a roll condition with crosswinds. Do not get in a hurry to get it off the ground. Let it run to pick up good speed, and then gently lift off. If you try to firewall the throttle and jerk it off the ground you will encounter problems. Smooth and steady is the key to successful takeoffs and remember: rudder is your friend long before ailerons become effective.
Landings are a challenge! Ken and I have had to work on methods to keep the An-2 from flipping over on its back after it touches down on our grass fields, and we have come up with similar strategies. Using a partial flap setting and flying the airplane to the ground with power rather than pulling it off completely prior to touching down helps.
After it touches down, you can pull it back and use full elevator to keep the tail planted. Ken chose to set up a landing mode on his radio to allow increased elevator throw to help that, and it appears to work well.
Let's Get Wet!
Floats are an option for the Antonov. If you love float flying, you should get a set. If you've never been float flying, this might not be the one to learn on, but the floats could easily be fitted to a .40-size trainer and then put on the An-2 after you gain some experience.
The floats add roughly 2 pounds, and I took that into account when I selected my power system. This system has plenty of power for this configuration!
The airplane beautifully rests on these floats in the water—no worries about it settling on the tail, etc. The water rudder was tricky to get working smoothly, but I eventually got it right. The problem I ran into was getting the control rod smoothly bent to make a large arc from the rudder horn down the gear legs and back to the rudder. It was either too stiff or wouldn't move, and supporting it along its route was critical.
I used the provided inner rod with a larger outer rod. This caused it to have a small amount of slop, but not enough to affect control. It didn't reduce rudder throw the way my original setup did, which was a plus.
Water handling was okay, but it was difficult to turn against the wind. This wasn't a problem during our test flights until some boats got in the way of our usual approach and we had to work with some crosswind and boat wake. Despite this, the Antonov handled well and flying with the floats was smooth and comfortable.
I limited my aerobatics to a couple of loops because seaplanes don't normally perform aerobatics, and I was fine with that.
Taxiing back to the shore, I couldn't help but wonder why I don't fly off water more often. It's a blast and I encourage you to order some floats for this unique airplane.
Conclusion
I love this airplane, but it is not for beginners and can test even experienced pilots under certain conditions. Maxford USA has again created a unique offering and has done so with innovative design ideas. Ken Myers' kit quality was clearly different from mine, but Maxford USA promptly and courteously responded to his inquiries. I had no significant issues with mine.
Whether you choose to fly the Antonov An-2 from land or water, you will love the attention it brings. Everyone notices this airplane, which can cause some problems at a lake. We attracted a boat crowd, limiting our approach options.
The Antonov An-2 handles great in the air, and I can't say enough about the Cobra motor system that Lucien Miller from Innov8tive Designs suggested for it.
— Greg Gimlick [email protected]
MANUFACTURER / DISTRIBUTOR: Maxford USA 15393 Illinois Ave., #B-C Paramount, CA 90723 (562) 529-3988 www.maxfordusa.com
SOURCES:
- Innov8tive Designs
(760) 468-8838 www.innov8tivedesigns.com
- Heads Up RC
(352) 624-0282 www.headsuphobby.com
Transcribed from original scans by AI. Minor OCR errors may remain.

