
Micro-Flying — Dave Robelen | [email protected]
Dave builds an enlarged and modified version of Ralph Bradley’s Sky Bug
Hello micro modelers!
Another couple of months have passed and this fast-paced field keeps developing.
I am going to break with my usual pattern and provide some detailed information about how to build a model I have been enjoying. As space permits, I will provide some coverage of the Mid-America Indoor Fun Fly (MIFF) meet that I attended in Kansas City, Missouri.
Last season I acquired some of the Plantraco 900 MHz equipment: a Deluxe Starter Package with the GB04 drive and 0.9-gram receiver, and a receiver and a 30 mAh Li-Poly cell meant for the Butterfly model. This equipment has served me well, flying in a variety of quickly built foam prototype models and a scale ultralight aircraft.
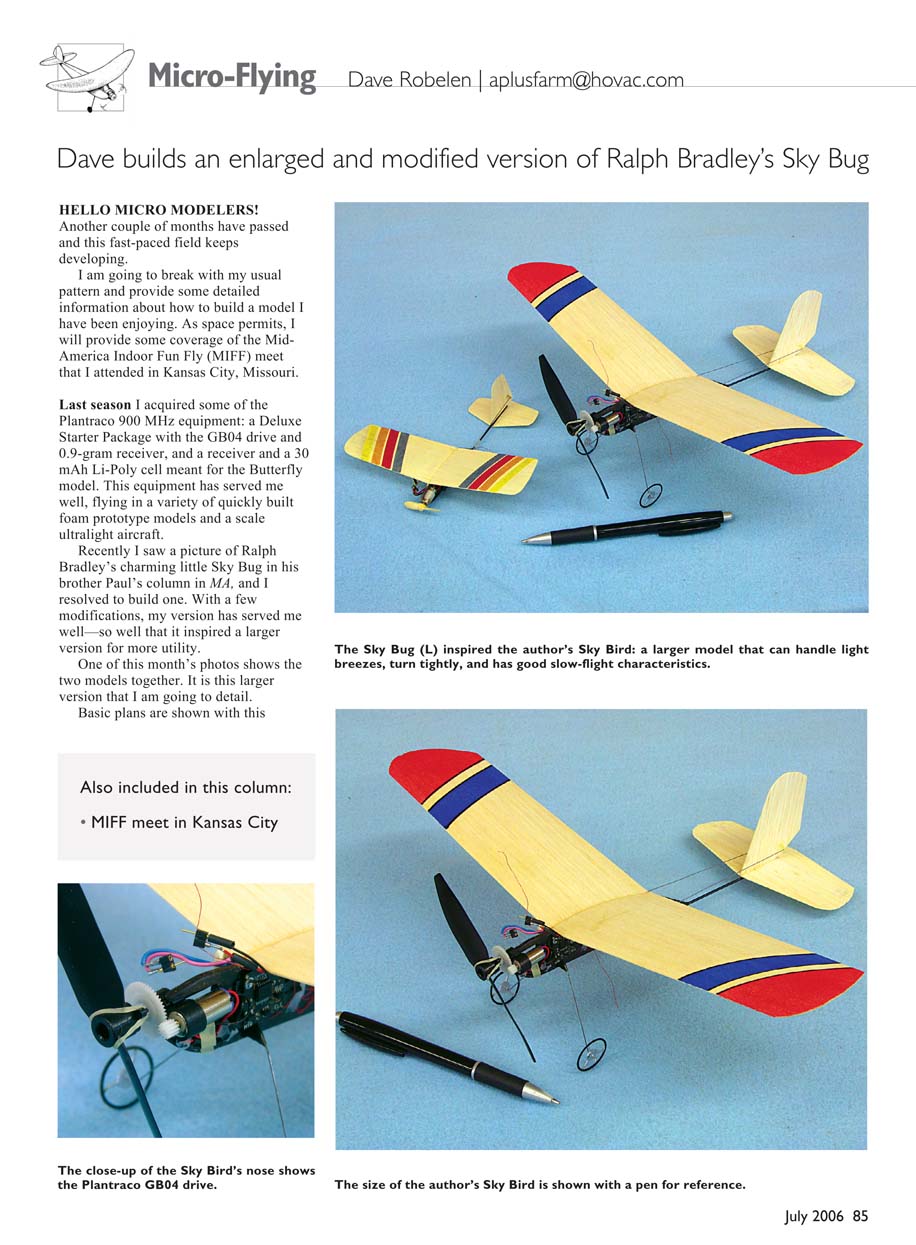
Recently I saw a picture of Ralph Bradley’s charming little Sky Bug in his brother Paul’s column in MA, and I resolved to build one. With a few modifications, my version has served me well—so well that it inspired a larger version for more utility.
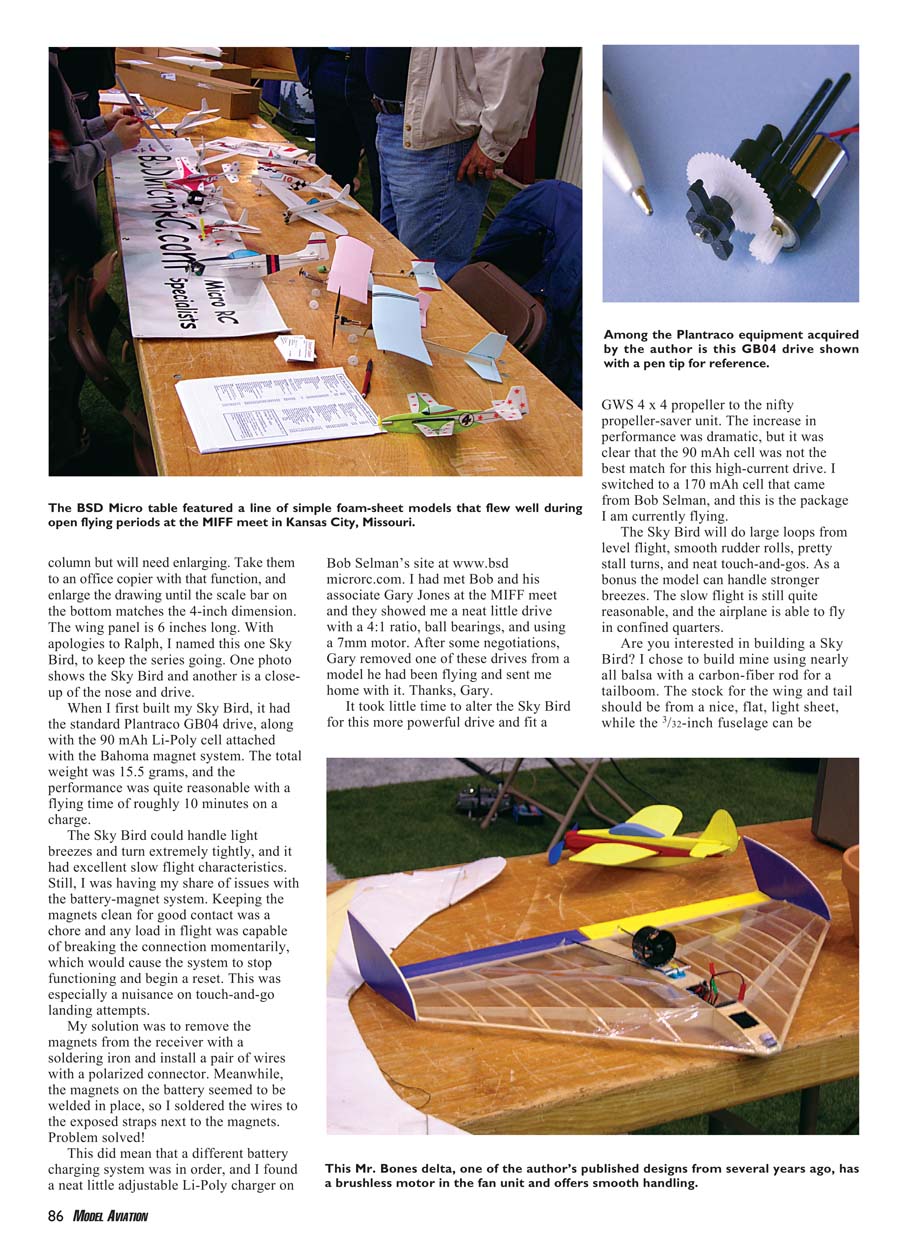
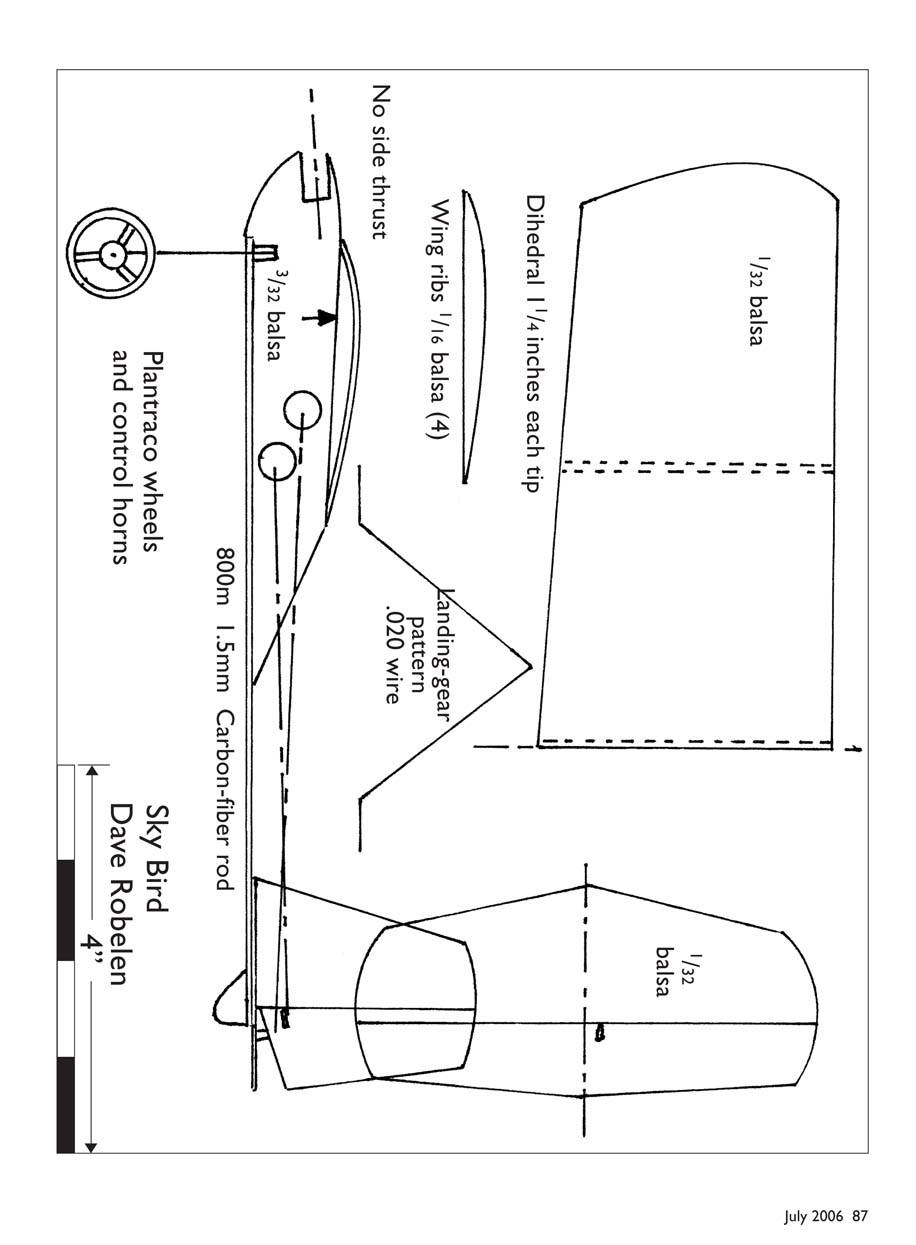
One of this month’s photos shows the two models together. It is this larger version that I am going to detail. Basic plans are shown with this column but will need enlarging. Take them to an office copier with that function, and enlarge the drawing until the scale bar on the bottom matches the 4-inch dimension. The wing panel is 6 inches long. With apologies to Ralph, I named this one Sky Bird, to keep the series going. One photo shows the Sky Bird and another is a closeup of the nose and drive.
When I first built my Sky Bird, it had the standard Plantraco GB04 drive, along with the 90 mAh Li-Poly cell attached with the Bahoma magnet system. The total weight was 15.5 grams, and the performance was quite reasonable with a flying time of roughly 10 minutes on a charge. The Sky Bird could handle light breezes and turn extremely tightly, and it had excellent slow-flight characteristics.
Still, I was having my share of issues with the battery-magnet system. Keeping the magnets clean for good contact was a chore and any load in flight was capable of breaking the connection momentarily, which would cause the system to stop functioning and begin a reset. This was especially a nuisance on touch-and-go landing attempts. My solution was to remove the magnets from the receiver with a soldering iron and install a pair of wires with a polarized connector. Meanwhile, the magnets on the battery seemed to be welded in place, so I soldered the wires to the exposed straps next to the magnets. Problem solved!
This did mean that a different battery-charging system was in order, and I found a neat little adjustable Li-Poly charger on Bob Selman’s site at www.bsd-microrc.com. I had met Bob and his associate Gary Jones at the MIFF meet and they showed me a neat little drive with a 4:1 ratio, ball bearings, and using a 7 mm motor. After some negotiations, Gary removed one of these drives from a model he had been flying and sent me home with it. Thanks, Gary. It took little time to alter the Sky Bird for this more powerful drive and fit a GWS 4 x 4 propeller to the nifty propeller-saver unit. The increase in performance was dramatic, but it was clear that the 90 mAh cell was not the best match for this high-current drive. I switched to a 170 mAh cell that came from Bob Selman, and this is the package I am currently flying.
The Sky Bird will do large loops from level flight, smooth rudder rolls, pretty stall turns, and neat touch-and-gos. As a bonus the model can handle stronger breezes. The slow flight is still quite reasonable, and the airplane is able to fly in confined quarters.
Plans and materials
- Enlarge the basic plans until the scale bar measures 4 inches; wing panel length is 6 inches.
- Name: Sky Bird (enlarged Sky Bug)
- Construction: nearly all balsa with a carbon-fiber rod tailboom
- Wing and tail stock: nice, flat, light sheet
- Fuselage: 3/32-inch balsa (a slightly firmer sheet is fine)
- Wing ribs: 1/16-inch balsa (4)
- Tail surfaces: 1/32-inch balsa
- Dihedral: 1/4 inch at each tip
- Landing-gear pattern: .020-inch wire
- Tailboom: 80 mm, 1.5 mm carbon-fiber rod
- Hardware: Plantraco wheels and control horns
- Note: No side thrust
Construction tips and assembly
- Wing
- I get the best results with these single-surface wings if I preform the approximate airfoil before assembly.
- Dampen the upper surface with window-cleaner spray and tape the limp sheets to a larger wing that has nearly the desired airfoil curve. When dry, use Elmer’s Carpenter Glue to attach the ribs, using pins to clamp the panels to a flat surface while drying.
- Remember to tilt the center ribs in to account for the dihedral. A few swipes with a sanding block in the center, and the wing panels can be joined.
- Tail and finishing
- Cut the tail surfaces from the same sheet of 1/32-inch wood, but do not cut the hinge lines yet.
- I found a light, clear sealer spray at the local Wal-Mart called Color Place Clear Gloss. Misted on and sanded smooth with 400-grit sandpaper, a couple of coats will do a fine job. The color trim on mine is carefully misted on straight from the spray can.
- Fuselage, drive and gear
- Cut the fuselage front to shape and add the boom. I covered mine with black tissue to resemble carbon fiber. Cut the notch for the drive and the actuator mounting holes.
- Install the .020-inch wire landing gear with a 3/32-inch balsa filler for a brace. Mount the actuators and the drive.
- Control surfaces and linkages
- Now cut the hinge lines in the tail and hinge the surfaces with 3/16-inch-wide strips of frosted Magic Mending tape. I used small fiberglass control horns sold by Plantraco and the Plantraco wheels.
- Mount the surfaces to the boom and make up a couple of pushrods. I used .015-inch steel wire for the main part, with a 2-inch length of .020-inch brass wire spliced on at the actuator end. Be sure that the controls center with the actuators at the center.
- Final assembly and trim
- Mount the wing and install the drive with the propeller on the nose. Locate the battery and receiver on the sides in a position that will achieve the correct balance. If you choose to use all Plantraco gear including the GB04 drive, make the nose 3/4 inch longer for proper balance.
- The Sky Bird will take off from a variety of surfaces. Making the first flights from a surface takeoff can reveal any trim issues before they become dangerous.
If you build one of these models, please send me a picture and your comments. It will be fun to see how others make out.
MIFF — Mid-America Indoor Fun Fly
I mentioned the MIFF meet in Kansas City. This took place the weekend of March 18–19, 2006. Based on the promotional material, I chose to drive the 1,200 miles to attend, and I am glad I did. The site was the indoor practice facility for the Kansas City Chiefs, and it was huge. The club that organized the meet—the Kansas City Flying Circuits—did an excellent job handling the operation, and the Saturday-night banquet was delicious.
There was ample open flying divided into periods for the different classes of models, as well as several categories of competition. The classes included IPS Racing, RC Scale, and Extreme Aerobatics. There was also a flight period for demonstrating replicas of early-period free-flight models. I counted 104 pilots registered and a large number of aircraft.
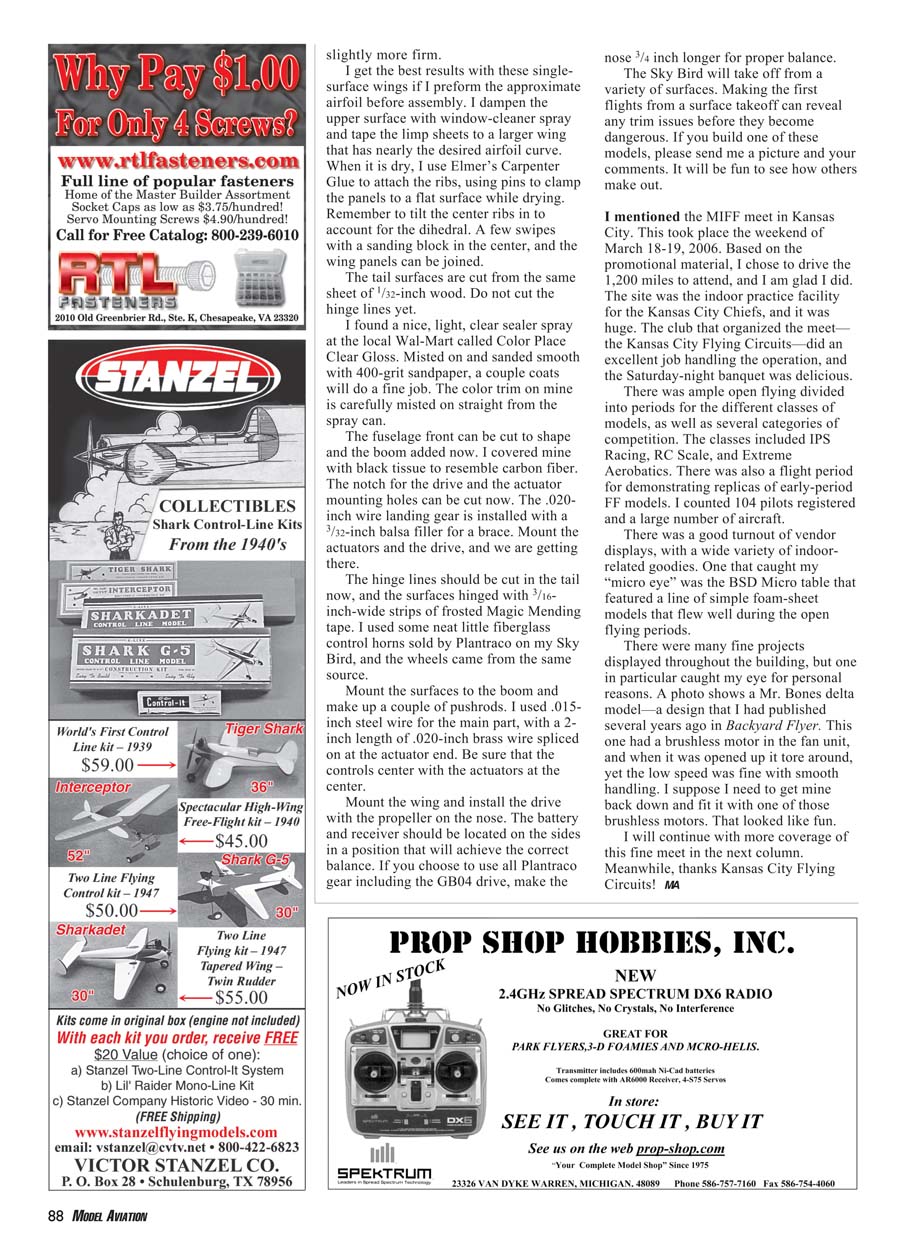
There was a good turnout of vendor displays, with a wide variety of indoor-related goodies. One that caught my “micro eye” was the BSD Micro table that featured a line of simple foam-sheet models that flew well during the open flying periods.
There were many fine projects displayed throughout the building, but one in particular caught my eye for personal reasons. A photo shows a Mr. Bones delta model—a design I had published several years ago in Backyard Flyer. This one had a brushless motor in the fan unit, and when it was opened up to tear around, the low speed was fine with smooth handling. I suppose I need to get mine back down and fit it with one of those brushless motors. That looked like fun.
I will continue with more coverage of this fine meet in the next column. Meanwhile, thanks Kansas City Flying Circuits!
MA
Transcribed from original scans by AI. Minor OCR errors may remain.

