
Micro-Flying
Dave Robelen | [email protected]
GREETINGS, friends and followers of RC micro flight. This has been a lean month for reader contributions, so you will have to suffer through more of my projects. I will write about finishing and covering techniques for the various materials used with the small models.
Vendors and resources
We have lost one of our valued vendors: Dynamics Unlimited. For unspecified reasons the company has closed permanently. You will be missed!
Still available vendors and resources:
- Bob and Janelle Selman — www.bsdmicrorc.com
- BP Hobbies — www.bphobbies.com
- John Worth’s magazine RC Micro World — www.cloud9rc.com
Visit John Worth’s site and look at his efforts; it will be worth your while.
BD-4 scale balsa model
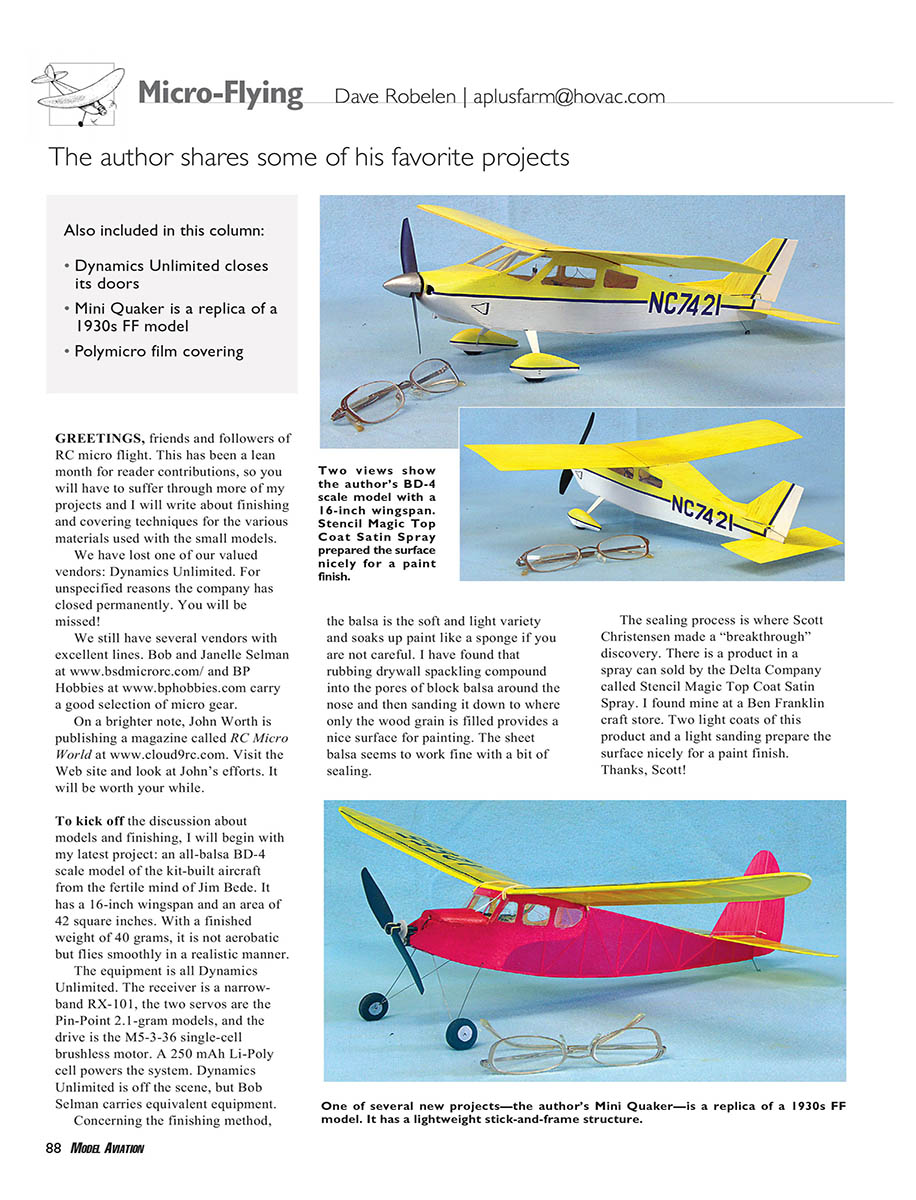
To kick off the discussion about models and finishing, here is my latest project: an all-balsa BD-4 scale model of the kit-built aircraft from the fertile mind of Jim Bede. It has a 16-inch wingspan and an area of 42 square inches. With a finished weight of 40 grams, it is not aerobatic but flies smoothly in a realistic manner.
Equipment (originally Dynamics Unlimited; equivalent items are available from other vendors):
- Receiver: narrowband RX-101
- Servos: Pin-Point 2.1-gram models (two)
- Motor: M5-3-36 single-cell brushless
- Battery: 250 mAh Li-Poly
Finishing balsa: filling and sealing
The balsa I use is the soft, light variety and soaks up paint like a sponge if you are not careful. I have found this method works well:
- Rub drywall spackling compound into the pores of block balsa around the nose.
- Sand down until only the wood grain is filled.
- Sheet balsa generally needs only a light sealing.
For sealing, Scott Christensen made a great discovery: Stencil Magic Top Coat Satin Spray (Delta Company), available at craft stores such as Ben Franklin. Two light coats and a light sanding prepare the surface nicely for paint. Thanks, Scott!
Painting tips
- Working with thin films or tissue: apply light coats to avoid excess weight.
- For Polymicro and similar films, modelers have had good results spraying thinned acrylic paints; this typically requires a high-pressure (≈50 psi) airbrush system.
- If you don’t have high pressure, an economical alternative is automobile touch-up spray paint: spray into a container and dilute roughly 50% with slow-drying auto paint thinner. Use a low-pressure airbrush and apply light coats. These systems may not completely fill the wood grain, but bright, consistent colors compensate.
Working with tissue-covered, undercambered wings
- Clamp flying surfaces to a flat surface while drying to prevent warping.
- For undercambered airfoils, fasten the covering to every rib.
- After covering, shrink tissue with a light mist of rubbing alcohol.
- Clamp while surfaces cure to avoid warps.
Preferred materials:
- Tissue: Esaki tissue (replica type preferred for authentic appearance) — available from Peck-Polymers: www.peck-polymers.com
- Adhesive: Elmer’s White Glue, spread thin before applying tissue
- Finish coat: Krylon Crystal Clear spray paint (works like nitrate dope; compatible with lacquer-based auto touch-up paints). Two coats usually give a nice sheen without excessive weight.
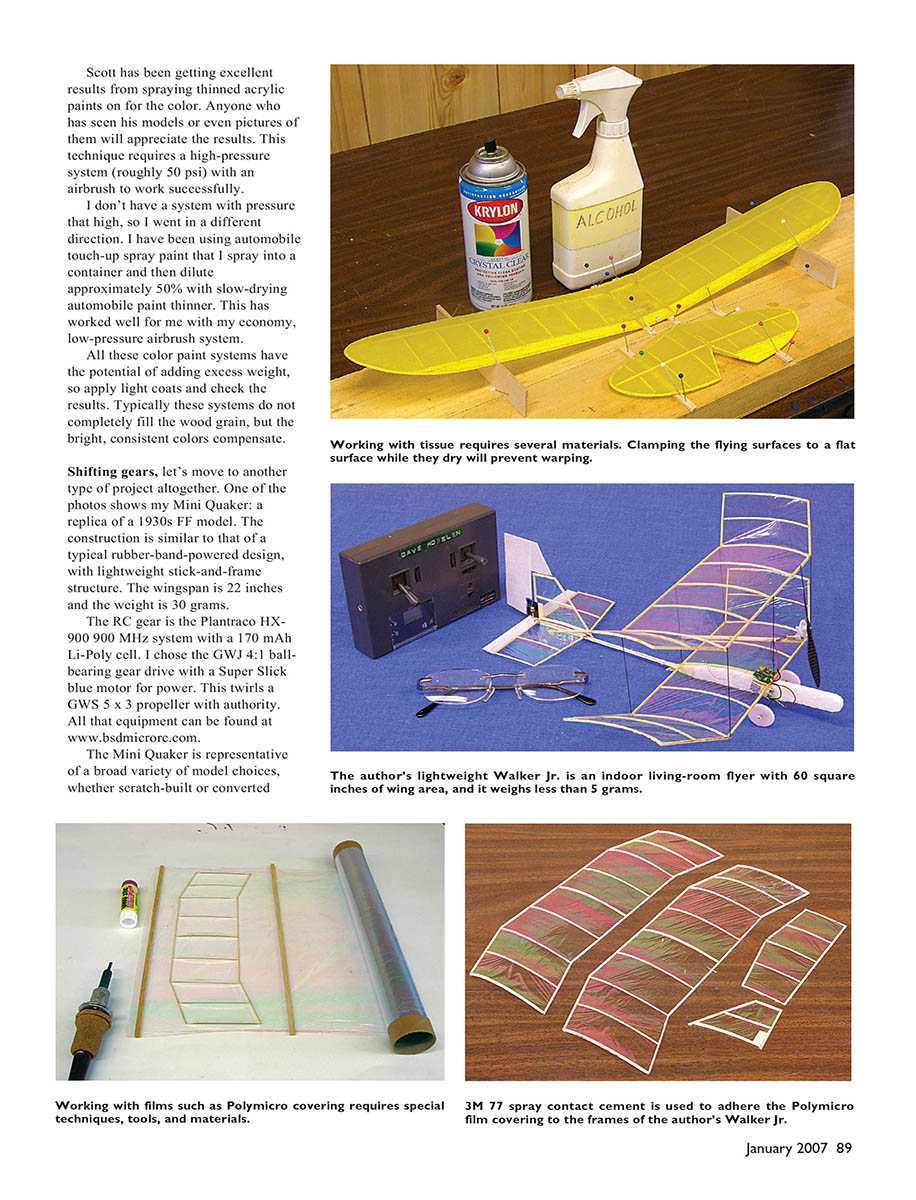
Mini Quaker (1930s FF replica)
One of the photos shows my Mini Quaker: a replica of a 1930s free-flight model. Construction is similar to a typical rubber-band-powered design, with a lightweight stick-and-frame structure. Wingspan: 22 inches; weight: 30 grams.
Radio and power:
- Plantraco HX-900 900 MHz system with a 170 mAh Li-Poly cell
- GWJ 4:1 ball-bearing gear drive with a Super Slick blue motor
- Propeller: GWS 5 x 3
All that equipment can be found at www.bsdmicrorc.com.
The Mini Quaker represents a broad variety of model choices, whether scratch-built or converted from rubber-powered FF designs. Performance is greatly enhanced by using an undercambered airfoil with a turbulator strip. I like the Benedek B6356b airfoil (downloadable from Profil: www.profil2.com). The Profil program is a free download with more than 1,000 airfoils — a real boon to scratch builders.
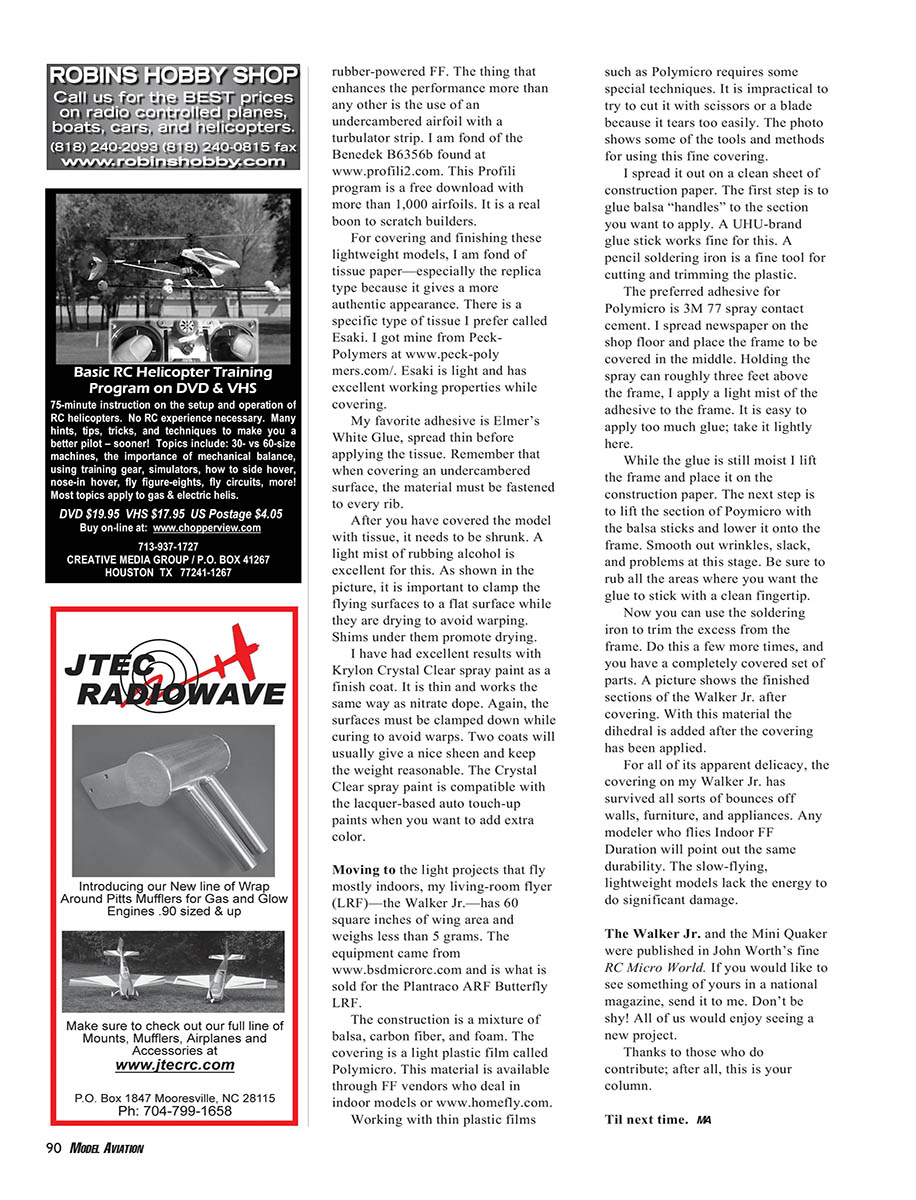
Walker Jr. and Polymicro covering techniques
Moving to light projects that fly mostly indoors, my living-room flyer (LRF) — the Walker Jr. — has 60 square inches of wing area and weighs less than 5 grams. The equipment came from www.bsdmicrorc.com and matches what is sold for the Plantraco ARF Butterfly LRF.
Construction: a mixture of balsa, carbon fiber, and foam. Covering: light plastic film called Polymicro (available through indoor FF vendors or www.homefly.com).
Working with Polymicro requires special techniques and tools. Cutting with scissors or a blade tears it too easily. The basic method I use:
Materials and tools:
- Polymicro film
- Construction paper (clean sheet)
- UHU glue stick (to make temporary balsa “handles”)
- Pencil soldering iron (for cutting/trimming)
- 3M 77 spray contact cement
- Newspaper (to protect the floor)
Steps:
- Spread Polymicro out on a clean sheet of construction paper.
- Glue balsa “handles” to the section you want to apply using a UHU glue stick.
- Spray a light mist of 3M 77 to the frame from about three feet away — be careful not to over-apply.
- While the glue is still moist, place the frame in the middle of the construction paper and lower the Polymicro section (using the balsa handles) onto the frame.
- Smooth out wrinkles and slack, and rub areas where the glue should stick with a clean fingertip.
- Trim excess film with a pencil soldering iron.
- Add dihedral after the covering has been applied, if required.
Despite its apparent delicacy, the Polymicro covering on my Walker Jr. has survived bounces off walls, furniture, and appliances. Slow-flying, lightweight models lack the energy to cause significant damage; indoor FF Duration models often show similar durability.
Publication and submissions
The Walker Jr. and the Mini Quaker were published in John Worth’s RC Micro World. If you would like to see something of yours in a national magazine, send it to me. Don’t be shy — we’d all enjoy seeing a new project.
Thanks to those who contribute; after all, this is your column.
Til next time. — MA
Transcribed from original scans by AI. Minor OCR errors may remain.

