
Modeling Spoken Here
Bob Hunt — Aeromodeling Editor
... I had a few surprises, at least one epiphany, many scares, and lots of satisfaction.
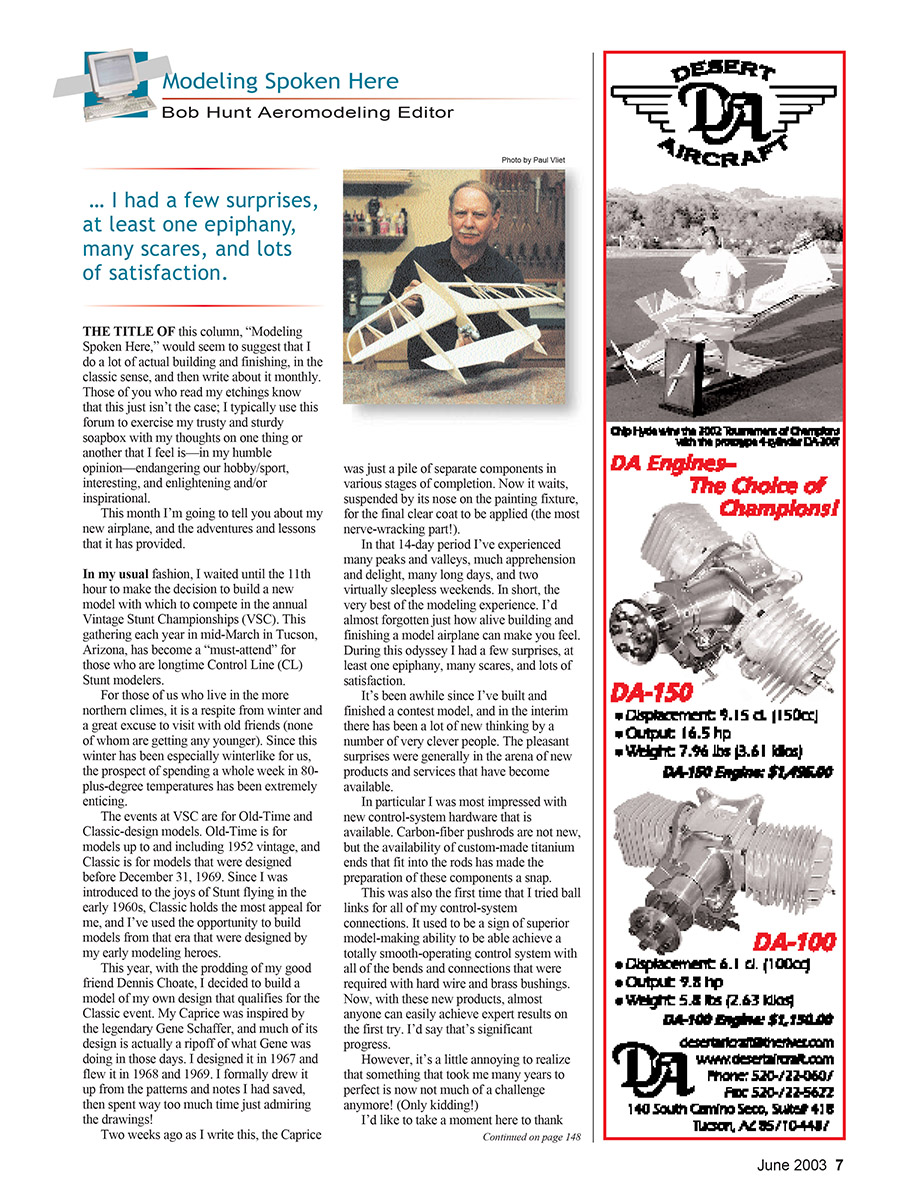
The title of this column, "Modeling Spoken Here," would seem to suggest that I do a lot of actual building and finishing, in the classic sense, and then write about it monthly. Those of you who read my writings know that this just isn't the case; I typically use this forum to exercise my trusty and sturdy soapbox with my thoughts on one thing or another that I feel is—in my humble opinion—endangering our hobby/sport, interesting, and enlightening and/or inspirational. This month I'm going to tell you about my new airplane, and the adventures and lessons that it has provided.
The Project: Building the Caprice
In my usual fashion, I waited until the 11th hour to make the decision to build a new model with which to compete in the annual Vintage Stunt Championships (VSC). This gathering each year in mid-March in Tucson, Arizona, has become a "must-attend" for those who are longtime Control Line (CL) Stunt modelers. For those of us who live in the more northern climes, it is a respite from winter and a great excuse to visit with old friends (none of whom are getting any younger). Since this winter has been especially winterlike for us, the prospect of spending a whole week in 80-plus-degree temperatures was extremely enticing.
The events at VSC are for Old-Time and Classic-design models. Old-Time is for models up to and including 1952 vintage, and Classic is for models that were designed before December 31, 1969. Since I was introduced to the joys of Stunt flying in the early 1960s, Classic holds the most appeal for me, and I've used the opportunity to build models from that era that were designed by my early modeling heroes.
This year, with the prodding of my good friend Dennis Choate, I decided to build a model of my own design that qualifies for the Classic event. My Caprice was inspired by the legendary Gene Schaffer, and much of its design is actually a ripoff of what Gene was doing in those days. I designed it in 1967 and flew it in 1968 and 1969. I formally drew it up from the patterns and notes I had saved, then spent way too much time just admiring the drawings!
Two weeks ago, as I write this, the Caprice was just a pile of separate components in various stages of completion. Now it waits, suspended by its nose on the painting fixture, for the final clear coat to be applied (the most nerve-wracking part!). In that 14-day period I've experienced many peaks and valleys, much apprehension and delight, many long days, and two virtually sleepless weekends. In short, the very best of the modeling experience. I'd almost forgotten just how alive building and finishing a model airplane can make you feel.
During this odyssey I had a few surprises, at least one epiphany, many scares, and lots of satisfaction.
New Products and Techniques
It's been a while since I've built and finished a contest model, and in the interim there has been a lot of new thinking by a number of very clever people. The pleasant surprises were generally in the arena of new products and services that have become available.
In particular I was most impressed with new control-system hardware. Carbon-fiber pushrods are not new, but the availability of custom-made titanium ends that fit into the rods has made the preparation of these components a snap. This was also the first time that I tried ball links for all of my control-system connections. It used to be a sign of superior model-making ability to achieve a totally smooth-operating control system with all of the bends and connections that were required with hard wire and brass bushings. Now, with these new products, almost anyone can easily achieve expert results on the first try. I'd say that's significant progress.
However, it's a little annoying to realize that something that took me many years to perfect is now not much of a challenge anymore! (Only kidding!)
I'd like to take a moment here to thank Tom Morris of Tom's Building Service for all of his assistance in this project, and especially for all the great control-system bits. Great stuff, Tom!
Workbench and Assembly
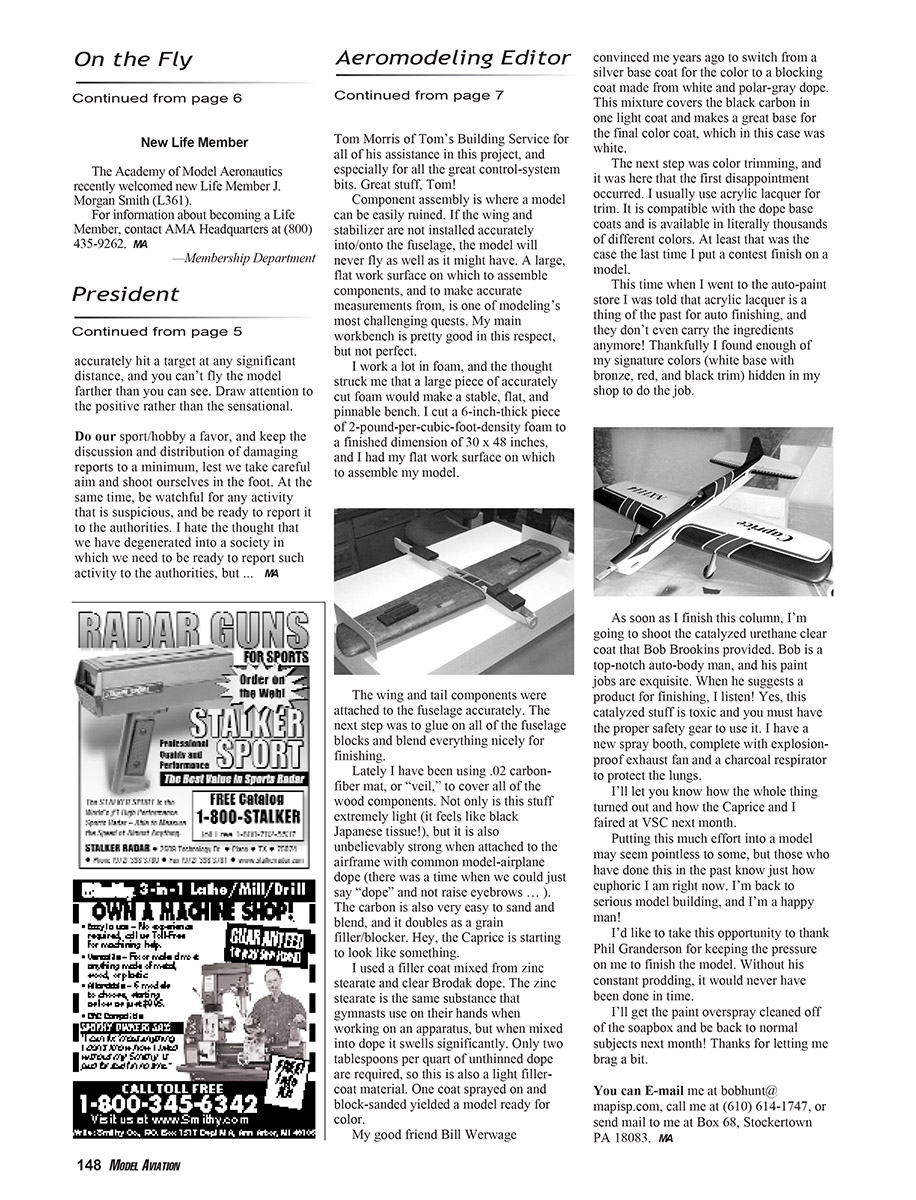
Component assembly is where a model can be easily ruined. If the wing and stabilizer are not installed accurately into or onto the fuselage, the model will never fly as well as it might have. A large, flat work surface on which to assemble components, and to make accurate measurements from, is one of modeling's most challenging quests. My main workbench is pretty good in this respect, but not perfect.
I work a lot in foam, and the thought struck me that a large piece of accurately cut foam would make a stable, flat, and pinnable bench. I cut a 6-inch-thick piece of 2-pound-per-cubic-foot-density foam to a finished dimension of 30 x 48 inches, and I had my flat work surface on which to assemble my model.
The wing and tail components were attached to the fuselage accurately. The next step was to glue on all of the fuselage blocks and blend everything nicely for finishing.
Covering, Filling, and Finishing
Lately I have been using 0.02 carbon-fiber mat, or "veil," to cover all of the wood components. Not only is this stuff extremely light (it feels like black Japanese tissue!), but it is also unbelievably strong when attached to the airframe with common model-airplane dope. The carbon is also very easy to sand and blend, and it doubles as a great filler/blocker. Hey, the Caprice is starting to look like something.
I used a filler coat mixed from zinc stearate and clear Brodak dope. The zinc stearate is the same substance that gymnasts use on their hands when working on an apparatus, but when mixed into dope it swells slightly. Only two tablespoons per quart of unthinned dope are required, so this is also a light filler-coat material. One coat sprayed on and block-sanded yielded a model ready for color.
My good friend Bill Werwage convinced me years ago to switch from a silver base coat for the color to a blocking coat made from white and polar-gray dope. This mixture covers the black carbon in one light coat and makes a great base for the final color coat, which in this case was white.
The next step was color trimming, and it was here that the first disappointment occurred. I usually use acrylic lacquer for trim. It is compatible with the base dope coats and is available in literally thousands of different colors. At least that was the case the last time I put a contest finish on a model.
This time when I went to the auto-paint store I was told that acrylic lacquer is a thing of the past for auto finishing, and they don't even carry the ingredients anymore! Thankfully I found enough of my signature colors (white base with bronze, red, and black trim) hidden in my shop to do the job.
As soon as I finish this column, I'm going to shoot the catalyzed urethane clear coat that Bob Brookins provided. Bob is a top-notch auto-body man, and his paint jobs are exquisite. When he suggests a product for finishing, I listen! Yes, this catalyzed stuff is toxic and you must have the proper safety gear to use it. I have a new spray booth, complete with explosion-proof exhaust fan and a charcoal respirator to protect the lungs.
I'll let you know how the whole thing turned out and how the Caprice and I fared at VSC next month.
Putting this much effort into a model may seem pointless to some, but those who have done this in the past know just how euphoric I am right now. I'm back to serious model building, and I'm a happy man!
Acknowledgments
- Dennis Choate — prodded me to build a Classic-design model
- Tom Morris, Tom's Building Service — control-system parts and assistance
- Bill Werwage — convinced me to use a white/polar-gray blocking coat
- Bob Brookins — provided the catalyzed urethane clear coat and finishing advice
- Phil Granderson — kept the pressure on me to finish the model
I'll get the paint overspray cleaned off of the soapbox and be back to normal subjects next month! Thanks for letting me brag a bit.
You can E-mail me at [email protected], call me at (610) 614-1747, or send mail to me at Box 68, Stockertown PA 18083.
MA
Transcribed from original scans by AI. Minor OCR errors may remain.

