
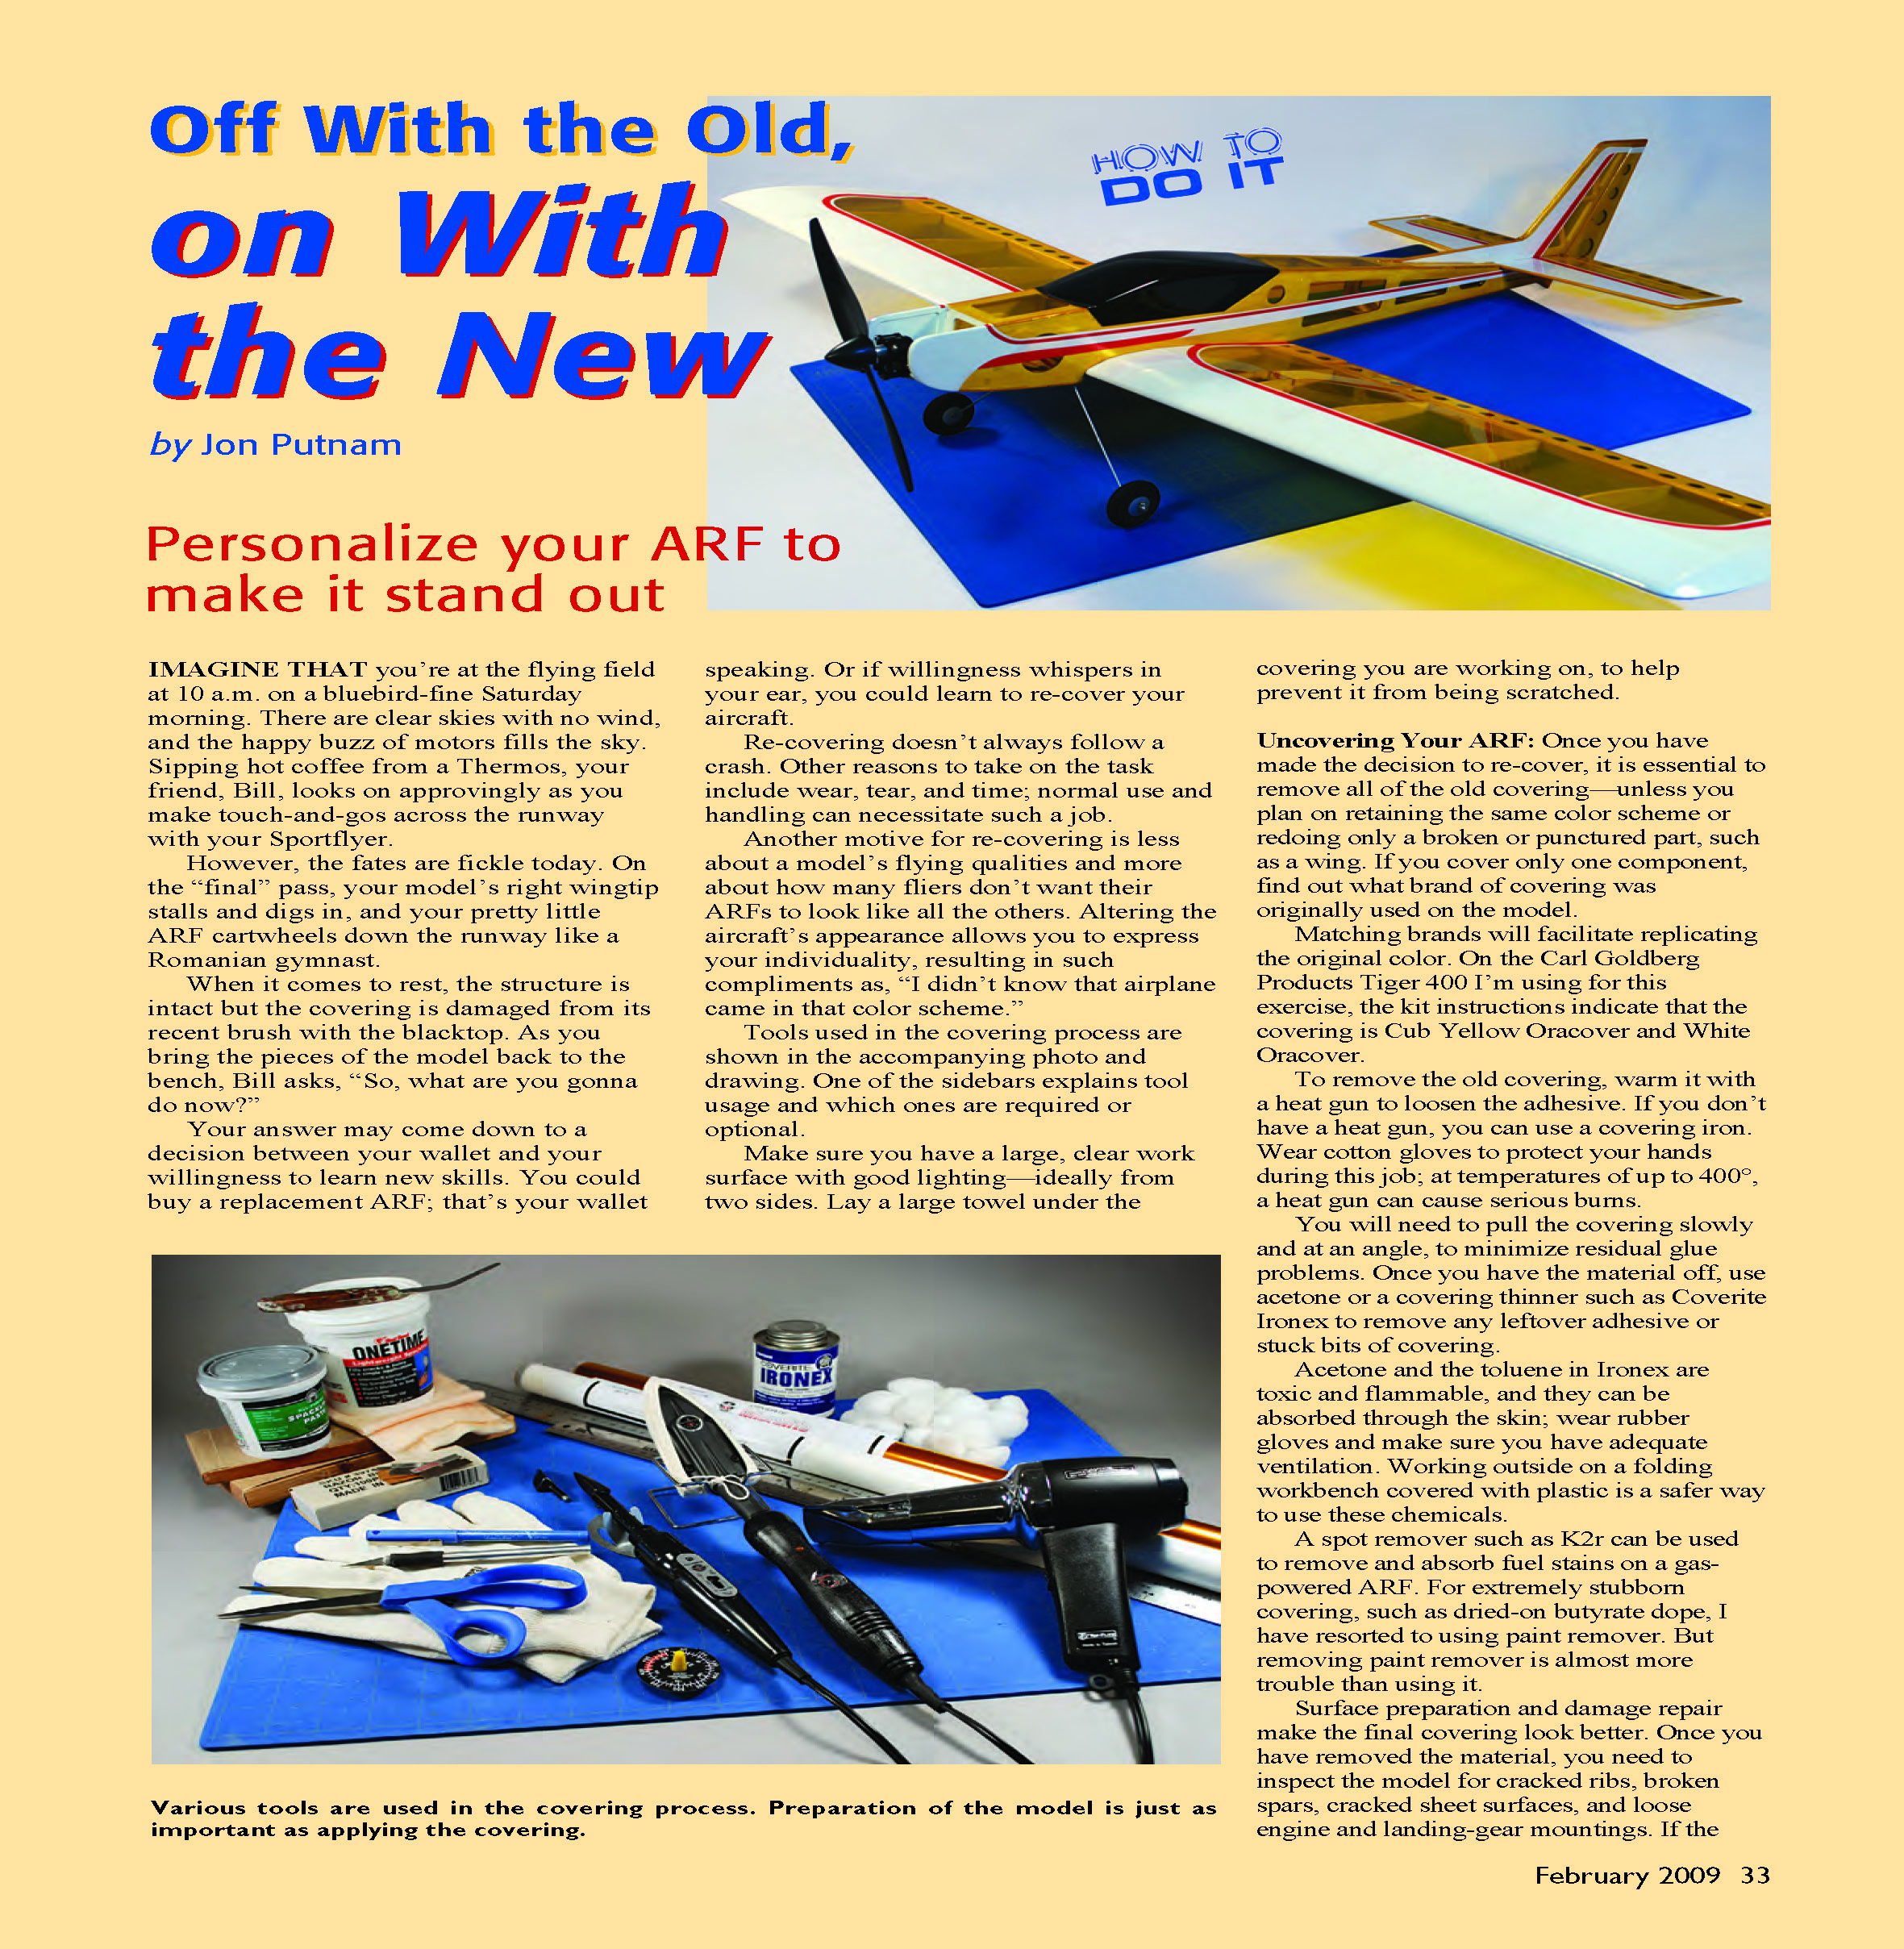

Off With the Old, on With the New
by Jon Putnam
Personalize your ARF to make it stand out
Imagine that you’re at the flying field at 10 a.m. on a bluebird-fine Saturday morning. There are clear skies with no wind, and the happy buzz of motors fills the sky. Sipping hot coffee from a Thermos, your friend Bill looks on approvingly as you make touch-and-gos across the runway with your Sportflyer.
However, the fates are fickle today. On the “final” pass, your model’s right wingtip stalls and digs in, and your pretty little ARF cartwheels down the runway like a Romanian gymnast.
When it comes to rest, the structure is intact but the covering is damaged from its recent brush with the blacktop. As you bring the pieces of the model back to the bench, Bill asks, “So, what are you gonna do now?”
Your answer may come down to a decision between your wallet and your willingness to learn new skills. You could buy a replacement ARF; that’s your wallet speaking. Or, if willingness whispers in your ear, you could learn to re-cover your aircraft.
Re-covering doesn’t always follow a crash. Other reasons to take on the task include wear, tear, and time; normal use and handling can necessitate such a job.
Another motive for re-covering is less about a model’s flying qualities and more about how many fliers don’t want their ARFs to look like all the others. Altering the aircraft’s appearance allows you to express your individuality, resulting in such compliments as, “I didn’t know that airplane came in that color scheme.”
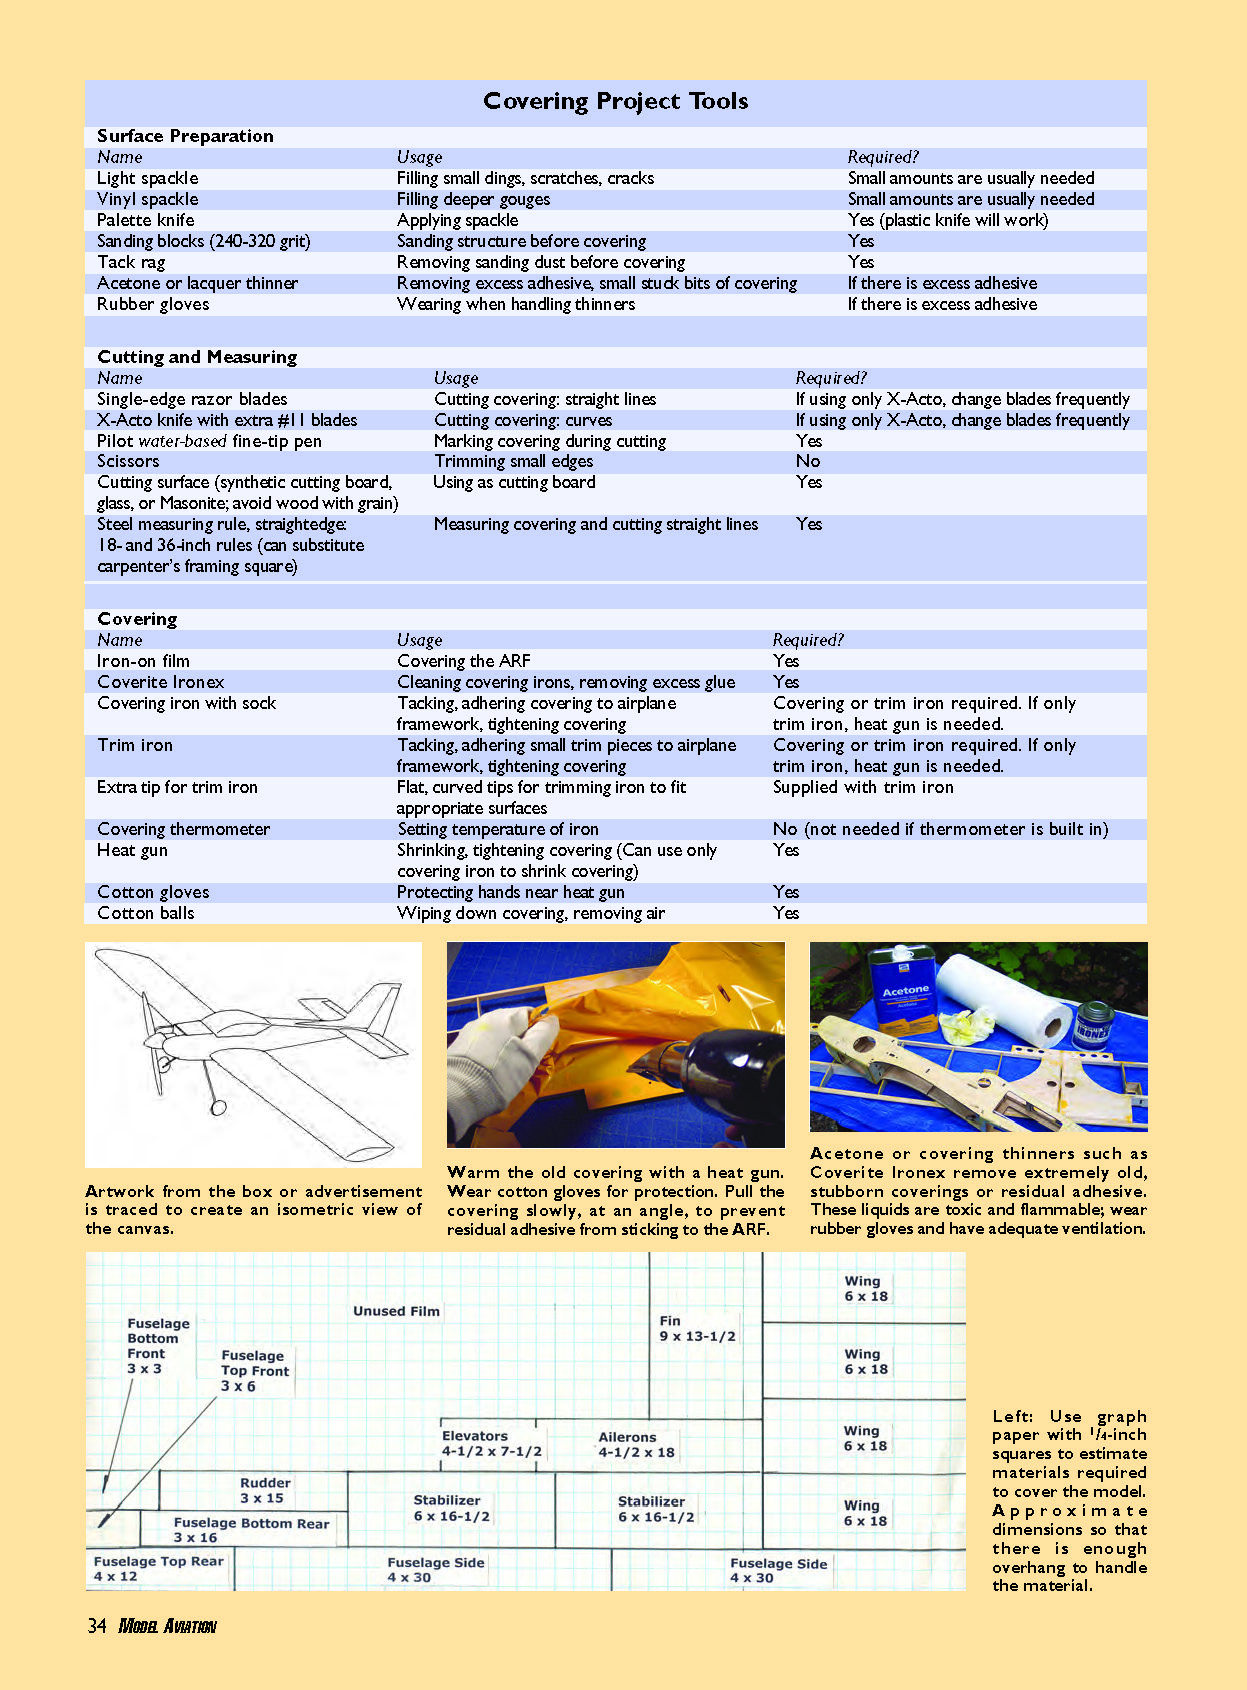
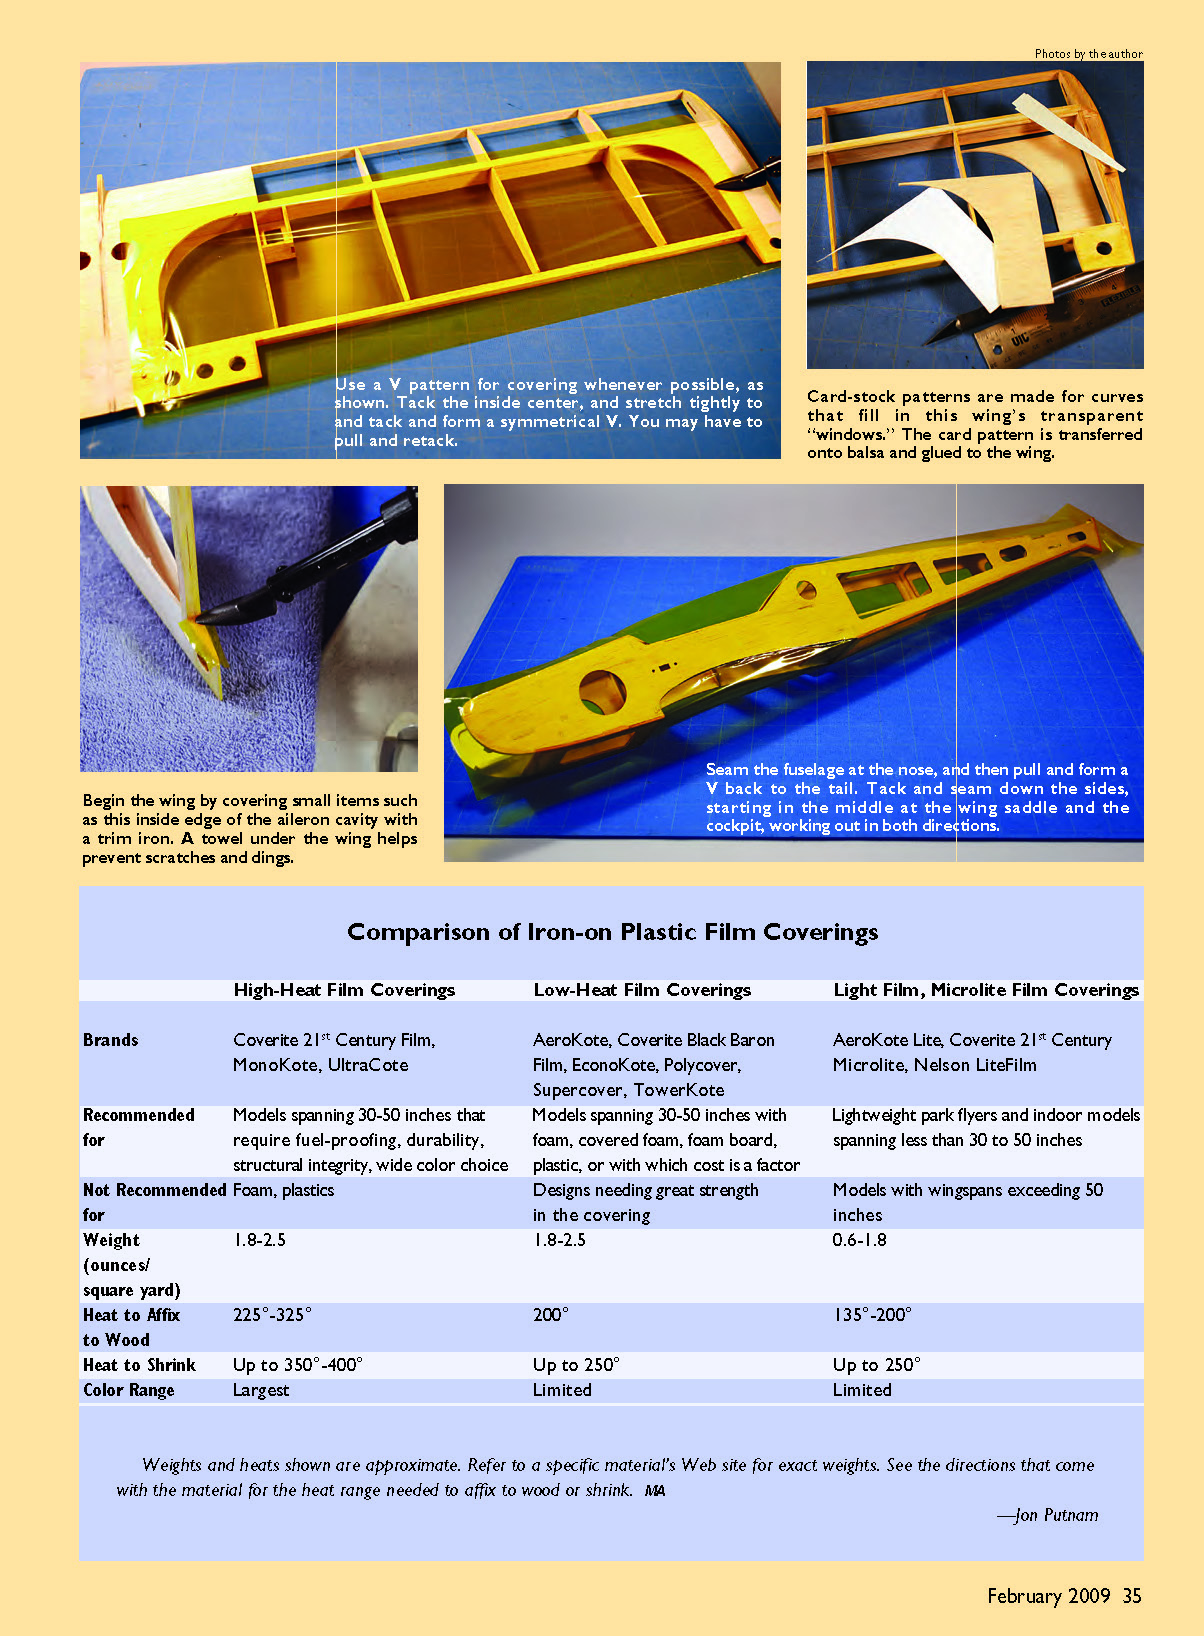
Tools used in the covering process are shown in the accompanying photo and drawing. One of the sidebars explains tool usage and which ones are required or optional.
Make sure you have a large, clear work surface with good lighting—ideally from two sides. Lay a large towel under the covering you are working on to help prevent it from being scratched.
Uncovering Your ARF
Once you have made the decision to re-cover, it is essential to remove all of the old covering—unless you plan on retaining the same color scheme or redoing only a broken or punctured part, such as a wing. If you cover only one component, find out what brand of covering was originally used on the model. Matching brands will facilitate replicating the original color. On the Carl Goldberg Tiger 400 I’m using for this exercise, the kit instructions indicate that the covering is Cub Yellow Oracover and White Oracover.
To remove the old covering, warm it with a heat gun to loosen the adhesive. If you don’t have a heat gun, you can use a covering iron. Wear cotton gloves to protect your hands during this job; at temperatures of up to 400°, a heat gun can cause serious burns.
You will need to pull the covering slowly and at an angle to minimize residual glue problems. Once you have the material off, use acetone or a covering thinner such as Coverite Ironex to remove any leftover adhesive or stuck bits of covering.
Acetone and the toluene in Ironex are toxic and flammable, and they can be absorbed through the skin; wear rubber gloves and make sure you have adequate ventilation. Working outside on a folding workbench covered with plastic is a safer way to use these chemicals.
A spot remover such as K2r can be used to remove and absorb fuel stains on a gas-powered ARF. For extremely stubborn covering, such as dried-on butyrate dope, I have resorted to using paint remover. But removing paint remover is almost more trouble than using it.
Surface preparation and damage repair make the final covering look better. Once you have removed the material, you need to inspect the model for cracked ribs, broken spars, cracked sheet surfaces, and loose engine and landing-gear mountings. If the structure is cracked or broken, repair it before covering. Preparation of the model is just as important as applying the covering.
Covering Project Tools
Surface Preparation
- Light spackle
- Usage: Filling small dings, scratches, cracks
- Required?: Small amounts are usually needed
- Vinyl spackle
- Usage: Filling deeper gouges
- Required?: Small amounts are usually needed
- Palette knife
- Usage: Applying spackle
- Required?: Yes (plastic knife will work)
- Sanding blocks (240–320 grit)
- Usage: Sanding structure before covering
- Required?: Yes
- Tack rag
- Usage: Removing sanding dust before covering
- Required?: Yes
- Acetone or lacquer thinner
- Usage: Removing excess adhesive, small stuck bits of covering
- Required?: If there is excess adhesive
- Rubber gloves
- Usage: Wearing when handling thinners
- Required?: If there is excess adhesive
Cutting and Measuring
- Single-edge razor blades
- Usage: Cutting covering; straight lines
- Required?: If using only X-Acto, change blades frequently
- X-Acto knife with extra #11 blades
- Usage: Cutting covering; curves
- Pilot water-based fine-tip pen
- Usage: Marking covering during cutting
- Required?: Yes
- Scissors
- Usage: Trimming small edges
- Required?: No
- Cutting surface (synthetic cutting board, glass, or Masonite; avoid wood with grain)
- Usage: Using as cutting board
- Required?: Yes
- Steel measuring rule, straightedge; 18- and 36-inch rules (can substitute carpenter’s framing square)
- Usage: Measuring covering and cutting straight lines
- Required?: Yes
Covering
- Iron-on film
- Usage: Covering the ARF
- Required?: Yes
- Coverite Ironex
- Usage: Cleaning covering irons, removing excess glue
- Required?: Yes
- Covering iron with sock
- Usage: Tacking, adhering covering to airplane framework, tightening covering
- Required?: Covering or trim iron required. If only a trim iron, a heat gun is needed.
- Trim iron
- Usage: Tacking, adhering small trim pieces to airplane framework, tightening covering
- Extra tip for trim iron
- Usage: Flat, curved tips for trimming iron to fit appropriate surfaces
- Required?: Supplied with trim iron
- Covering thermometer
- Usage: Setting temperature of iron
- Required?: No (not needed if thermometer is built in)
- Heat gun
- Usage: Shrinking, tightening covering (can use only covering iron to shrink covering)
- Required?: Yes
- Cotton gloves
- Usage: Protecting hands near heat gun
- Required?: Yes
- Cotton balls
- Usage: Wiping down covering, removing air
- Required?: Yes
Comparison of Iron-on Plastic Film Coverings
Categories and Brands
- High-Heat Film Coverings
- Brands: Coverite 21st Century Film, MonoKote, UltraCote
- Low-Heat Film Coverings
- Brands: AeroKote, Coverite Black Baron Film, EconoKote, Polycover, Supercover, TowerKote
- Light Film / Microlite Film Coverings
- Brands: AeroKote Lite, Coverite 21st Century Microlite, Nelson LiteFilm
Recommended for
- High-Heat: Models spanning 30–50 inches that require fuel-proofing, durability, structural integrity, and a wide color choice
- Low-Heat: Models spanning 30–50 inches with foam, covered foam, foam board, or plastic, or where cost is a factor
- Light Film / Microlite: Lightweight park flyers and indoor models spanning less than 30–50 inches
Not Recommended for
- High-Heat: Foam, plastics
- Low-Heat: Designs needing great strength in the covering
- Light Film / Microlite: Models with wingspans exceeding 50 inches
Properties
- Weight (ounces/square yard)
- High-Heat: 1.8–2.5
- Low-Heat: 1.8–2.5
- Light Film / Microlite: 0.6–1.8
- Heat to Affix to Wood
- High-Heat: 225°–325°
- Low-Heat: 200°
- Light Film / Microlite: 135°–200°
- Heat to Shrink
- High-Heat: Up to 350°–400°
- Low-Heat: Up to 250°
- Light Film / Microlite: Up to 250°
- Color Range
- High-Heat: Largest
- Low-Heat: Limited
- Light Film / Microlite: Limited
Weights and heats shown are approximate. Refer to a specific material's website for exact weights and to the directions that come with the material for the heat range needed to affix to wood or shrink.
—Jon Putnam
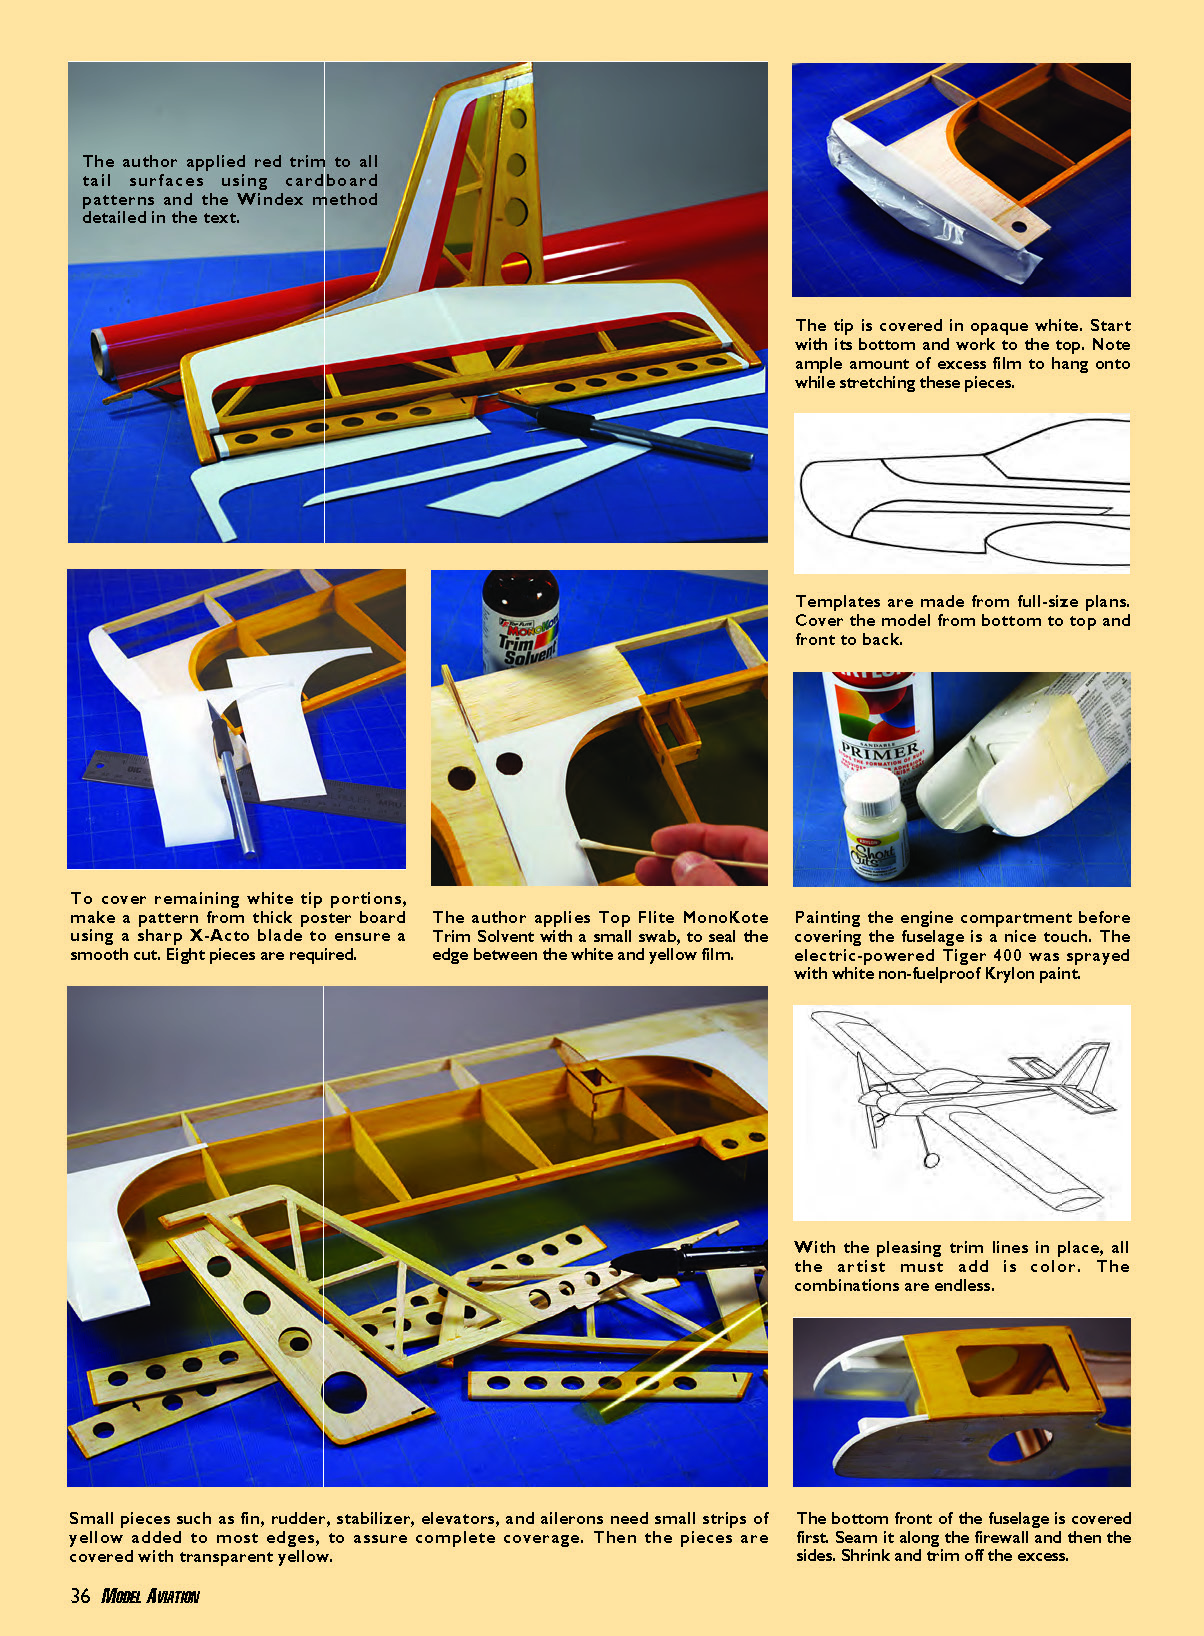
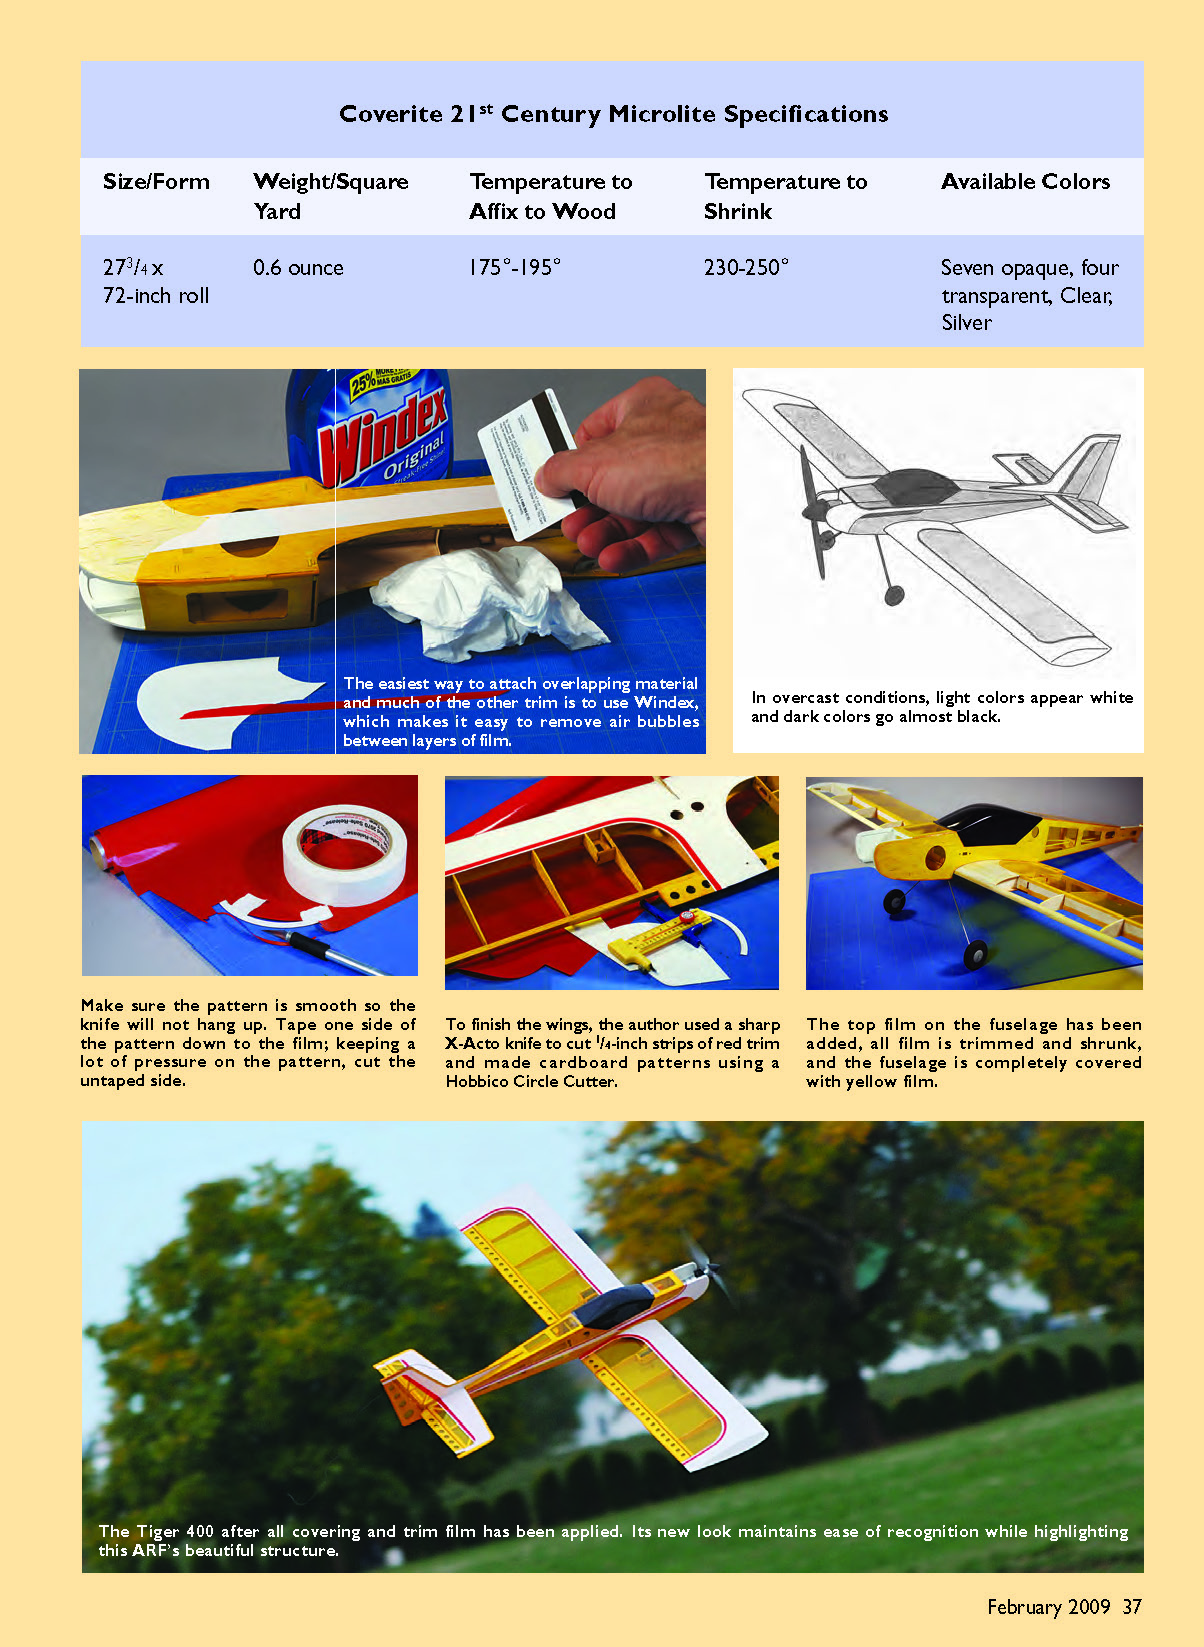
The author applied red trim to all tail surfaces using cardboard patterns and the Windex method detailed in the text.
The tip is covered in opaque white. Start with its bottom and work to the top. Note ample amount of excess film to hang onto while stretching these pieces.
Templates are made from full-size plans. Cover the model from bottom to top and front to back.
To cover remaining white tip portions, make a pattern from thick poster board using a sharp X-Acto blade to ensure a smooth cut. Eight pieces are required.
The author applies Top Flite MonoKote Trim Solvent with a small swab to seal the edge between the white and yellow film.
Painting the engine compartment before covering the fuselage is a nice touch. The electric-powered Tiger 400 was sprayed with white non-fuelproof Krylon paint.
Small pieces such as fin, rudder, stabilizer, elevators, and ailerons need small strips of yellow added to most edges to assure complete coverage. Then the pieces are covered with transparent yellow.
With the pleasing trim lines in place, all the artist must add is color. The combinations are endless.
The bottom front of the fuselage is covered first. Seam it along the firewall and then the sides. Shrink and trim off the excess.
Coverite 21st Century Microlite Specifications
- Size/Form: 27 3/4 x 72-inch roll
- Weight/Square Yard: 0.6 ounce
- Temperature to Affix to Wood: 175°–195°
- Temperature to Shrink: 230°–250°
- Available Colors: Seven opaque, four transparent, Clear, Silver
If the airplane needs repairs or regluing, now is the time to do it.
Once you have made the repairs, fill nicks and dings using light or vinyl spackle and a palette knife. Lightly sand the surface with 240- to 320-grit paper.
When you are finished sanding, wipe off the surface with a tack rag. Run your fingers over the surface and hold the model up to the light at an angle to check for imperfections. If you can feel or see flaws now, you'll see them later when your ARF is covered. Covering does not hide bad workmanship underneath it.
Choosing a Covering
Before you select the airplane's colors, decide if you will use opaque or transparent film, or some combination of each, and which brands come in the shades you want. To pick a type and brand of covering, you need to understand the differences between them.
Iron-on coverings come in four types: high heat, low heat, fabric, and light films. Fabric coverings are used mainly on heavier scale models of full-scale airplanes that were covered with fabric. I’ll skip those, because the Tiger 400 is a lightweight, nonscale ARF. An accompanying sidebar describes the differences between iron-on plastic films.
For the Tiger 400, I decided to use Coverite 21st Century Microlite: a light, iron-on plastic that is suited to airplanes with wings spanning less than 50 inches. Since my model is a low-weight electric, it does not need a heavier covering with fuelproof qualities. And because it is built lightly, it does not have structures to resist the force and pull of heavier coverings when they shrink, which can lead to warping or breakage.
No matter what film you choose, be aware of the size of roll it comes in, its weight, its temperature rating, and the colors that are available.
The Covering Method
A logical process makes covering easier. There are four main points to remember.
- Start small or simple. Learn to cover by practicing on scrap balsa or a smaller object such as a simple wing, rudder, or stabilizer until you have a feel for the temperature and the tools. Tackle more difficult items such as a fuselage later.
- Cover bottom to top and back to front. Imagine air and fuel running over your ARF from front to back and top to bottom. If a seam's edge faces down or back, it will be much less likely to show when light hits it, catch air from the slipstream, or collect fuel and dirt.
- On a wing or stabilizer, where possible, cover the bottom first and top last, overlapping the top covering around and over the bottom by 1/8 inch. On a fuselage, cover the bottom, the sides, and then the top. There can be exceptions depending on how the model is constructed.
With a two-color scheme, try to have the darker color overlap the lighter one, or the opaque shade overlap the transparent one. On my Tiger 400, the Microlite White on the front of the fuselage and the wings will overlap the Microlite Transparent Yellow.
- Hide seams under trim. If you are going to apply a trim piece on the side of a fuselage or striping to a wing, use it to hide a seam if there is one.
On my Tiger 400, the red wing striping hides the seam where the white overlaps the yellow. White Microlite is not very opaque, and some of the yellow would show through without this trim layer.
Covering the wing and control surfaces in two colors is not that hard. I decided to use Transparent Yellow over the open rib sections and opaque White on the LE, tip wing bay, and center section. This will create transparent "windows" in the wing, which improves visibility at a distance and looks great.
If you don't want to get involved in a two-color job, you can follow these directions and cover the entire bottom of the wing and then the top. Most directions that come with film rolls illustrate covering a simple wing.
The Tiger 400's design drawing shows a curved shape for the transparent sections on the wing. One way to achieve this is to add small sections of balsa sheet in the shape of the curve at both tips and the wing center section.
Begin the wing by covering small areas such as the inside edge of the aileron cavity. A trim iron is ideal for these diminutive pieces. The forward edge of the aileron cavity will be concealed by the film from the top and bottom of the wing.
I like to place the wing on a towel to avoid scratching the film when working on it. To begin, I cut the yellow covering according to the cutting guide. To do this, lay the material on a cutting board with the adhesive side up. With transparent film, a cutting board marked with a 1-inch grid makes this operation a snap.
Mark the covering with a water-based Pilot pen. Slice the film from the roll using a steel rule and a sharp X-Acto knife or razor blade. Remove the backing and place the covering on the bottom of the wing.
Whenever I can, I use a "V" pattern to attach the covering. To use this technique, tack the inside center seam and then stretch the film tightly to each side of the center. Then form a symmetrical V out to the tip. Beginning at the center of each side, tack at roughly 1-inch intervals out to the four corners. Once the material is tacked, seal it to the wood.
Cut notches for the film around each rib, seal it to the spar, and then seal it to the TE and the center and tip of the wing panel. Seal all edges again and then shrink with a heat gun.
I often seal more edge than I know will eventually remain on the model, to assist in keeping the film attached while I heat-shrink it. I also routinely reseal film after shrinking it with a heat gun, because the gun can loosen the adhesive. When all this is done, trim the panel.
Shrinking film with a heat gun is more art than science. Try to work the entire piece at one time, starting 3–4 inches above it.
When using a heat gun, you can always get closer and bring more heat into contact with the film. If you are using a covering iron, you can always turn up the temperature. You can easily burn a hole in the film if you get too close with a heat gun, which usually means you will need to re-cover that panel.
Keeping the heat gun or covering iron moving continually across the film will help you avoid burn holes. Shielding neighboring film with cardboard or a wet rag is a great tactic to avoid burning film.
Once the film is taut, rub any area on sheet balsa with a cotton ball to work air bubbles out and help set the glue. If there are small creases that don't pull out with the heat gun, I often remove them with a trim iron rather than risk getting too close with a heat gun. Reseal all seams after shrinking with a heat gun.
At this point I trim the ends of the finished heat-shrunk yellow wing panel using a cardboard pattern, a new X-Acto blade, and a light touch. I apply enough pressure to cut only the film—not the balsa under it. I also trim the TE, leaving roughly 1/8 inch wrapped around the upper side of the wing.
As I mentioned, the Tiger 400's tips will be covered in white. If you are doing a one-color scheme, finish the tips first so that the wing film will overlap them. I start with the bottom of the tip and then cover the top.
Tack the film on the high point or spar position of the tip or the end rib, and then stretch and seal that rib to the TE. Repeat the process for the LE. Beginning at the same spar location, stretch the film and seal it to the outer edges of the tip. When finished, carefully shrink the film and trim off the excess.
Repeat those steps for the top of the tip, and you have one tip done. Covering these components takes time, but the rewards are worth it.
To cover the remaining curved portions near the tip and wing center, make a cardboard pattern to fit the space. This will be almost the same shape that was filled with 1/16-inch sheet balsa. Add extra film to the uncurved edges.
To make this pattern and most of the others, use thick poster board and a sharp blade on the hobby knife to ensure a smooth cut. When finished, I cut eight pieces of the opaque white.
A trim iron comes in handy for attaching the white panels. Keeping the seam small, I tack at the lowest point of the curve. Then I pull and seal the film to the TE, slightly overlapping the yellow, and finish the curve. I seal the center seam as well as the top edge, smooth any wrinkles, push out air bubbles, and close the seam at the bottom. Shrinking the panel with a gun or iron follows.
A delicate touch is required if you are using a heat gun. Protect the panel next to it with a piece of cardboard or a damp cloth to avoid burns. Use cotton to work out any air bubbles. Repeat this process for all panels. When finished, you can apply Top Flite MonoKote Trim Solvent with a small swab to seal the edge between the different-color films.
After completing those panels, you'll probably find that the wing's LE will be a snap to cover. Of course, you'll do the bottom side first so that the top film overlaps it.
The covering is attached along the spar line. Tack it at the center, and then stretch and seal it to the tip, taking care to keep the line straight. Tack the LE in the center of the wing panel, and tack and stretch at 1-inch intervals in both directions.
When finished, all edges are sealed, the panel is shrunk, and the excess material is trimmed off using a straightedge. Now cover both bottom panels and both top panels.
At this point, my Tiger 400's wing is completely covered with the yellow and white film. All that remains is to attach the red trim.
Attaching Trim (Windex Method)
The easiest way to attach a strip or much of the other trim to a model is to use a method involving Windex. It can virtually eliminate air bubbles between layers of film.
On my ARF, I sprayed a light coat of the glass cleaner on the plastic, aligned the white film where I wanted it, and used a credit card to squeegee out the excess liquid. I cleaned up and worked out any remaining Windex with a tissue.
Pushing the credit card rather than dragging it works better, and its edge can be used quite effectively to nudge pieces of film into place. If you have any persistent air bubbles, prick them with a sharp pin and work out the air. Let one side dry overnight before doing the other side, or you may regret it.
If the film overlaps an edge such as the LE or TE, tack it to that edge with a trim iron. When the film is dry, you can use extremely low heat on a covering iron to set the adhesive in the trim film and then seal the edges with trim solvent. If a piece does not look right when dried, it can usually be lifted, sprayed, and repositioned.
To finish my ARF's wings, I used an incredibly sharp X-Acto knife to cut 1/4-inch red trim from film in strips and curves. The cardboard patterns for the curves were easy to make with help from a Hobbico Circle Cutter. I applied all the red trim using Windex, set the adhesive with an iron on low heat, and then sealed it using trim solvent.
One of the hardest things to do is cut out small trim pieces, such as the 1/4-inch-wide curves for the red trim, and get a smooth cut. I use the following tips for success:
- Use a new, sharp X-Acto blade.
- Make sure the pattern is smooth so that the knife blade will not hang up on it.
- Tape one side of the pattern down and, while keeping pressure on it, cut the untaped edge in one smooth, continuous motion.
- Without moving the pattern, apply tape to the other side of the pattern, remove the original tape, and cut the remaining side.
- When designing these curved pieces, allow extra film to overlap the adjoining piece.
I decided to deviate from the plan and add 1/8-inch red Great Planes Kwik Stripe Striping Tape on top of the white side stripe and 1/16-inch white tape along the back edge of the tail surfaces, to echo the line I formed on the wings.
I had not planned on using the red side stripe; however, once the Tiger 400 was finished, I felt like it needed one more stripe to complete the trim scheme. Striping tape was a fast and easy way to obtain it.
Anyone can learn to cover a model. The results can be rewarding and give your airplane that custom, non-ARF look that will set it apart at the flying field. As I did, you might also gain an appreciation of how good the work is that comes out of the ARF factories.
Good covering and happy flying! —Jon Putnam [email protected]
That was only part of the covering job; there’s still a fuselage and a tail section to do. You can find that part of the story and many more photos on MA’s Sport Aviator website.
—MA Staff
Sources
- Tiger 400 review, Jon Putnam’s complete covering how-to:
- Sport Aviator
- www.masportaviator.com
- Radio Control Model Airplanes (book) by John Carroll
- Kalmbach Books
- (800) 533-6644
- www.kalmbach.com
- There Are No Secrets (book) by Harry Higley; Tom’s Techniques (book) by Tom Ingram and Harry Higley
- Harry B. Higley & Sons, Inc.
- 433 W. Arguilla Dr., Glenwood IL 60425
- www.harryhigley.com
- Covering RC Airplanes: Volume I (book) by Faye Stilley; Covering RC Airplanes: Volume II (book) by Faye Stilley
- RCStore.com
- (888) 235-2021
- https://secure.rcstore.com
Transcribed from original scans by AI. Minor OCR errors may remain.

