
Park View: Maxford USA Curtiss Jenny Electric ARF
By Michael Ramsey
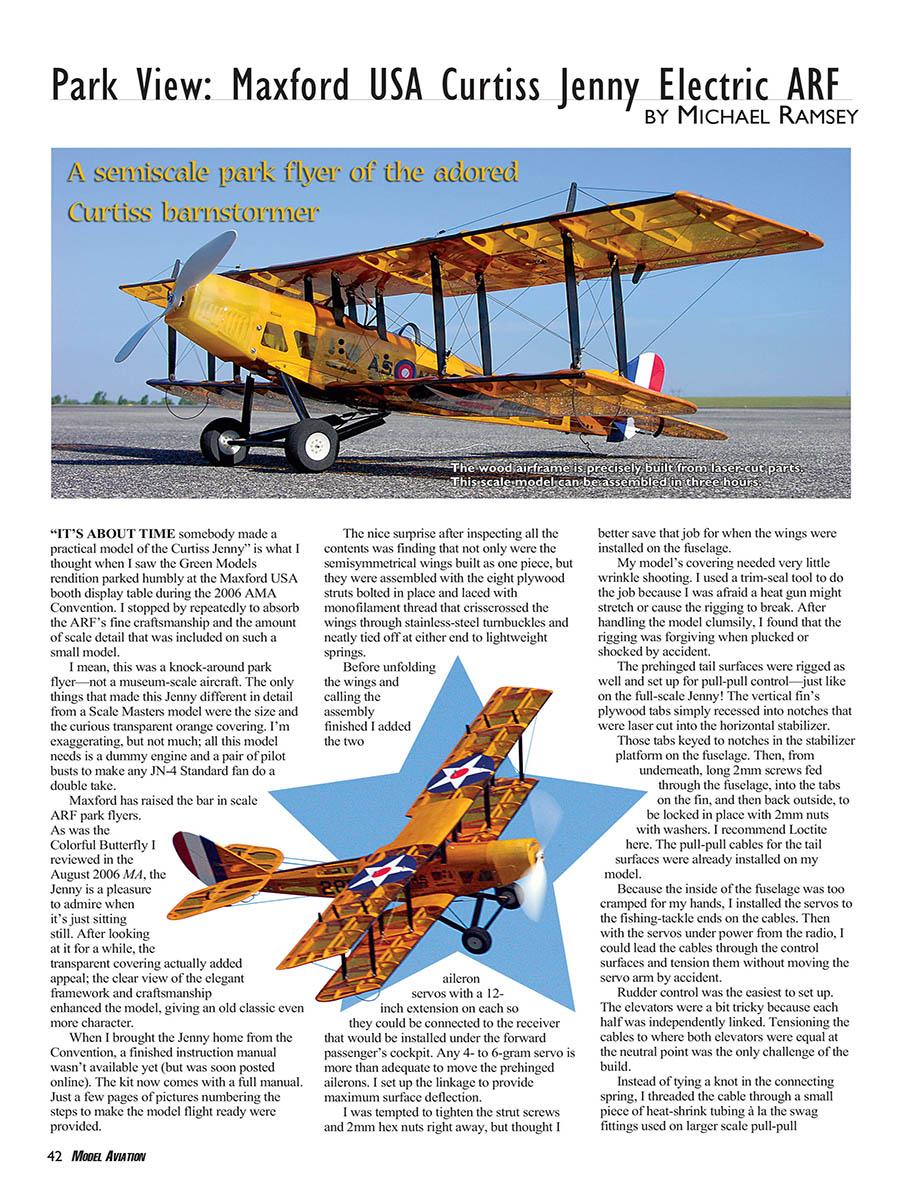
“It's about time somebody made a practical model of the Curtiss Jenny,” is what I thought when I saw the Green Models rendition parked humbly at the Maxford USA booth display table during the 2006 AMA Convention. I stopped by repeatedly to absorb the ARF’s fine craftsmanship and the amount of scale detail that was included on such a small model.
I mean, this was a knock-around park flyer—not a museum-scale aircraft. The only things that made this Jenny different in detail from a Scale Masters model were the size and the curious transparent orange covering. I’m exaggerating, but not much; all this model needs is a dummy engine and a pair of pilot busts to make any JN-4 Standard fan do a double take.
Maxford has raised the bar in scale ARF park flyers.
As was the Colorful Butterfly I reviewed in the August 2006 MA, the Jenny is a pleasure to admire when it’s just sitting still. After looking at it for a while, the transparent covering actually added appeal; the clear view of the elegant framework and craftsmanship enhanced the model, giving an old classic even more character.
When I brought the Jenny home from the Convention, a finished instruction manual wasn’t available yet (but was soon posted online). The kit now comes with a full manual. Just a few pages of pictures numbering the steps to make the model flight ready were provided.
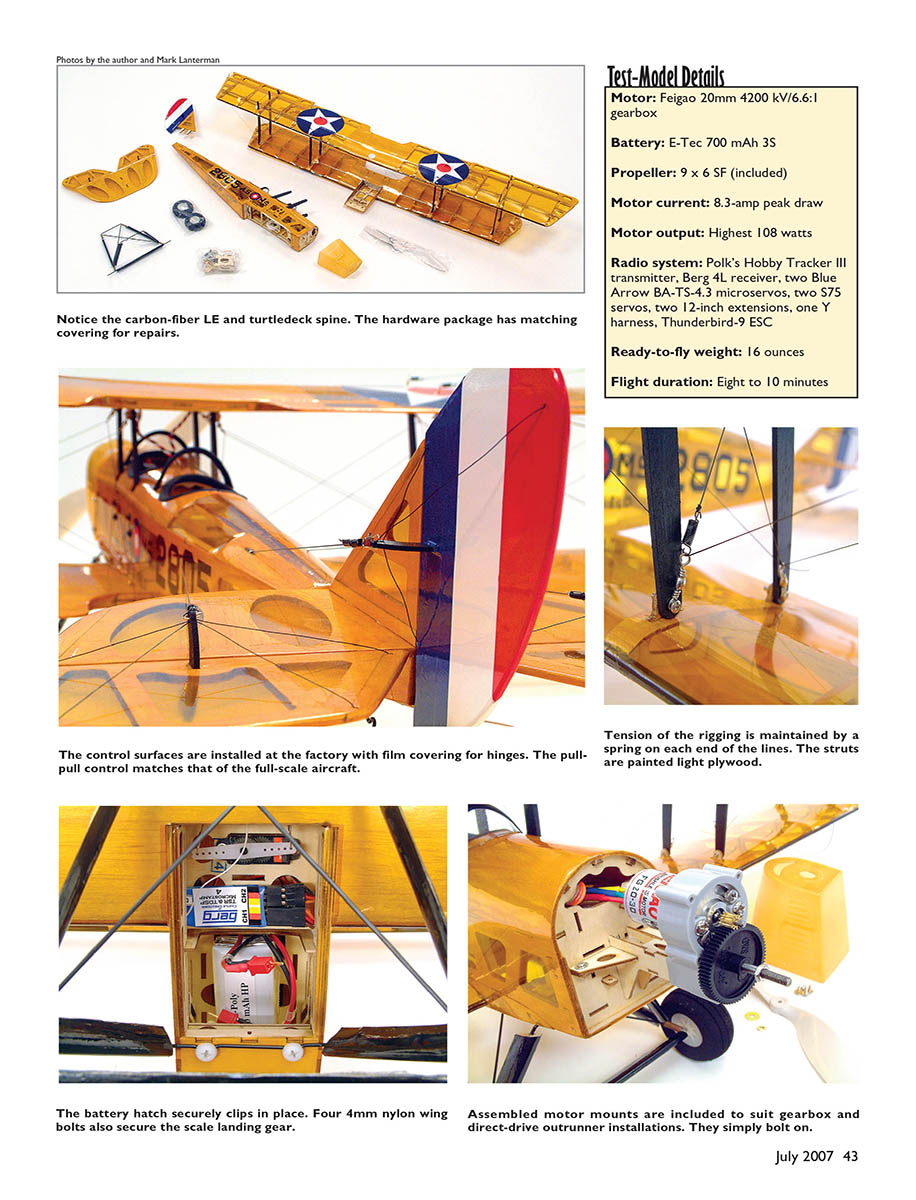
The nice surprise after inspecting all the contents was finding that not only were the semisymmetrical wings built as one piece, but they were assembled with the eight plywood struts bolted in place and laced with monofilament thread that crisscrossed the wings through stainless-steel turnbuckles and neatly tied off at either end to lightweight springs.
Before unfolding the wings and calling the assembly finished I added the two aileron servos with a 12-inch extension on each so they could be connected to the receiver that would be installed under the forward passenger’s cockpit. Any 4- to 6-gram servo is more than adequate to move the prehinged ailerons. I set up the linkage to provide maximum surface deflection. I was tempted to tighten the strut screws and 2mm hex nuts right away, but thought I better save that job for when the wings were installed on the fuselage.
My model’s covering needed very little wrinkle shooting. I used a trim-seal tool to do the job because I was afraid a heat gun might stretch or cause the rigging to break. After handling the model clumsily, I found that the rigging was forgiving when plucked or shocked by accident.
The prehinged tail surfaces were rigged as well and set up for pull-pull control—just like on the full-scale Jenny! The vertical fin’s plywood tabs simply recessed into notches that were laser cut into the horizontal stabilizer. Those tabs keyed to notches in the stabilizer platform on the fuselage. Then, from underneath, long 2mm screws fed through the fuselage, into the tabs on the fin, and then back outside, to be locked in place with 2mm nuts with washers. I recommend Loctite here.
The pull-pull cables for the tail surfaces were already installed on my model. Because the inside of the fuselage was too cramped for my hands, I installed the servos to the fishing-tackle ends on the cables. Then with the servos under power from the radio, I could lead the cables through the control surfaces and tension them without moving the servo arm by accident. Rudder control was the easiest to set up. The elevators were a bit tricky because each half was independently linked. Tensioning the cables to where both elevators were equal at the neutral point was the only challenge of the build.
Instead of tying a knot in the connecting spring, I threaded the cable through a small piece of heat-shrink tubing à la the swag fittings used on larger-scale pull-pull applications. Instead of “crimping,” I added a drop of thick cyanoacrylate with the cable pulled taut. If the elevators come out somewhat uneven when you do this, disconnect the long cable and tie enough knots in the line to shorten the string and correct its length.
Two motor mounts were included to suit either a gearbox or a brushless outrunner motor. Each plywood laser-cut mount tab locked into the firewall and was secured with two small screws.
The instructions showed a brushed Speed 350 motor and 6:1 gearbox. I had an older foamie power system lying around that had an output of 80–100 watts, depending on whether a two- or three-cell battery was chosen. It would use the included 9 x 6 SF propeller and provide the necessary ground clearance. My amp draw is approximately 8 amps (wide-open throttle) static with this setup.
The firewall required light carving to allow the Thunderbird-9 controller to pass through. I fit the cowl so it was tight on three sides but open on the bottom, to allow heat from the motor to escape.
To mount the finished fuselage I fed it, back to front, between the wings and onto the corresponding frame of the lower center section. As the center cabane mounting tabs met the struts in the fuselage, the assembly had to be carefully jiggled into place.
It was a thing of beauty when the whole assembly fit together snugly. The quality and accuracy of the parts fit left me with no alignment issues or curiously shaped gaps to try to fix or ignore.
I used all the hardware that came with the kit. The only part that didn't work out was the carbon-fiber rod included as either pushrods or wingtip skids. I used the Z-bend finished metal pushrods for the ailerons, so I attempted to bend the 1 mm carbon rod and fit it into the plywood bracket holes in the bottom of the lower wingtips.
Carbon fiber is well known for its stiffness, and I couldn't get the skid material to work. I substituted music wire of the same diameter and had much more luck. Don't skip this scale detail; the narrow wheelbase permits regular tip-dragging landings.
The landing gear was last to attach, as it was secured with the same screws that held on the bottom wing. The wheels had plastic tubing for wheel collars. I suggest carefully gluing that tubing in place with cyanoacrylate.
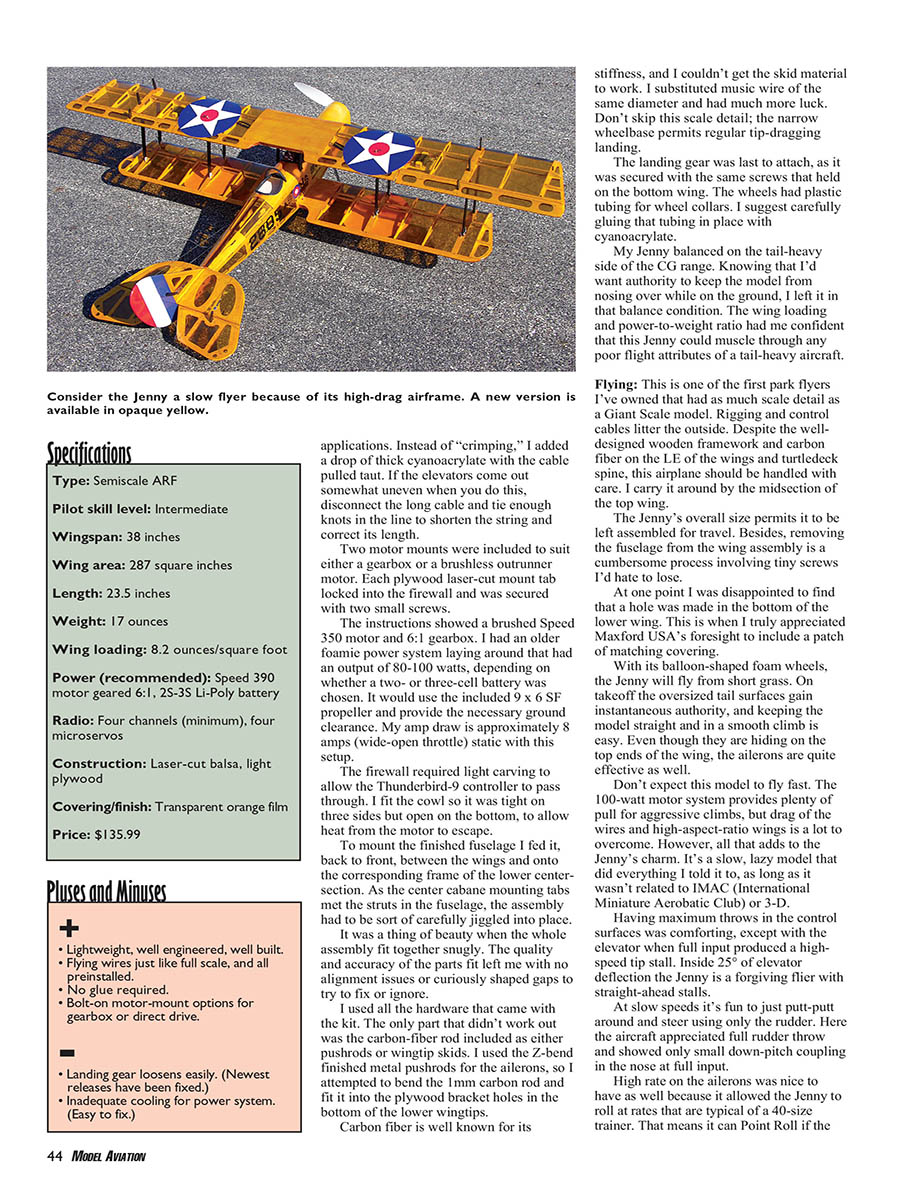
My Jenny balanced on the tail-heavy side of the CG range. Knowing that I'd want authority to keep the model from nosing over while on the ground, I left it in that balance condition. The wing loading and power-to-weight ratio had me confident that this Jenny could muscle through any poor flight attributes of a tail-heavy aircraft.
Test-Model Details
- Motor: Feigao 20mm 4200 kV / 6.6:1 gearbox
- Battery: E-Tec 700 mAh 3S
- Propeller: 9 x 6 SF (included)
- Motor current: 8.3-amp peak draw
- Motor output: Highest 108 watts
- Radio system: Polk’s Hobby Tracker III transmitter, Berg 4L receiver, two Blue Arrow BA-TS-4.3 microservos, two Spektrum RC S75 servos, two 12-inch extensions, one Y harness, Thunderbird-9 ESC
- Ready-to-fly weight: 16 ounces
- Flight duration: Eight to 10 minutes
Flying
This is one of the first park flyers I've owned that had as much scale detail as a Giant Scale model. Rigging and control cables litter the outside. Despite the well-designed wooden framework and carbon fiber on the leading edge of the wings and turtledeck spine, this airplane should be handled with care. I carry it around by the midsection of the top wing.
The Jenny's overall size permits it to be left assembled for travel. Besides, removing the fuselage from the wing assembly is a cumbersome process involving tiny screws I'd hate to lose.
At one point I was disappointed to find that a hole was made in the bottom of the lower wing. This is when I truly appreciated Maxford USA's foresight to include a patch of matching covering.
With its balloon-shaped foam wheels, the Jenny will fly from short grass. On takeoff the oversized tail surfaces gain instantaneous authority, and keeping the model straight and in a smooth climb is easy. Even though they are hidden on the top ends of the wing, the ailerons are quite effective as well.
Don't expect this model to fly fast. The 100-watt motor system provides plenty of pull for aggressive climbs, but drag of the wires and high-aspect-ratio wings is a lot to overcome. However, all that adds to the Jenny's charm. It's a slow, lazy model that did everything I told it to, as long as it wasn't related to IMAC (International Miniature Aerobatic Club) or 3-D.
Having maximum throws in the control surfaces was comforting, except with the elevator when full input produced a high-speed tip stall. Inside 25° of elevator deflection the Jenny is a forgiving flier with straight-ahead stalls.
At slow speeds it's fun to just putt-putt around and steer using only the rudder. Here the aircraft appreciated full rudder throw and showed only small down-coupling in the nose at full input.
High rate on the ailerons was nice to have as well because it allowed the Jenny to roll at rates that are typical of a 40-size trainer. That means it can point roll if the pilot is adept at mixing in rudder and elevator during the maneuver sequence. Inverted flight is possible, but that's not so Jenny-like.
Landings were smoothest if a little power were carried all the way to touchdown. The extra thrust is again required to overcome the drag of all those cables. (The full-scale Jenny was the same way.)
To prevent ground looping, touch the main wheels down while holding the model at a nose-high attitude. As soon as that fixed tail skid touches the ground, the model stops quickly and nosing over is no longer possible.
The power combination in my model allows for a 10-minute flight. However, the battery is warmer than I would like at the end since only half throttle is used during the flight. To promote the flow of heat to the outside, I opened up the covering on the battery hatch.
The complex landing-gear assembly is a great feature. But the contact arrangement with the mounting screws allows the gear's front end to come loose from time to time no matter how tight the screws are.
The system would work better if the relief bends in front of the wire pointed backward instead of forward. That way the mounting points would be in tension and little force from the mounting screws would be required to hold the gear in place. I'll fix the gear by silver-soldering a wire that encloses the front mounting holes.
I'm proud to own this Jenny for its flying qualities and distinctive features. I've flown it in winds as high as 10 mph with no problems.
To add a spinner to the front end, I recommend the prop nuts available from Du-Bro Products. Maxford USA just announced the release of this Jenny covered in opaque yellow "fabric-like" covering. The last touch to my Jenny might be to add a pair of lightweight pilots.
Michael Ramsey [email protected]
Manufacturer / Distributor
Maxford USA Corp. DBA of Green RC Models USA 13909 Artesia Blvd. Cerritos, CA 90703 (866) 706-8288 www.maxfordusa.com
Sources
- Accessories: Du-Bro
- 80 Bonner Rd.
- Wauconda, IL 60084
- (800) 848-9411
- [email protected]
- www.dubro.com
- Berg 4L receiver, Thunderbird-9 ESC: Castle Creations
- 235 S. Kansas Ave.
- Olathe, KS 66061
- (913) 390-6939
- [email protected]
- www.castlecreations.com
- Blue Arrow BA-TS-4.3 microservos: AeroMicro
- 2090 Duane Ave.
- Santa Clara, CA 95054
- (408) 496-6699
- [email protected]
- www.aeromicro.com
- Feigao 20mm, 4200 kV motor; GWS 350-D gearbox; 700 mAh E-Tec Li-Poly, 11.1-volt battery: BP Hobbies
- 140 Ethel Rd. W. Suite J
- Piscataway, NJ 08854
- (732) 287-3933 (9 a.m.-5 p.m. EST)
- [email protected]
- www.bphobbies.com
- Spektrum RC S75 servos: Horizon Hobby, Inc.
- 4105 Fieldstone Rd.
- Champaign, IL 61822
- (217) 352-1913
- www.spektrumrc.com
- Tracker III transmitter: Polk's Hobby
- 695 S. 21st St.
- Irvington, NJ 07111
- (973) 351-9800
- [email protected]
- www.polkshobby.com
Other Reviews of This Product
- May 2007 Fly RC magazine: page 90
- March 2007 Model Airplane News magazine: page 90
Transcribed from original scans by AI. Minor OCR errors may remain.

