
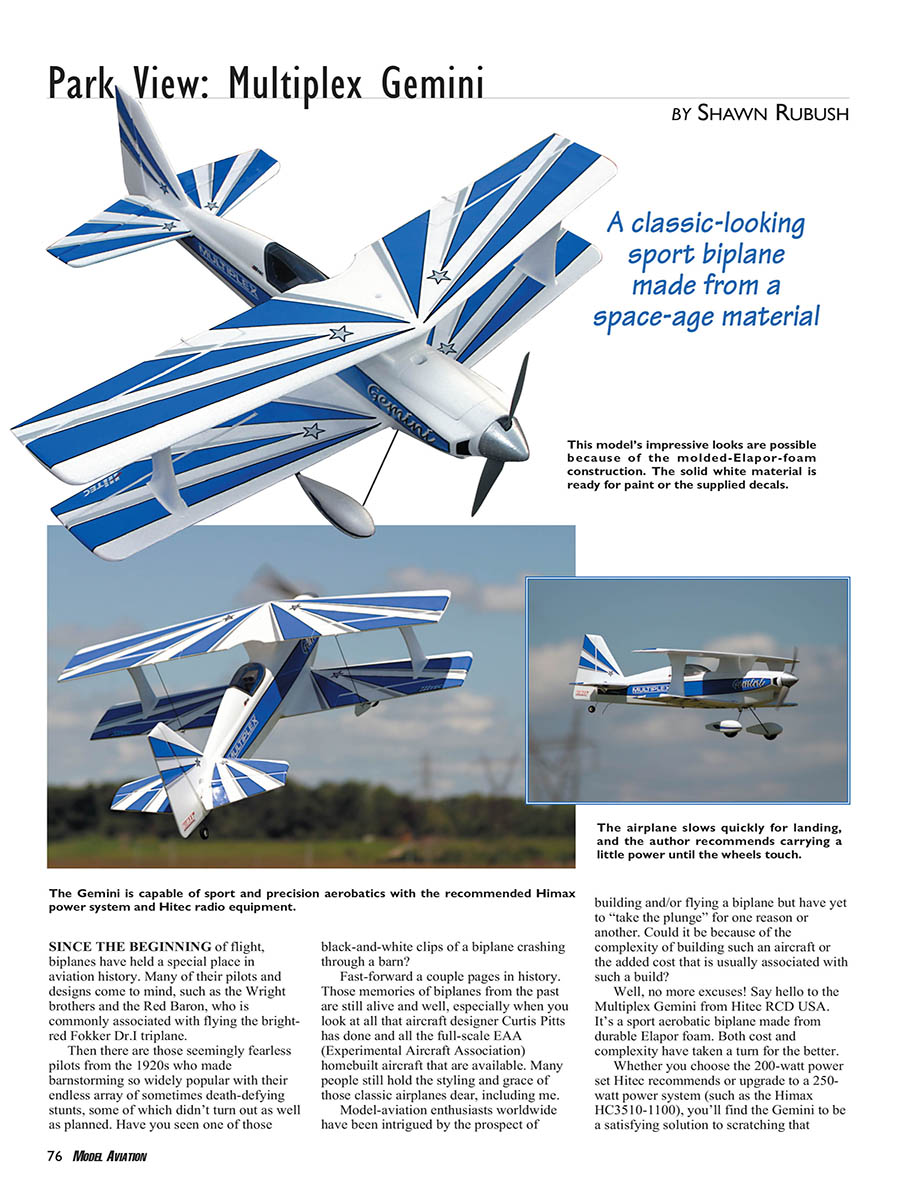
Park View: Multiplex Gemini
By Shawn Rubush
Since the beginning of flight, biplanes have held a special place in aviation history. Many pilots and designs come to mind, from the Wright brothers to the Red Baron and his bright-red Fokker Dr.I triplane. Then there are the seemingly fearless barnstormers of the 1920s, whose death-defying stunts made those black-and-white clips of biplanes crashing through barns part of aviation lore.
Those memories are still alive and well today, especially when you look at aircraft designer Curtis Pitts and the many full-scale EAA homebuilt airplanes inspired by classic biplane styling. Model-aviation enthusiasts worldwide have been intrigued by the prospect of building and flying a biplane, but some have hesitated because of the perceived complexity or cost.
Say hello to the Multiplex Gemini from Hitec RCD USA. It’s a sport aerobatic biplane made from durable Elapor foam that brings cost and complexity down. Whether you use the 200-watt power set Hitec recommends or upgrade to a 250-watt system (such as the Himax HC3510-1100), the Gemini is a satisfying way to scratch that biplane itch.
Assembly Overview
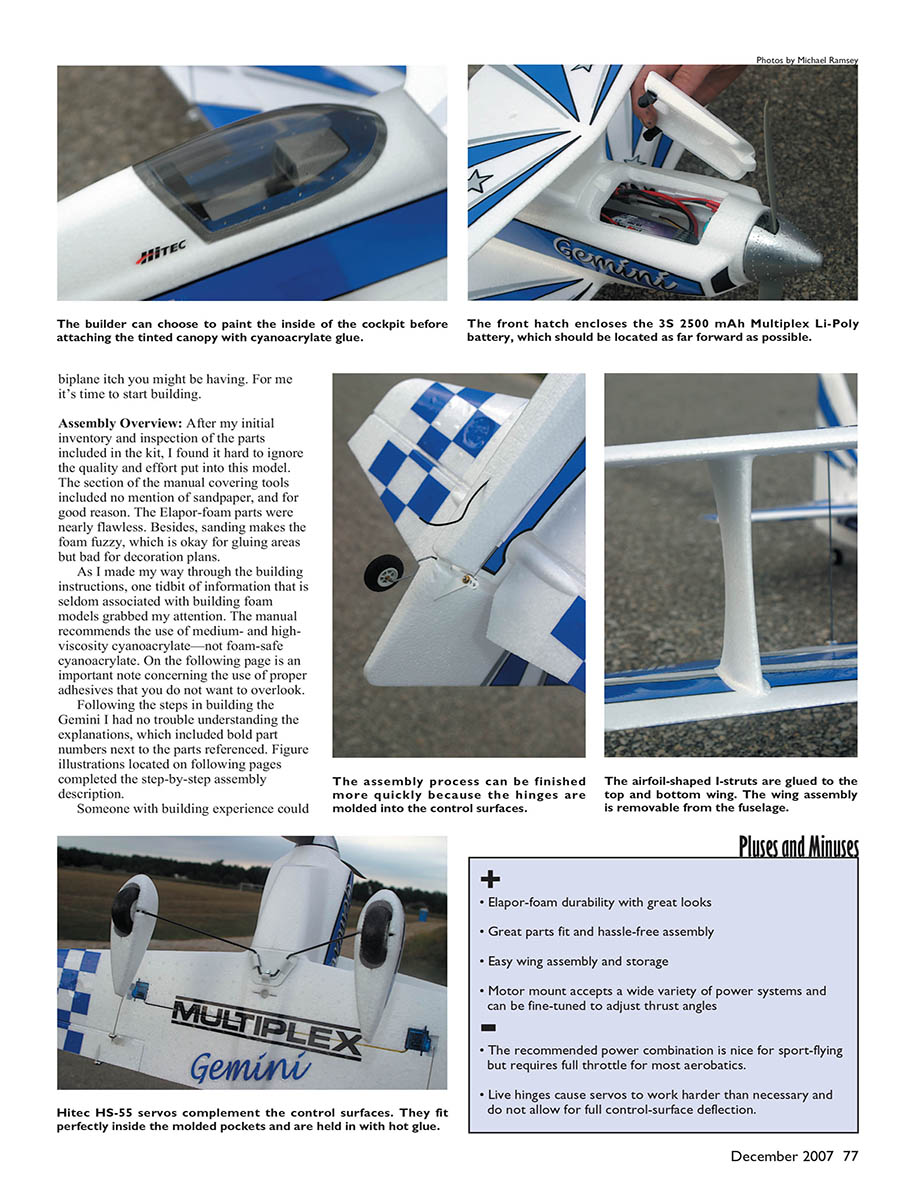
After my initial inventory and inspection of the kit parts, I was impressed by the quality and attention to detail. The manual omitted sandpaper from the tool list for good reason: the Elapor foam parts were nearly flawless. Sanding Elapor makes the foam fuzzy, which is okay for gluing areas but bad for decoration plans.
One interesting manual recommendation is the use of medium- and high-viscosity cyanoacrylate—not foam-safe cyanoacrylate. The manual includes an important note on proper adhesives that you should not overlook. The step-by-step instructions were easy to follow, with bold part numbers referenced in the text and clear figure illustrations.
Someone with building experience could have the Gemini finished in an afternoon. The assembly is fast because the hinges are molded into the control surfaces, the airfoil-shaped I-struts glue to the top and bottom wings, and the wing assembly is removable from the fuselage.
The only way to get accurate alignment is to temporarily mount only the bottom wing to the fuselage and then sight down the fuselage to ensure the horizontal tail section mounts parallel to the wing.
I’ll touch on the notable points that arose during assembly rather than repeat the manual step-by-step:
- The first step is to assemble the control snakes (pushrods), followed by gluing the servos into the fuselage halves.
- Before gluing servos, be sure they are centered and have the correct control horns installed. The aileron servo pockets are snug; once installed, removing control horns could damage the wing.
- Dry-fit control snakes, exercise the servos to ensure fluid movement, then glue the outer sleeves in place—being careful not to glue them to the inner sleeves. Leave enough sleeve end loose at the tail to permit the needed range of movement.
- Install the motor mounts with a generous amount of glue. Rough up contact areas to improve the bond before applying cyanoacrylate.
- I detailed and painted the cockpit and chose the fully enclosed canopy instead of the open-top option shown on the box art.
- The horizontal tail fits tightly, but true level can only be confirmed once the wings are mounted.
- Apply decals before starting wing assembly, but leave the fuselage-side decals that cover the elevator and rudder servos until after electronics are mounted, in case servo centering or placement changes.
When gluing the control snakes and other parts, take care to avoid bonding parts that should remain free-moving. The wing assembly is straightforward: the molded hinges and snug fits allow quick assembly and storage.
Pluses and Minuses
- Elapor foam provides durability with great looks.
- Excellent parts fit and hassle-free assembly.
- Easy wing assembly and storage.
- Motor mount accepts a wide variety of power systems and can be fine-tuned to adjust thrust angles.
- The recommended 200-watt power combination is fine for sport flying but requires full throttle for most aerobatics.
- Live hinges cause servos to work harder than necessary and do not allow for maximum control-surface deflection.
I almost completed the build using only the illustrations. It’s hard to imagine someone having an unsuccessful building experience with this kit.
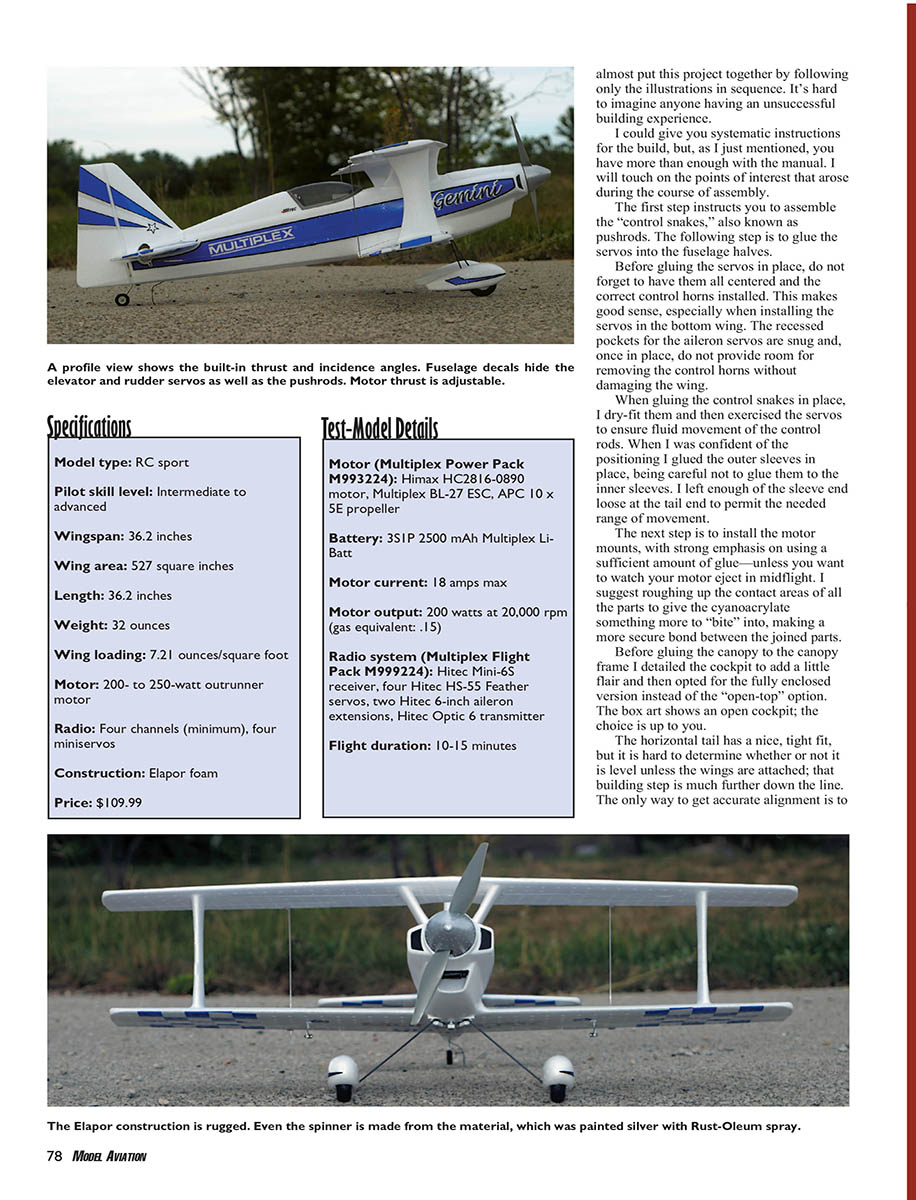
Specifications (Gemini)
- Model type: RC sport
- Pilot skill level: Intermediate to advanced
- Wingspan: 36.2 inches
- Wing area: 527 square inches
- Length: 36.2 inches
- Weight: 32 ounces
- Wing loading: 7.21 ounces/square foot
- Motor: 200- to 250-watt outrunner motor
- Radio: Four channels (minimum), four miniservos
- Construction: Elapor foam
- Price: $109.99
Test-Model Details
- Motor (Multiplex Power Pack M999224): Himax HC2816-0890 motor, Multiplex BL-27 ESC, APC 10 x 5E propeller
- Battery: 3S1P 2500 mAh Multiplex Li-Batt
- Motor current: 18 amps max
- Motor output: 200 watts at 20,000 rpm (gas equivalent: .15)
- Radio system (Multiplex Flight Pack M999224): Hitec Mini-6S receiver, four Hitec HS-55 Feather servos, two Hitec 6-inch aileron extensions, Hitec Optic 6 transmitter
- Flight duration: 10–15 minutes
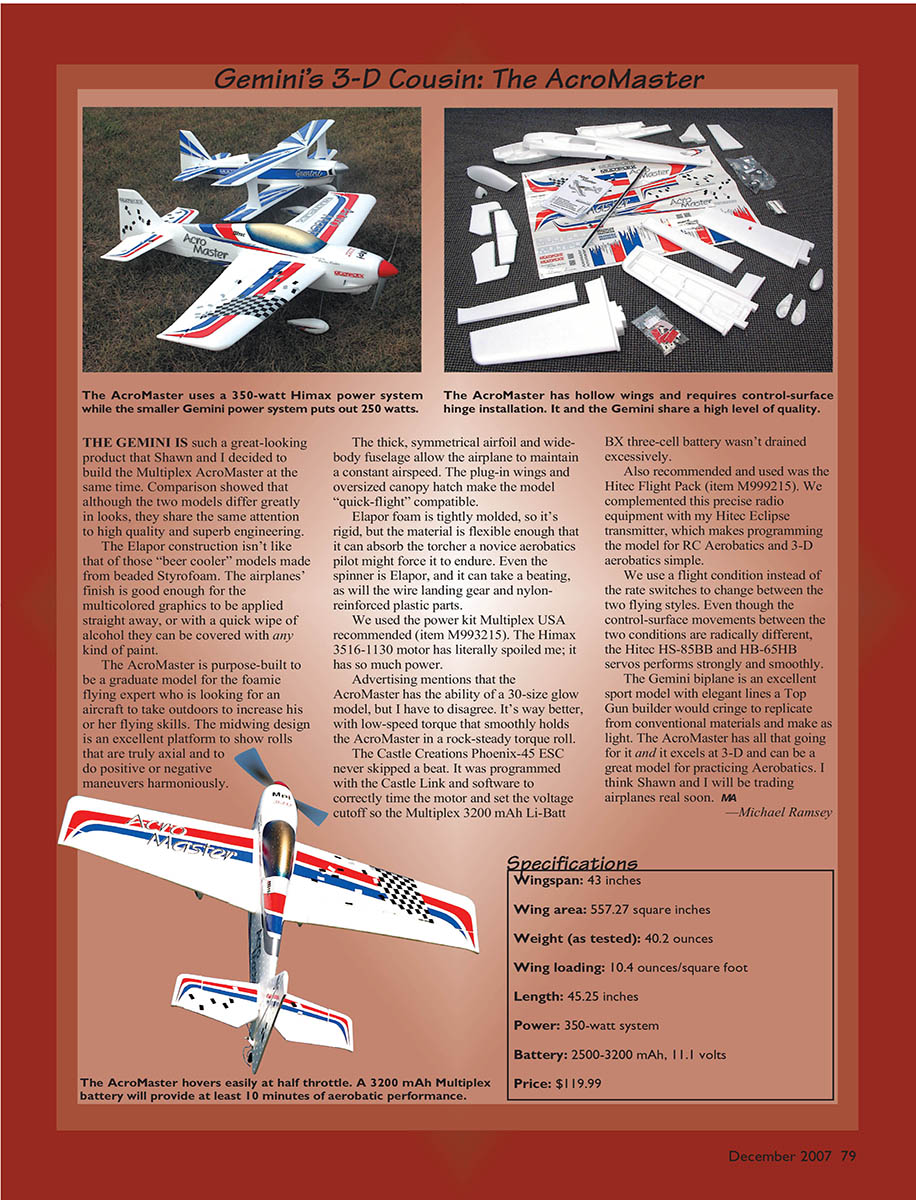
Multiplex AcroMaster (Comparative notes)
The Gemini is such a great-looking product that Shawn and I decided to build the Multiplex AcroMaster at the same time. Though the two models differ greatly in appearance, they share the same high quality and superb engineering.
Elapor construction is not like beaded Styrofoam “beer cooler” models. The material is tightly molded and rigid, yet flexible enough to absorb novice aerobatic punishment. The finish is good enough that multicolored graphics can be applied immediately; with a quick alcohol wipe, the surface can be painted as well. Even the spinner is Elapor and can take a beating; so can the wire landing gear and nylon-reinforced plastic parts.
The AcroMaster is a graduate model for the foamie flying expert who wants an outdoor airplane to advance flying skills. The midwing design provides an excellent platform for axial rolls and harmonious positive/negative maneuvers. The thick, symmetrical airfoil and wide fuselage allow the airplane to maintain a constant airspeed. Plug-in wings and an oversized canopy hatch make the model “quick-flight” compatible.
We used the power kit Multiplex USA recommended (item M993215). The Himax 3516-1130 motor has a lot of power and impressed me. Advertising claims the AcroMaster matches a 30-size glow model; I’d argue it’s even better, with low-speed torque that holds a rock-steady torque roll.
The Castle Creations Phoenix-45 ESC was reliable. It was programmed with Castle Link software to set timing and voltage cutoff so the Multiplex 3200 mAh Li-Batt BX three-cell battery wasn’t excessively drained. We used the Hitec Flight Pack (item M999215) and a Hitec Eclipse transmitter for easy programming for RC aerobatics and 3-D flying.
We use a flight-condition switch rather than rate switches to change between flying styles. Even with radically different control-surface movements between conditions, the Hitec HS-85BB and HS-65HB servos performed smoothly.
The Gemini is an excellent sport model with elegant lines hard to replicate in conventional materials while staying light. The AcroMaster complements that by excelling at 3-D flight and aerobatic practice. Shawn and I will likely be trading airplanes soon. —Michael Ramsey
Specifications (AcroMaster)
- Wingspan: 43 inches
- Wing area: 557.27 square inches
- Weight (as tested): 40.2 ounces
- Wing loading: 10.4 ounces/square foot
- Length: 45.25 inches
- Power: 350-watt system
- Battery: 2500–3200 mAh, 11.1 volts
- Price: $119.99
Assembly and Flight Impressions (continued)
After gluing the horizontal tail section in place, install the tail-wheel assembly in the rudder. The tail-wheel wire is spring steel and is tough to bend; placing it upside down in a vise or clamp makes achieving the needed 90° bend easier and avoids stressing the plastic control horn and bracket. Once completed, the tail fin installs quickly.
Apply the decals before wing assembly, except the ones covering elevator and rudder servos, which are best left until after electronics installation. The lightweight, three-color graphics add character to the model and are worth protecting until servo centering is finalized.
Be mindful of the aileron link horns: the holes in each end are different sizes and are easily reversed.
Install the receiver through the bottom fuselage opening. I placed it just forward of the right-side opening to offset the ESC weight, which I mounted on the left side in the battery compartment; this also allowed the 6-inch aileron extensions to exit the bottom wing opening and helped achieve the proper center of gravity (C.G.).
Join the one-piece wings to the fuselage by laying the fuselage on its side and rolling it into place—this minimizes prying and eases aileron connections.
Before installing the motor, reverse the shaft as needed to correctly mount it on the supplied mount and use the included collet-style propeller adapter. The motor bolts to the center of a nylon-reinforced adjustable mount; turn the adjustment screws to the recommended offset (maximum right thrust and no downthrust).
With the airplane assembled, set up low rates and full control throw on high rates. Verify operation, recheck the C.G., apply final fuselage side decals, and top off the Multiplex Li-Poly battery.
The Fun Part
The local soccer field was a perfect place for the inaugural flight. The Gemini needed full throttle to take off from short grass, but it was smooth and predictable using the recommended control settings. Vertical climbs revealed that 3-D maneuvers were not the plane’s forte; it didn’t have the power.
The Gemini was comfortable in straight-ahead stalls, upright and inverted. Flying inverted indicated the C.G. was a bit too far aft; moving the battery forward about 1/4 inch improved neutrality.
Rolls required some aileron differential programming to be more axial. The Hitec Optic 6 transmitter I used employs Channel 1 and Channel 5 for differential mixing, so the Hitec Mini-6S receiver worked fine. I moved the servo plug from Channel 6 and exchanged the flaperon mix function for differential; only about a 20% mix was needed.
Knife-edge flight required careful coupling and altitude if throttle couldn’t be maintained. Most aerobatic maneuvers required full throttle; backing off throttle allowed comfortable slower-speed flight. On approach, a biplane’s extra wing drag meant carrying approximately one-quarter power to prevent an early stall. Stalls were straight ahead, so dropping a wing wasn’t a concern.
On one landing, I throttled down before the tail wheel touched and the airplane nosed over on soft grass. The aircraft was unhurt; the next flight finished without incident.
Adding the Multiplex Gemini to my collection was a good building and flying experience. From start to finish I had eight to ten hours invested, including cockpit detail and spinner paint. I built and flew it on the same day—how many biplanes can be assembled this quickly?
Shawn Rubush [email protected]
Manufacturer/Distributor
- Multiplex Modelsport USA / Hitec RCD USA
- 12115 Paine St.
- Poway, CA 92064
- (858) 748-6948
- www.multiplexusa.com
Products Used in Review
- Transmitter, servos, receiver: Hitec RCD — (858) 748-6948 — www.hitecrcd.com
- Motor: Maxx Products International — (800) 416-6299 — www.maxxprod.com
Other Review Sources
- Backyard Flyer: November 2007
Transcribed from original scans by AI. Minor OCR errors may remain.

