
Park View/Plane Talk: AirBorne Models Texan EP ARF/Texan 60 ARF
Jeff Troy
Overview
AirBorne Models in Livermore, California, is the U.S. distributor for The World Models (TWM). A subsidiary of Radar Limited, TWM is one of the leading Asian producers of top-quality ARFs and accessories. TWM has developed a reputation for producing ARFs that deliver strong performance while being offered at prices American RC pilots find attractive.
The North American AT-6 Texan is a popular modeling subject, and TWM wisely added it to its stable of World War II trainers. With good nose and tail moments, ample wing and control-surface area, this model fits most intermediate sport and fun-scale fliers.
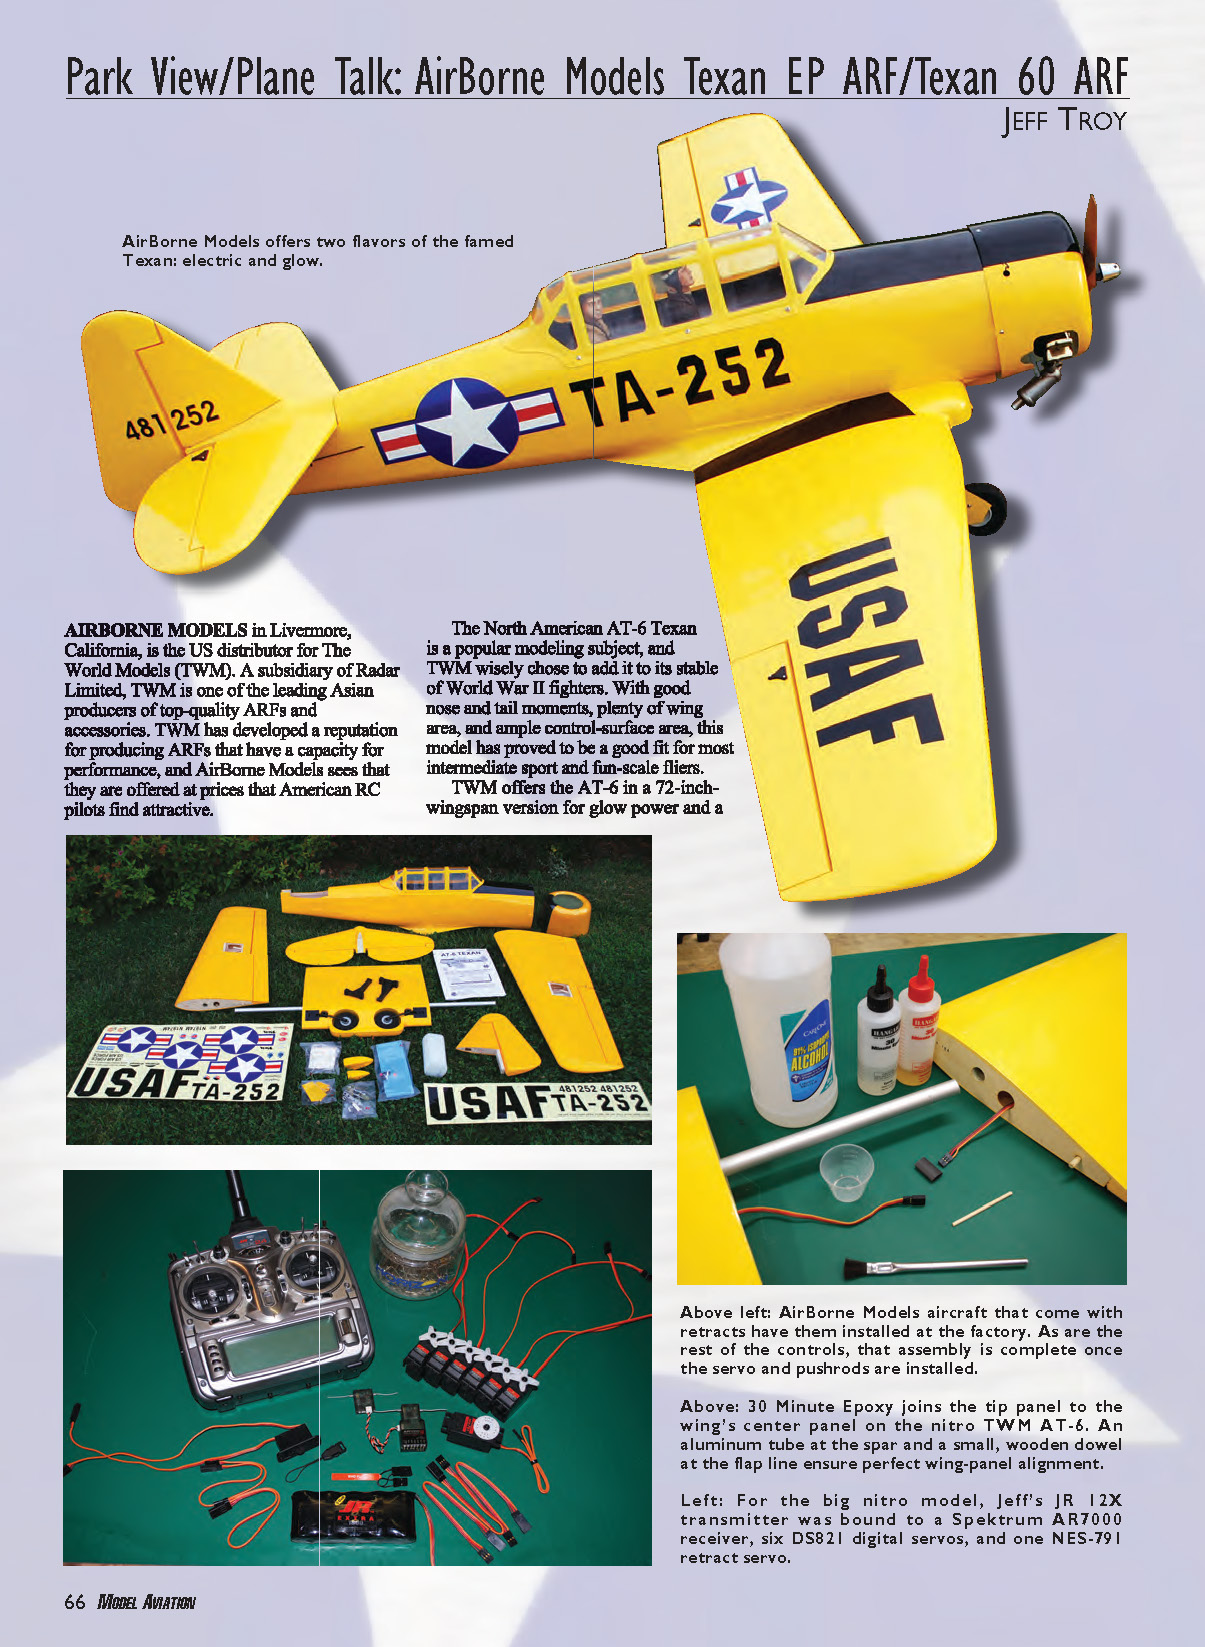
TWM offers the AT-6 in a 72-inch-wingspan version for glow power and a 44-inch version for electric power. Both come with many desirable features, including factory-built, laser-cut wooden airframe components; factory-painted fiberglass cowls; complete hardware and fastener packages; and factory-installed, retractable main landing gear.
These Texans are models of full-scale military trainers, but they are not primary RC trainers. They are low-wing, aerobatics-capable airplanes best suited for pilots who have experience with one or two models. TWM assumes purchasers have built models before; therefore, the instruction manuals rely primarily on diagrams and symbols. The instructions present no problems unless a complete novice attempts them—and no rank beginner should attempt to fly either aircraft.
Build and Electronics
Both models assemble quickly because of extensive prefabrication. The larger (glow) model requires a four-stroke engine in the .90–1.00 range. The EP version is available with a TWM KM0283010 brushless outrunner motor and matching HW2340100 propeller adapter; I used the kit-supplied motor for the EP and chose the Saito FA-100GK (Golden Knight) for the nitro Texan.
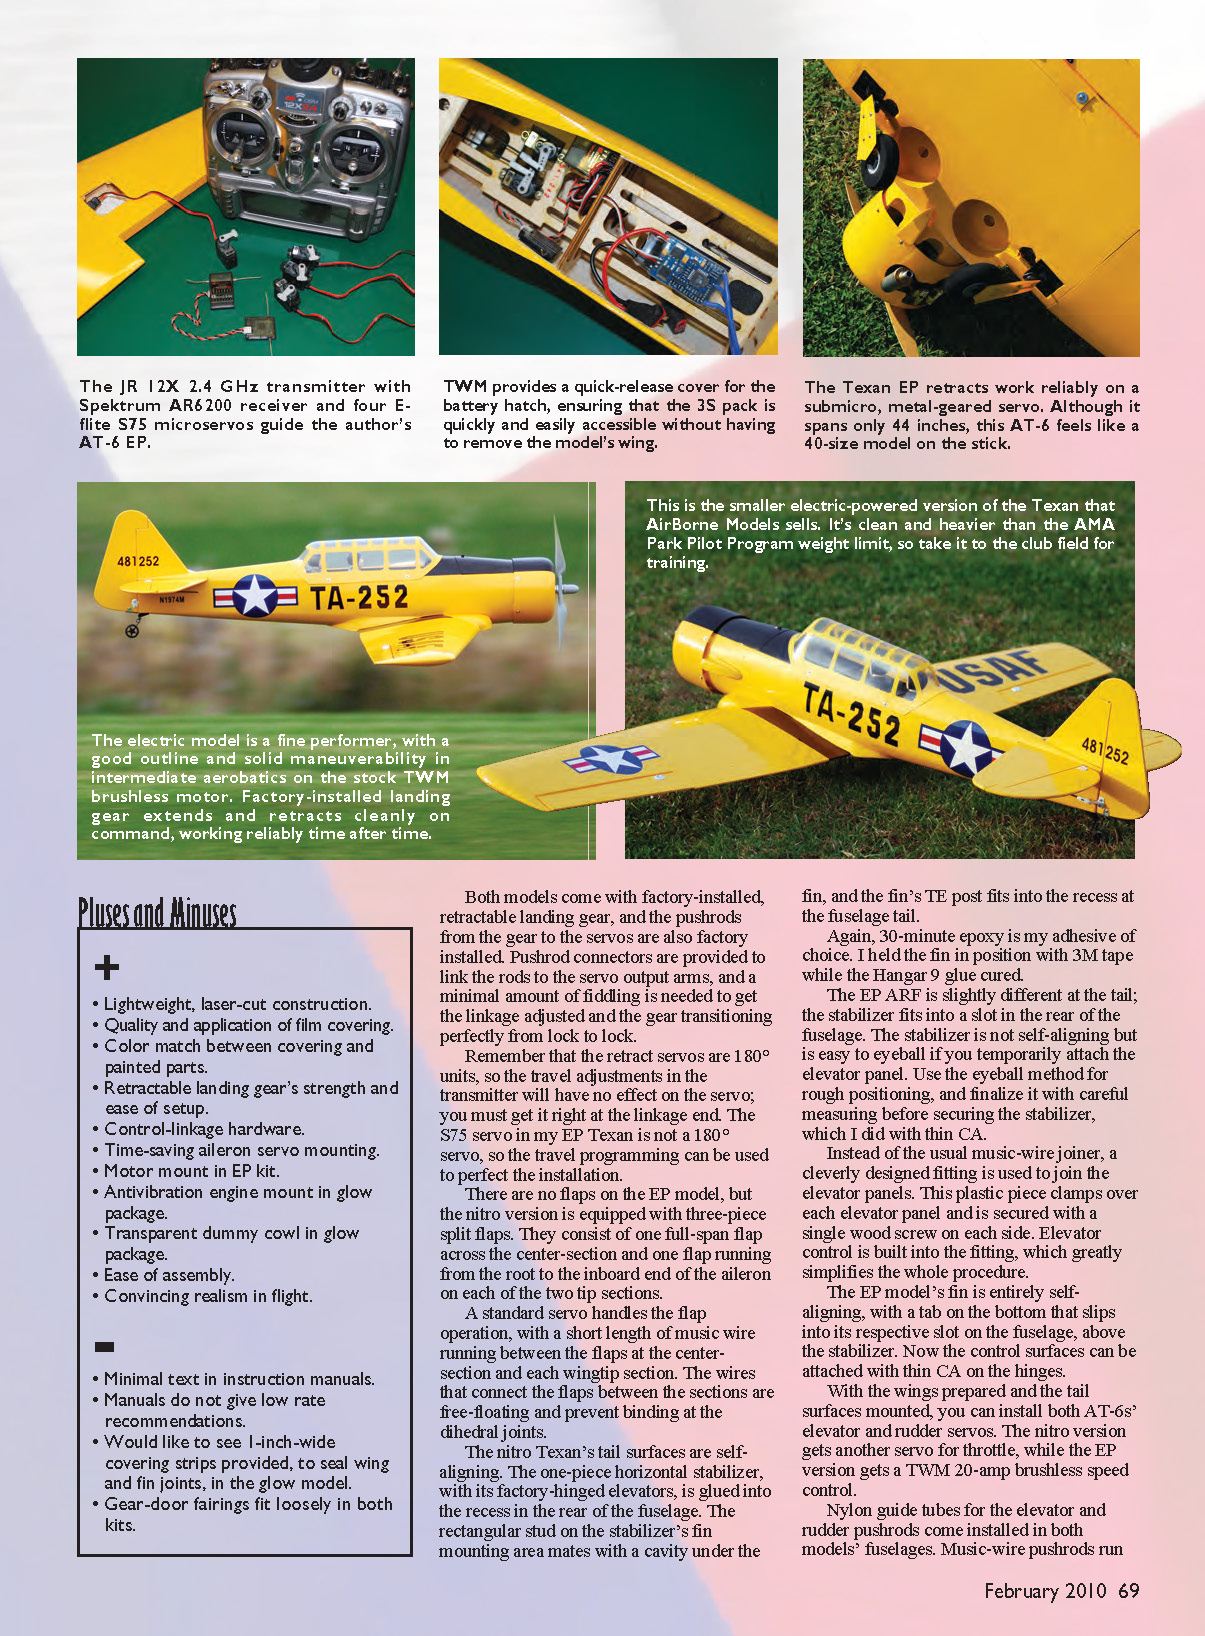
I programmed two model memories in my 2.4 GHz JR 12X transmitter and selected suitable onboard RC gear:
- Glow AT-6: six standard-size servos and one low-profile 180° retract servo. I used six Spektrum DS821 digital servos and a JR NES-791 180° retract servo. Receiver: Spektrum AR7000 (primary unit plus remote receiver). Additional components: appropriate servo extensions and Y harnesses, JR charge jack switch, JR Extra 1800 mAh battery.
- EP AT-6: five microservos (E-flite S75), TWM 20-amp brushless ESC, TWM KM0283010 brushless motor (kit option), and 3S 2100 mAh Li-Poly battery. Receiver: Spektrum AR6200 (primary unit plus remote receiver).
Wing and Landing Gear
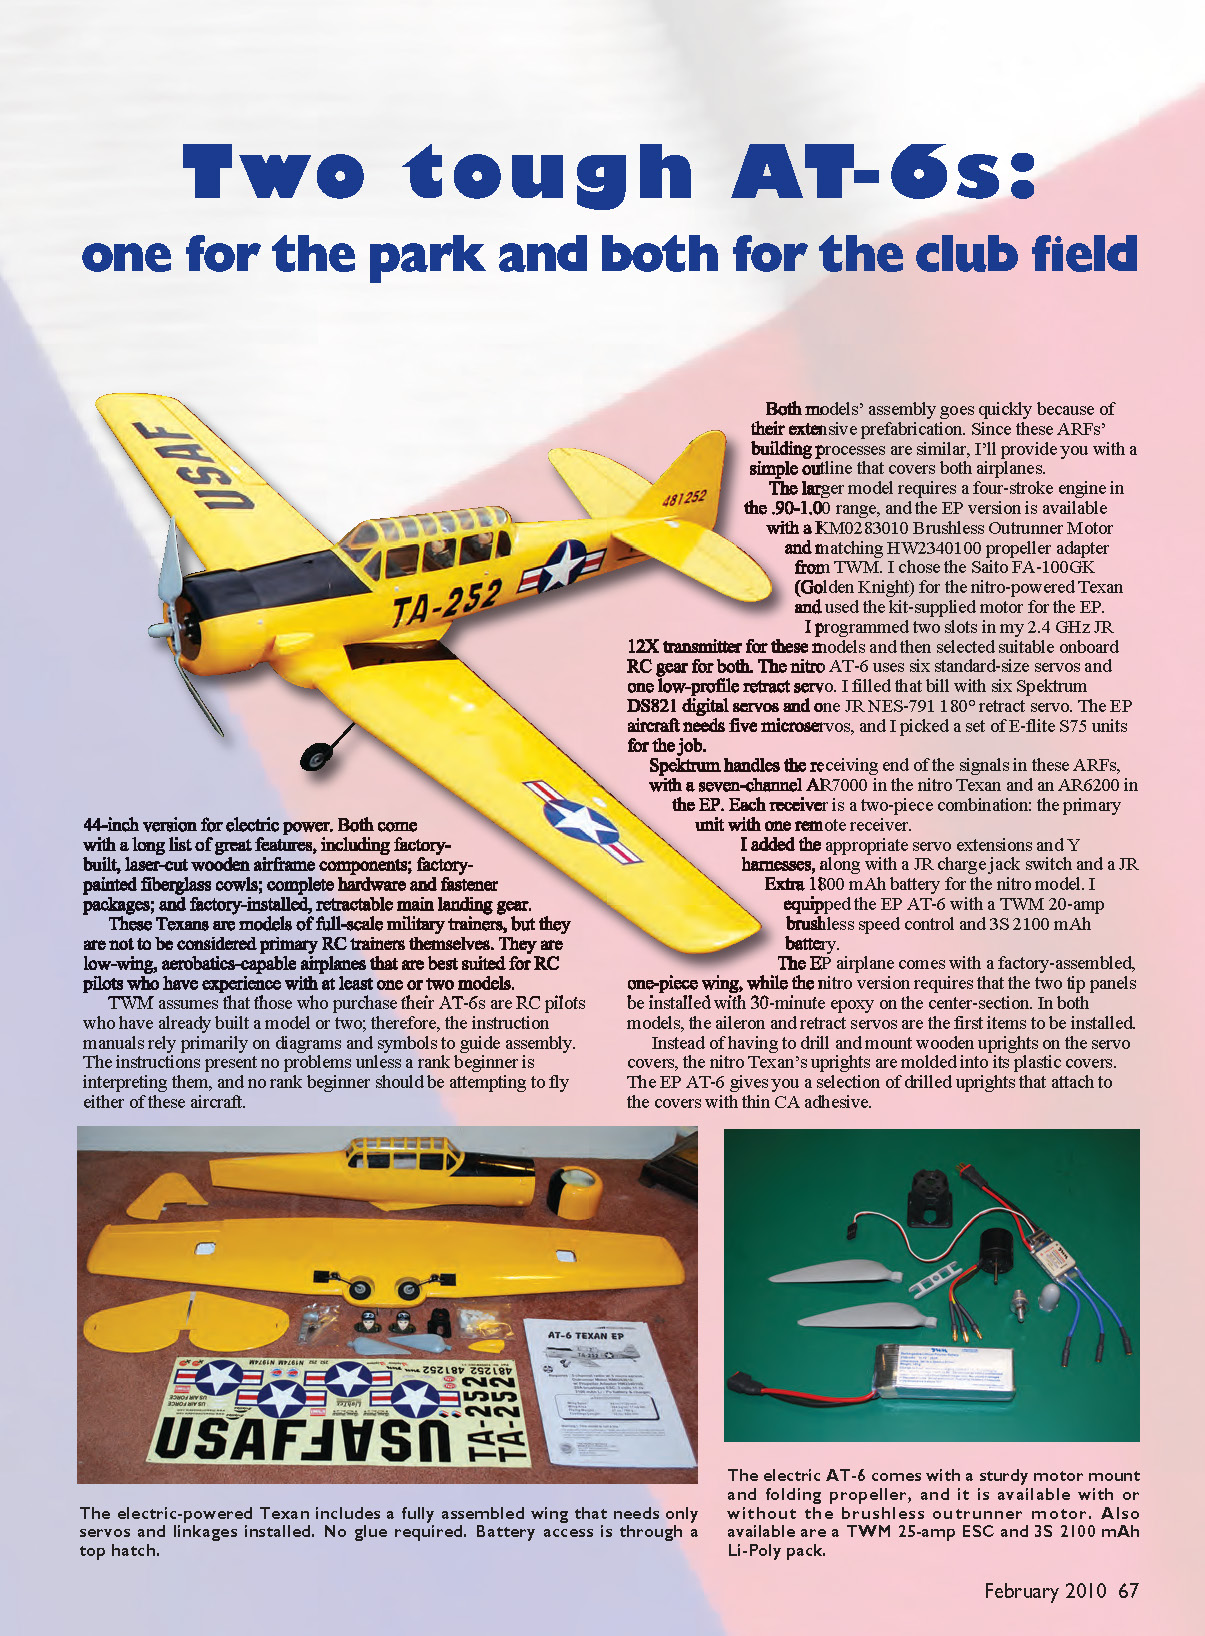
- The EP airplane comes with a factory-assembled, one-piece wing that needs only servos and linkages installed—no glue required. Battery access is through a top hatch.
- The glow version requires the two wing tip panels to be epoxied to the center-section with 30-minute epoxy.
- In both models, aileron and retract servos are the first items to be installed.
- The nitro Texan’s servo uprights are molded into its plastic covers; the EP offers pre-drilled uprights that attach to the covers with thin CA.
- Both models include factory-installed retractable main gear and factory-installed pushrods from the gear to the servos. Pushrod connectors link the rods to the servo output arms; only minor adjustment is needed to get the linkage to transition smoothly from lock to lock.
Important: the retract servos are 180° units, so transmitter travel adjustments will have no effect on the servo. You must set the geometry correctly at the linkage end. The S75 servos used in my EP Texan are not 180° units, so transmitter travel programming can be used to perfect that installation.
The EP electric AT-6 comes with a sturdy motor mount and folding propeller. The EP kit is available with or without the brushless outrunner motor, and TWM also offers a 25-amp ESC and 3S 2100 mAh Li-Poly pack.
Tail and Control Surfaces
- Nylon guide tubes for the elevator and rudder pushrods are installed in both fuselages. Music-wire pushrods run from the servos to the control horns and are secured with pushrod connectors. The pushrods were pre-bent to proper shape; minor tweaking at the connectors is usually all that’s needed. Use a small amount of blue thread-lock on the control-horn screws.
- The nitro Texan’s tail surfaces are self-aligning. The one-piece horizontal stabilizer, with factory-hinged elevators, is glued into the fuselage recess. A rectangular stud on the stabilizer mates with a cavity under the fin, and the fin’s trailing-edge post fits into the fuselage tail recess. I used 30-minute epoxy and held the fin in position with 3M tape while the glue cured.
- The EP ARF’s stabilizer fits into a slot in the rear fuselage. It’s not self-aligning but is easy to eyeball for rough positioning; finalize with careful measuring and secure with thin CA. Instead of a music-wire joiner, the EP uses a plastic clamp fitting that attaches over each elevator panel and is secured with one wood screw per side—this fitting includes the elevator control hookup, simplifying assembly.
- The EP fin is self-aligning via a bottom tab that slips into a slot on the fuselage. Attach control surfaces with thin CA on the hinges.
The nitro version includes three-piece split flaps: one full-span center-section flap and one flap from the root to the inboard end of each aileron on the tip panels. A standard servo operates the flaps; short lengths of music wire run between the flap sections. These wires are free-floating to prevent binding at the dihedral joints.
Setup and Flight Impressions
With the models set up at the transmitter, I used the recommended throws and then reduced rates as required while becoming familiar with each model:
- Elevator: 12–15° high rate, 4–6° low rate
- Ailerons: 20–25° high, 8–10° low
- Rudder: 20–25° high, 8–10° low
- Flaps: 25–30°
The nitro Texan is heavier and more stable; the EP is lighter and a bit more agile. Both are predictable and fun to fly. The nitro model’s ground handling is excellent—free-castering tailwheel and wide-track main gear provide good directional control and no-leap liftoff. The EP’s smaller size feels like a .40-size model on the sticks.
Both AT-6s are capable of intermediate aerobatic maneuvers—loops, rolls, and hammerheads—with crisp response. Landings are straightforward when you plan the approach and use a little power to slow the descent.
If you want a realistic-looking Texan without building one from scratch, these TWM ARFs from AirBorne Models are an attractive option. They offer good construction, reliable hardware, and enjoyable flying characteristics. It’s good when a model goes together easily and performs well, and it’s even better when you get all of that for a reasonable price. These airplanes meet those conditions and are priced competitively.
AT-6 Texan (Glow) Specifications
- Wingspan: 72 inches
- Wing area: 777 square inches
- Length: 35.5 inches
- Weight: 8.4 pounds
- Radio: Six- or more-channel transmitter and receiver with six standard-size servos and one low-profile retract servo
- Power: .91 four-stroke engine
The nitro AT-6 offers superb ground handling, with solid tracking and no-leap liftoff. Climbout is gradual with the recommended elevator throws.
AT-6 Texan EP Specifications
- Wingspan: 44 inches
- Wing area: 264 square inches
- Length: 32 inches
- Weight: 27 ounces
- Radio: Five- or more-channel transmitter and receiver with five microservos and ESC
- Power: TWM KM0283010 brushless outrunner motor
- Battery: 3S 2100 mAh Li-Poly
Pluses and Minuses
Pluses:
- Lightweight, laser-cut construction
- Quality and application of film covering
- Color match between covering and painted parts
- Strength and ease of setup of retractable landing gear
- Good control-linkage hardware
- Time-saving aileron servo mounting
- Motor mount included in EP kit
- Antivibration engine mount in glow package
- Transparent dummy cowl in glow package
- Ease of assembly
- Convincing realism in flight
Minuses:
- Minimal text in instruction manuals (rely heavily on diagrams)
- Manuals do not provide recommended low-rate settings
- Would like to see 1-inch-wide covering strips provided to seal wing and fin joints on the glow model
- Gear-door fairings fit loosely in both kits
Manufacturer/Distributor
AirBorne Models, LLC 2403 Research Dr. Livermore, CA 94550 (925) 371-0922 www.airborne-models.com
Sources
- Horizon Hobby (Saito, Spektrum, JR, Hangar 9)
(800) 338-4639 www.horizonhobby.com
- Du-Bro Products, Inc.
(800) 848-9411 www.dubro.com
- 3M
(888) 364-3577 www.3m.com
- W.S. Deans
(714) 828-6494 www.wsdeans.com
- Great Planes
(800) 637-7660 www.greatplanes.com
Jeff Troy [email protected]
Transcribed from original scans by AI. Minor OCR errors may remain.

