
Piper Pacer
by Robert Dance
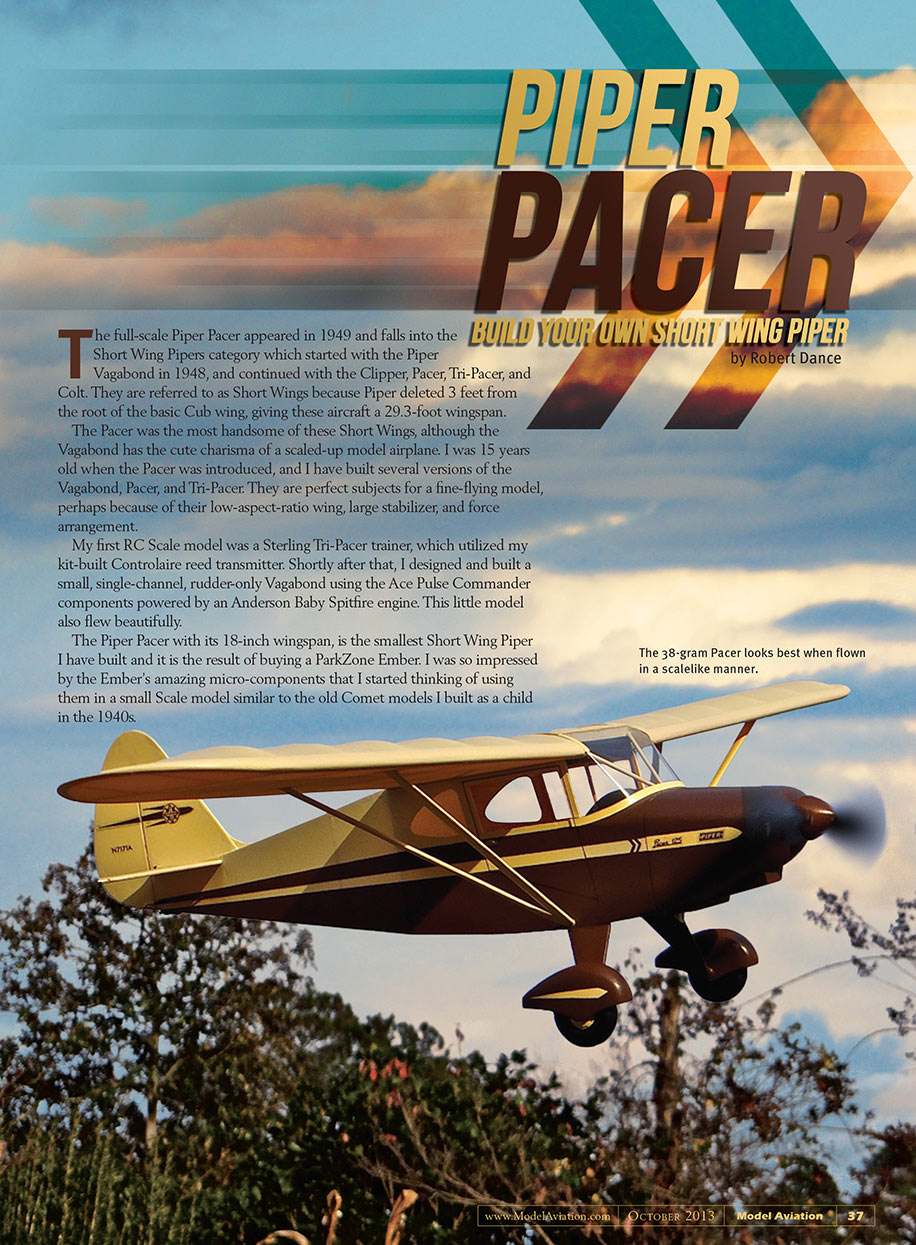
The full-scale Piper Pacer appeared in 1949 and falls into the Short Wing Pipers category which started with the Piper Vagabond in 1948, and continued with the Clipper, Pacer, Tri-Pacer, and Colt. They are referred to as Short Wings because Piper deleted 3 feet from the root of the basic Cub wing, giving these aircraft a 29.3-foot wingspan.
The Pacer was the most handsome of these Short Wings, although the Vagabond has the cute charisma of a scaled-up model airplane. I was 15 years old when the Pacer was introduced, and I have built several versions of the Vagabond, Pacer, and Tri-Pacer. They are perfect subjects for a fine-flying model, perhaps because of their low-aspect-ratio wing, large stabilizer, and fuselage arrangement.
My first RC Scale model was a Sterling Tri-Pacer trainer, which utilized my kit-built Controlaire reed transmitter. Shortly after that, I designed and built a small, single-channel, rudder-only Vagabond using the Ace Pulse Commander components powered by an Anderson Baby Spitfire engine. This little model also flew beautifully.
The Piper Pacer with its 18-inch wingspan is the smallest Short Wing Piper I have built and it is the result of buying a ParkZone Ember. I was so impressed by the Ember's amazing micro-components that I started thinking of using them in a small Scale model similar to the old Comet models I built as a child in the 1940s. This Pacer's construction is similar to those Comets and to the small models designed by Walt Mooney during the 1950s and 1960s, which were offered as full-size plans in model magazines. Those who have built stick-and-tissue aircraft should have no problem building this Pacer. Builders with a creative inclination might want to convert it to a rubber-powered FF model.
The Pacer has large, balanced elevator and rudder areas, and I recommend dual rates to lessen the throw on these surfaces. Otherwise, the model may be sensitive to control. I did not use dual rates, but to lessen the throw, I made the control horns longer than normal.
Spektrum and ParkZone have several tiny receiver/servo bricks that can be used in this model. ParkZone's PKZU2164 brick features AS3X artificial stabilization which might be interesting to try, although I have never used it myself. This brick is also aileron capable, if you want to modify the Pacer for ailerons. The HobbyZone Champ's components, including the motor, could be used for the Pacer.
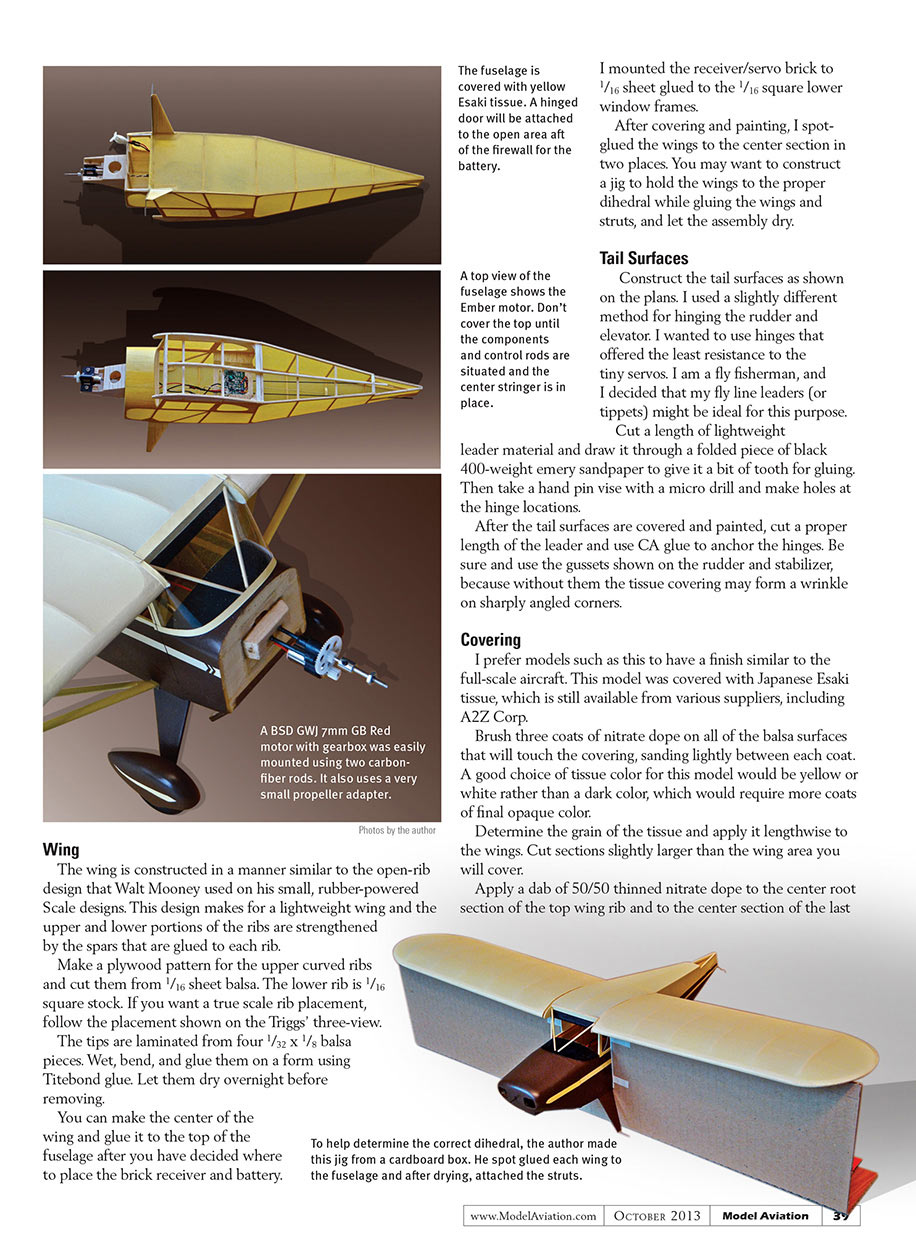
The first motor I tried had insufficient power, so I installed a Bob Selman Designs (BSD) GB Red motor and gearbox. It was easily mounted with two carbon-fiber rods. The plans show the ParkZone P-51 motor, which should have more than enough power for this model. You can look on the ParkZone, Spektrum, and HobbyZone websites for parts lists for these motor and receiver components.
For the flying propeller, I trimmed 3/8 inch from each tip of a ParkZone P-51 propeller and rounded and balanced it. ParkZone also offers control rods for these models.
Fuselage
I generally use original Titebond glue because it gives you time for adjustments and after it dries, it is easy to sand.
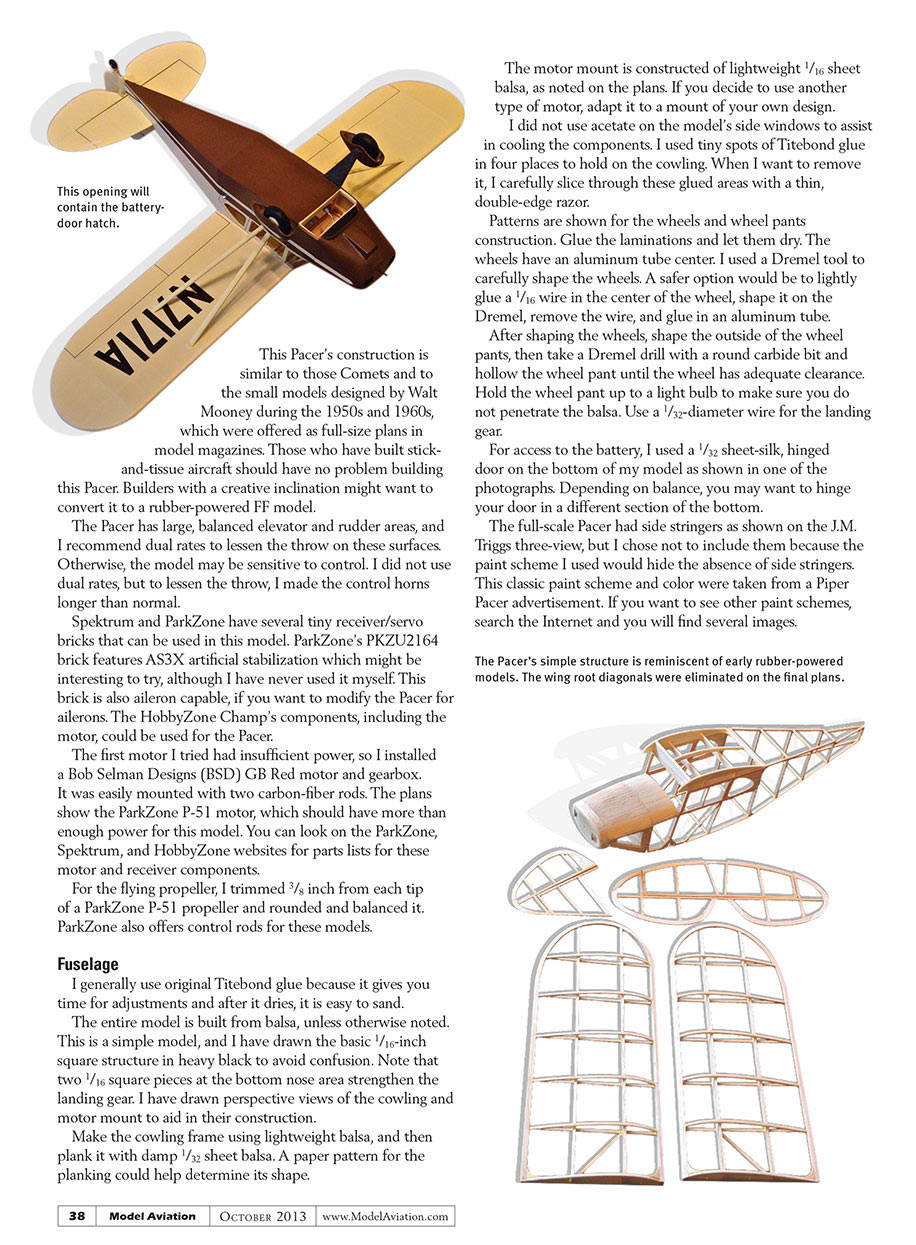
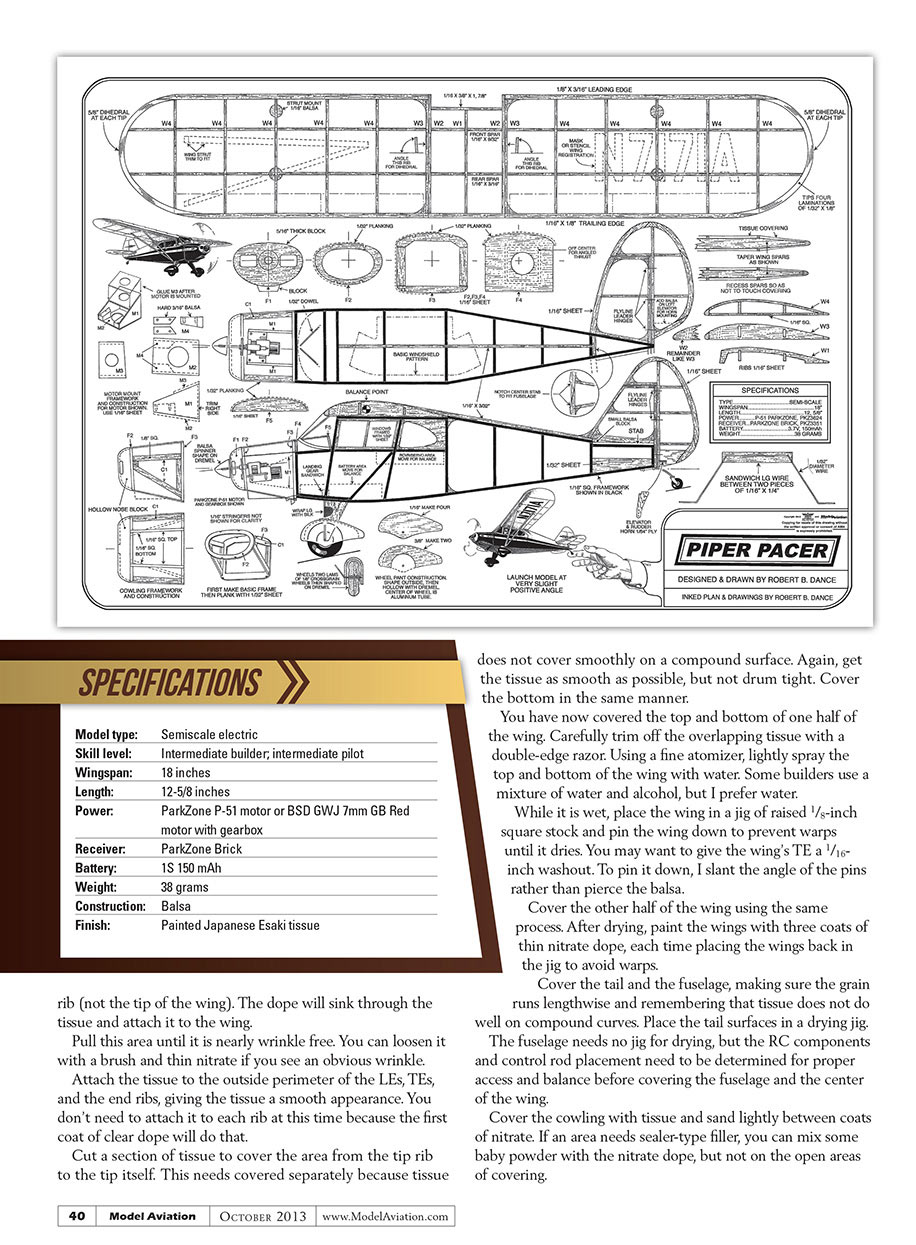
The entire model is built from balsa, unless otherwise noted. This is a simple model, and I have drawn the basic 1/16-inch square structure in heavy black to avoid confusion. Note that two 1/16 square pieces at the bottom nose area strengthen the landing gear. I have drawn perspective views of the cowling and motor mount to aid in their construction.
Make the cowling frame using lightweight balsa, and then plank it with damp 1/32 sheet balsa. A paper pattern for the planking could help determine its shape.
The motor mount is constructed of lightweight 1/16 sheet balsa, as noted on the plans. If you decide to use another type of motor, adapt it to a mount of your own design.
I did not use acetate on the model's side windows to assist in cooling the components. I used tiny spots of Titebond glue in four places to hold on the cowling. When I want to remove it, I carefully slice through these glued areas with a thin, double-edge razor.
Patterns are shown for the wheels and wheel pants construction. Glue the laminations and let them dry. The wheels have an aluminum tube center. I used a Dremel tool to carefully shape the wheels. A safer option would be to lightly glue a 1/16 wire in the center of the wheel, shape it on the Dremel, remove the wire, and glue in an aluminum tube.
After shaping the wheels, shape the outside of the wheel pants, then take a Dremel drill with a round carbide bit and hollow the wheel pant until the wheel has adequate clearance. Hold the wheel pant up to a light bulb to make sure you do not penetrate the balsa. Use a 1/32-diameter wire for the landing gear.
For access to the battery, I used a 1/32 sheet-silk, hinged door on the bottom of my model as shown in one of the photographs. Depending on balance, you may want to hinge your door in a different section of the bottom.
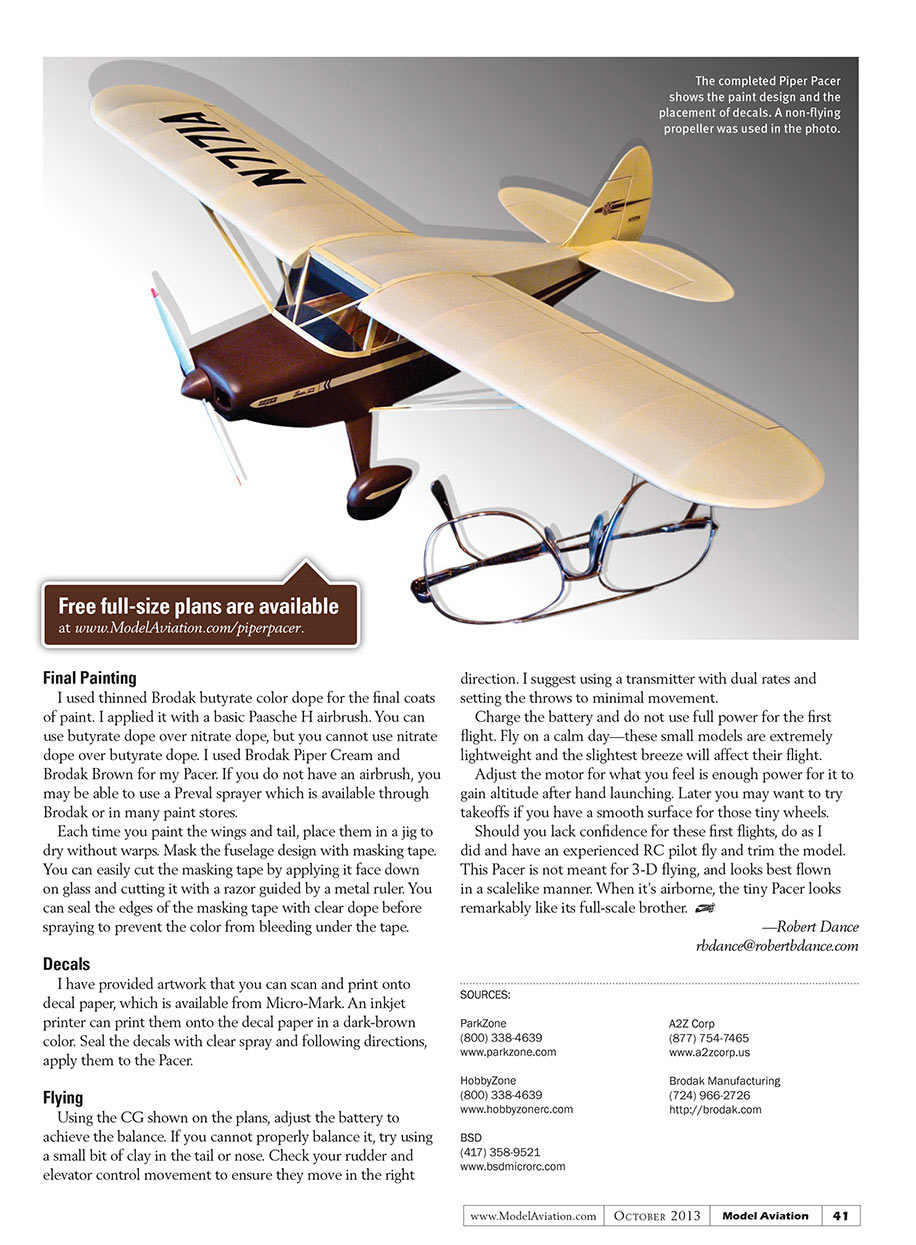
The full-scale Pacer had side stringers as shown on the J.M. Triggs three-view, but I chose not to include them because the paint scheme I used would hide the absence of side stringers. This classic paint scheme and color were taken from a Piper Pacer advertisement. If you want to see other paint schemes, search the Internet and you will find several images.
The Pacer's simple structure is reminiscent of early rubber-powered models. The wing root diagonals were eliminated on the final plans.
Wing
The wing is constructed in a manner similar to the open-rib design that Walt Mooney used on his small, rubber-powered Scale designs. This design makes for a lightweight wing and the upper and lower portions of the ribs are strengthened by the spars that are glued to each rib.
Make a plywood pattern for the upper curved ribs and cut them from 1/16 sheet balsa. The lower rib is 1/16 square stock. If you want a true scale rib placement, follow the placement shown on the Triggs' three-view.
The tips are laminated from four 1/32 x 1/8 balsa pieces. Wet, bend, and glue them on a form using Titebond glue. Let them dry overnight before removing.
You can make the center of the wing and glue it to the top of the fuselage after you have decided where to place the brick receiver and battery.
I mounted the receiver/servo brick to 1/16 sheet glued to the 1/16 square lower window frames.
After covering and painting, I spot-glued the wings to the center section in two places. You may want to construct a jig to hold the wings to the proper dihedral while gluing the wings and struts, and let the assembly dry.
Tail Surfaces
Construct the tail surfaces as shown on the plans. I used a slightly different method for hinging the rudder and elevator. I wanted to use hinges that offered the least resistance to the tiny servos. I am a fly fisherman, and I decided that my fly line leaders (or tippets) might be ideal for this purpose.
Cut a length of lightweight leader material and draw it through a folded piece of black 400-weight emery sandpaper to give it a bit of tooth for gluing. Then take a hand pin vise with a micro drill and make holes at the hinge locations.
After the tail surfaces are covered and painted, cut a proper length of the leader and use CA glue to anchor the hinges. Be sure and use the gussets shown on the rudder and stabilizer, because without them the tissue covering may form a wrinkle on sharply angled corners.
Covering
I prefer models such as this to have a finish similar to the full-scale aircraft. This model was covered with Japanese Esaki tissue, which is still available from various suppliers, including A2Z Corp.
Brush three coats of nitrate dope on all of the balsa surfaces that will touch the covering, sanding lightly between each coat. A good choice of tissue color for this model would be yellow or white rather than a dark color, which would require more coats of final opaque color.
Determine the grain of the tissue and apply it lengthwise to the wings. Cut sections slightly larger than the wing area you will cover.
Apply a dab of 50/50 thinned nitrate dope to the center root section of the top wing rib and to the center section of the last rib on the lower center section. Stretch the covering over the wing and lightly iron or use a soft brush to get the tissue tight. Let it dry and then shrink with water and dope as needed. The dope will sink through the tissue and attach it to the wing.
Pull this area until it is nearly wrinkle free. You can loosen it with a brush and thin nitrate if you see an obvious wrinkle.
Attach the tissue to the outside perimeter of the LEs, TEs, and the end ribs, giving the tissue a smooth appearance. You don't need to attach it to each rib at this time because the first coat of clear dope will do that.
Cut a section of tissue to cover the area from the tip rib to the tip itself. This needs covered separately because tissue does not cover smoothly on a compound surface. Again, get the tissue as smooth as possible, but not drum tight. Cover the bottom in the same manner.
You have now covered the top and bottom of one half of the wing. Carefully trim off the overlapping tissue with a double-edge razor. Using a fine atomizer, lightly spray the top and bottom of the wing with water. Some builders use a mixture of water and alcohol, but I prefer water.
While it is wet, place the wing in a jig of raised 1/8-inch square stock and pin the wing down to prevent warps until it dries. You may want to give the wing's TE a 1/16-inch washout. To pin it down, I slant the angle of the pins rather than pierce the balsa.
Cover the other half of the wing using the same process. After drying, paint the wings with three coats of thin nitrate dope, each time placing the wings back in the jig to avoid warps.
Cover the tail and the fuselage, making sure the grain runs lengthwise and remembering that tissue does not do well on compound curves. Place the tail surfaces in a drying jig.
The fuselage needs no jig for drying, but the RC components and control rod placement need to be determined for proper access and balance before covering the fuselage and the center of the wing.
Cover the cowling with tissue and sand lightly between coats of nitrate. If an area needs sealer-type filler, you can mix some baby powder with the nitrate dope, but not on the open areas of covering.
Final Painting
I used thinned Brodak butyrate color dope for the final coats of paint. I applied it with a basic Paasche H airbrush. You can use butyrate dope over nitrate dope, but you cannot use nitrate dope over butyrate dope. I used Brodak Piper Cream and Brodak Brown for my Pacer. If you do not have an airbrush, you may be able to use a Preval sprayer which is available through Brodak or in many paint stores.
Each time you paint the wings and tail, place them in a jig to dry without warps. Mask the fuselage design with masking tape. You can easily cut the masking tape by applying it face down on glass and cutting it with a razor guided by a metal ruler. You can seal the edges of the masking tape with clear dope before spraying to prevent the color from bleeding under the tape.
Decals
I have provided artwork that you can scan and print onto decal paper, which is available from Micro-Mark. An inkjet printer can print them onto the decal paper in a dark-brown color. Seal the decals with clear spray and following directions, apply them to the Pacer.
Flying
Using the CG shown on the plans, adjust the battery to achieve the balance. If you cannot properly balance it, try using a small bit of clay in the tail or nose. Check your rudder and elevator control movement to ensure they move in the right direction. I suggest using a transmitter with dual rates and setting the throws to minimal movement.
Charge the battery and do not use full power for the first flight. Fly on a calm day—these small models are extremely lightweight and the slightest breeze will affect their flight.
Adjust the motor for what you feel is enough power for it to gain altitude after hand launching. Later you may want to try takeoffs if you have a smooth surface for those tiny wheels.
Should you lack confidence for these first flights, do as I did and have an experienced RC pilot fly and trim the model. This Pacer is not meant for 3-D flying, and looks best flown in a scalelike manner. When it’s airborne, the tiny Pacer looks remarkably like its full-scale brother.
—Robert Dance [email protected]
SOURCES:
ParkZone (800) 338-4639 www.parkzone.com
HobbyZone (800) 338-4639 www.hobbyzonerc.com
BSD (417) 358-9521 www.bsdmicrocr.com
A2Z Corp (877) 754-7465 www.a2zcorp.us
Brodak Manufacturing (724) 966-2726 http://brodak.com
Transcribed from original scans by AI. Minor OCR errors may remain.

