
Plane Talk
Tom Sullivan
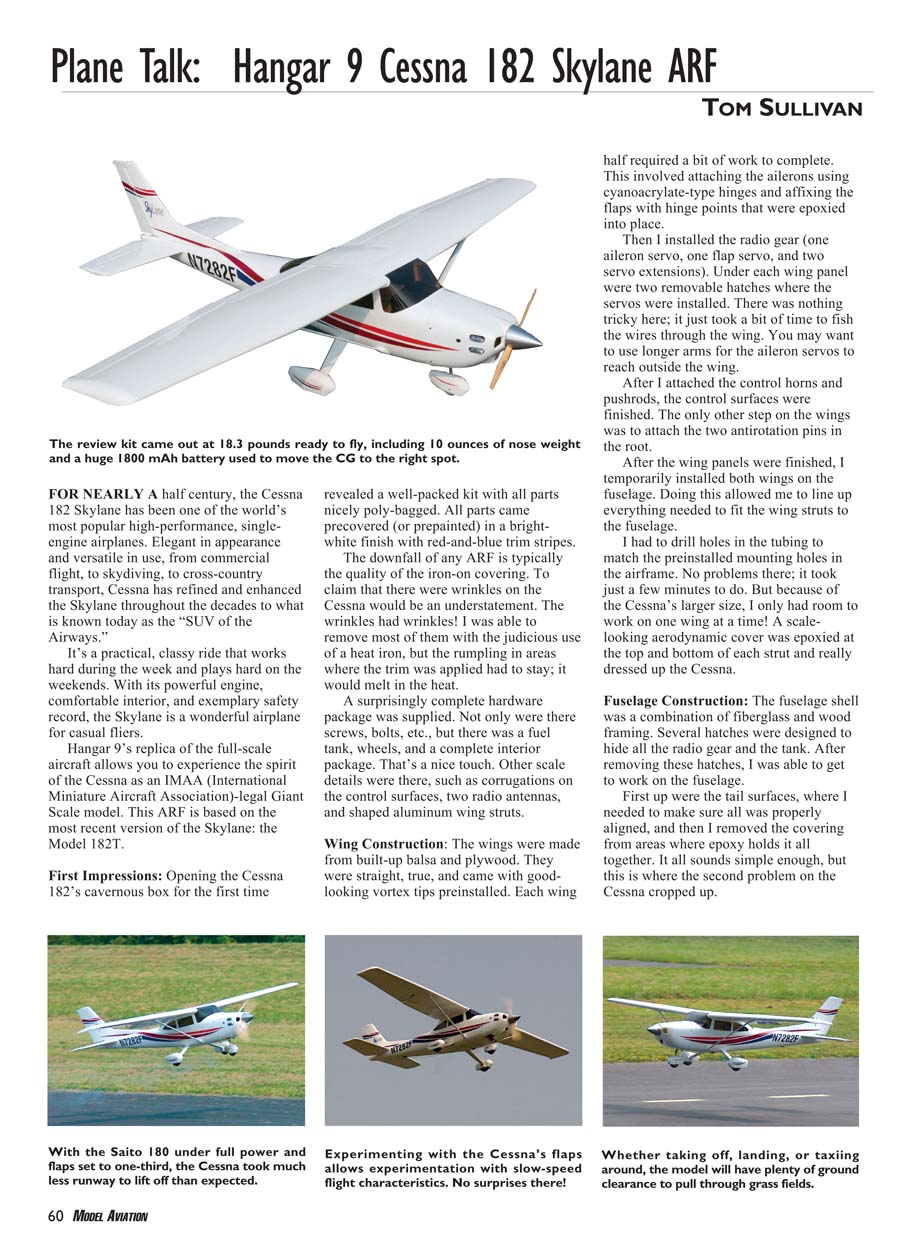
The review kit came out at 18.3 pounds ready to fly, including 10 ounces of nose weight and a huge 1800 mAh battery used to move the CG to the right spot.
FOR NEARLY a half century, the Cessna 182 Skylane has been one of the world's most popular high-performance, single-engine airplanes. Elegant in appearance and versatile in use, from commercial flight, to skydiving, to cross-country transport, Cessna has refined and enhanced the Skylane throughout the decades to what is known today as the "SUV of the Airways."
It's a practical, classy ride that works hard during the week and plays hard on the weekends. With its powerful engine, comfortable interior and exemplary safety record, the Skylane is a wonderful airplane for casual fliers.
Hangar 9's replica of the full-scale aircraft allows you to experience the spirit of the Cessna as an IMAA (International Miniature Aircraft Association)-legal Giant Scale model. This ARF is based on the most recent version of the Skylane: the Model 182T.
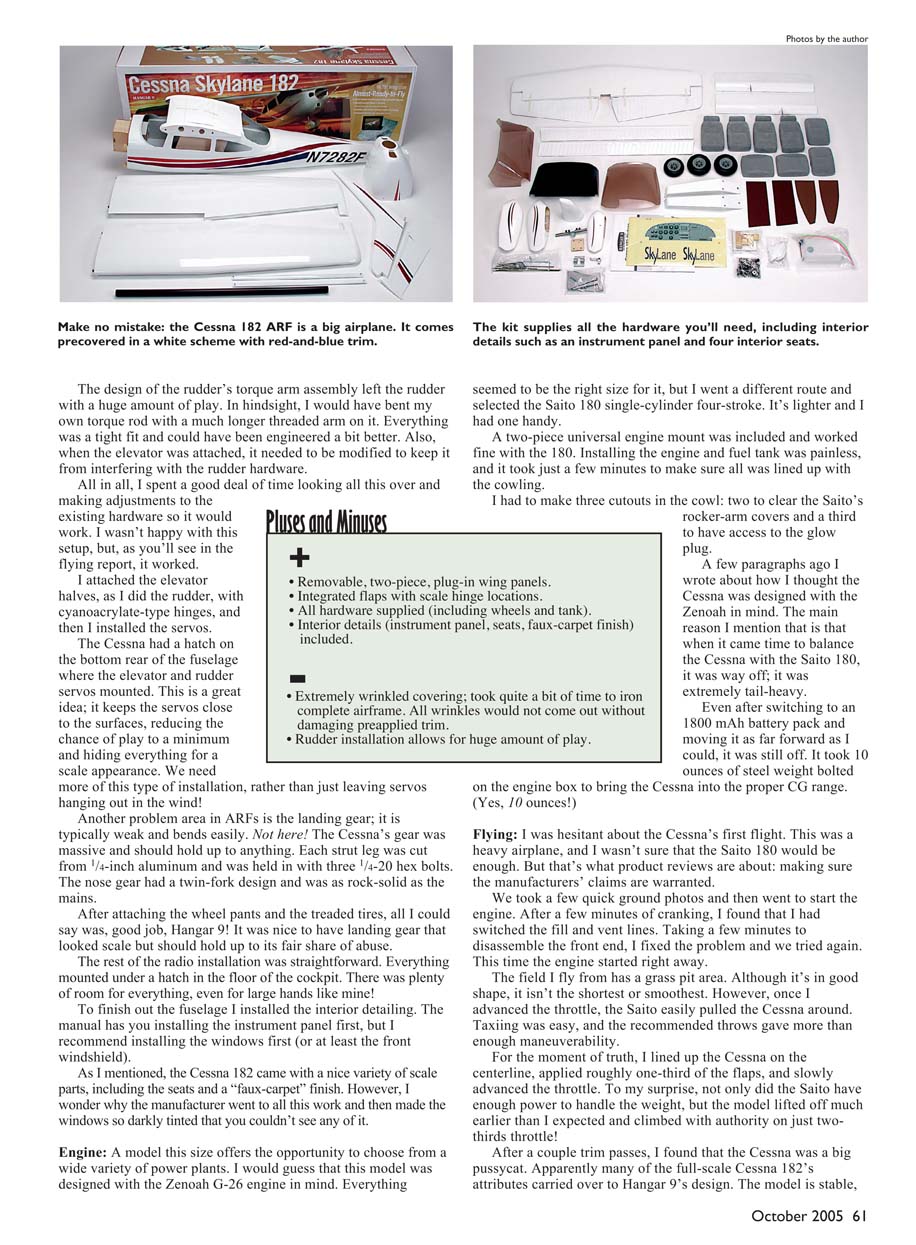
First Impressions: Opening the Cessna 182's cavernous box for the first time revealed a well-packed kit with all parts nicely poly-bagged. All parts came precovered (or prepainted) in a bright-white finish with red-and-blue trim stripes.
The downfall of any ARF is typically the quality of the iron-on covering. To claim that there were wrinkles on the Cessna would be an understatement. The wrinkles had wrinkles! I was able to remove most of them with the judicious use of a heat iron, but the rumpling in areas where the trim was applied had to stay; it would melt in the heat.
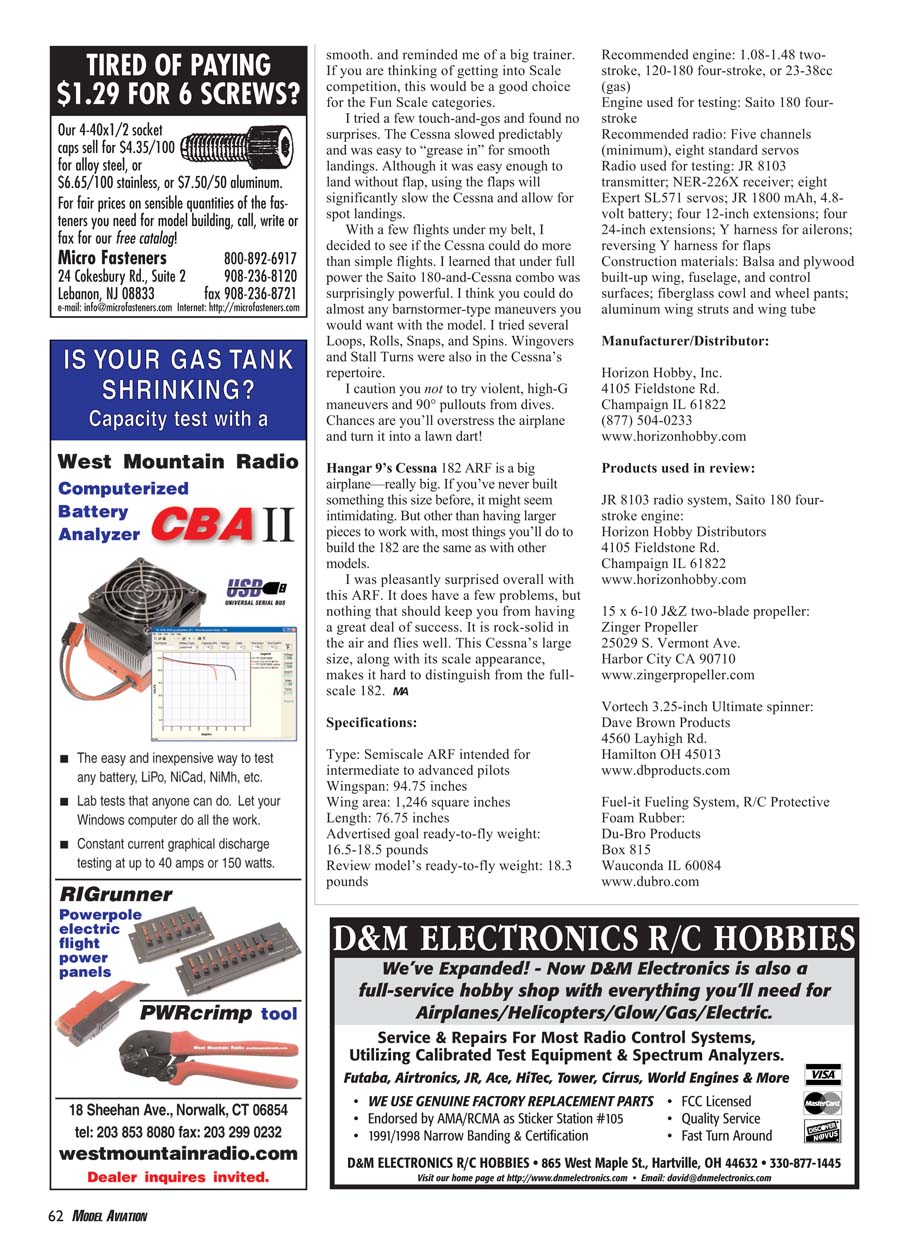
A surprisingly complete hardware package was supplied. Not only were there screws, bolts, etc., but there was a fuel tank, wheels, and a complete interior package. That's a nice touch. Other scale details were there, such as corrugations on the control surfaces, two radio antennas, and shaped aluminum wing struts.
Wing Construction: The wings were made from built-up balsa and plywood. They were straight, true, and came with good-looking vortex tips preinstalled. Each wing half required a bit of work to complete. This involved attaching the ailerons using cyanoacrylate-type hinges and affixing the flaps with hinge points that were epoxied into place.
Then I installed the radio gear (one aileron servo, one flap servo, and two servo extensions). Under each wing panel were two removable hatches where the servos were installed. There was nothing tricky here; it just took a bit of time to fish the wires through the wing. You may want to use longer arms for the aileron servos to reach outside the wing.
After I attached the control horns and pushrods, the control surfaces were finished. The only other step on the wings was to attach the two antirotation pins in the root.
After the wing panels were finished, I temporarily installed both wings on the fuselage. Doing this allowed me to line up everything needed to fit the wing struts to the fuselage.
I had to drill holes in the tubing to match the preinstalled mounting holes in the airframe. No problems there; it took just a few minutes to do. But because of the Cessna's larger size, I only had room to work on one wing at a time! A scale-looking aerodynamic cover was epoxied at the top and bottom of each strut and really dressed up the Cessna.
Fuselage Construction: The fuselage shell was a combination of fiberglass and wood framing. Several hatches were designed to hide all the radio gear and the tank. After removing these hatches, I was able to get to work on the fuselage.
First up were the tail surfaces, where I needed to make sure all was properly aligned, and then I removed the covering from areas where epoxy holds it all together. It all sounds simple enough, but this is where the second problem on the Cessna cropped up.
Plane Talk
Tom Sullivan
The design of the rudder's torque arm assembly left the rudder with a huge amount of play. In hindsight, I would have bent my own torque rod with a much longer threaded arm on it. Everything was a tight fit and could have been engineered a bit better. Also, when the elevator was attached, it needed to be modified to keep it from interfering with the rudder hardware.
All in all, I spent a good deal of time looking all this over and making adjustments to the existing hardware so it would work. I wasn't happy with this setup, but, as you'll see in the flying report, it worked.
I attached the elevator halves, as I did the rudder, with cyanoacrylate-type hinges, and then I installed the servos.
The Cessna had a hatch on the bottom rear of the fuselage where the elevator and rudder servos mounted. This is a great idea; it keeps the servos close to the surfaces, reducing the chance of play to a minimum and hiding everything for a scale appearance. We need more of this type of installation, rather than just leaving servos hanging out in the wind!
Another problem area in ARFs is the landing gear; it is typically weak and bends easily. Not here! The Cessna's gear was massive and should hold up to anything. Each strut leg was cut from 1/4-inch aluminum and was held in with three 1/4-20 hex bolts. The nose gear had a twin-fork design and was as rock-solid as the mains.
After attaching the wheel pants and the treaded tires, all I could say was, good job, Hangar 9! It was nice to have landing gear that looked scale but should hold up to its fair share of abuse.
The rest of the radio installation was straightforward. Everything mounted under a hatch in the floor of the cockpit. There was plenty of room for everything, even for large hands like mine!
To finish out the fuselage I installed the interior detailing. The manual has you installing the instrument panel first, but I recommend installing the windows first (or at least the front windshield).
As I mentioned, the Cessna 182 came with a nice variety of scale parts, including the seats and a "faux-carpet" finish. However, I wonder why the manufacturer went to all this work and then made the windows so darkly tinted that you couldn't see any of it.
Engine:
A model this size offers the opportunity to choose from a wide variety of power plants. I would guess that this model was designed with the Zenoah G-26 engine in mind. Everything seemed to be the right size for it, but I went a different route and selected the Saito 180 single-cylinder four-stroke. It's lighter and I had one handy.
A two-piece universal engine mount was included and worked fine with the 180. Installing the engine and fuel tank was painless, and it took just a few minutes to make sure all was lined up with the cowling.
I had to make three cutouts in the cowl: two to clear the Saito's rocker-arm covers and a third to have access to the glow plug.
A few paragraphs ago I wrote about how I thought the Cessna was designed with the Zenoah in mind. The main reason I mention that is that when it came time to balance the Cessna with the Saito 180, it was way off; it was extremely tail-heavy.
Even after switching to an 1800 mAh battery pack and moving it as far forward as I could, it was still off. It took 10 ounces of steel weight bolted on the engine box to bring the Cessna into the proper CG range. (Yes, 10 ounces!)
Flying:
I was hesitant about the Cessna's first flight. This was a heavy airplane, and I wasn't sure that the Saito 180 would be enough. But that's what product reviews are about: making sure the manufacturers' claims are warranted.
We took a few quick ground photos and then went to start the engine. After a few minutes of cranking, I found that I had switched the fill and vent lines. Taking a few minutes to disassemble the front end, I fixed the problem and we tried again. This time the engine started right away.
The field I fly from has a grass pit area. Although it's in good shape, it isn't the shortest or smoothest. However, once I advanced the throttle, the Saito easily pulled the Cessna around. Taxiing was easy, and the recommended throws gave more than enough maneuverability.
For the moment of truth, I lined up the Cessna on the centerline, applied roughly one-third of the flaps, and slowly advanced the throttle. To my surprise, not only did the Saito have enough power to handle the weight, but the model lifted off much earlier than I expected and climbed with authority on just two-thirds throttle!
After a couple trim passes, I found that the Cessna was a big pussycat. Apparently many of the full-scale Cessna 182's attributes carried over to Hangar 9's design. The model is stable, smooth, and reminded me of a big trainer. If you are thinking of getting into Scale competition, this would be a good choice for the Fun Scale categories.
I tried a few touch-and-gos and found no surprises. The Cessna slowed predictably and was easy to "grease in" for smooth landings. Although it was easy enough to land without flaps, using the flaps will significantly slow the Cessna and allow for spot landings.
With a few flights under my belt, I decided to see if the Cessna could do more than simple flights. I learned that under full power the Saito 180-and-Cessna combo was surprisingly powerful. I think you could do almost any barnstormer-type maneuvers you would want with the model. I tried several Loops, Rolls, Snaps, and Spins. Wingovers and Stall Turns were also in the Cessna's repertoire.
I caution you not to try violent, high-G maneuvers and 90° pullouts from dives. Chances are you'll overstress the airplane and turn it into a lawn dart!
Hangar 9's Cessna 182 ARF is a big airplane—really big. If you've never built something this size before, it might seem intimidating. But other than having larger pieces to work with, most things you'll do to build the 182 are the same as with other models.
I was pleasantly surprised overall with this ARF. It does have a few problems, but nothing that should keep you from having a great deal of success. It is rock-solid in the air and flies well. This Cessna's large size, along with its scale appearance, makes it hard to distinguish from the full-scale 182. MA
Specifications:
Type: Semiscale ARF intended for intermediate to advanced pilots Wingspan: 94.75 inches Wing area: 1,246 square inches Length: 76.75 inches Advertised goal ready-to-fly weight: 16.5–18.5 pounds Review model's ready-to-fly weight: 18.3 pounds
Recommended engine: 1.08–1.48 two-stroke, 120–180 four-stroke, or 23–38cc (gas) Engine used for testing: Saito 180 four-stroke
Recommended radio: Five channels (minimum), eight standard servos Radio used for testing: JR 8103 transmitter; NER-226X receiver; eight Expert SL571 servos; JR 1800 mAh, 4.8-volt battery; four 12-inch extensions; four 24-inch extensions; Y harness for ailerons; reversing Y harness for flaps Construction materials: Balsa and plywood built-up wing, fuselage, and control surfaces; fiberglass cowl and wheel pants; aluminum wing struts and wing tube
Manufacturer/Distributor:
Horizon Hobby, Inc. 4105 Fieldstone Rd. Champaign IL 61822 (877) 504-0233 www.horizonhobby.com
Products used in review:
JR 8103 radio system, Saito 180 four-stroke engine: Horizon Hobby Distributors 4105 Fieldstone Rd. Champaign IL 61822 www.horizonhobby.com
15 x 6-10 J&Z two-blade propeller: Zinger Propeller 25029 S. Vermont Ave. Harbor City CA 90710 www.zingerpropeller.com
Vortech 3.25-inch Ultimate spinner: Dave Brown Products 4560 Layhigh Rd. Hamilton OH 45013 www.dbproducts.com
Fuel-it Fueling System, R/C Protective Foam Rubber: Du-Bro Products Box 815 Wauconda IL 60084 www.dubro.com
Transcribed from original scans by AI. Minor OCR errors may remain.

