
Plane Talk: AirBorne Models Tucano 60 ARF
Tom Sullivan
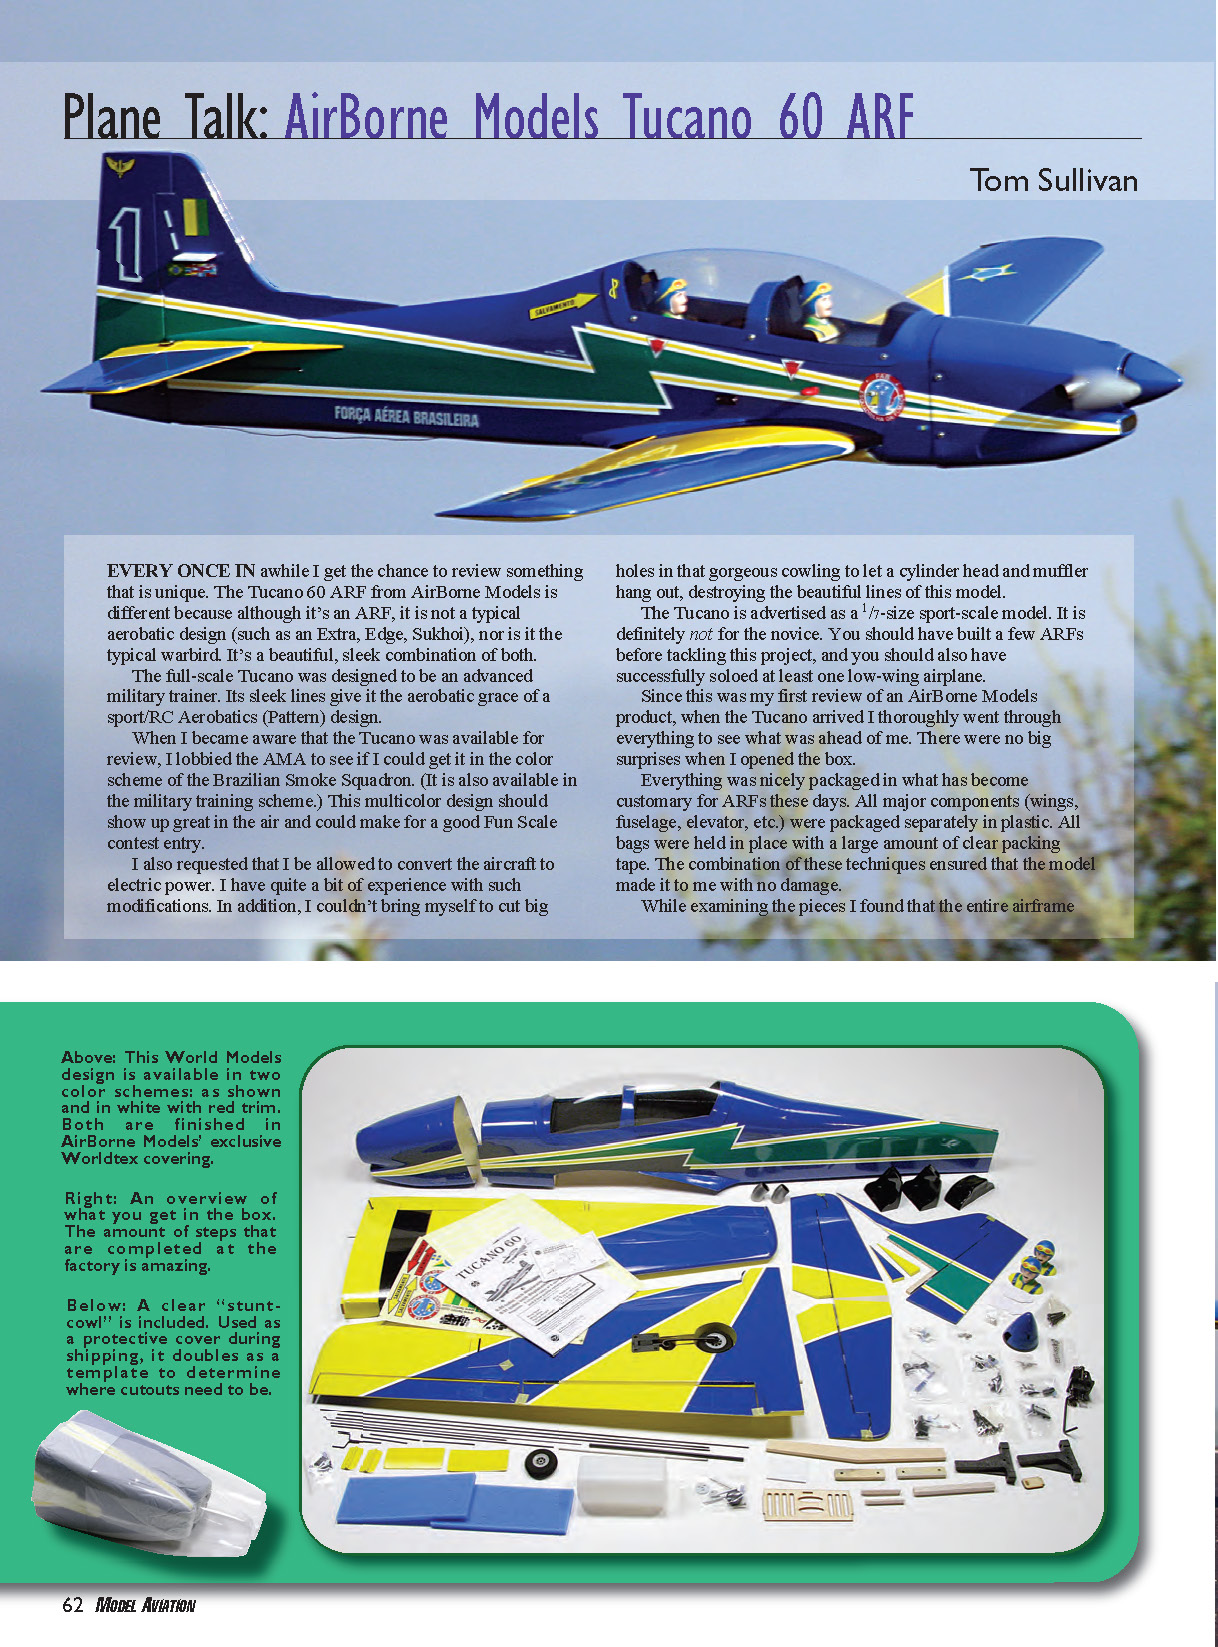
EVERY ONCE IN awhile I get the chance to review something that is unique. The Tucano 60 ARF from AirBorne Models is different because although it's an ARF, it is not a typical aerobatic design (such as an Extra, Edge, Sukhoi), nor is it the typical warbird. It's a beautiful, sleek combination of both.
The full-scale Tucano was designed to be an advanced military trainer. Its sleek lines give it the aerobatic grace of a sport/RC Aerobatics (Pattern) design.
When I became aware that the Tucano was available for review, I lobbied the AMA to see if I could get it in the color scheme of the Brazilian Smoke Squadron. (It is also available in the military training scheme.) This multicolor design should show up great in the air and could make for a good Fun Scale contest entry.
I also requested that I be allowed to convert the aircraft to electric power. I have quite a bit of experience with such modifications. In addition, I couldn't bring myself to cut big holes in that gorgeous cowling to let a cylinder head and muffler hang out, destroying the beautiful lines of this model.
The Tucano is advertised as a 1/7-size sport-scale model. It is definitely not for the novice. You should have built a few ARFs before tackling this project, and you should also have successfully soloed at least one low-wing airplane.
Since this was my first review of an AirBorne Models product, when the Tucano arrived I thoroughly went through everything to see what was ahead of me. There were no big surprises when I opened the box.
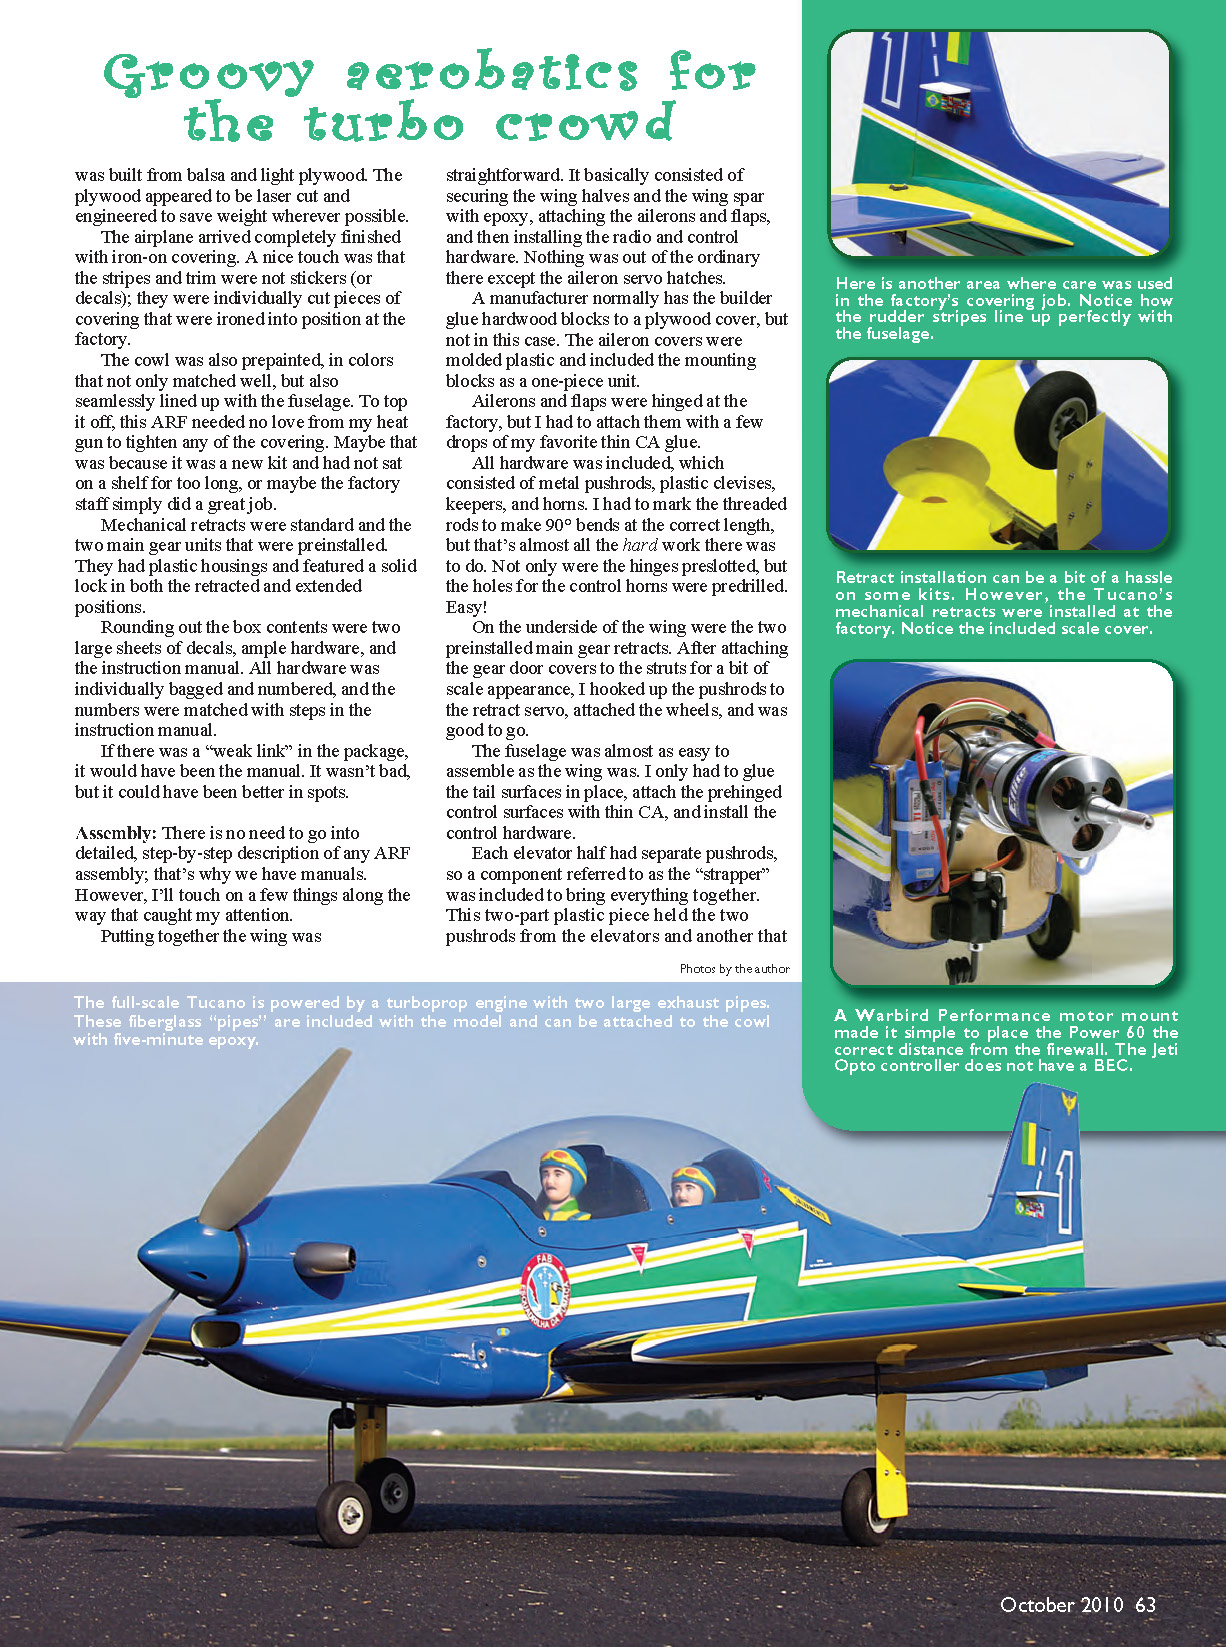
Everything was nicely packaged in what has become customary for ARFs these days. All major components (wings, fuselage, elevator, etc.) were packaged separately in plastic. All bags were held in place with a large amount of clear packing tape. The combination of these techniques ensured that the model made it to me with no damage.
While examining the pieces I found that the entire airframe was built from balsa and light plywood. The plywood appeared to be laser cut and engineered to save weight wherever possible. The airplane arrived completely finished with iron-on covering. A nice touch was that the stripes and trim were not stickers (or decals); they were individually cut pieces of covering that were ironed into position at the factory. The cowl was also prepainted, in colors that not only matched well, but also seamlessly lined up with the fuselage. To top it off, this ARF needed no love from my heat gun to tighten any of the covering. Maybe that was because it was a new kit and had not sat on a shelf for too long, or maybe the factory staff simply did a great job.
Mechanical retracts were standard and the two main gear units were preinstalled. They had plastic housings and featured a solid lock in both the retracted and extended positions. Rounding out the box contents were two large sheets of decals, ample hardware, and the instruction manual. All hardware was individually bagged and numbered, and the numbers were matched with steps in the instruction manual. If there was a "weak link" in the package, it would have been the manual. It wasn't bad, but it could have been better in spots.
Assembly
There is no need to go into a detailed, step-by-step description of any ARF assembly; that's why we have manuals. However, I'll touch on a few things along the way that caught my attention.
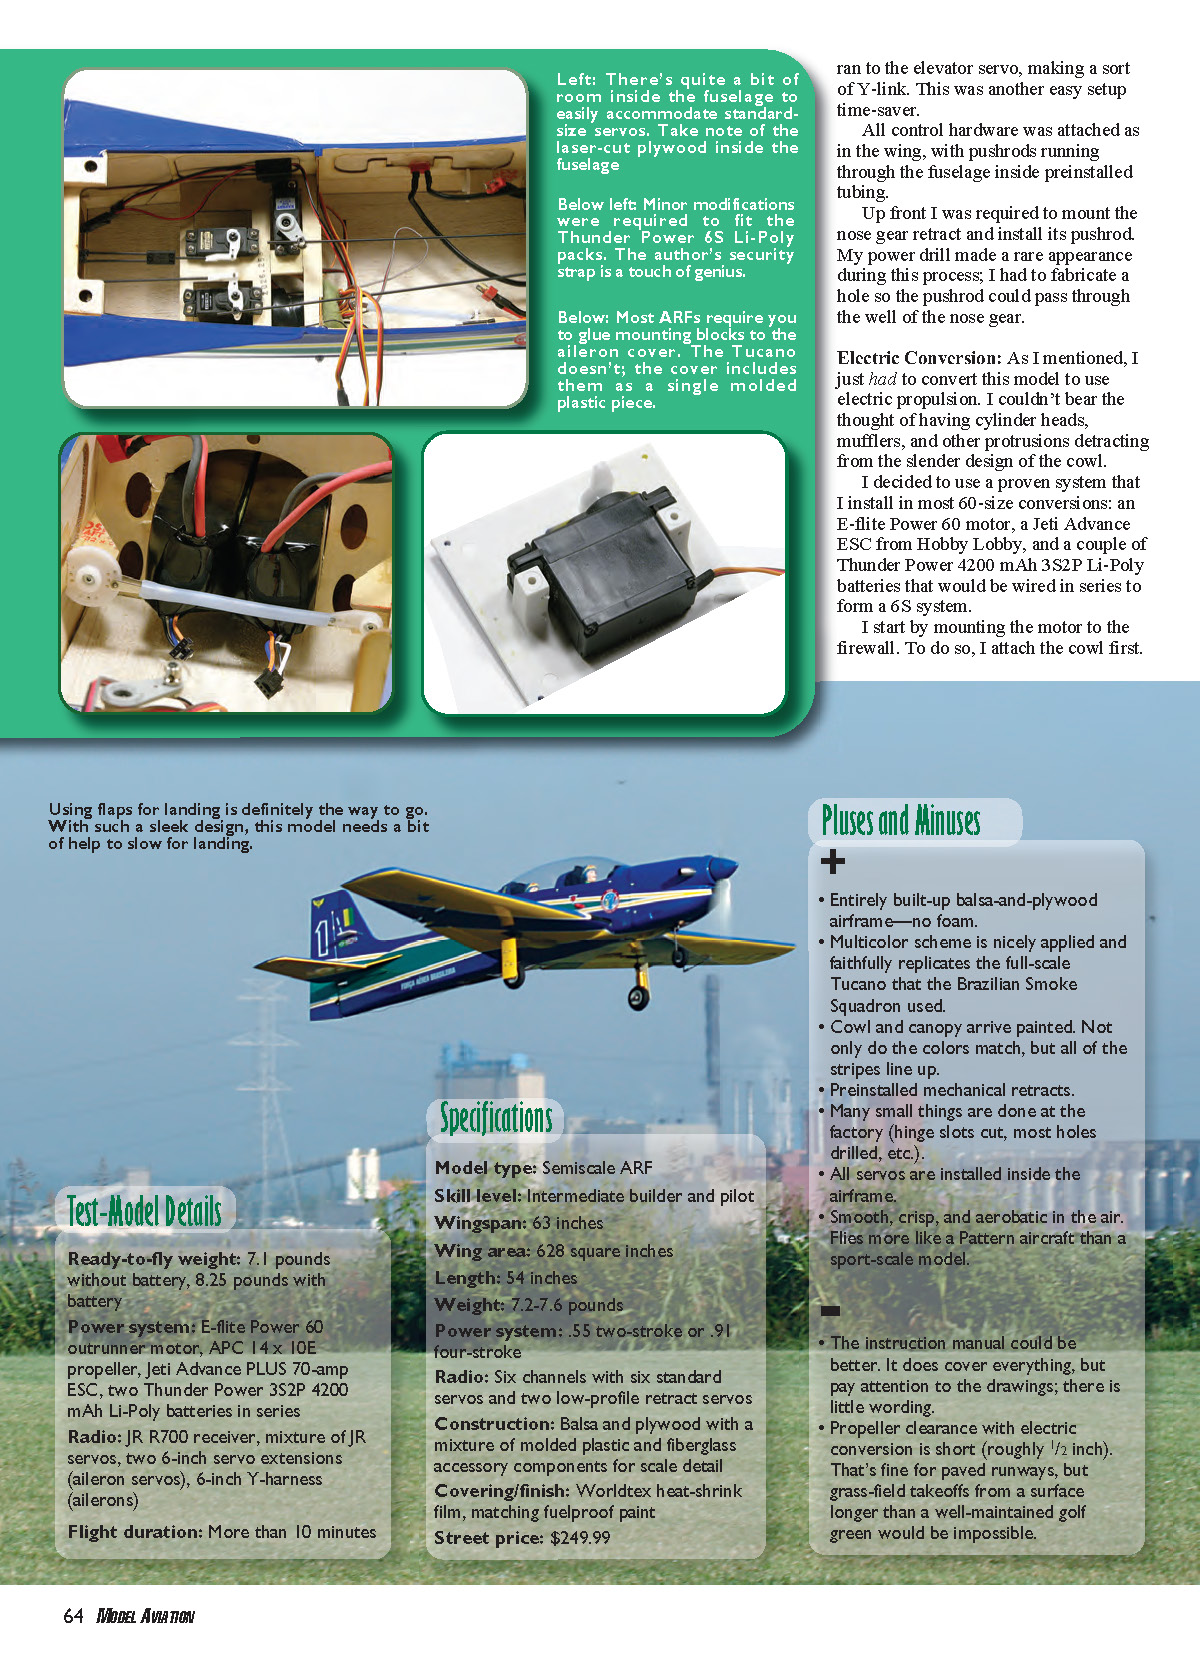
Putting together the wing was straightforward. It basically consisted of securing the wing halves and the wing spar with epoxy, attaching the ailerons and flaps, and then installing the radio and control hardware. Nothing was out of the ordinary there except the aileron servo hatches. A manufacturer normally has the builder glue hardwood blocks to a plywood cover, but not in this case. The aileron covers were molded plastic and included the mounting blocks as a one-piece unit. Ailerons and flaps were hinged at the factory, but I had to attach them with a few drops of my favorite thin CA glue.
All hardware was included, which consisted of metal pushrods, plastic clevises, keepers, and horns. I had to mark the threaded rods to make 90° bends at the correct length, but that's almost all the hard work there was to do. Not only were the hinges preslotted, but the holes for the control horns were predrilled. Easy!
On the underside of the wing were the two preinstalled main gear retracts. After attaching the gear door covers to the struts for a bit of scale appearance, I hooked up the pushrods to the retract servo, attached the wheels, and was good to go.
The fuselage was almost as easy to assemble as the wing was. I only had to glue the tail surfaces in place, attach the prehinged control surfaces with thin CA, and install the control hardware. Each elevator half had separate pushrods, so a component referred to as the "strapper" was included to bring everything together. This two-part plastic piece held the two pushrods from the elevators and another that connected to the servo. A Y-harness ran to the elevator servo, making a sort of Y-link. This was another easy setup time-saver.
All control hardware was attached as in the wing, with pushrods running through the fuselage inside preinstalled tubing.
Up front I was required to mount the nose gear retract and install its pushrod. My power drill made a rare appearance during this process; I had to fabricate a hole so the pushrod could pass through the well of the nose gear.
Electric Conversion
As I mentioned, I converted this model to use electric propulsion. I couldn't bear the thought of having cylinder heads, mufflers, and other protrusions detracting from the slender design of the cowl.
I decided to use a proven system that I install in most 60-size conversions: an E-flite Power 60 motor, a Jeti Advance ESC from Hobby Lobby, and a couple of Thunder Power 4200 mAh 3S2P Li-Poly batteries that would be wired in series to form a 6S system.
I start by mounting the motor to the firewall. To do so, I attach the cowl first.
The Smoke Squadron
Thinking back throughout the many air shows I've attended and the numerous acts, stunts, airplanes, and characters I've seen across the country, a few stand out. Tops on many people's list might be the Navy Blue Angels or Air Force Thunderbirds for their precision and speed. Or maybe the Red Baron Pizza Squadron's Stearmans, Patty Wagstaff and her Extra, or the extreme aerobatics of Shawn D. Tucker and his Challenger.
All of those are fantastic performers, but there's a group I was lucky enough to see that made a huge impression on me. It seems like a gazillion years ago (it was actually the early 1980s), but I remember the experience like it was yesterday.
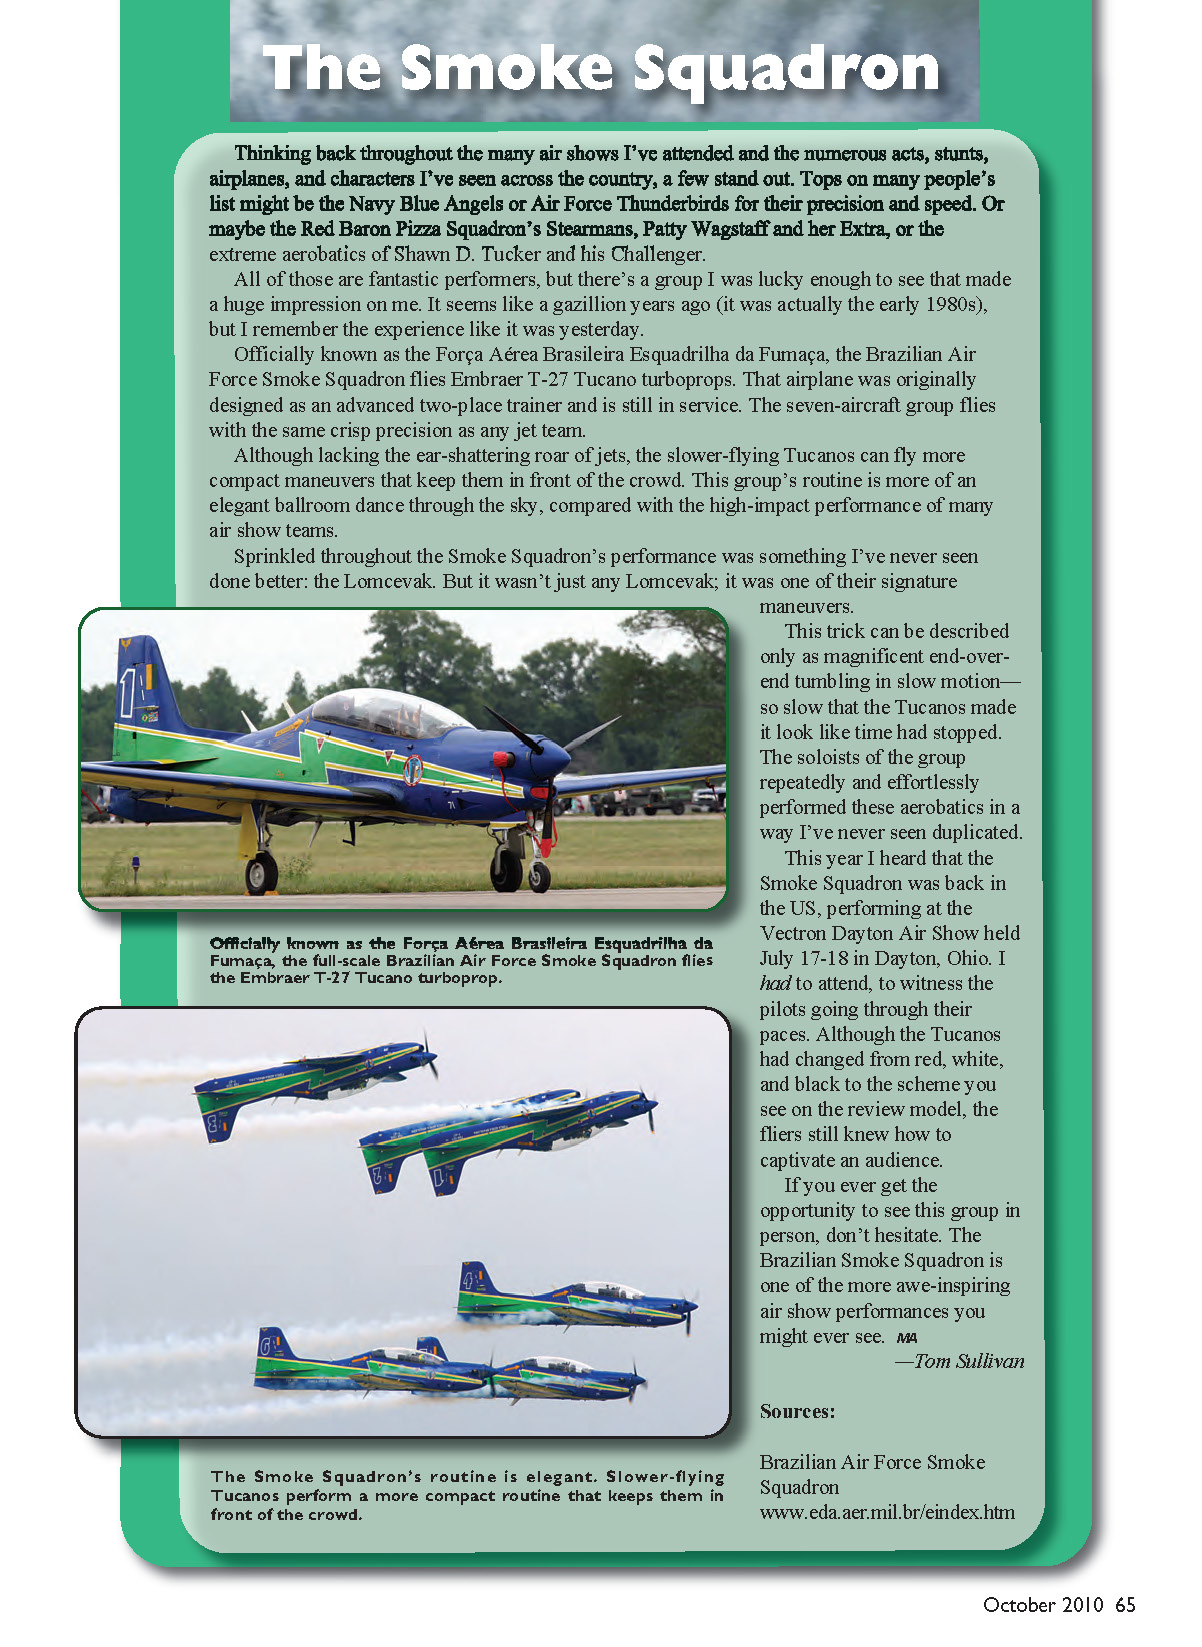
Officially known as the Força Aérea Brasileira Esquadrilha da Fumaça, the Brazilian Air Force Smoke Squadron flies Embraer T-27 Tucano turboprops. That airplane was originally designed as an advanced two-place trainer and is still in service. The seven-aircraft group flies with the same crisp precision as any jet team.
Although lacking the ear-shattering roar of jets, the slower-flying Tucanos can fly more compact maneuvers that keep them in front of the crowd. This group's routine is more of an elegant ballroom dance through the sky, compared with the high-impact performance of many air show teams.
Sprinkled throughout the Smoke Squadron's performance was something I've never seen done better: the Lomcevak. But it wasn't just any Lomcevak; it was one of their signature maneuvers.
This trick can be described only as magnificent end-over-end tumbling in slow motion—so slow that the Tucanos made it look like time had stopped. The soloists of the group repeatedly and effortlessly performed these aerobatics in a way I've never seen duplicated.
This year I heard that the Smoke Squadron was back in the US, performing at the Vectren Dayton Air Show held July 17–18 in Dayton, Ohio. I had to attend, to witness the pilots going through their paces. Although the Tucanos had changed from red, white, and black to the scheme you see on the review model, the fliers still knew how to captivate an audience.
If you ever get the opportunity to see this group in person, don't hesitate. The Brazilian Smoke Squadron is one of the more awe-inspiring air show performances you might ever see.
—Tom Sullivan
Sources:
- Brazilian Air Force Smoke Squadron
- www.eda.aer.mil.br/eindex.htm
Because the cowl’s mounting holes were predrilled, all I had to do was align its stripes with the fuselage and then mark and drill the holes into the fuselage. I measured the distance from the firewall to the front of the cowl.
After I removed the cowl, I adjusted my Warbird Performance aluminum mount, with the motor attached, to the correct distance and placed it on the firewall to line up the shaft to center in the cowl’s opening. After marking and drilling the attachment holes for the mount, I affixed it using 10-32 hex bolts, blind nuts, and a touch of thread lock.
With the motor mounted, I attached the ESC to the firewall on a small balsa spacer I made from scrap material. I also marked a couple of 3/4-inch holes on the firewall and cut them using my Dremel tool, to allow air to pass through the fuselage.
It was time for the balance. With the wing attached and noting the balance point (3.54 inches from the wing LE), I placed the batteries on top of the fuselage and moved them fore and aft to find where the Tucano would balance. They would best be mounted slightly aft of the firewall, positioned where the fuel tank would typically go.
The width of the two battery packs required that I trim a bit (approximately 1/8 inch) from each side of the former where the LE of the wing would slot into. I used a system of “less is more” when securing the packs in position but allowing the maximum airflow.
Throughout the years I have learned that you don’t need much material there—just enough to keep the packs in place. You could use plywood or some sort of hard wood, but the best solution I have found is to use Popsicle (mixing) sticks. Cut to length to fit snugly between the two formers, I use one stick on each side of the batteries and one across the opening in the former, to keep the packs from shifting.
To keep the batteries in place, yet have them be removable, I make two triangular pieces from scrap plywood. Then I attach spare servo arms to each piece. Between them, these arms will hold a small pushrod that is threaded on one end and has a Z-bend at the other. Then I slip a piece of medium fuel tubing over the pushrod, to act as a cushion against the batteries, and install a clevis on the threaded end. To remove the packs, you simply unclip the clevis from the arm and rotate it out of the way. This method is easy, quick, and lightweight.
One of the most important parts of this (or any) electric conversion is to make sure you include an external arming plug for the power system. I normally use a female Deans connector mounted through the side of the fuselage, and I’ve made a few small male “jumpers” that can plug in to complete the circuit. This way I can assemble the model, turn on the radio, and move out to the runway with no worries of bumping the throttle stick.
The last step was to employ my Dremel tool to enlarge the opening in the cowl, to let a bit more air through the fuselage. It turned out that this opening provided a good amount of airflow to keep everything cool, even after a good 10 minutes of full-power flying.
Final Assembly
To finish the Tucano, the radio needed to be installed. With the exception of the receiver battery, everything fit nicely in the wing bay with plenty of room to spare. The receiver battery would fit there too, but I shifted it to the rear of the fuselage for ballast.
As it turns out, the factory thought of the balance issue and designed a hatch on the underside of the fuselage. Normally you would mount the battery there and then cover it by reattaching the hatch cover with a few screws. But since I needed the heated air to exit the fuselage, I decided to leave this hatch off.
With the radio installed, there were a few cosmetic steps to complete. They involved mounting the included pilot figures, applying decals, and attaching the canopy. (If you want to use this as a Fun Scale model, make sure to install those pilots; it’s in the rules.)
There were also small parts to install that would have added to the scale appearance: two white antennas and a step. I chose not to use them; I would no doubt knock them off, causing a bit of “hangar rash.”
All finished, my review Tucano ARF came in at 7.1 pounds without batteries. With them in place the model topped out at 8.25 pounds, making it a bit heavier than recommended but probably not that far off if you consider that a glow-powered model is heavier with a full tank of fuel.
The total time from when I opened the box to this point was roughly 10 hours, including the electric conversion.
Flying
After installing the batteries, attaching the wing, and quickly double-checking all control throws, I installed the arming plug and taxied the Tucano out for initial tests.
As I mentioned, this electric conversion uses a propeller that leaves little ground clearance, so I was careful to avoid as many cracks and bumps as I could. It had been awhile since I had flown a model with a tricycle gear configuration, and this one proved to be a dream to taxi. It required little rudder input to turn and tracked well under power.
For the first takeoff I chose not to use flaps. Rollout took nearly 60 feet, and a gentle pull of the stick had the Tucano smoothly climbing skyward.
After a few trim passes and the obligatory photo flybys, it was time to see how the aircraft handled. Straight-and-level flight required a tad more than one-third throttle.
Because of this airplane’s clean lines, it gained speed in a hurry and was a bit reluctant to slow; I learned that during the first few practice landing attempts. Even after a few tries, the first touchdown was long. I decided to try flaps on the next flight.
Using flaps on the second takeoff, the rollout length wasn’t noticeably shorter; however, the climbout could be much steeper. Dropping flaps in flight also allows you to dramatically slow the Tucano and maintain a good deal of maneuverability.
Landing with flaps is definitely the way to go. You can use their extra drag to bring the model down in a much shorter distance and at a safer speed.
In the last of three initial flights, I decided to wring it out. Using full throttle for most of the flight, I wanted to see not only how the airplane performed, but also how well the internal cooling would work and what kind of flight time could be expected.
On the performance side, the Tucano flies like almost any sport-Pattern aircraft. Loops, Rolls, Point Rolls, Hammerheads, Split “S”s, Immelmann turns, and more are nearly effortless. This model also excels at snaps and spins, as does the full-scale version.
The E-flite Power 60 has more than enough power to continuously loop from level flight and offers a good 10 minutes of airtime using full power. Applying throttle more judiciously, you can easily stretch this to 15 minutes with a little power to spare for a touch-and-go or two.
Having written countless reviews through the years, I’ve been of the mind-set that no model package is perfect. Thankfully, I work with a magazine that encourages the reviewers not only to bring up problems an airplane has, but also to offer workarounds if possible.
I’m pleasantly surprised to write something that I never have. There were simply no problems with the review Tucano. Yes, the instruction manual could have been improved upon, but all the parts were included, the pieces fit together, and, best of all, the finished model flies great. It didn’t even have enough wrinkles for me to bother with getting out the heat gun.
An issue might pop up if you decide to go with a glow engine, but in looking through the instructions and parts I think the result will be the same. This is a well-thought-out ARF that faithfully represents the full-scale aircraft. It has fantastic flying characteristics and I’ll certainly be putting a lot of time on it.
Tom Sullivan [email protected]
Manufacturer/Distributor
World Models / AirBorne Models 4749-K Bennett Dr. Livermore, CA 94551 (925) 371-0922 www.airborne-models.com
Sources
- E-flite
(800) 338-4639 www.e-fliterc.com
- JR
(800) 338-4639 www.jrradios.com
- Thunder Power RC
(702) 228-8883 www.thunderpowerrc.com
- Warbird Performance
- Hobby Lobby
(866) 512-1444 www.hobby-lobby.com
- APC propellers: Landing Products
(530) 661-0399 www.apcprop.com
Transcribed from original scans by AI. Minor OCR errors may remain.

