
Plane Talk: ESM Douglas Dauntless SBD ARF
MICHAEL RAMSEY
Introduction
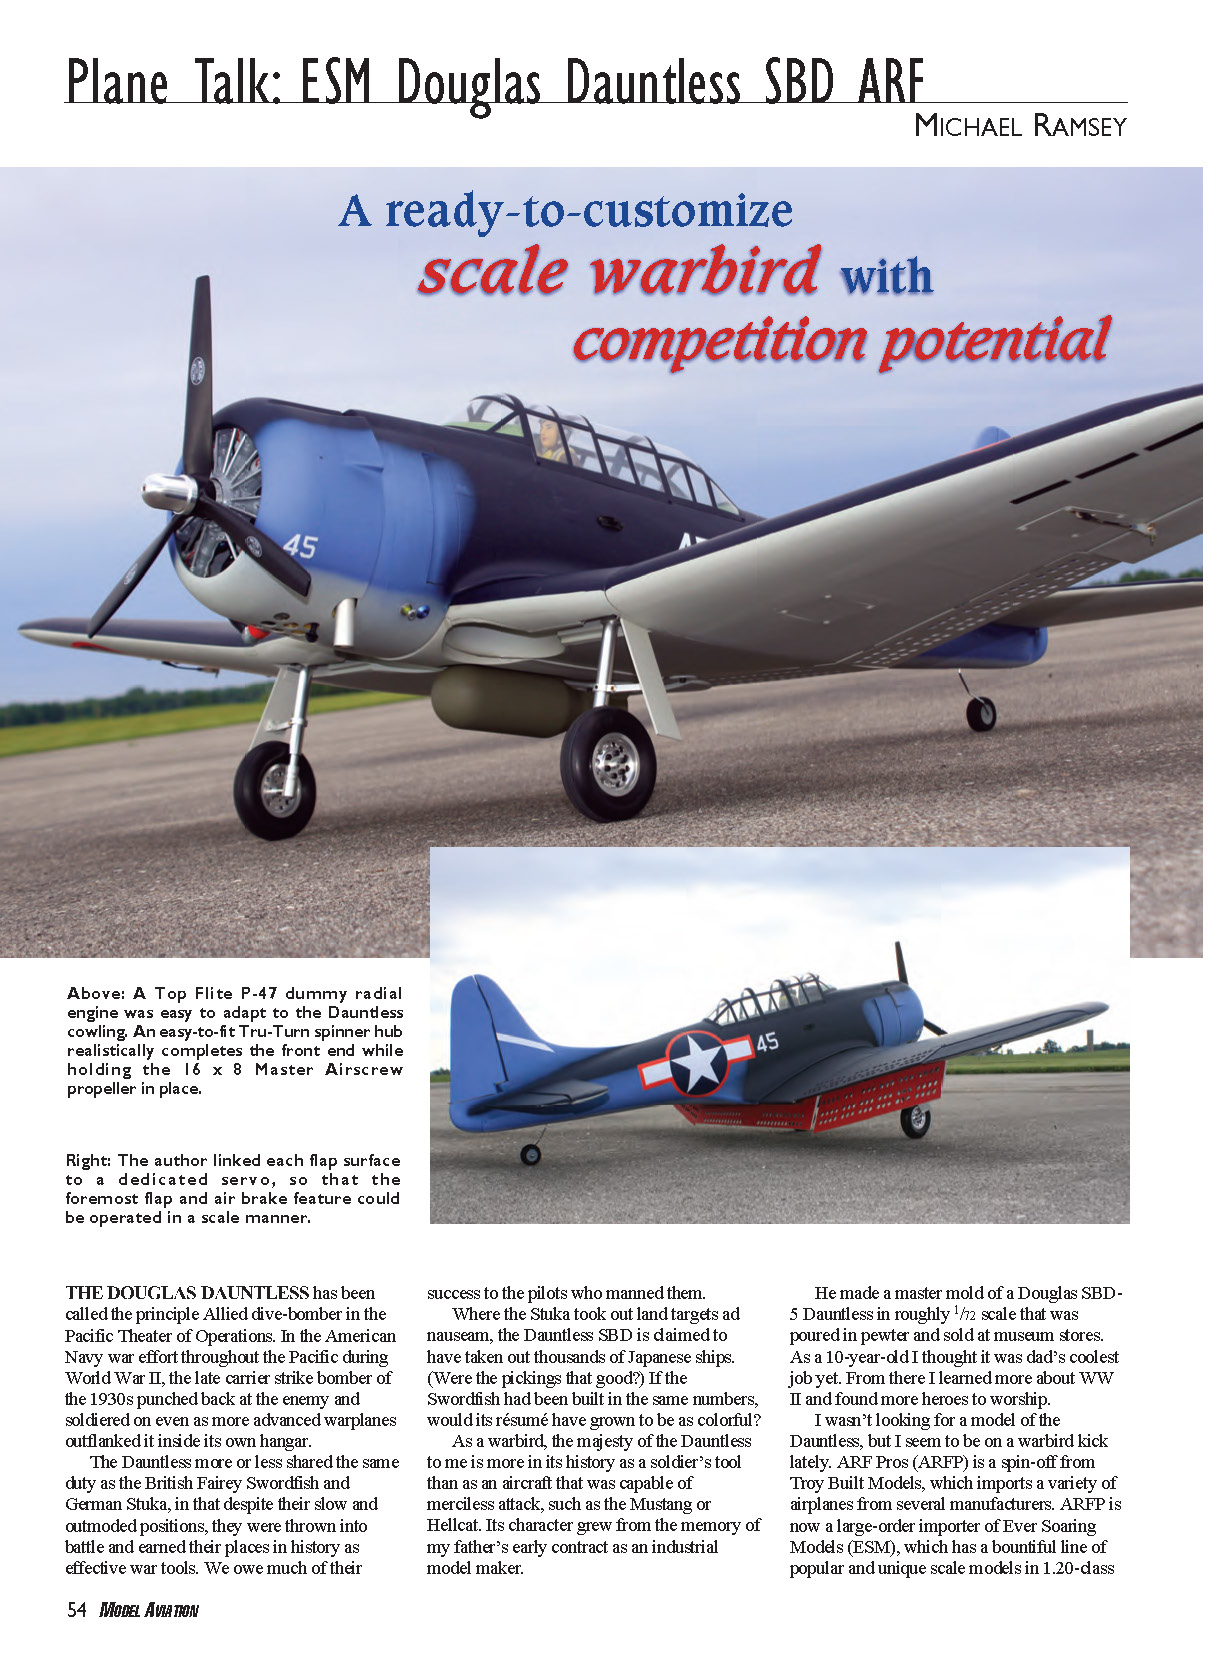
The Douglas Dauntless has been called the principal Allied dive-bomber in the Pacific Theater of Operations. In the American Navy war effort throughout the Pacific during World War II, the late-1930s carrier strike bomber punched back at the enemy and soldiered on even as more advanced warplanes outflanked it inside their own hangars. The Dauntless, like the British Fairey Swordfish and German Stuka, despite being relatively slow and outmoded, was thrown into battle and earned its place in history as an effective war tool. We owe much of its success to the pilots who manned it.
Where the Stuka took out land targets ad nauseam, the Dauntless SBD is claimed to have taken out thousands of Japanese ships. If the Swordfish had been built in the same numbers, would its résumé have been as colorful?
As a warbird, the Dauntless’s majesty for me is more in its history as a soldier’s tool than as a high-performance attacker like the Mustang or Hellcat. My interest grew from my father’s early contract as an industrial model maker—he made a master mold of a Douglas SBD-5 Dauntless in roughly 1/72 scale that was poured in pewter and sold in museum stores. As a 10-year-old I thought it was dad’s coolest job yet. From there I learned more about World War II and found more heroes to worship.
The Kit and Options
ARF Pros (ARFP) is a spin-off from Troy Built Models, which imports a variety of airplanes from several manufacturers. ARFP is now a large-order importer of Ever Soaring Models (ESM), which has a bountiful line of popular and unique scale models in 1.20-class glow and 50cc gas sizes.
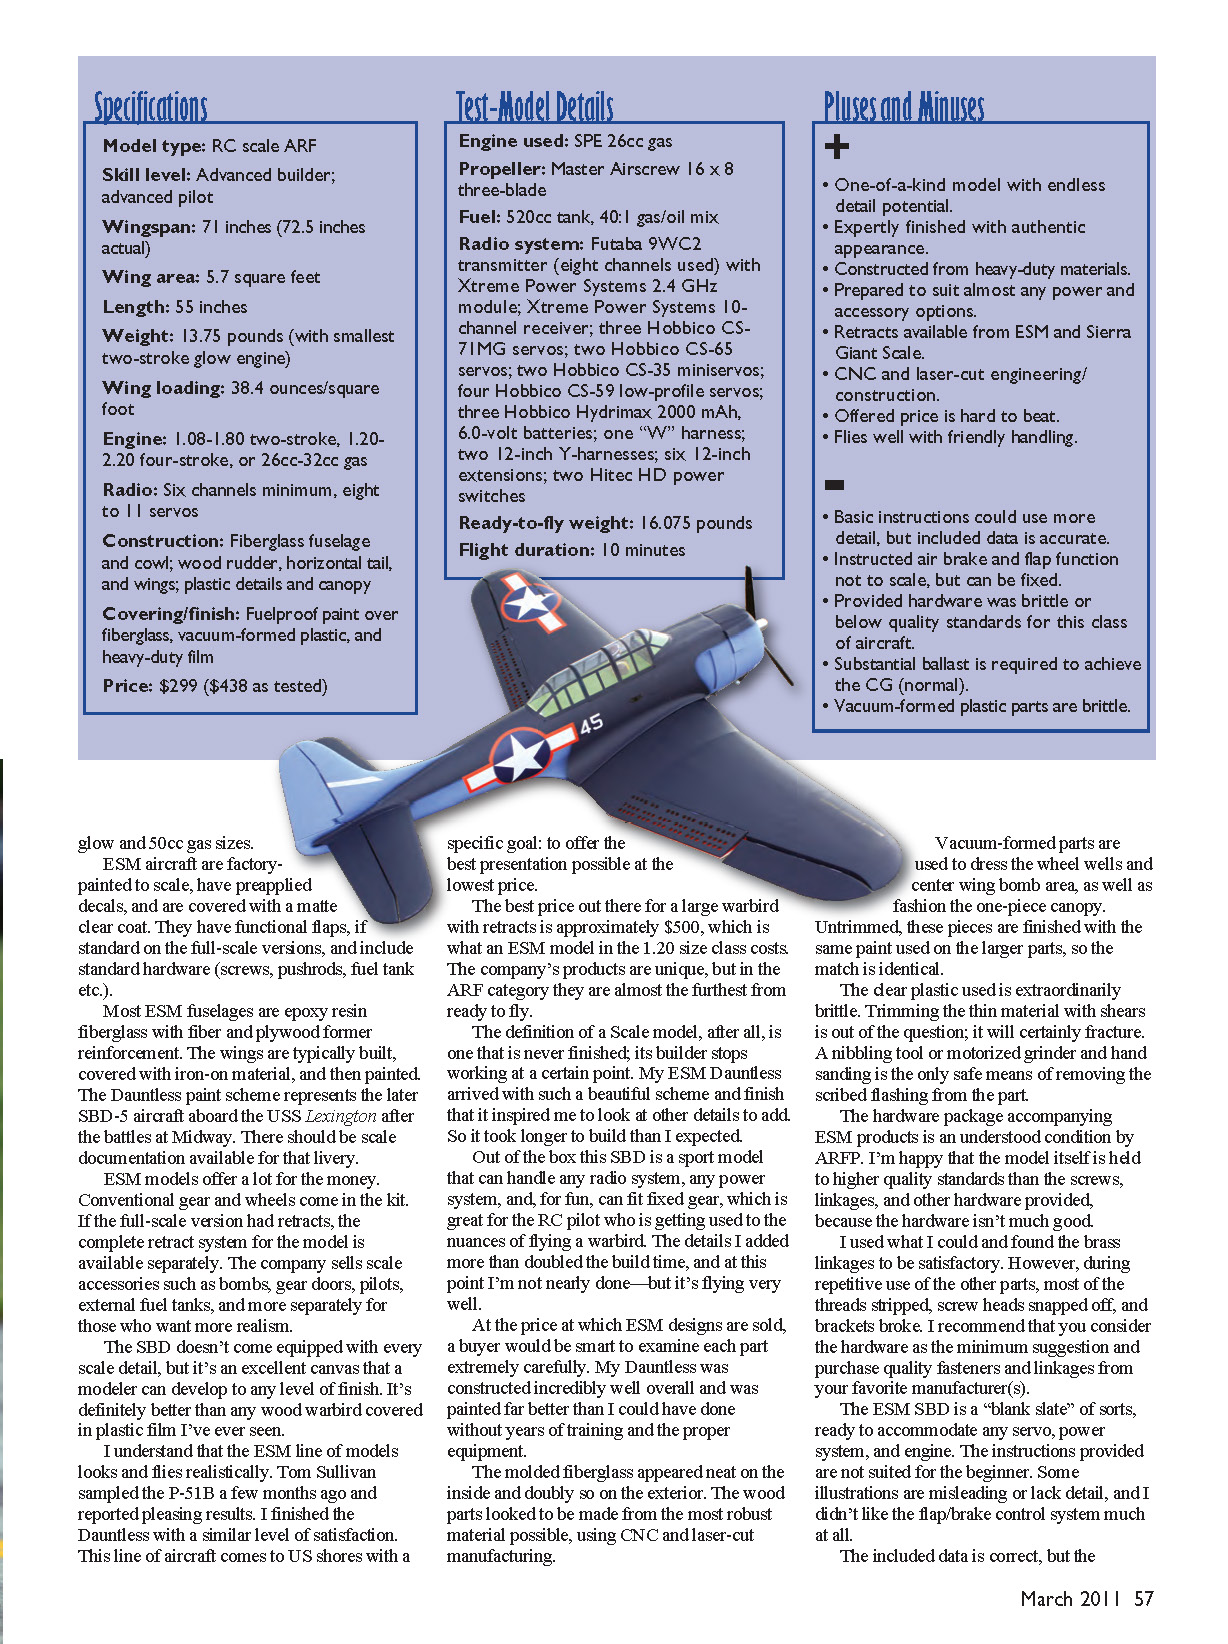
- Available as an option (at a great price) are ESM pneumatic retracts made specifically for the Dauntless. A standard servo is all that is required to complete the package.
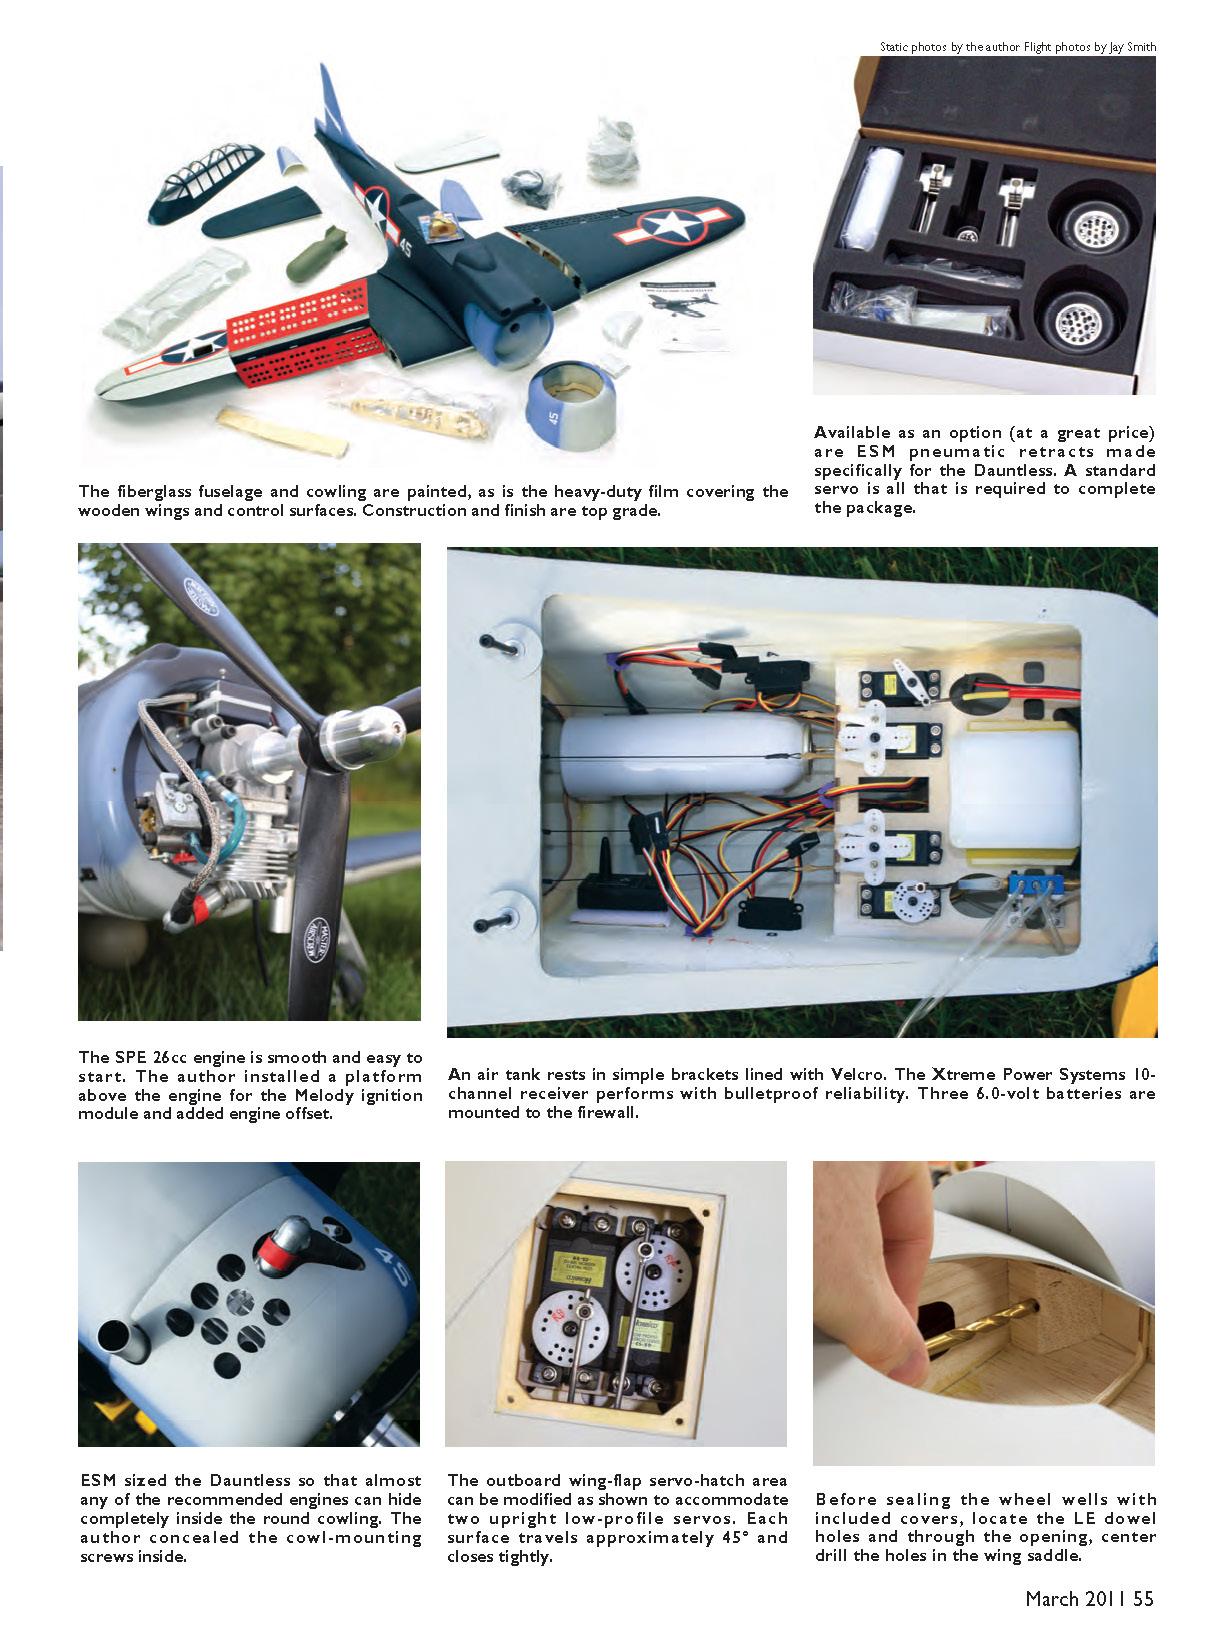
- ESM aircraft are factory-painted to scale, have preapplied decals, and are covered with a matte clear coat. They have functional flaps where standard on the full-scale versions and include standard hardware (screws, pushrods, fuel tank, etc.).
- The Dauntless paint scheme represents the later SBD-5 aircraft aboard the USS Lexington after the battles at Midway.
Construction and Finish
Most ESM fuselages are epoxy resin fiberglass with fiber and plywood former reinforcement. The wings are typically built, covered with iron-on material, and then painted. Vacuum-formed parts are used to dress the wheel wells and center wing bomb area, as well as to fashion the one-piece canopy. Untrimmed, these pieces are finished with the same paint used on the larger parts, so the match is identical.
The molded fiberglass looked neat on the inside and doubly so on the exterior. The wood parts appeared to be robust, made using CNC and laser-cut manufacturing. I only wish the wood surfaces carried the paneling detail resembling that on the molded parts and that the moving surfaces had a fabric texture.
The clear plastic used for the canopy and other vac-formed parts is extraordinarily brittle. Trimming the thin material with shears will fracture it; a nibbling tool or motorized grinder and careful hand sanding are the safe means of removing scribed flashing.
The hardware package is an understood shortcoming. The model itself is held to much higher quality standards than the screws, linkages, and other hardware provided. Brass linkages were satisfactory, but many of the included screws and small parts stripped threads, snapped heads, or broke under repetitive use. Consider the included hardware as a minimum suggestion and plan to purchase higher-quality fasteners and linkages.
Build and Installation
- The SPE 26cc engine is smooth and easy to start. I installed a platform above the engine for the Melody ignition module and added engine offset.
- An air tank rests in simple brackets lined with Velcro. The Xtreme Power Systems 10-channel receiver performed with bulletproof reliability. Three 6.0-volt batteries were mounted to the firewall.
- ESM sized the Dauntless so that most recommended engines can hide completely inside the round cowling. I concealed the cowl-mounting screws inside the cowl for a cleaner look.
- Before sealing the wheel wells with the included covers, locate the leading-edge dowel holes and, through the well opening, center-drill the holes in the wing saddle.
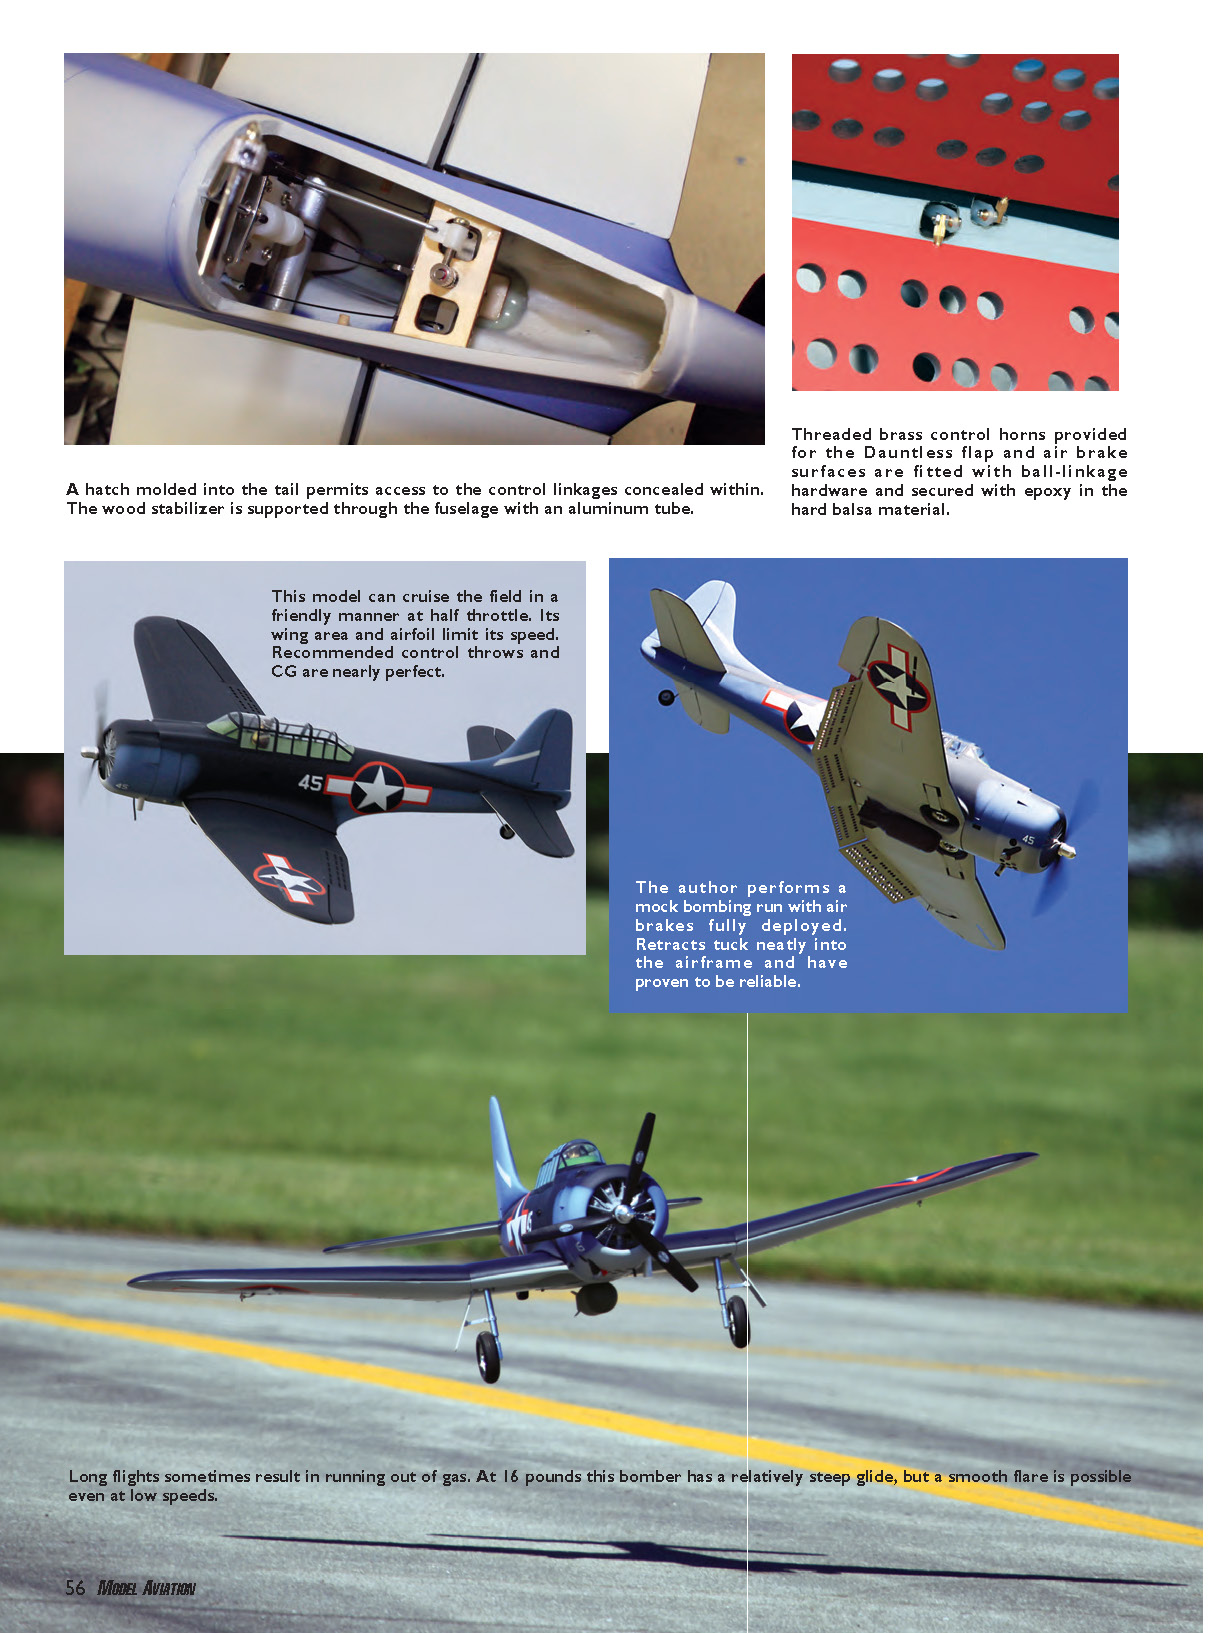
- A hatch molded into the tail permits access to the control linkages concealed within. The wood stabilizer is supported through the fuselage with an aluminum tube.
- Threaded brass control horns provided for the Dauntless flap and air-brake surfaces were fitted with ball-linkage hardware and secured with epoxy into the hard balsa material.
The ESM SBD is a blank slate, ready to accommodate virtually any servo, power system, and engine. However, the instructions are not suited for a beginner—some illustrations are misleading or lack detail, and the flap/brake control system recommendation is not ideal. The included data is correct, but the suggested assembly sequences are not always the best for builders who want to add scale details such as a dummy engine.
Controls, Flaps and Airbrakes
Flaps and airbrakes are distinctive SBD features and are well executed on the ESM model, except for the recommended operation. As supplied, the manual calls for only the model’s central wing surface to operate as the flap and only the twin top and bottom outer surfaces to operate as brakes. On the full scale, the flap function should include the center and two outer moving surfaces working in unison.
- Two upright low-profile servos will fit in the space provided for a single standard brake servo. I modified the outboard wing-flap servo-hatch area to accommodate two upright low-profile servos.
- With each surface controlled by dedicated servos, movement is easy to customize. I have the lower surfaces linked to a “V” harness and the upper flaps on a Y-harness. They are mixed in the transmitter so that one slider operates the flaps and the other operates the brake.
- Each surface travels approximately 45° and closes tightly. My brake deflection is about 45°, and the operation is dramatic—the warbird practically stops in the air.
- As I learned during flight testing, flaps are unnecessary for takeoff and landing but are fun and useful for different approaches. I apply a landing mix so that down-elevator is trimmed in when flaps are dropped past 15°.
Surface controls were neatly planned by ESM. Except for the ailerons, all linkages are internal. Ball-linkage hardware was included and used throughout. The elevator and rudder are cable-controlled, which I prefer, but the provided cable had a low strand count and seemed brittle. I substituted a multistrand insulated cable for the pull-pull system and carefully set the correct tension.
It’s best to set controls mechanically with the recommended throw limits—too much elevator throw can make a warbird unfriendly. I used longer servo arms and shortened control horns where needed to obtain the required travel and resolution.
Power, Thrustline and Flight Impressions
To assure comfortable cruising and handling, checking the engine thrust line was critical. The stabilizer and thrustline were parallel and the wing set with a measure of positive incidence, making the aircraft want to climb with power, similar to a trainer. There was no side offset in the firewall as delivered.
I mounted the engine with 2° downthrust and right thrust, and I offset the engine up and to the left so the propeller shaft poked through the middle of the dummy radial—this took trial and error but was worthwhile. My Dauntless still climbs a bit at full power, but it cruises easily at half throttle and needs minimal rudder correction when power is applied. I still carry a bit of down-trim; I recommend 3° of downthrust or 1° of positive incidence in the stabilizer for others.
I would guess that a glow engine such as a 1.20–1.80 four-stroke would power the model well and offer an authentic sound. Electric power could be adapted with careful modifications. Radial-engine scale models notoriously need weight up front to achieve correct balance; I chose a gas engine and also added a dummy engine. Even with the gas engine, three batteries on the firewall, and the dummy engine, I poured 4 ounces of lead shot into the rim of the cowling. The recommended CG in the manual is spot on.
The SPE 26cc is plenty of power for this bomber. The three-blade Master Airscrew propeller looked great, provided the needed thrust for scale flight, and helped with noise abatement. Small gas engines are loud, but the three-blade prop reduced perceived noise.
Flight characteristics:
- The Dauntless is a slow roller; it rumbles in the roll axis, which enhances the heavy-bomber feel. I used a longer servo arm and shorter control horn for maximum roll throw.
- Pitch control is comfortable when following recommended rates. If I had followed the manual illustrations for throws, the model would have been too sensitive.
- When no wind is present, flaps help slow the SBD for landing. Otherwise it will touch down relatively fast. Tail-high arrivals are common, and a dirty-pass abort requires only adding power to climb out and re-enter the pattern.
- The model cruises the field comfortably at half throttle. Wing area and airfoil limit top speed, but scale handling is very pleasant. Long flights sometimes result in running out of fuel; at 16 pounds this bomber has a relatively steep glide, but a smooth flare is possible even at low speeds.
To enter a mock bombing run, I deploy the brakes and hold down-elevator to maintain the dive as the engine runs just above idle. Recovery before reaching the ground is simply removing down-elevator pressure; as the nose returns to the horizon I apply power and retract the brakes.
Retracts, Plumbing and Reliability
I don’t want a model warbird with fixed gear if the full-scale version had retracts. The ESM retract option is a beautiful package working satisfactorily. The aluminum construction and wheel hubs are nicely made.
- I opted for a lighter tail wheel for practicality but installed the retracts for best fit, which required carving some wood to ensure plumbing clearance.
- The system leaks a small amount; with 80–100 pounds in the tank at the start of a flight I can cycle the gear about nine times.
Paint and Chemical Resistance
Straight alcohol seems to have no effect on the paint, and lacquer thinner has only limited effect. The paint appears chemically adhered to the covered surfaces, sealing the film seams and conforming to the heat-sensitive material where needed.
Final Thoughts and Recommendations
ESM models offer a lot for the money. At roughly $500 for a large warbird with retracts in the 1.20 size class, they represent an excellent value. The products are unique within the ARF category but are not true ready-to-fly models; they are closer to a high-quality ARF that benefits from careful building and aftermarket hardware.
- Inspect every part carefully on arrival.
- Replace marginal hardware with quality fasteners and linkages.
- Consider the recommended thrust adjustments (roughly 2–3° downthrust and a slight right offset) and confirm CG per the manual.
- Use two servos for the outboard flap/brake surfaces and mix in the transmitter for correct flap/brake behavior.
The SBD doesn’t come equipped with every scale detail, but it’s an excellent canvas for modelers to develop to any level. My added details more than doubled the build time, but the model flies very well and the finish inspired me to add more. I now have a taste for scale that has me wanting to fly more and seriously considering a larger project—or perhaps one of the ESM International Miniature Aircraft Association–legal 50cc engine–powered models.
Go fly!
MR Michael Ramsey [email protected]
Manufacturer/Distributor
ESM/ARF Pros 859 US Hwy. 41 Byp. S Venice, FL 34285 (941) 232-8188 www.arfpromodelplanes.com
Sources
- SPE Engines: Cermark, (562) 906-0808, www.cermark.com
- Master Airscrew: Windsor Propeller Company, Box 250, Rancho Cordova, CA 95741, http://masterairscrew.com
- Futaba: (217) 398-8970, www.futaba-rc.com
- Hitec: (858) 748-6948, www.hitecrcd.com
- Tru-Turn: (281) 479-9600, www.tru-turn.com
- Xtreme Power Systems: 2440 N. Kiowa Blvd., Lake Havasu City, AZ 86403, www.xtremepowersystems.net
- Hobbico: (217) 398-8970, www.hobbico.com
- Dauntless cockpit: VQ Warbirds, www.vqwarbirds.com
- Sierra Giant Scale: (440) 476-4885, www.sierragiant.com
Transcribed from original scans by AI. Minor OCR errors may remain.

