
Plane Talk: Fliton Extra 330S Mini, Rogue 3D Bipe, and Edge 540 Freestyle
Michael Ramsey
The art of laser cutting makes these ARFs unique through and through
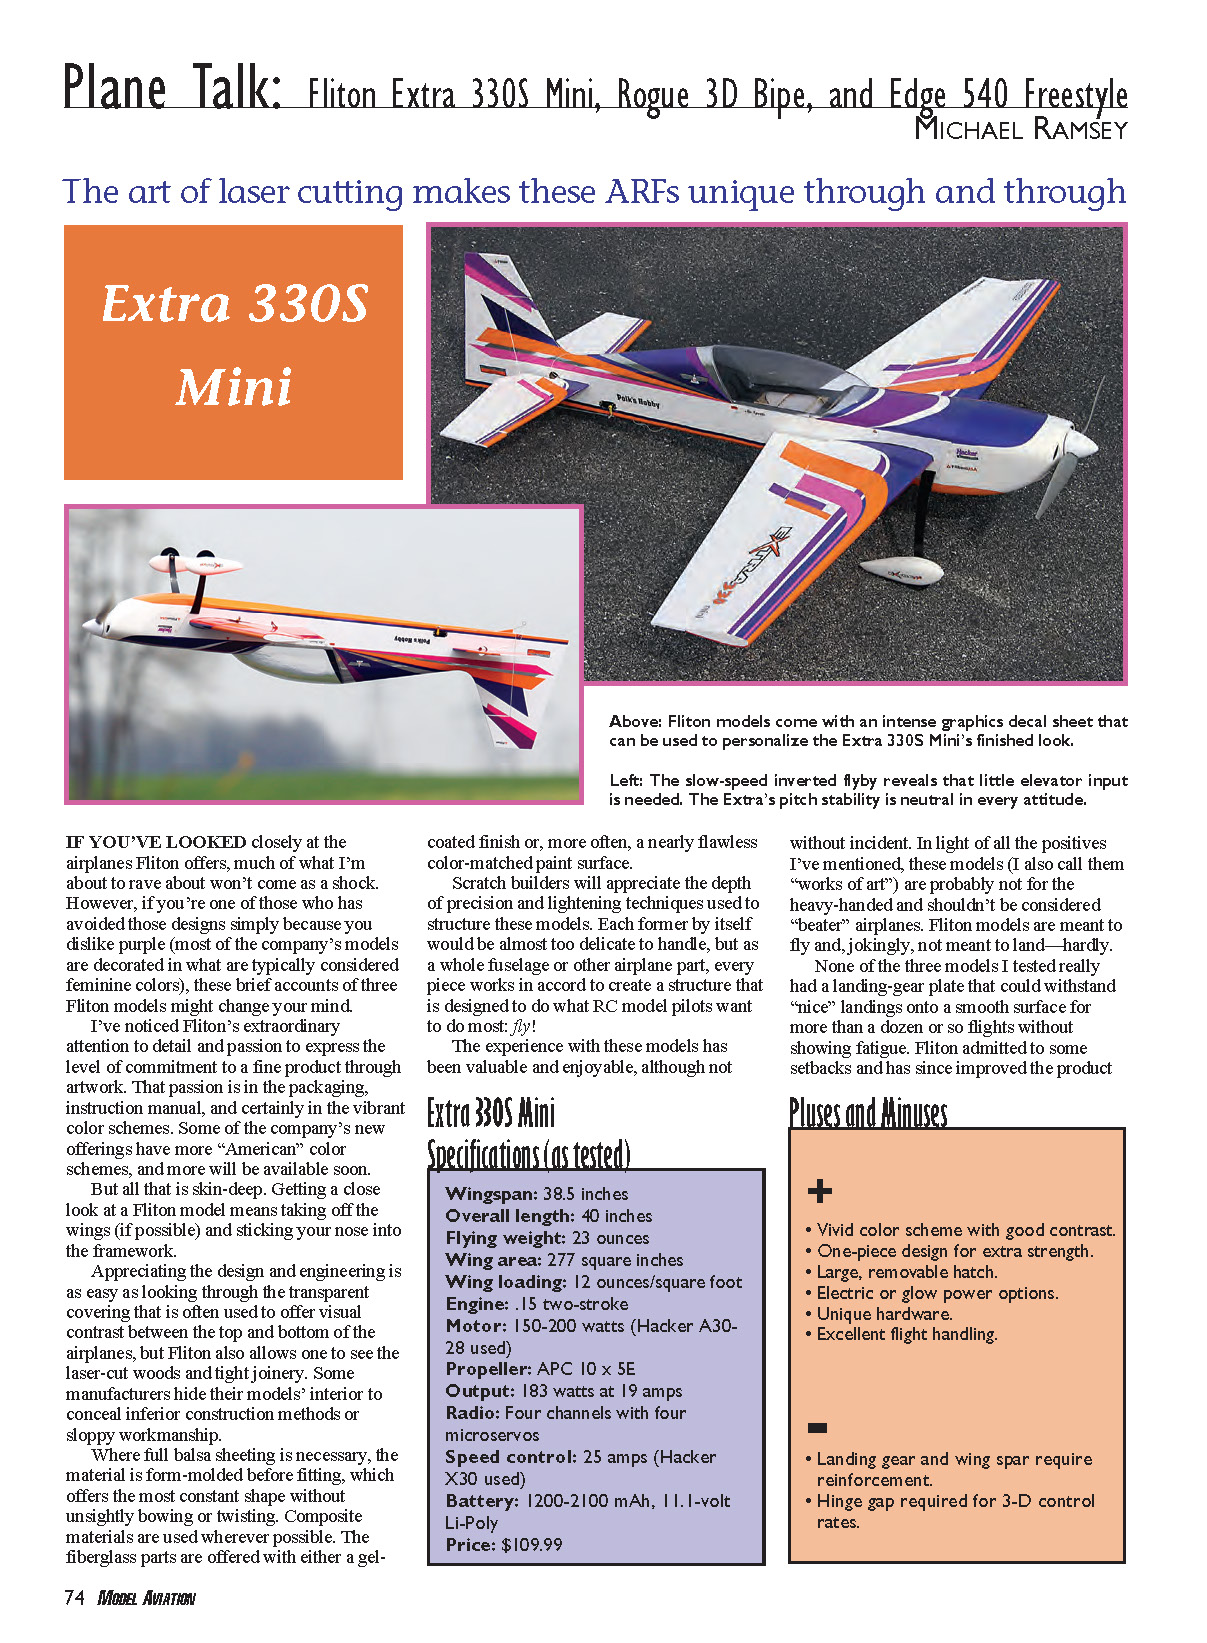
If you've looked closely at the airplanes Fliton offers, much of what I'm about to rave about won't come as a shock. However, if you're one of those who has avoided those designs simply because you dislike purple (most of the company's models are decorated in what are typically considered feminine colors), these brief accounts of three Fliton models might change your mind.
I've noticed Fliton's extraordinary attention to detail and passion to express the level of commitment to a fine product through artwork. That passion is in the packaging, instruction manual, and certainly in the vibrant color schemes. Some of the company's new offerings have more "American" color schemes, and more will be available soon.
But all that is skin-deep. Getting a close look at a Fliton model means taking off the wings (if possible) and sticking your nose into the framework.
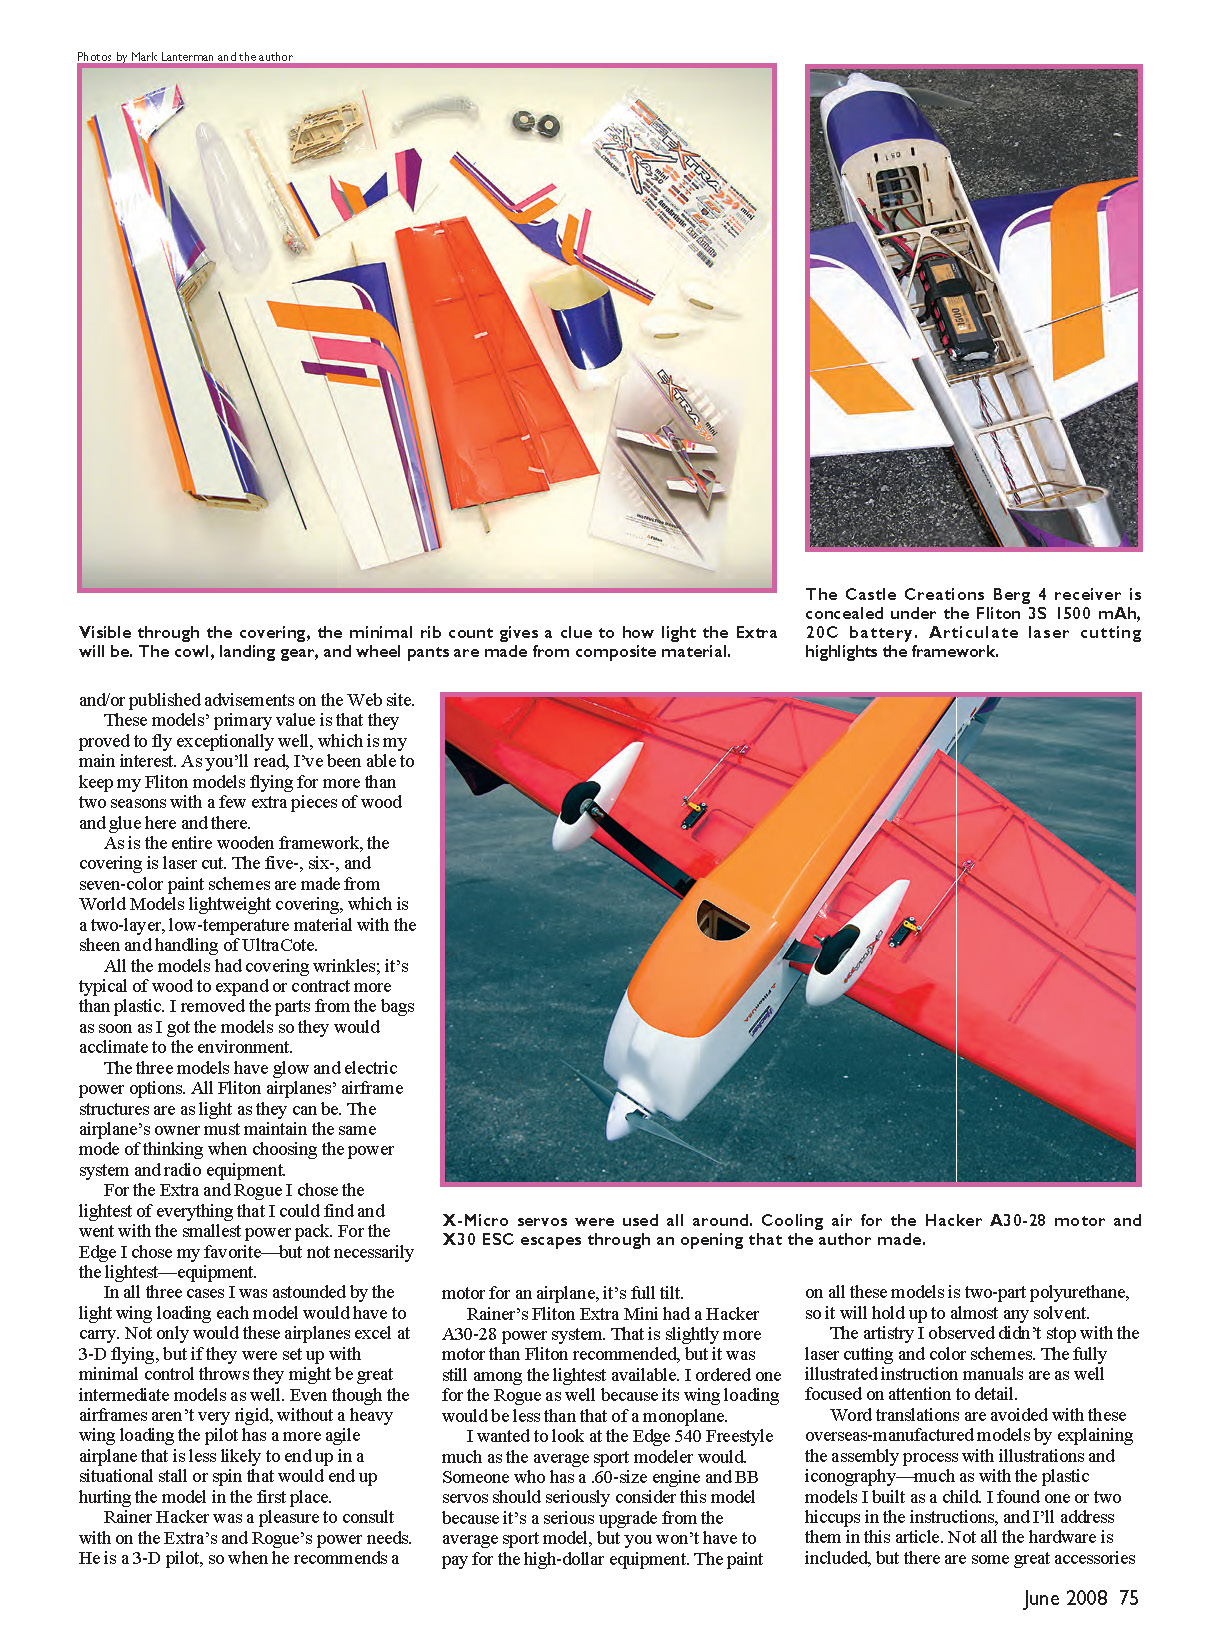
Appreciating the design and engineering is as easy as looking through the transparent covering that is often used to offer visual contrast between the top and bottom of the airplanes, but Fliton also allows one to see the laser-cut woods and tight joinery. Some manufacturers hide their models' interior to conceal inferior construction methods or sloppy workmanship. Where full balsa sheeting is necessary, the material is form-molded before fitting, which offers the most constant shape without unsightly bowing or twisting. Composite materials are used wherever possible. The fiberglass parts are offered with either a gel-coated finish or, more often, a nearly flawless color-matched paint surface. Scratch builders will appreciate the depth of precision and lightening techniques used to structure these models. Each former by itself would be almost too delicate to handle, but as a whole fuselage or other airplane part, every piece works in accord to create a structure that is designed to do what RC model pilots want to do most: fly!
The experience with these models has been valuable and enjoyable, although not without incident. In light of all the positives I've mentioned, these models (I also call them "works of art") are probably not for the heavy-handed and shouldn't be considered "beater" airplanes. Fliton models are meant to fly and, jokingly, not meant to land—hardly. None of the three models I tested really had a landing-gear plate that could withstand "nice" landings onto a smooth surface for more than a dozen or so flights without showing fatigue. Fliton admitted to some setbacks and has since improved the product.
Extra 330S Mini Specifications (as tested)
- Wingspan: 38.5 inches
- Overall length: 40 inches
- Flying weight: 23 ounces
- Wing area: 277 square inches
- Wing loading: 12 ounces/square foot
- Engine: .15 two-stroke
- Motor: 150–200 watts (Hacker A30-28 used)
- Propeller: APC 10 x 5E
- Output: 183 watts at 19 amps
- Radio: Four channels with four microservos
- Speed control: 25 amps (Hacker X30 used)
- Battery: 1200–2100 mAh, 11.1-volt Li-Poly
- Price: $109.99
Pluses and Minuses
Pluses
- Vivid color scheme with good contrast
- One-piece design for extra strength
- Large, removable hatch
- Electric or glow power options
- Unique hardware
- Excellent flight handling
Minuses
- Landing gear and wing spar require reinforcement
- Hinge gap required for 3-D control rates
These models' primary value is that they proved to fly exceptionally well, which is my main interest. As you'll read, I've been able to keep my Fliton models flying for more than two seasons with a few extra pieces of wood and glue here and there.
As is the entire wooden framework, the covering is laser cut. The five-, six-, and seven-color paint schemes are made from World Models lightweight covering, which is a two-layer, low-temperature material with the sheen and handling of UltraCote.
All the models had covering wrinkles; it's typical of wood to expand or contract more than plastic. I removed the parts from the bags as soon as I got the models so they would acclimate to the environment.
The three models have glow and electric power options. All Fliton airplanes' airframe structures are as light as they can be. The airplane's owner must maintain the same mode of thinking when choosing the power system and radio equipment.
For the Extra and Rogue I chose the lightest of everything that I could find and went with the smallest power pack. For the Edge I chose my favorite—but not necessarily the lightest—equipment.
In all three cases I was astounded by the light wing loading each model would have to carry. Not only would these airplanes excel at 3-D flying, but if they were set up with minimal control throws they might be great intermediate models as well. Even though the airframes aren't very rigid, without a heavy wing loading the pilot has a more agile airplane that is less likely to end up in a situational stall or spin that would end up hurting the model in the first place.
Rainer Hacker was a pleasure to consult with on the Extra's and Rogue's power needs. He is a 3-D pilot, so when he recommends motor for an airplane, it's full tilt.
Rainer's Fliton Extra Mini had a Hacker A30-28 power system. That is slightly more motor than Fliton recommended, but it was still among the lightest available. I ordered one for the Rogue as well because its wing loading would be less than that of a monoplane.
I wanted to look at the Edge 540 Freestyle much as the average sport modeler would. Someone who has a .60-size engine and BB servos should seriously consider this model because it's a serious upgrade from the average sport model, but you won't have to pay for the high-dollar equipment. The paint on all these models is two-part polyurethane, so it will hold up to almost any solvent.
The artistry I observed didn't stop with the laser cutting and color schemes. The fully illustrated instruction manuals are as well focused on attention to detail.
Word translations are avoided with these overseas-manufactured models by explaining the assembly process with illustrations and iconography—much as with the plastic models I built as a child. I found one or two hiccups in the instructions, and I'll address them in this article. Not all the hardware is included, but there are some great accessories available that I used; the rest of the hardware is easy to find, such as aluminum control horns.
If your primary interest in an ARF is how well it can perform in the air, read on and perhaps enjoy a Fliton product of your own.
The Fliton Extra Mini keeps in mind that pilots who fly this kind of model have high precision-aerobatic expectations but still want to play with 3-D. It has the potential a fun-fly pilot craves. Just look at those control surfaces; they're huge.
This small model is designed with the wing in roughly the middle of the fuselage, as on the original Walter Extra-designed full-scale aircraft. The midwing design is better for neutral stability whether the model is flown upright or inverted.
With the wing in the middle of the fuselage, making it removable weakens the structure or requires a great deal of structural weight to maintain rigidity. Fliton designed this park flyer so the wings are permanently glued to the fuselage sides.
The all-wood model is really no bigger than a typical foamie. Precision CL models are one piece for the same reason Fliton chose: the airframes are stronger and lighter. Fliton also went the lightweight route and built the ailerons and tail surfaces flat.
I used the X-Micro servo on all four control surfaces. As one of the smallest servos in its class, I've found the gear train to be almost indestructible. Its speed and accuracy are that of some servos twice the size, and it's well suited for the Extra.
A good idea is to have plenty of room when assembling the Extra so the wings can be aligned properly; stands under each keep it lined up with the stabilizer. Fliton's latest advisement mentions applying generous amounts of epoxy in the fuselage pockets. Clamps also help keep the joints of the dihedral braces tight. My first Extra didn't come with the now-included carbon-fiber (CF) dihedral brace; I wish it did.
Fliton now recommends that this model not be flown through excessive high-G maneuvers such as abrupt snaps or waterfalls. But they're so much fun to do with this airplane!
I broke the wing on my first Extra 330S Mini. I actually cracked it and splinted the joint with light plywood. That was enough to hold it until the main balsa spar failed completely because of the weakness of the embedded balsa material.
The new Extra came with the CF reinforcement and a spar made from denser balsa. The new model hasn't failed me yet, and I've snapped and pulled the same high Gs I did with the first airplane.
The bevels at the hinge lines on the control surfaces do not accommodate 3-D rates and a tight hinge joint. A roughly 1.5 mm gap is required, which can be sealed with tape or covering material.
The elevator is split at the joiner and must be accurately glued to the opposite half. That's a simple task as long as you do it before installing the rudder (which blocks the view of the opposite elevator). The inside hinges' location wisely reinforces the joiner material.
Even though the control surfaces are flat, they're constructed from high-density balsa so they're rigid with no external bracing. Extra CF bracing is included to stiffen the pushrods, which can be trimmed to fit and glued over the stock metal pushrods.
Examine the landing-gear plate closely at the joints; this is a weak area of the Extra. The only improvement I made here was to add a fillet of slow-cure epoxy at the seams of the parts. The second model, at least, held up well this way.
The motor-mount parts are delicate by themselves, but the assembly is ingeniously light and stiff. Once the assembly is completed with the correct right thrust, it is positional, up or down, on the firewall so the correct alignment with the cowl can be achieved. A 1½-inch Great Planes plastic spinner dresses up the front end nicely.
The center of gravity (CG) was achieved with the flight battery mounted in the middle of the balance range. Simply removing the battery can strain the mounting tray, so I added light plywood to help strengthen that area. Openings in the cowl and in the bottom of the fuselage should be made to promote cooling of the power system.
Fliton does not specify control-throw rates, but because this Extra so closely resembles a foamie, I passed my experience with those models to this one. I set maximum control throws on all the surfaces as the high rate with 50% exponential (expo); low rate was half those values with no expo. After the initial flights, I increased the expo values to approximately 65% and hardly used the low rate.
I found the Extra 330S Mini to have a lot in common with other Extra aircraft I've flown. It can be piloted precisely and in a similar manner as an RC Aerobatics (Pattern) model.
Tracking is straight, but the Extra is susceptible to light turbulence because it's a small aircraft. Nonetheless, in calm conditions I consider it to be a good practice airplane for IMAC (International Miniature Aerobatic Club). This Extra's long tail moment retards its tumbling ability, but it's refreshing to fly such a minimalist aircraft that feels like a 30%-scale model in the air.
As far as coupling goes, there isn't a maneuver this model can do for which some cross-controlling isn't necessary, but the mixing can be worked out in the radio or corrected by the pilot.
The Extra's habits are familiar and predictable. At the end of flight-testing it was a pleasure to find that all the trim levers were close to center, meaning the model's built-in incidences and thrust angles were close to spot on.
Back to the foamie reference, the Fliton Extra 330S Mini should be treated in much the same manner as one. It's delicate and requires specific flight conditions and flying sites to perform well.
I would never attempt to fly this model from a grass field unless the site had putting-green conditions. However, I will be flying my Hacker-powered Extra Mini at the park, from the baseball diamond, or at an open parking lot.
A 1200–1500 mAh Li-Poly pack is good for seven to 10 minutes of hard flying, and the APC 10 x 5E propeller pulls the model well while drawing only approximately 19 amps static.
Rogue 3D Bipe
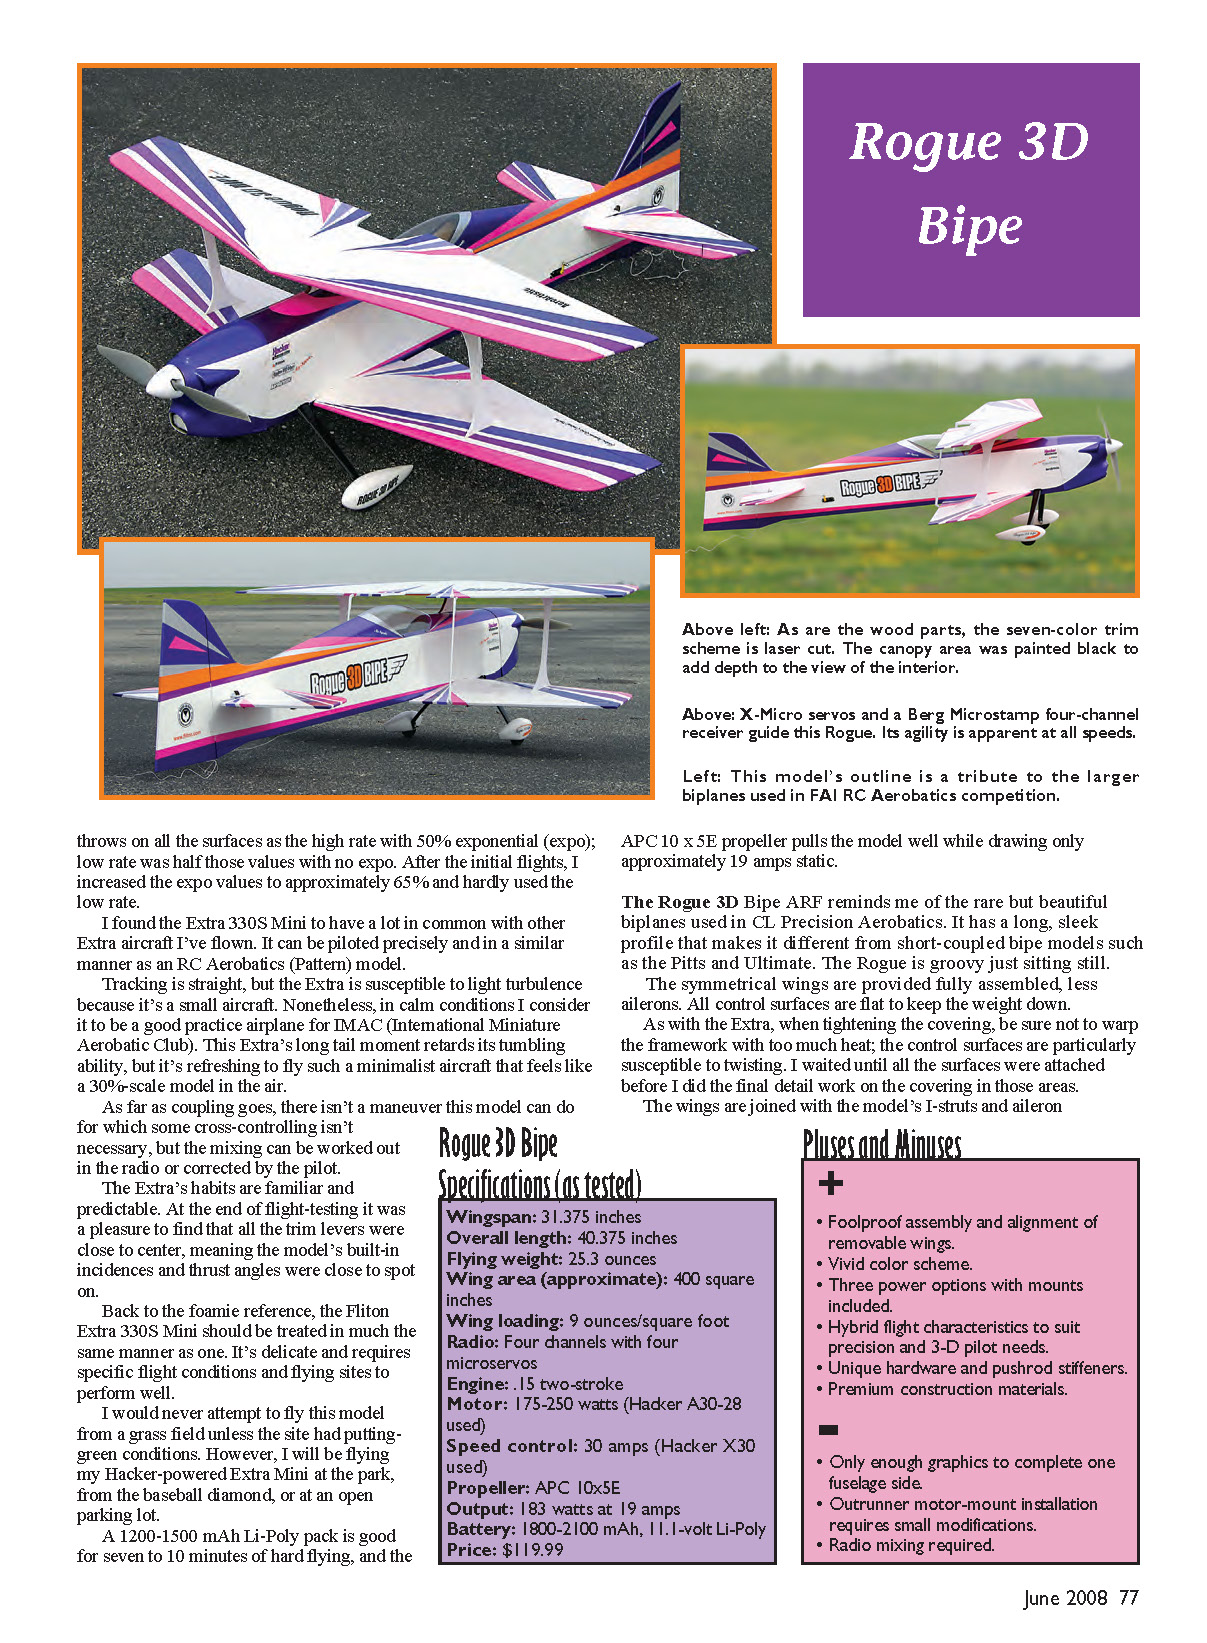
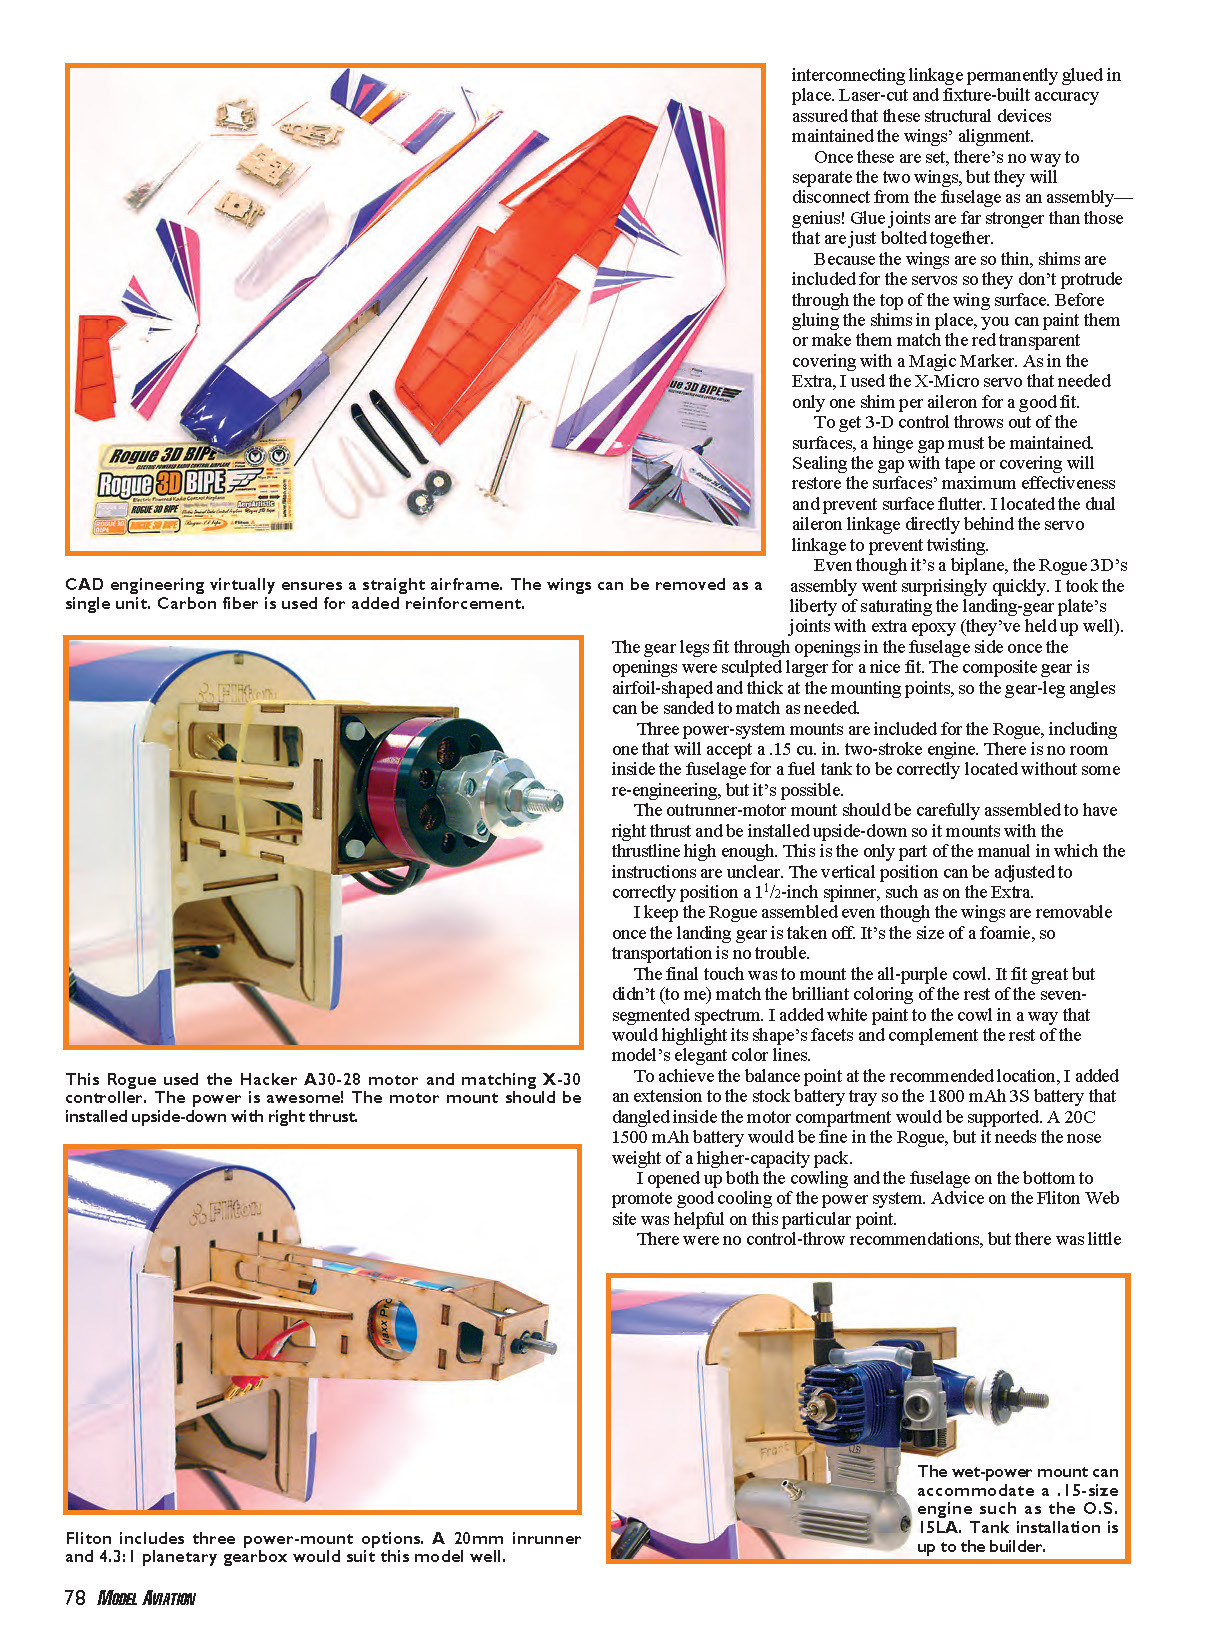
The Rogue 3D Bipe ARF reminds me of the rare but beautiful biplanes used in CL precision aerobatics. It has a long, sleek profile that makes it different from short-coupled bipe models such as the Pitts and Ultimate. The Rogue is groovy just sitting still.
The symmetrical wings are provided fully assembled, less ailerons. All control surfaces are flat to keep the weight down.
As with the Extra, when tightening the covering, be sure not to warp the framework with too much heat; the control surfaces are particularly susceptible to twisting. I waited until all the surfaces were attached before I did the final detail work on the covering in those areas.
The wings are joined with the model's I-struts and aileron interconnecting linkage permanently glued in place. Laser-cut and fixture-built accuracy assured that these structural devices maintained the wings' alignment.
Once these are set, there's no way to separate the two wings, but they will disconnect from the fuselage as an assembly—genius! Glue joints are far stronger than those that are just bolted together.
Because the wings are so thin, shims are included for the servos so they don't protrude through the top of the wing surface. Before gluing the shims in place, you can paint them or make them match the red transparent covering with a Magic Marker. As in the Extra, I used the X-Micro servo that needed only one shim per aileron for a good fit.
To get 3-D control throws out of the surfaces, a hinge gap must be maintained. Sealing the gap with tape or covering will restore the surfaces' maximum effectiveness and prevent surface flutter. I located the dual aileron linkage directly behind the servo linkage to prevent twisting.
Even though it's a biplane, the Rogue 3D's assembly went surprisingly quickly. I took the liberty of saturating the landing-gear plate's joints with extra epoxy (they've held up well).
The gear legs fit through openings in the fuselage side once the openings were sculpted larger for a nice fit. The composite gear is airfoil-shaped and thick at the mounting points, so the gear-leg angles can be sanded to match as needed.
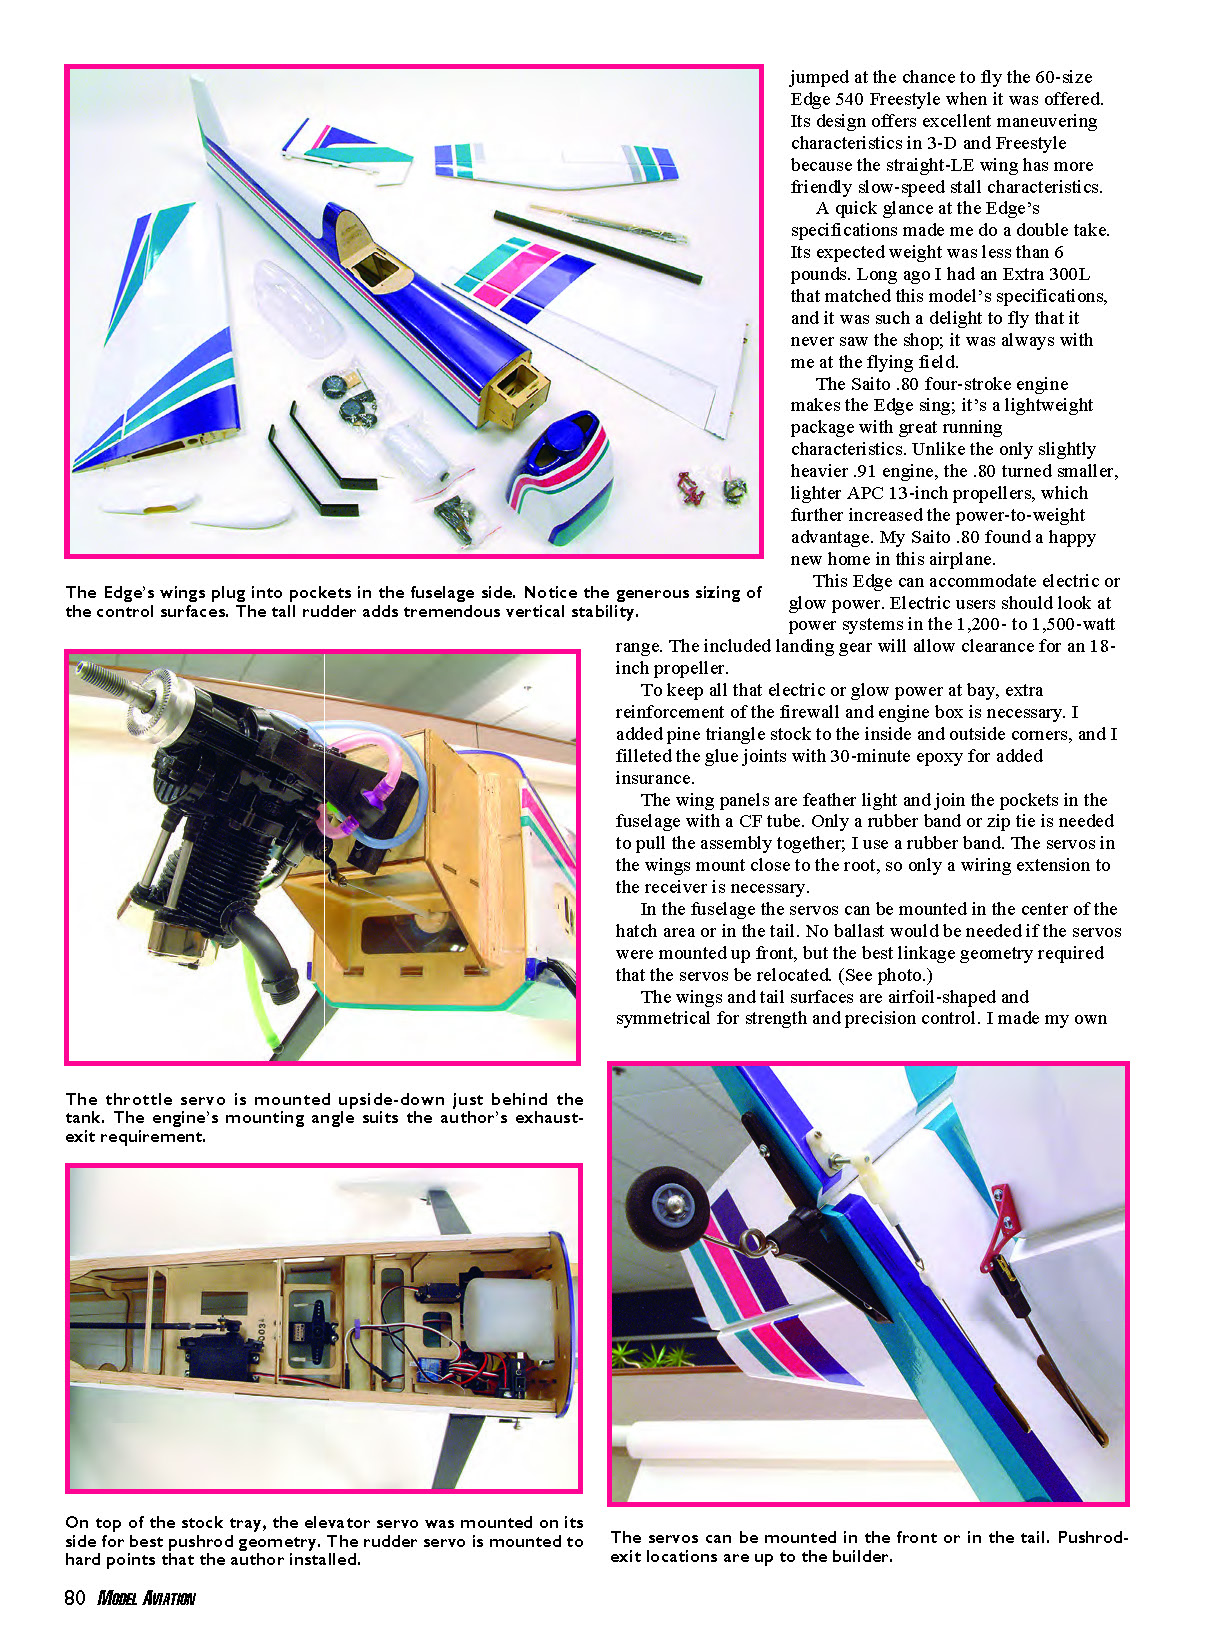
Three power-system mounts are included for the Rogue, including one that will accept a .15 cu. in. two-stroke engine. There is no room inside the fuselage for a fuel tank to be correctly located without some re-engineering, but it's possible.
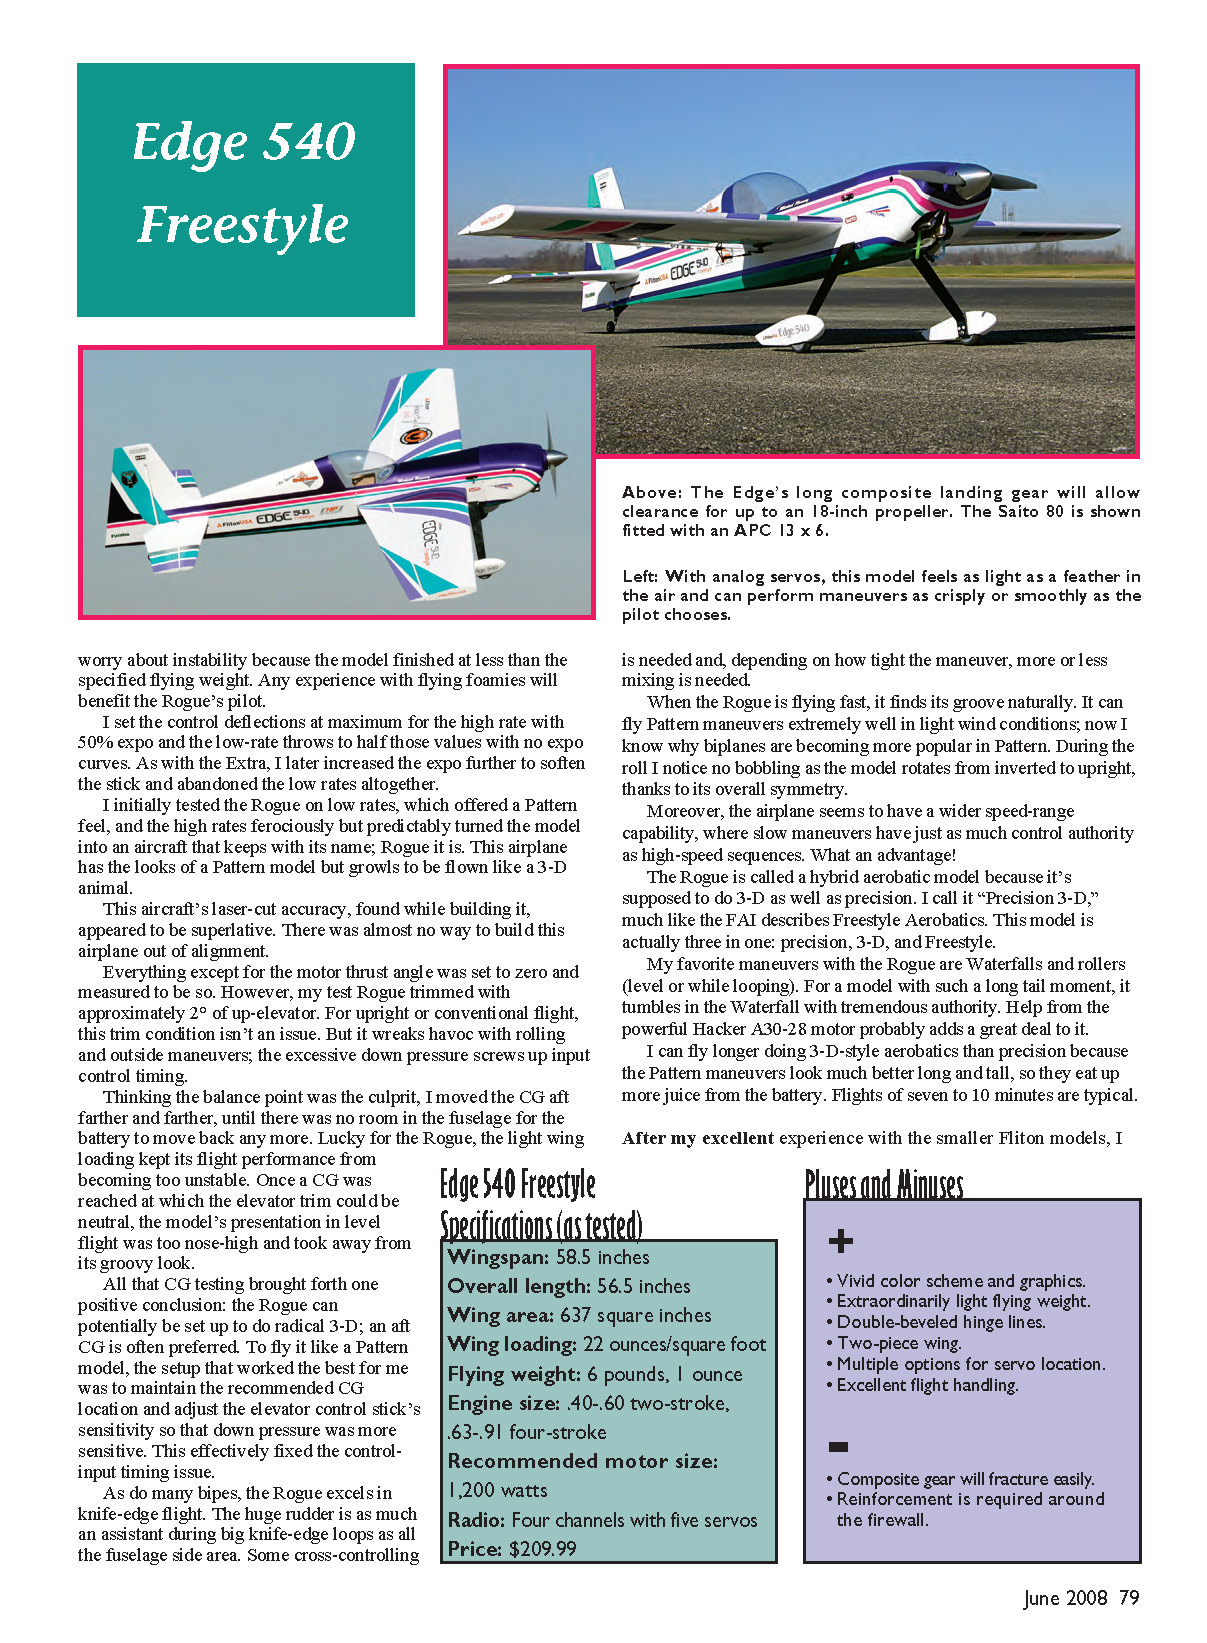
The outrunner-motor mount should be carefully assembled to have right thrust and be installed upside-down so it mounts with the thrustline high enough. This is the only part of the manual in which the instructions are unclear. The vertical position can be adjusted to correctly position a 1½-inch spinner, such as on the Extra.
I keep the Rogue assembled even though the wings are removable once the landing gear is taken off. It's the size of a foamie, so transportation is no trouble.
The final touch was to mount the all-purple cowl. It fit great but didn't (to me) match the brilliant coloring of the rest of the seven-segmented spectrum. I added white paint to the cowl in a way that would highlight its shape's facets and complement the rest of the model's elegant color lines.
To achieve the balance point at the recommended location, I added an extension to the stock battery tray so the 1800 mAh 3S battery that dangled inside the motor compartment would be supported. A 20C 1500 mAh battery would be fine in the Rogue, but it needs the nose weight of a higher-capacity pack.
I opened up both the cowling and the fuselage on the bottom to promote good cooling of the power system. Advice on the Fliton web site was helpful on this particular point.
There were no control-throw recommendations, but there was little worry about instability because the model finished at less than the specified flying weight. Any experience with flying foamies will benefit the Rogue's pilot.
I set the control deflections at maximum for the high rate with 50% expo and the low-rate throws to half those values with no expo curves. As with the Extra, I later increased the expo further to soften the stick and abandoned the low rates altogether.
I initially tested the Rogue on low rates, which offered a Pattern feel, and the high rates ferociously but predictably turned the model into an aircraft that keeps with its name; Rogue it is. This airplane has the looks of a Pattern model but growls to be flown like a 3-D animal.
This aircraft's laser-cut accuracy, found while building it, appeared to be superlative. There was almost no way to build this airplane out of alignment.
Everything except for the motor thrust angle was set to zero and measured to be so. However, my test Rogue trimmed with approximately 2° of up-elevator. For upright or conventional flight, this trim condition isn't an issue. But it wreaks havoc with rolling and outside maneuvers; the excessive down pressure screws up input control timing.
Thinking the balance point was the culprit, I moved the CG aft farther and farther, until there was no room in the fuselage for the battery to move back any more. Lucky for the Rogue, the light wing loading kept its flight performance from becoming too unstable. Once a CG was reached at which the elevator trim could be neutral, the model's presentation in level flight was too nose-high and took away from its groovy look.
All that CG testing brought forth one positive conclusion: the Rogue can potentially be set up to do radical 3-D; an aft CG is often preferred. To fly it like a Pattern model, the setup that worked the best for me was to maintain the recommended CG location and adjust the elevator control stick's sensitivity so that down pressure was more sensitive. This effectively fixed the control-input timing issue.
As do many bipes, the Rogue excels in knife-edge flight. The huge rudder is as much an assistant during big knife-edge loops as all the fuselage side area. Some cross-controlling is needed and, depending on how tight the maneuver, more or less mixing is needed.
When the Rogue is flying fast, it finds its groove naturally. It can fly Pattern maneuvers extremely well in light wind conditions; now I know why biplanes are becoming more popular in Pattern. During the roll I notice no bobbling as the model rotates from inverted to upright, thanks to its overall symmetry.
Moreover, the airplane seems to have a wider speed-range capability, where slow maneuvers have just as much control authority as high-speed sequences. What an advantage!
The Rogue is called a hybrid aerobatic model because it's supposed to do 3-D as well as precision. I call it "Precision 3-D," much like the FAI describes Freestyle Aerobatics. This model is actually three in one: precision, 3-D, and Freestyle.
My favorite maneuvers with the Rogue are waterfalls and rollers (level or while looping). For a model with such a long tail moment, it tumbles in the waterfall with tremendous authority. Help from the powerful Hacker A30-28 motor probably adds a great deal to it.
I can fly longer doing 3-D-style aerobatics than precision because the Pattern maneuvers look much better long and tall, so they eat up more juice from the battery. Flights of seven to 10 minutes are typical.
Edge 540 Freestyle
Edge 540 Freestyle Specifications (as tested)
- Wingspan: 58.5 inches
- Overall length: 56.5 inches
- Wing area: 637 square inches
- Wing loading: 22 ounces/square foot
- Flying weight: 6 pounds, 1 ounce
- Engine size: .40–.60 two-stroke, 63–91 four-stroke
- Recommended motor size: 1,200 watts
- Radio: Four channels with five servos
- Price: $209.99
Pluses and Minuses
Pluses
- Vivid color scheme and graphics
- Extraordinarily light flying weight
- Double-beveled hinge lines
- Two-piece wing
- Multiple options for servo location
- Excellent flight handling
Minuses
- Composite gear will fracture easily
- Reinforcement is required around the firewall
After my excellent experience with the smaller Fliton models, I jumped at the chance to fly the 60-size Edge 540 Freestyle when it was offered. Its design offers excellent maneuvering characteristics in 3-D and Freestyle because the straight-LE wing has more friendly slow-speed stall characteristics.
A quick glance at the Edge's specifications made me do a double take. Its expected weight was less than 6 pounds. Long ago I had an Extra 300L that matched this model's specifications, and it was such a delight to fly that it never saw the shop; it was always with me at the flying field.
The Saito .80 four-stroke engine makes the Edge sing; it's a lightweight package with great running characteristics. Unlike the only slightly heavier .91 engine, the .80 turned smaller, lighter APC 13-inch propellers, which further increased the power-to-weight advantage. My Saito .80 found a happy new home in this airplane.
This Edge can accommodate electric or glow power. Electric users should look at power systems in the 1,200–1,500-watt range. The included landing gear will allow clearance for an 18-inch propeller.
To keep all that electric or glow power at bay, extra reinforcement of the firewall and engine box is necessary. I added pine triangle stock to the inside and outside corners, and I filleted the glue joints with 30-minute epoxy for added insurance.
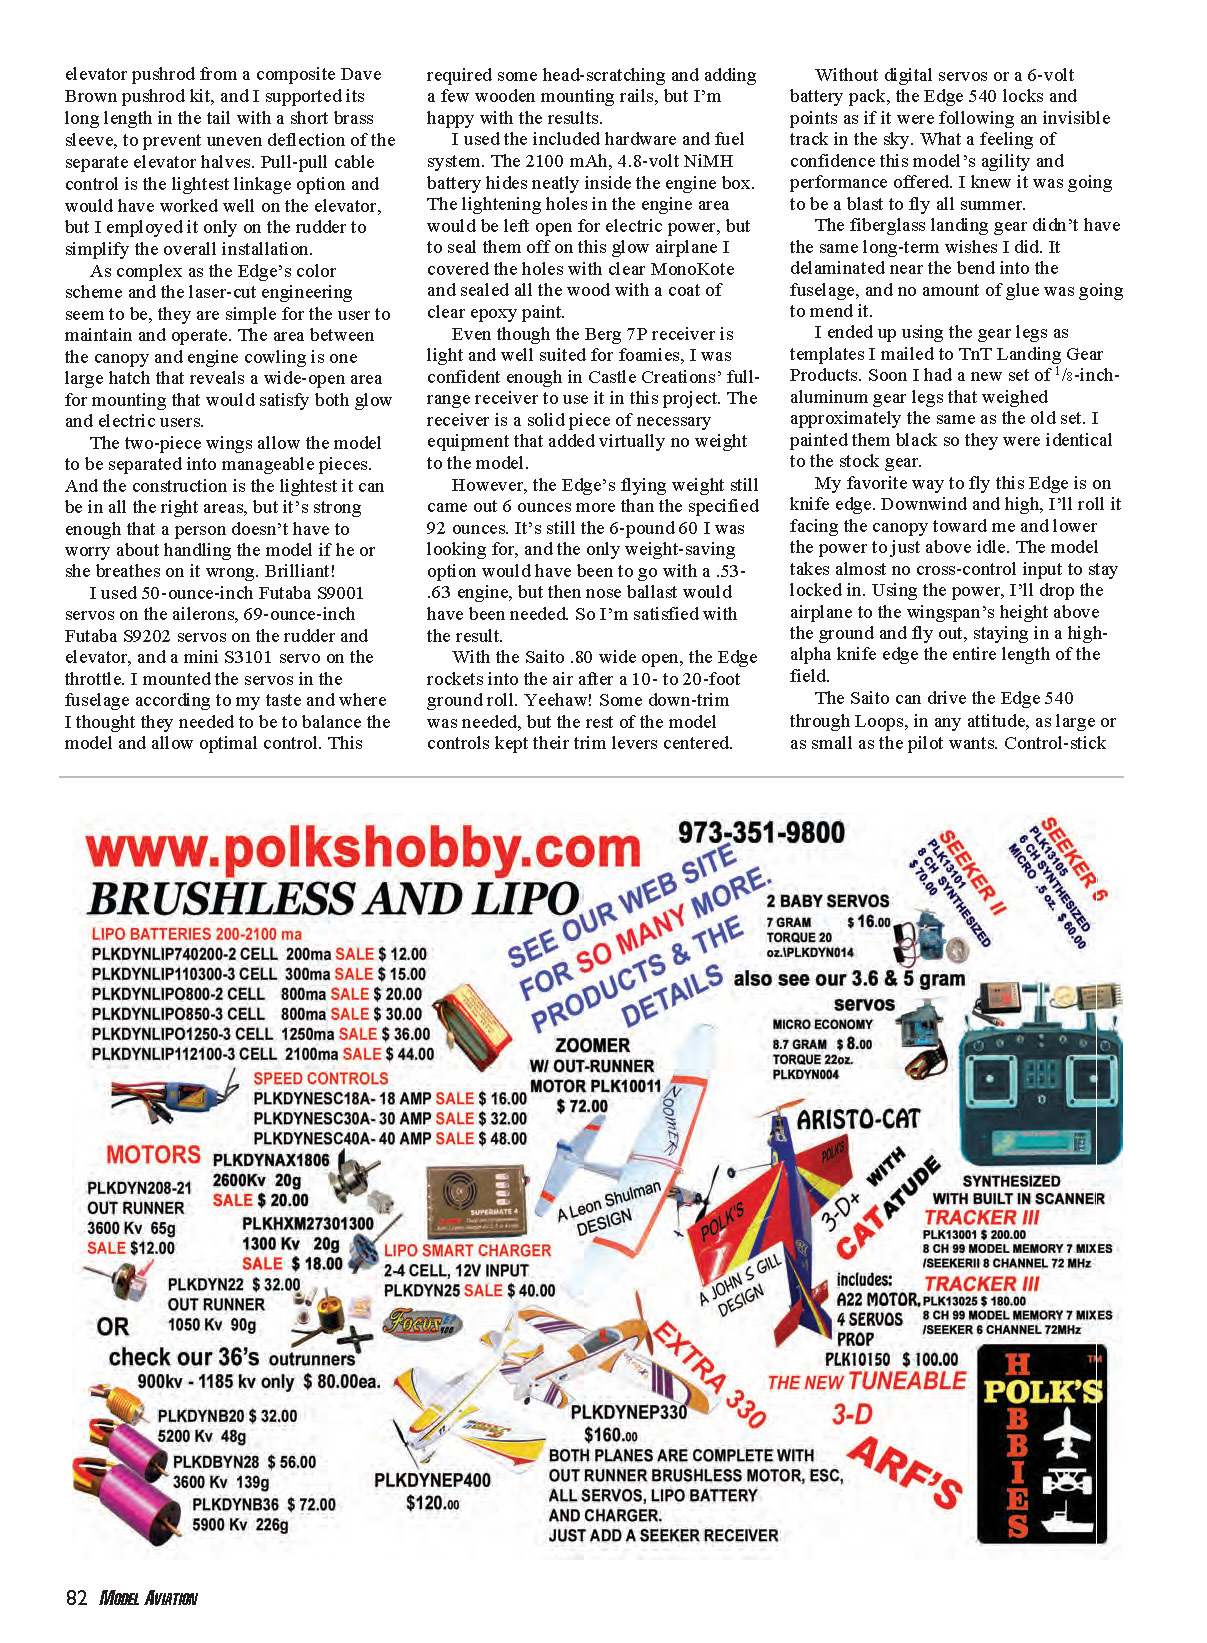
The wing panels are feather light and join the pockets in the fuselage with a CF tube. Only a rubber band or zip tie is needed to pull the assembly together; I use a rubber band. The servos in the wings mount close to the root, so only a wiring extension to the receiver is necessary.
In the fuselage the servos can be mounted in the center of the hatch area or in the tail. No ballast would be needed if the servos were mounted up front, but the best linkage geometry required that the servos be relocated.
The wings and tail surfaces are airfoil-shaped and symmetrical for strength and precision control. I made my own elevator pushrod from a composite Dave Brown pushrod kit, and I supported its long length in the tail with a short brass sleeve to prevent uneven deflection of the separate elevator halves. Pull-pull cable control is the lightest linkage option and would have worked well on the elevator, but I employed it only on the rudder to simplify the overall installation.
As complex as the Edge’s color scheme and the laser-cut engineering seem to be, they are simple for the user to maintain and operate. The area between the canopy and engine cowling is one large hatch that reveals a wide-open area for mounting that would satisfy both glow and electric users.
The two-piece wings allow the model to be separated into manageable pieces. The construction is the lightest it can be in all the right areas, but it’s strong enough that a person doesn’t have to worry about handling the model if he or she breathes on it wrong.
I used 50 oz-in Futaba S9001 servos on the ailerons, 69 oz-in Futaba S9202 servos on the rudder and elevator, and a mini S3101 servo on the throttle. I mounted the servos in the fuselage according to my taste and where I thought they needed to be to balance the model and allow optimal control. This required some head-scratching and adding a few wooden mounting rails, but I’m happy with the results.
I used the included hardware and fuel system. The 2100 mAh, 4.8-volt NiMH battery hides neatly inside the engine box. The lightening holes in the engine area would be left open for electric power, but to seal them off on this glow airplane I covered the holes with clear MonoKote and sealed all the wood with a coat of clear epoxy paint.
Even though the Berg 4P/7P receiver is light and well suited for foamies, I was confident enough in Castle Creations’ full-range receiver to use it in this project. The receiver is a solid piece of necessary equipment that added virtually no weight to the model.
However, the Edge’s flying weight still came out 6 ounces more than the specified 92 ounces. It’s still the 6-pound 60 I was looking for, and the only weight-saving option would have been to go with a .53–.63 engine, but then nose ballast would have been needed. So I’m satisfied with the result.
With the Saito .80 wide open, the Edge rockets into the air after a 10- to 20-foot ground roll. Yeehaw! Some down-trim was needed, but the rest of the model controls kept their trim levers centered.
Without digital servos or a 6-volt battery pack, the Edge 540 locks and points as if it were following an invisible track in the sky. What a feeling of confidence this model’s agility and performance offered. I knew it was going to be a blast to fly all summer.
The fiberglass landing gear didn’t have the same long-term wishes I did. It delaminated near the bend into the fuselage, and no amount of glue was going to mend it.
I ended up using the gear legs as templates I mailed to TnT Landing Gear Products. Soon I had a new set of 1/8-inch-aluminum gear legs that weighed approximately the same as the old set. I painted them black so they were identical to the stock gear.
My favorite way to fly this Edge is on knife edge. Downwind and high, I’ll roll it facing the canopy toward me and lower the power for just above idle. The model takes almost no cross-control input to stay locked in. Using the power, I’ll drop the airplane to the wingspan’s height above the ground and fly out, staying in a high-alpha knife edge the entire length of the field.
The Saito can drive the Edge 540 through loops, in any attitude, as large or as small as the pilot wants. Harmony was realized with almost no radio-program adjustments. I set the control-surface travel amounts to Fliton's recommendations, but this Edge would be happy if I decided to program the throws beyond that. The roll rate is simply wicked!
I was surprised by how well this model executes harriers and waterfalls, even though the elevator halves don't have counterbalances. Light wing wagging is apparent in the harrier.
The airplane will hover almost effortlessly, but it takes getting used to because it easily falls on its canopy as it will toward the gear. I exchanged some of the hardware for good ball links from Du-Bro, which I believe contributed to the Edge's precision.
Michael Ramsey [email protected]
Manufacturer:
Fliton USA
- 4790 Irvine Blvd., Suite 105/299
- Irvine, CA 92620
- (888) 473-0856
- www.fliton.com
Distributor:
Horizon Hobby Inc.
- (800) 338-4639
- www.horizonhobby.com
Fliton USA
Sources:
- Hacker A30-28, X-30 power system: Hacker Brushless USA — (480) 726-7519 — www.hackerbrushless.com
- Saito engines: Horizon Hobby — (800) 338-4639 — www.saitoengines.com
- Berg 4P, 7P receiver: Castle Creations — (913) 390-6939 — www.castlecreations.com
- Futaba: (800) 637-7660 — www.futaba-rc.com
- Tru-Turn: (281) 479-9600 — www.tru-turn.com
- APC Propeller: (530) 661-0399 — www.apcprop.com
- TnT Landing Gear: (419) 868-5408 — www.tntlandinggear.com
Other Review Sources:
- Extra 330S Mini: 3D Flyer: September 2006
- Rogue 3D Bipe: None
- Edge 540 Freestyle: 3D Flyer: November 2006
Transcribed from original scans by AI. Minor OCR errors may remain.

