
Plane Talk: Great Planes Giant Super Sportster ARF
BY JERRY SMITH
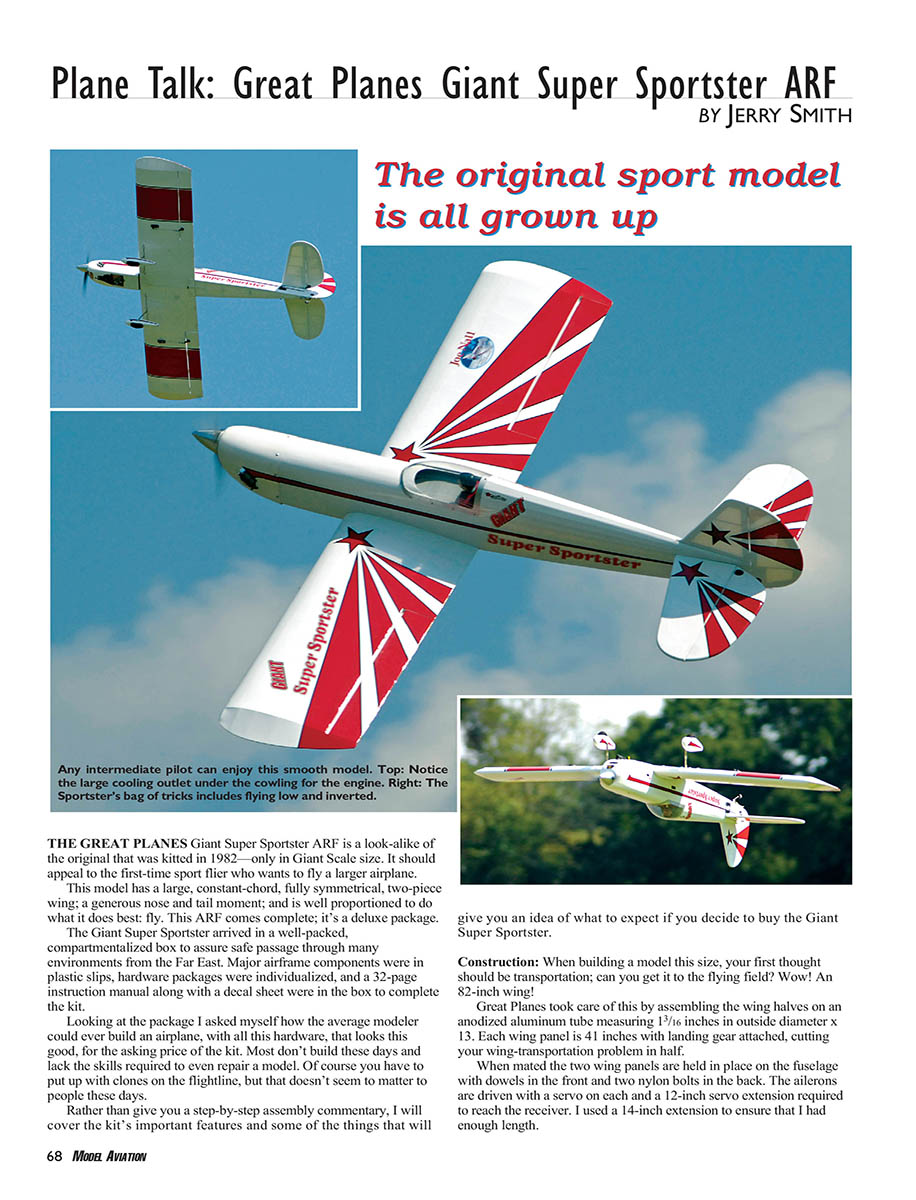
The original sport model is all grown up
The Great Planes Giant Super Sportster ARF is a look-alike of the original kited model from 1982—only in Giant Scale size. It should appeal to the first-time sport flier who wants a larger airplane. The model has a large, constant-chord, fully symmetrical, two-piece wing; a generous nose and tail moment; and is well proportioned to do what it does best: fly. This ARF comes complete; it's a deluxe package.
The Giant Super Sportster arrived in a well-packed, compartmentalized box to assure safe passage from the Far East. Major airframe components were in plastic slips, hardware packages were individualized, and a 32-page instruction manual along with a decal sheet were included.
Rather than give a step-by-step assembly commentary, this review covers the kit's important features and highlights of what to expect if you decide to buy the Giant Super Sportster.
Construction
When building a model this size, the first consideration is transportation: can you get it to the flying field? An 82-inch wing is large, so Great Planes assembled each wing half on an anodized aluminum tube measuring 13/16-inch outside diameter by 13 inches. Each wing panel is 41 inches with the landing gear attached, cutting the wing-transportation problem in half. When mated, the two wing panels are held to the fuselage with a dowel in the front and two nylon bolts in the back.
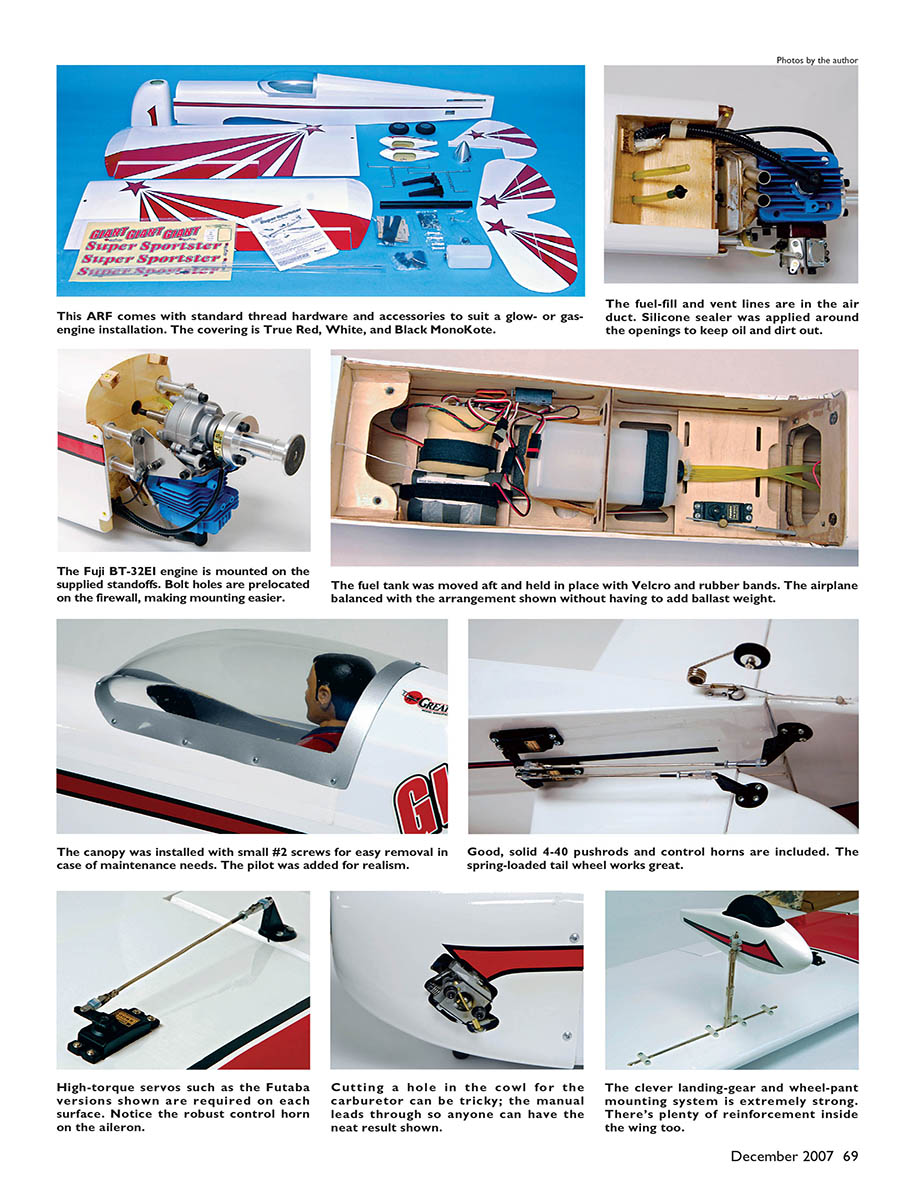
The ailerons are driven with a servo on each side; a 12-inch servo extension is required to reach the receiver (I used a 14-inch extension to ensure adequate length). The fuel-fill and vent lines run in the air duct, and silicone sealer was applied around the openings to keep oil and dirt out. This ARF includes standard-thread hardware and accessories suitable for either a glow or gas engine installation. The covering is True Red, White, and Black MonoKote.
Bolt holes are prelocated on the firewall, making engine mounting easier. The supplied Fuji BT-32EI engine mounts on the included standoffs. The fuel tank was moved aft and is held in place with Velcro and rubber bands; the airplane balanced with this arrangement without adding ballast. Good, solid 4-40 pushrods and control horns are included. The spring-loaded tail wheel works great. The canopy was installed with small #2 screws for easy removal in case maintenance is needed; the pilot was added for realism. High-torque servos such as the Futaba models shown are required on each surface. Cutting a hole in the cowl for the carburetor can be tricky, but the manual provides a pattern to achieve a neat result. The clever landing-gear and wheel-pant mounting system is extremely strong, and there's plenty of reinforcement inside the wing.
Landing Gear and Wheel Pants
The landing-gear struts are stout and beefed up for heavier loads. Each strut is made from two wires, welded, wrapped with wire, and plated, each going in opposite directions to provide a torque arm and mounted in a block in the wing. One wire strut is foreshortened to allow the painted-fiberglass wheel pant to be mounted with two nylon landing-gear straps. To prevent the pant from rotating on the strut, the end of the wheel axle is captured in a hole inside the wheel pant. Installing the wheel pant took some fiddling—placing the wheel and hardware on the axle and getting the wheel centered in the opening.
Tail-Wheel Assembly
The tail-wheel assembly impressed me; it's one of the best I've seen in an ARF kit. A nylon bushing is mounted in a factory-drilled hole in the fuselage tail. The tail-wheel wire strut is mounted in the bushing with a wheel collar installed and retained by an aluminum clip with screws to prevent it from coming out. A thin wire acting as a spring is soldered and wrapped to the tail-wheel strut and captured in a nylon bushing mounted on the rudder. The assembly is completely plated and reminiscent of the Sullivan tail wheel, with differences in mounting and spring arrangement.
Servo Placement and Wiring
The servos for the rudder and elevators are mounted in the tail. I generally hold off mounting the rudder servo until I see how the model balances. With the heavier gas engine I chose and the Giant Super Sportster’s long nose moment, it was easy to mount the rudder servo in the back. Using a lighter engine might require more consideration.
Mounting servos in the rear offers shorter linkages and better accessibility, but it requires longer servo extension leads. I used a Y harness to tie the elevators together, requiring an 8-inch extension lead to reach the receiver; the rudder-servo extension lead is 16 inches long. I installed a length of 1-inch-diameter light cardboard tubing along the inside of the fuselage and pulled the wires through it to keep them in place.
Engine Installation
I installed a Fuji BT-32EI engine, as recommended in the instructions. I chose the Electronic Ignition System (EIS) version because it is lighter; either the EIS or the magneto-style version is acceptable. The Fuji package includes engine mount, muffler, and ignition module. The EIS advances ignition timing as rpm increases—delayed timing at low rpm for easy starts and advanced timing at high rpm. The ignition module runs on 4.8 volts with a current consumption of 188 mAh, and it is waterproof. I used a 1000 mAh battery to power it and mounted the ignition box and battery, wrapped in foam, behind the firewall in the bottom of the fuselage, with the switch harness nearby.
Engine installation is fast and easy. Mounting holes are premarked on the firewall and the hardware pack includes turned-aluminum standoffs with blind nuts and bolts. If you choose a different engine you will need to adapt the mount. An engine mount and instructions for mounting a glow engine are included if you prefer that route. The fuel tank is mounted at the CG per the manual.
Mounting the cowl is straightforward if you follow the manual. You must remove the carburetor to slip the cowl over the engine. I had to cut out the bottom of the cowl to accommodate the muffler pipes and used the carburetor-opening pattern printed in the manual to mark the cowl. I used a Dremel routing tool to cut it out; this was the only tricky part. Be sure to use thread-locking compound on carburetor bolts so they stay put. The Fuji carburetor protrudes from the side of the cowl allowing easy access to the choke and needle valves—a thoughtful feature.
Canopy
I installed the canopy with small #2 screws and hardened the screw holes with thin cyanoacrylate. The manual suggests gluing on the canopy; I found that screws allow easy removal for maintenance or pilot installation. Gluing the canopy would be more difficult to remove and might look messy if removed later. The pilot shown in the manual is available from Great Planes (item GPMA2475); my pilot was from another ARF kit.
Balance and Ground Runs
I balanced the Giant Super Sportster at the recommended 5-1/4 inches behind the leading edge, which puts the CG at roughly 33% of the chord. The manual suggested that builders might want to move the CG another inch aft later, but I would not recommend going as far back as 39%—5-1/4 inches worked well and required no added nose or tail weight. I fueled the tank and ran the engine on the bench to familiarize myself with it and avoid trouble at the flying field. The Fuji started immediately and required no needle-valve tweaking. I ran two tanks of 32:1 fuel/oil mixture (for break-in) and was satisfied. After the first gallon, switch to 42:1 thereafter.
Flying
At the field I fueled up and started the engine; it fired immediately. I taxied to the runway, checked ground handling, and took off at slightly more than half throttle. I climbed to altitude, checked trim—two clicks of down pitch had the airplane flying hands-off—and tried mild aerobatics: rolls, loops, inverted flight (which required a touch of down), spins, and stall turns. After about 15 minutes I set up for landing; the model came in steady with a bit of throttle. I cut throttle over the runway, rounded off, and landed on all three wheels.
After two months and about 60 flights, I concluded that this is a great airplane. It's a joy to fly, and if you choose it as your first Giant Scale airplane you will be pleased with its easy and gentle flight envelope. The Giant Super Sportster is one of the best airplanes I have reviewed: a deluxe ARF built to laser-cut high standards, with excellent hardware, and covered and trimmed by skillful craftsmen. The recommended Fuji 32 is ideal power for it; it started and ran reliably throughout testing.
Test-Model Details
Pluses and Minuses
- Good quality and construction
- Excellent hardware pack
- Outstanding flight envelope
- Exceptional cost value
- Covering sags in sun
Specifications
- Engine used: Fuji BT-32EI two-stroke (EIS version tested)
- Propeller: APC 18 x 8
- Fuel: 32:1 gas/oil mix for the first gallon (break-in), 42:1 thereafter
- Radio system: Futaba 9C transmitter, Futaba PCM receiver; four Futaba S9001 servos on flight controls; one Futaba S3004 servo on throttle; SR Batteries 1400 mAh Ni-Cd pack
- Ready-to-fly weight: 13.5 pounds
- Flight duration: 15–20 minutes with throttle management
- Type: ARF sport
The Super Sportster's Beginning
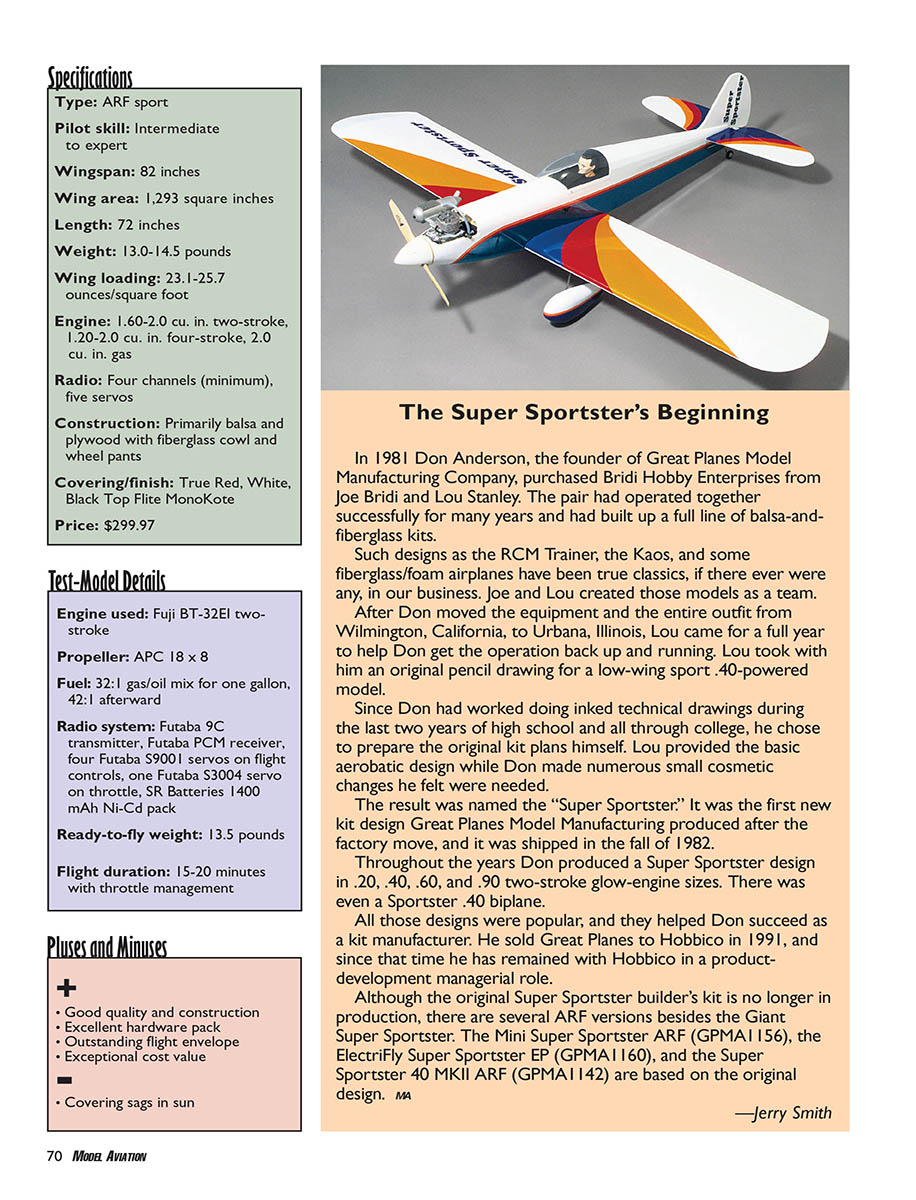
In 1981 Don Anderson, founder of Great Planes Model Manufacturing Company, purchased Bridi Hobby Enterprises from Joe Bridi and Lou Stanley. Joe and Lou had built a line of balsa-and-fiberglass kits including true classics such as the RCM Trainer, the Kaos, and some fiberglass/foam airplanes. After Don moved the equipment from Wilmington, California to Urbana, Illinois, Lou came for a year to help get the operation running. Lou brought an original pencil drawing for a low-wing sport .40-powered model.
Don, who had experience doing inked technical drawings in high school and college, prepared the kit plans himself. Lou provided the basic aerobatic design while Don made small cosmetic changes. The result was the Super Sportster, the first new kit produced after the factory move; it shipped in fall 1982.
Over the years Don produced Super Sportster designs in .20, .40, .60, and .90 two-stroke glow-engine sizes and even a Sportster .40 biplane. These designs were popular and helped Don succeed as a kit manufacturer. He sold Great Planes to Hobbico in 1991 and remained with Hobbico in a product-development managerial role.
Although the original Super Sportster kit is no longer in production, several ARF versions are based on the original design: the Mini Super Sportster ARF (GPMA1156), the ElectriFly Super Sportster EP (GPMA1160), and the Super Sportster 40 MKII ARF (GPMA1142).
—Jerry Smith [email protected]
Manufacturer / Distributor
- Great Planes Model Manufacturing
Box 9021, Champaign IL 61826 (217) 398-3630 www.greatplanes.com
Products Used in Review
- Fuji engine — Great Planes Model Distributors, (800) 637-7660, www.fuji-mvac.com
- Tools — Dremel, (800) 437-3635, www.dremel.com
- Battery pack — SR Batteries, (631) 286-0079, www.srbatteries.com
Other Review Sources
- RC Report: November 2006
Transcribed from original scans by AI. Minor OCR errors may remain.

