
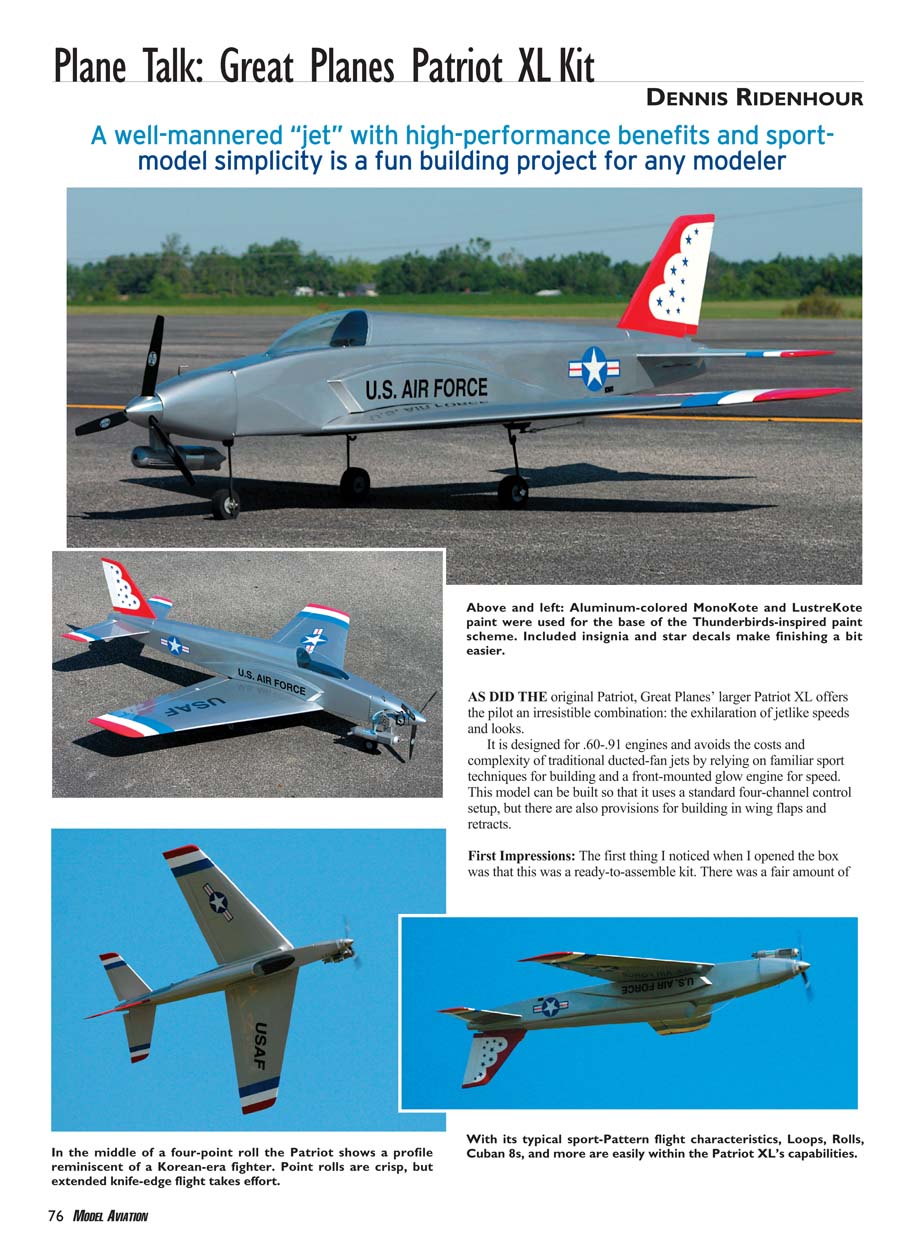
Plane Talk: Great Planes Patriot XL Kit
DENNIS RIDENHOUR
A well-mannered "jet" with high-performance benefits and sport-model simplicity is a fun building project for any modeler.
As did the original Patriot, Great Planes' larger Patriot XL offers the pilot an irresistible combination: the exhilaration of jetlike speeds and looks. It is designed for .60–.91 cu. in. engines and avoids the cost and complexity of traditional ducted-fan jets by relying on familiar sport techniques for building and a front-mounted glow engine for speed. This model can be built so that it uses a standard four-channel control setup, but there are also provisions for building in wing flaps and retracts.
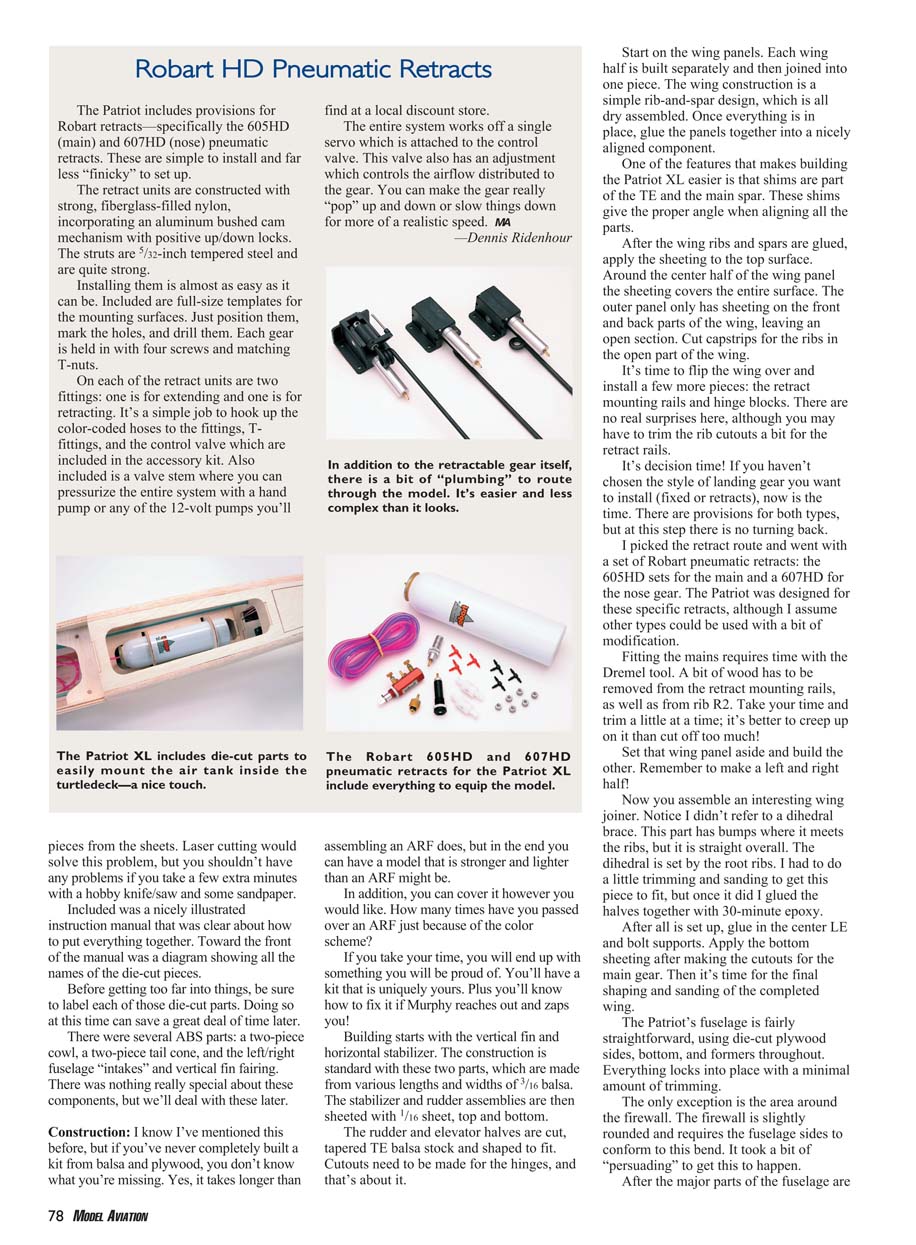
The Patriot includes provisions for Robart retracts—specifically the 605HD (main) and 607HD (nose) pneumatic retracts. These are simple to install and far less finicky to set up. The retract units are constructed with strong, fiberglass-filled nylon. All of the radio gear in the fuselage is mounted in the rear and is accessed from the underside of the fuselage through a hatch. You can choose fixed or retractable gear for the Patriot XL. Additional hardware is included for flaps, although they weren't used on this test model.
First Impressions
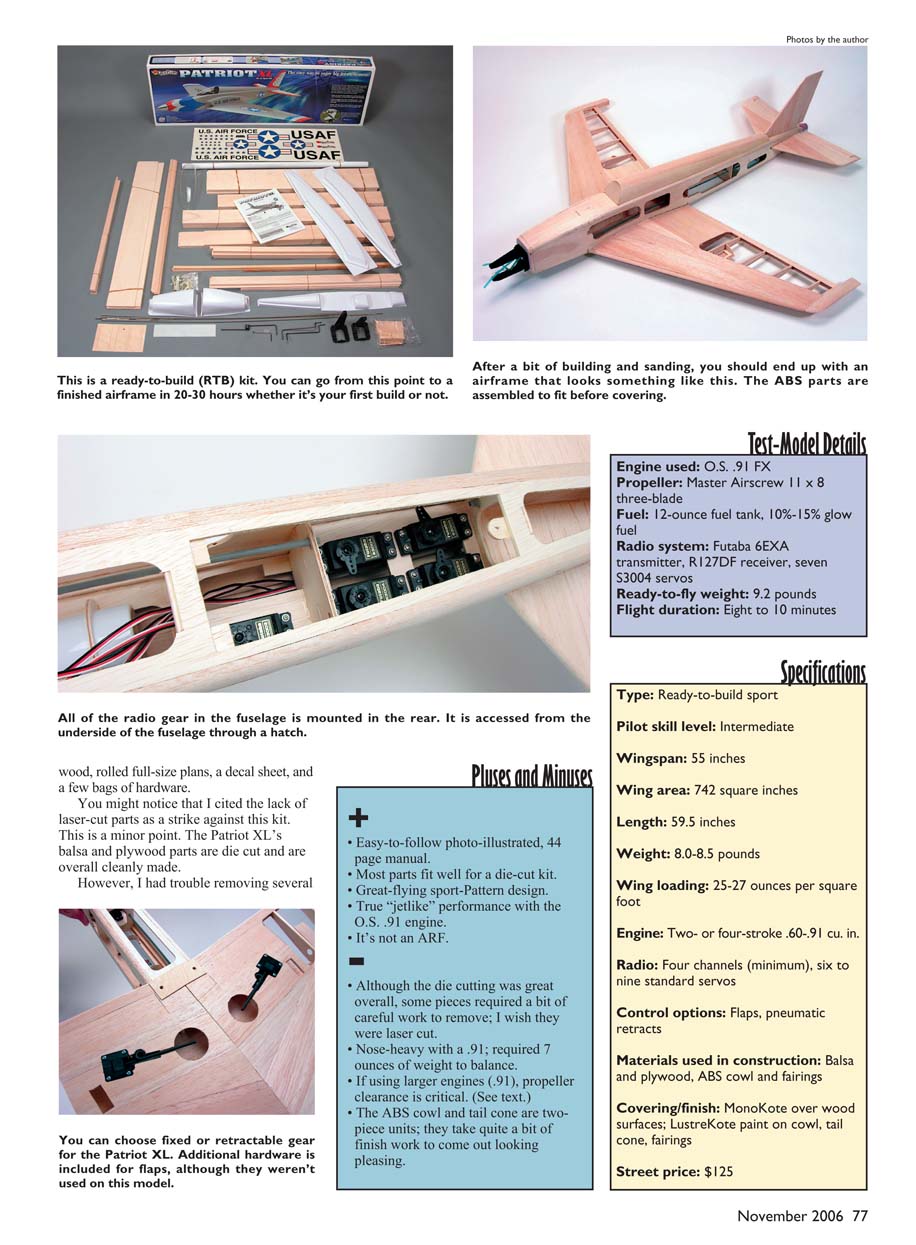
The first thing I noticed when I opened the box was that this was a ready-to-assemble kit. There was a fair amount of wood, rolled full-size plans, a decal sheet, and a few bags of hardware. The Patriot XL's balsa and plywood parts are die-cut and overall cleanly made, but I had trouble removing several pieces from the sheets. Laser cutting would solve this problem, but you shouldn't have any trouble if you take a few extra minutes with a hobby knife, a small saw, and some sandpaper.
Included was a nicely illustrated instruction manual (44 pages) that was clear about how to put everything together. Toward the end of the manual was a diagram showing all the names of the die-cut pieces. Before getting too far into things, be sure to label each of those die-cut parts—doing so at this time can save a great deal of time later.
There were several ABS parts: a two-piece cowl, a two-piece tail cone, and the left/right fuselage "intakes" and vertical fin fairing. There was nothing special about these components, but they require a fair amount of trimming, sanding, and filler to look their best.
Pluses and Minuses
- Easy-to-follow photo-illustrated, 44-page manual.
- Most parts fit well for a die-cut kit.
- Great-flying sport-pattern design.
- True “jetlike” performance with the O.S. .91 engine.
- It's not an ARF—full kitbuilding experience and customization.
- Although the die cutting was great overall, some pieces required careful work to remove; I wish they were laser cut.
- Nose-heavy with a .91 engine; required about 7 ounces of tail weight to balance.
- If using larger engines (.91), propeller clearance is critical.
- The ABS cowl and tail cone are two-piece units and take quite a bit of finish work to come out looking pleasing.
Test-Model Details
- Engine used: O.S. .91 FX
- Propeller: Master Airscrew 11 x 8 three-blade
- Fuel: 12-ounce fuel tank, 10%–15% glow fuel
- Radio system: Futaba 6EXA transmitter, R127DF receiver, seven S3004 servos
- Ready-to-fly weight: 9.2 pounds
- Flight duration: 8–10 minutes
Specifications
- Type: Ready-to-build sport
- Pilot skill level: Intermediate
- Wingspan: 55 inches
- Wing area: 742 square inches
- Length: 59.5 inches
- Weight (recommended): 8.0–8.5 pounds
- Wing loading: 25–27 oz/ft²
- Engine: Two- or four-stroke .60–.91 cu. in.
- Radio: Four channels (minimum), six to nine standard servos
- Control options: Flaps, pneumatic retracts
- Materials used in construction: Balsa and plywood, ABS cowl and fairings
- Covering/finish: MonoKote over wood surfaces; LustreKote paint on cowl, tail cone, fairings
- Street price: $125
Construction
If you've never completely built a kit from balsa and plywood, you don't know what you're missing. Yes, it takes longer than assembling an ARF, but in the end you can have a model that is stronger and lighter—and one you can fix yourself if Murphy strikes.
Building starts with the vertical fin and horizontal stabilizer. The construction is standard: these two parts are made from various lengths and widths of 3/16" balsa. The stabilizer and rudder assemblies are then sheeted with 1/16" sheet, top and bottom. The rudder and elevator halves are cut from tapered T.E. balsa stock and shaped to fit. Cutouts need to be made for the hinges.
Start on the wing panels. Each wing half is built separately and then joined into one piece. The wing construction is a simple rib-and-spar design and is dry-assembled first. One helpful feature is that shims are part of the trailing edge and the main spar; these shims give the proper angle when aligning parts. After the wing ribs and spars are glued, apply the top sheeting. Around the center half of the wing panel the sheeting covers the entire surface; the outer panel only has sheeting on the front and back sections, leaving an open middle section where you cut capstrips for the ribs.
Once framed up, test-fit the wing to the cradle, trim as needed, and drill the holes for the center pins and wing hold-down bolts. Flip the wing over and install the retract mounting rails and hinge blocks. You may have to trim the rib cutouts a bit for the retract rails.
It's decision time: fixed gear or retracts. There are provisions for both types, but at this stage there is no turning back. I picked the retract route and used Robart pneumatic retracts (605HD mains and 607HD nose). Fitting the mains requires time with a Dremel tool—remove small amounts of wood from the retract mounting rails and rib R2, trimming little by little.
Assemble the wing joiner (this part sets dihedral via the root ribs rather than being a bent dihedral brace). After fitting, glue the halves together with 30-minute epoxy, then glue in the center L.E. and bolt supports. Apply the bottom sheeting around the main gear and do the final shaping and sanding.
The fuselage is straightforward, using die-cut plywood sides, bottom, and formers. Everything locks into place with minimal trimming, except around the firewall—the firewall is slightly rounded and requires the fuselage sides to conform to this bend, which took a bit of persuading.
When mounting the nose gear (if using retracts), make the gear as long as possible. Using the 2-inch wheel takes every bit of ground clearance possible to keep the propeller off the ground. Propeller clearance is critical; on the .91 I had to move the engine as far forward as possible and still required about 7 ounces of tail weight to balance.
Install the pushrod tubes, routing them through the prepunched holes. Install the turtledeck—it's a bit flimsy until the sheeting is applied, so be careful not to snap the stringers. After assembly, give the fuselage a good sanding, round off corner blocks, and blend the turtledeck into a smooth unit.
Attach the tail surfaces (stabilizer and vertical fin). Keep everything properly aligned while the epoxy is curing—extra attention here pays dividends in flight performance.
Engine
The kit calls for a .60–.91 two- or four-stroke engine. Since this is a model with "jet-type" performance and I had an O.S. .91 FX available, I used it. The included mount worked fine. I mounted the .91 on its side, with the muffler extending below the fuselage. Again, propeller clearance and balance are critical with the larger engine.
Radio
The radio installation is somewhat unique for a kit this size. Much of the radio gear is installed in the rear of the fuselage and is accessed through a bottom hatch held in place with one screw. This design keeps the rudder and elevator pushrods short and helps with CG balance. The manual indicates you'll need more servo extensions than typical because of this layout. There's plenty of room for batteries and the receiver; I used seven standard servos and left the flap hardware unused on this test model.
Final Assembly
The ABS cowl and tail cone are two-piece units and require a good deal of cutting, trimming, sanding, and filler to look right. I painted the ABS parts before final installation. I could not get the cowl to mount properly over the firewall without trimming some of the corner blocks around the firewall—the cowling corner radii were slightly different from the guides.
Attaching the side "intakes" requires care. To save weight there are large holes in the sides of the fuselage, leaving limited material for mounting the intakes. I mounted the pieces to the wood itself (rather than to the covering) to ensure a solid bond; this made covering a bit trickier but ensured they would stay on in flight.
Covering was done with MonoKote on the wood surfaces; LustreKote paint was used on the cowl, tail cone, and fairings. The kit includes Thunderbirds-style decals, which simplify finishing. Install the remaining hardware—hinges, clevises, etc.—and attach the canopy. The supplied cyanoacrylate hinge material was used for the control surfaces.
With everything finished, the test model balanced quite a bit nose-heavy and required about 7 ounces of tail weight to reach the correct CG, bringing the all-up ready-to-fly weight to 9.2 pounds.
Flying
After assembly and a preflight check, I started the engine, warmed it up, and taxied out. Rotation used a gentle bit of up elevator, and the takeoff was brisk—the airplane accelerates quickly.
The Patriot XL handles rolls, loops, Cuban 8s, and point rolls well. Knife-edge flight requires continuous rudder pressure but is manageable. Stall behavior is benign with plenty of warning. Landings with the retracts are straightforward if you use a bit of power on the flare. With the O.S. .91, flight duration was about eight to ten minutes on a 12-ounce tank.
The Patriot XL is a great choice for someone wanting the look and speed of a jet without the cost and complexity of a ducted-fan installation. It is fun to build and fun to fly—a rewarding flier for an intermediate pilot.
Transcribed from original scans by AI. Minor OCR errors may remain.

