
Plane Talk: Hyperion “Miss America” P-51 Mustang 25e
Ben Lanterman
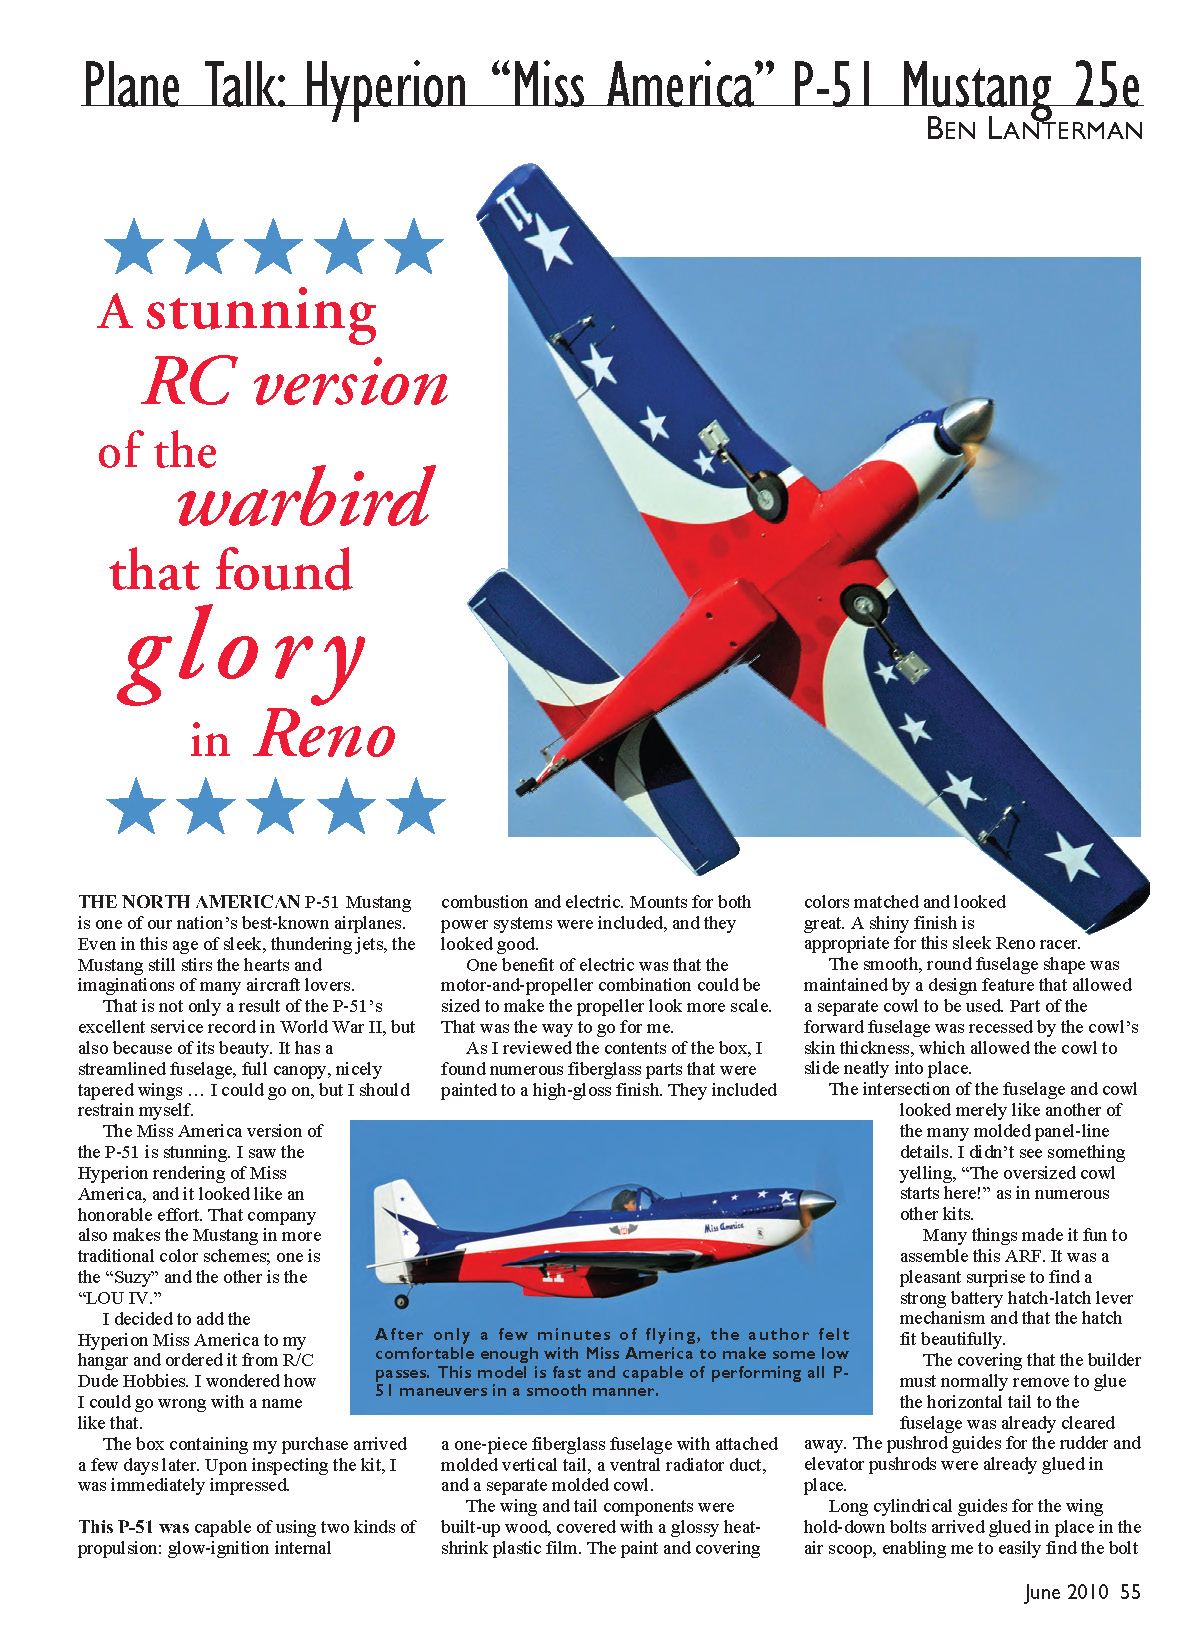
The North American P-51 Mustang is one of our nation’s best-known airplanes. Even in this age of sleek, thundering jets, the Mustang still stirs the hearts and imaginations of many aircraft lovers. That is not only a result of the P-51’s excellent service record in World War II, but also because of its beauty. It has a streamlined fuselage, full canopy, nicely tapered wings … I could go on, but I should restrain myself.
The Miss America version of the P-51 is stunning. I saw the Hyperion rendering of Miss America, and it looked like an honorable effort. That company also makes the Mustang in more traditional color schemes; one is the “Suzy” and the other is the “LOU IV.” I decided to add the Hyperion Miss America to my hangar and ordered it from R/C Dude Hobbies. I wondered how I could go wrong with a name like that.
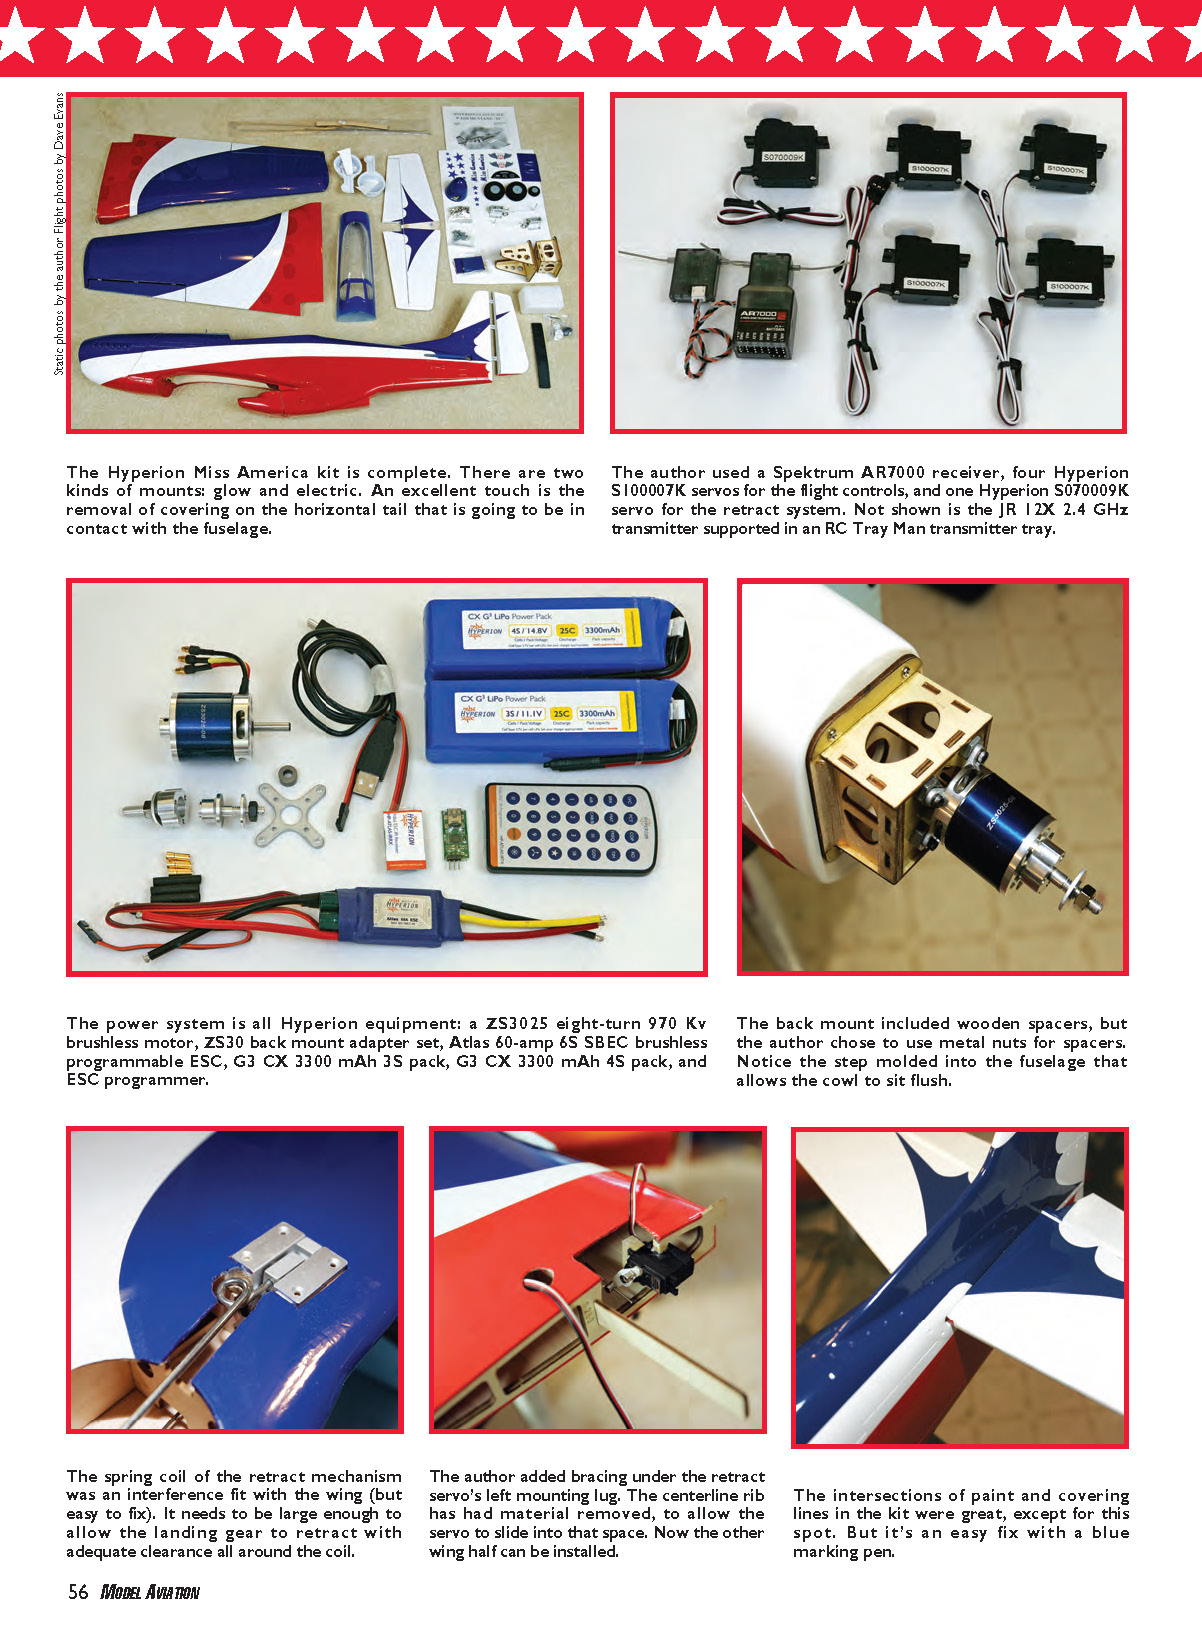
The box containing my purchase arrived a few days later. Upon inspecting the kit, I was immediately impressed.
This P-51 was capable of using two kinds of propulsion: glow-ignition internal combustion and electric. Mounts for both power systems were included, and they looked good. One benefit of electric was that the motor-and-propeller combination could be sized to make the propeller look more scale. That was the way to go for me.
As I reviewed the contents of the box, I found numerous fiberglass parts that were painted to a high-gloss finish. They included a one-piece fiberglass fuselage with attached molded vertical tail, a ventral radiator duct, and a separate molded cowl. The wing and tail components were built-up wood, covered with a glossy heat-shrink plastic film. The paint and covering colors matched and looked great. A shiny finish is appropriate for this sleek Reno racer.
The smooth, round fuselage shape was maintained by a design feature that allowed a separate cowl to be used. Part of the forward fuselage was recessed by the cowl's skin thickness, which allowed the cowl to slide neatly into place. The intersection of the fuselage and cowl looked merely like another of the many molded panel-line details. I didn't see something yelling, "The oversized cowl starts here!" as in numerous other kits.
Many things made it fun to assemble this ARF. It was a pleasant surprise to find a strong battery hatch-latch lever mechanism and that the hatch fit beautifully. The covering that the builder must normally remove to glue the horizontal tail to the fuselage was already cleared away. The pushrod guides for the rudder and elevator pushrods were already glued in place. Long cylindrical guides for the wing hold-down bolts arrived glued in place in the air scoop, enabling me to easily find the bolt.
I added extra epoxy around the outside of the guides to proactively protect them from my screwdriver's edges. All blind nuts were in place as needed except for the motor-mount bolt and nut set, which would vary with the propulsion method used.
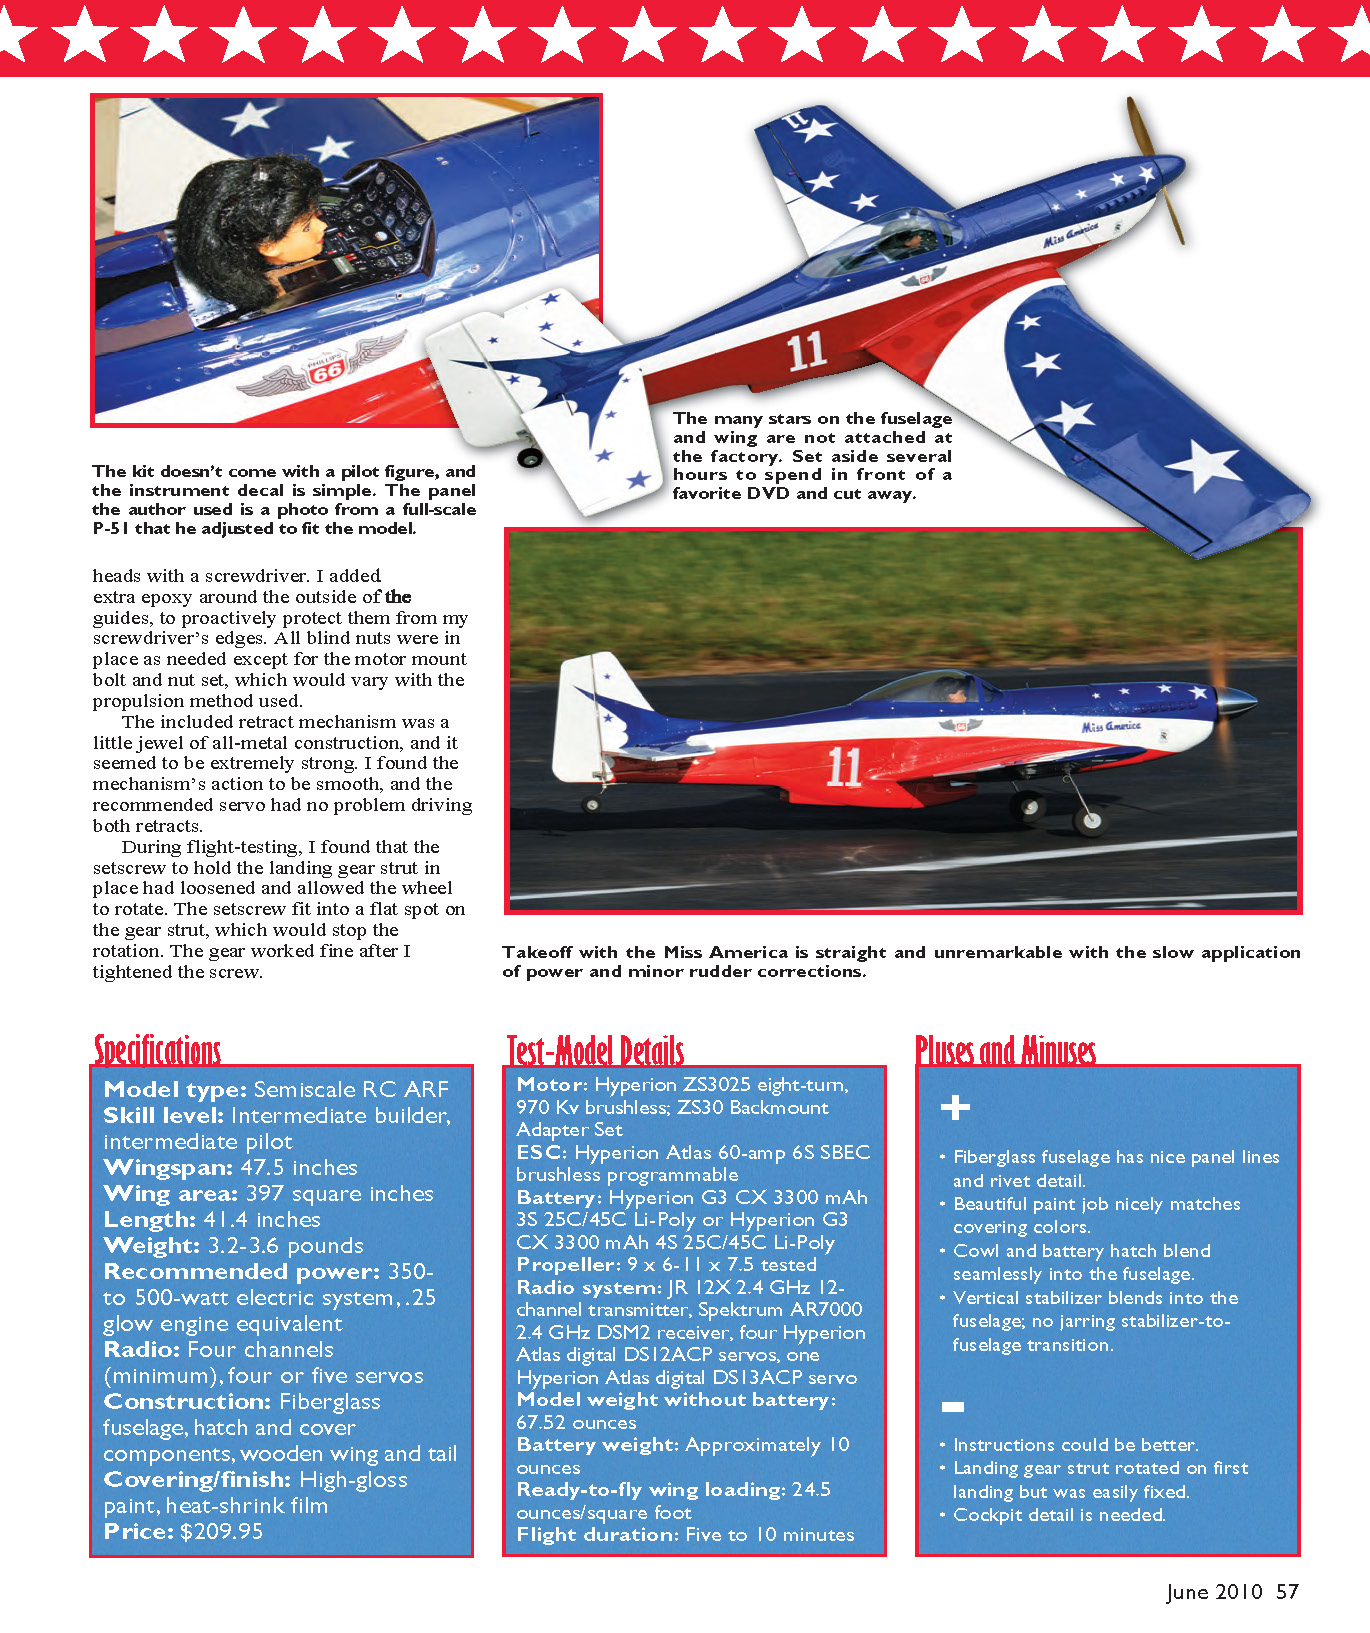
The included retract mechanism was a little jewel of all-metal construction and seemed to be extremely strong. I found the mechanism's action to be smooth, and the recommended servo had no problem driving both retracts. During flight-testing, I found that the setscrew to hold the landing-gear strut in place had loosened and allowed the wheel to rotate. The setscrew fit into a flat spot on the gear strut, which would stop the rotation. The gear worked fine after I tightened the screw.
Specifications
- Model type: Semiscale RC ARF
- Skill level: Intermediate builder, intermediate pilot
- Wingspan: 47.5 inches
- Wing area: 397 square inches
- Length: 41.4 inches
- Weight: 3.2–3.6 pounds
- Recommended power: 350- to 500-watt electric system, .25 glow engine equivalent
- Radio: Four channels (minimum), four or five servos
- Construction: Fiberglass fuselage, hatch and cowl components, wooden wing and tail
- Covering/finish: High-gloss paint, heat-shrink film
- Price: $209.95
Test-Model Details
- Motor: Hyperion ZS3025 eight-turn, 970 Kv brushless; ZS30 Backmount Adapter Set
- ESC: Hyperion Atlas 60-amp 6S SBEC brushless programmable
- Battery: Hyperion G3 CX 3300 mAh 3S 25C/45C Li-Poly or Hyperion G3 CX 3300 mAh 4S 25C/45C Li-Poly
- Propeller: 9 x 6 – 11 x 7.5 tested
- Radio system: JR 12X 2.4 GHz 12-channel transmitter; Spektrum AR7000 2.4 GHz DSM2 receiver; four Hyperion Atlas digital DS12ACP servos; one Hyperion Atlas digital DS13ACP servo
- Model weight without battery: 67.52 ounces
- Battery weight: Approximately 10 ounces
- Ready-to-fly wing loading: 24.5 ounces/square foot
- Flight duration: Five to 10 minutes
Pluses and Minuses
- Fiberglass fuselage has nice panel lines and rivet detail.
- Beautiful paint job nicely matches covering colors.
- Cowl and battery hatch blend seamlessly into the fuselage.
- Vertical stabilizer blends into the fuselage; no jarring stabilizer-to-fuselage transition.
- Instructions could be better.
- Landing-gear strut rotated on first landing but was easily fixed.
- Cockpit detail is needed.
Someone who is accustomed to building expensive models might take all of this P-51’s features for granted, but the average modeler (such as I) will probably be delighted with the attention given to the small details. However, one detail that isn’t delightful is that the stars are not placed in position at the factory. I had to cut them from a sheet, peel them off, and stick them on the airplane. And there are many stars.
Construction
Your eyes might be drawn to the “Instructions with Diagrams,” but you must not follow that build sequence. Instead, follow the “Written Instruction” directions and use the diagrams as a visual guide.
If you have purchased this model and are capable of flying it, you should be able to work your way through the instructions. There isn’t a great deal of work to do and it goes quickly. Thanks to this article and customer feedback, I understand that Hyperion is addressing the quality of the instructions provided.
I used the recommended Hyperion servos, ESC, Li-Poly batteries, and motor. I could have gotten cheaper parts, but I reasoned that although the cost of these components was coming out of my personal modeling fund, I could maximize the airplane’s performance and lifetime if I started with quality parts.
I won’t repeat each construction step because such notes in reviews are boring. The only thing you must do in sequence is slide the elevator through the fuselage slot before sliding the stabilizer through the slot. You can’t do that in reverse order.
When I initially tried the retract installation, the suspension coil bumped into the wing. I used a Dremel rotary tool to carefully remove the interference.
The retract-servo installation needs clarification. Instructions would have you join the wings and then install the servo and retracts. It’s tough to bend wires and adjust things with the wings glued together and the servo installed; there is no room to work in the small space available.
I used a different approach: I worked on a wing half at a time. I mounted the servo and worked on all pushrod wire bending until the retract on that wing half worked perfectly. I added balsa reinforcement between the servo and the wing skin to make it a solid mount. Then I pushed the wing halves together on the joiner (without glue) and determined how to bend the pushrod from the other retract until it worked okay.
As I pushed the wings together with 30-minute epoxy, I fed the retract pushrod wire of the second wing half through its servo connector. There was a mess of epoxy to contend with as it squirted out of the dihedral joiner areas, so I was careful to wipe off the excess. Then I taped the wings together to hold everything in position. After the epoxy hardened, I fine-tuned the retract system and fully tightened the setscrews on the servo connector.
The little Atlas digital DS13 servo is rugged. At the field I installed the flight battery, turned on the transmitter, plugged in the flight battery, checked the controls, and tested the motor, with no problems. When I picked up the airplane, the landing gear retracted. I had inadvertently knocked the retract switch to the up position, leaving the DS13 working hard for at least five minutes, trying to generate enough force to bring up the wheels. The servo is still working fine and seems none the worse for the abuse.
The little Hyperion servo does a beautiful job of moving the landing gear and, if properly set up, will never be overloaded. To get a more realistic-looking retraction, you can use the Hyperion servo programmer and set the retract speed to two to three seconds. For the P-51, I slowed retraction with the programming features in the JR 12X transmitter.
The included nylon wing hold-down bolts have small cross-sections. As I was fitting the wing, they twisted an alarming amount. Rather than face the problem of a sheared bolt, I found two bolts that worked in their place.
The wing was not seating in the wing saddle because the most aft part of the trailing edge was not as rounded as the saddle. However, I could force it into position with thumb pressure. I put two huge washers (pieces of plywood would work) under the bolt heads and pulled the wing into the fuselage saddle. This procedure “squishes” the balsa just a bit. Overnight the wing should fit fine, with no pressure needed from then on. I understand that this will be addressed in a future version of the model.
When I initially put the blue spinner and propeller on the motor and applied power, there was a strong vibration. I removed the propeller (which had been balanced) and installed a spacer in its place. The spinner still ran with a strong vibration. I removed the spinner and mounted it on my magnetic propeller/spinner balancer, where I found a strong out-of-balance condition.
I dug through my spinner drawer and found a 2-1/2-inch P-51–style Tru-Turn that ran smoothly, so I decided to use it for flight-testing. I’ll work on balancing the blue spinner later, because it looks great on the airplane.
After finishing the Mustang, I decided to dress up the cockpit a little. I searched the internet and found a partial photo of a P-51 cockpit. Using Photoshop, I managed to change it enough to fit in the appropriate area in the model. Then I looked through my stock and found a lady pilot figure. It’s a bit large scale-wise, but it looks so much better than an empty cockpit.
With a two-rate radio system, I set the recommended control throws to the low-rate switch setting. This allows a pilot to switch to the high-rate settings if the need for more authority arises. You can adjust all of this later to suit your individual tastes.
Verify that the ESC low-voltage cutoff (LVC) is set to match the number of cells you are using. I used the Hyperion Atlas 60-amp ESC, and its LVC is set by a separate handheld controller. Because the default LVC is set for two Li-Poly cells and I was going to use three, I needed to change the setting.
Power Experiments
You need to adjust the propeller size to suit the flight performance you desire. And be careful of the condition of the Li-Poly battery you are going to employ; some of mine are getting old and won’t perform as well as I would like.
I decided to test a collection of propellers on the Hyperion ZS3025 eight-turn, 970 Kv brushless motor with a new 3S CX 3300 mAh 25C Hyperion Li-Poly and a new 4S CX 3300 mAh 25C Hyperion Li-Poly. The results after five-second run times with propeller load are as follows:
- 9 x 6 APC Sport with 3S CX: 265 watts, 11.7 volts, 22.8 amps, 62.8 watts/pound
- 9 x 6 APC Sport with 4S CX: 456 watts, 14.0 volts, 33.0 amps, 108.1 watts/pound
- 10 x 6 Top Flite with 3S CX: 350 watts, 11.7 volts, 30.0 amps, 72.3 watts/pound
- 10 x 6 Top Flite with 4S CX: 690 watts, 15.0 volts, 46.0 amps, 142.6 watts/pound
- 11 x 7.5 Top Flite with 3S CX: 480 watts, 11.4 volts, 42 amps, 113.7 watts/pound
I settled on the Top Flite 11 x 7.5 with the 3S battery for the first flight. At slightly more than 100 watts per pound, I thought that combo should give good initial thrust and be reasonably easy on the battery. The ESC was okay at 42 amps, since it is capable of 60.
Flight Test
The runway was a smooth paved blacktop, the particular autumn day was in the high 50s, and the wind was approximately 3 mph down the centerline of the runway.
Only a touch of right rudder and a bit of up-elevator was required for Miss America to take off. Liftoff occurred roughly at the same time that the command for full power was given. The model needed only slight right aileron trim to be perfect in roll, and I was happy and surprised to find that pitch trim seemed to be right on. After one more turn around the field, I realized that the Mustang was flying beautifully and that I had forgotten to retract the landing gear—so I did.
As I flew the airplane from one end of the field to the other, I performed several typical P-51 maneuvers. Loops were large and straight. Rolls needed just a touch of down-elevator when inverted, giving a straight flight path with a nice roll rate. Wingovers and half Cuban 8s worked great for turnaround maneuvers.
This aircraft is steady at lower airspeeds too. I guided it through several low-level, tight 360° turns and it went where pointed.
I flew the model into the landing pattern where, after prompting, I remembered to lower the landing gear and let Miss America slow while letting the altitude drop on the downwind and crosswind legs. As the P-51 approached the end of the runway, I felt that it was going a bit fast. So I cut power entirely and let it glide in.
The coast to the runway was in a level attitude and resulted in a main-wheels-touching-first landing. There was a long, gentle bounce, and the aircraft tracked down the center of the runway, finally dropping to the tail wheel.
The preceding flights gave me an opportunity to evaluate the low-speed region of the flight envelope. After a rapid zoom climb to altitude, I throttled the airplane back to zero power and it started gliding. I slowly eased in up-elevator until I was holding full aft stick. This is the elevator deflection I use for normal maneuvering at the low-rate switch setting—not the large deflections on the high-rate setting.
Using the low-rate settings, Miss America slowly glided with the nose pitched up a bit. As the speed bled off, it gently dropped the left wing, followed by a dive and a slight loss in altitude, then back to nose-up level flight. This behavior was fairly consistent. At a slightly faster speed, I could hold the elevator full up and steer the model around the sky fairly easily.
I was determined to do a slow landing, so I took the airplane slower over the end of the runway. As it got closer, I fed in more up-elevator. When the wheels touched down, I had full up-elevator held. The P-51 was going nice and slow and touched down with no bounce. Perfect landing!
As mentioned earlier, set the control deflections you normally use in flight on the low-rate switch. This gives enough control movement to achieve normal maneuvers but will protect you from accidentally inputting a large amount of elevator on landing and stalling the model at the wrong time. Leave the high control deflections to a high-rate switch setting and go to them when you have a lot of sky under the aircraft.
The smooth fiberglass fuselage with the glossy “Miss America” color scheme makes for a beautiful stand-off scale model. The build time is short and easy. The total package (servos, radio, motor, battery) that I used allowed it to perform as a P-51 should. The long dives reaching maximum speed just over the runway reminded me of full-scale Mustangs I have seen, and they were terrific. The airplane’s low- and high-speed handling qualities are good, and the P-51 flies great with no surprises.
Control responses are smooth, and the maneuverability is all that I had hoped. Miss America’s speed is blistering with the 3S Li-Poly, and I am looking forward to investigating the 4S power option.
This model is not for the RC beginner. You should have experience with at least one low-wing, aileron-and-elevator-controlled airplane before trying to fly it. Miss America will reward you with a nice flying experience.
Ben Lanterman [email protected]
Manufacturer / Distributor
- Hyperion / Empire Hobby
- 950 E. Baseline Ave. Unit 210
- Apache Junction, AZ 85219
- (480) 982-0909
- www.empirerc.com
Sources
- R/C Dude Hobbies — (503) 657-6670 — www.rcdude.com
- JR — (800) 338-4639 — www.jrradios.com
- Spektrum — (800) 338-4639 — www.spektrumrc.com
Transcribed from original scans by AI. Minor OCR errors may remain.

