
Plane Talk: Sig Manufacturing Messerschmitt Bf 109 ARF
Tom Sullivan
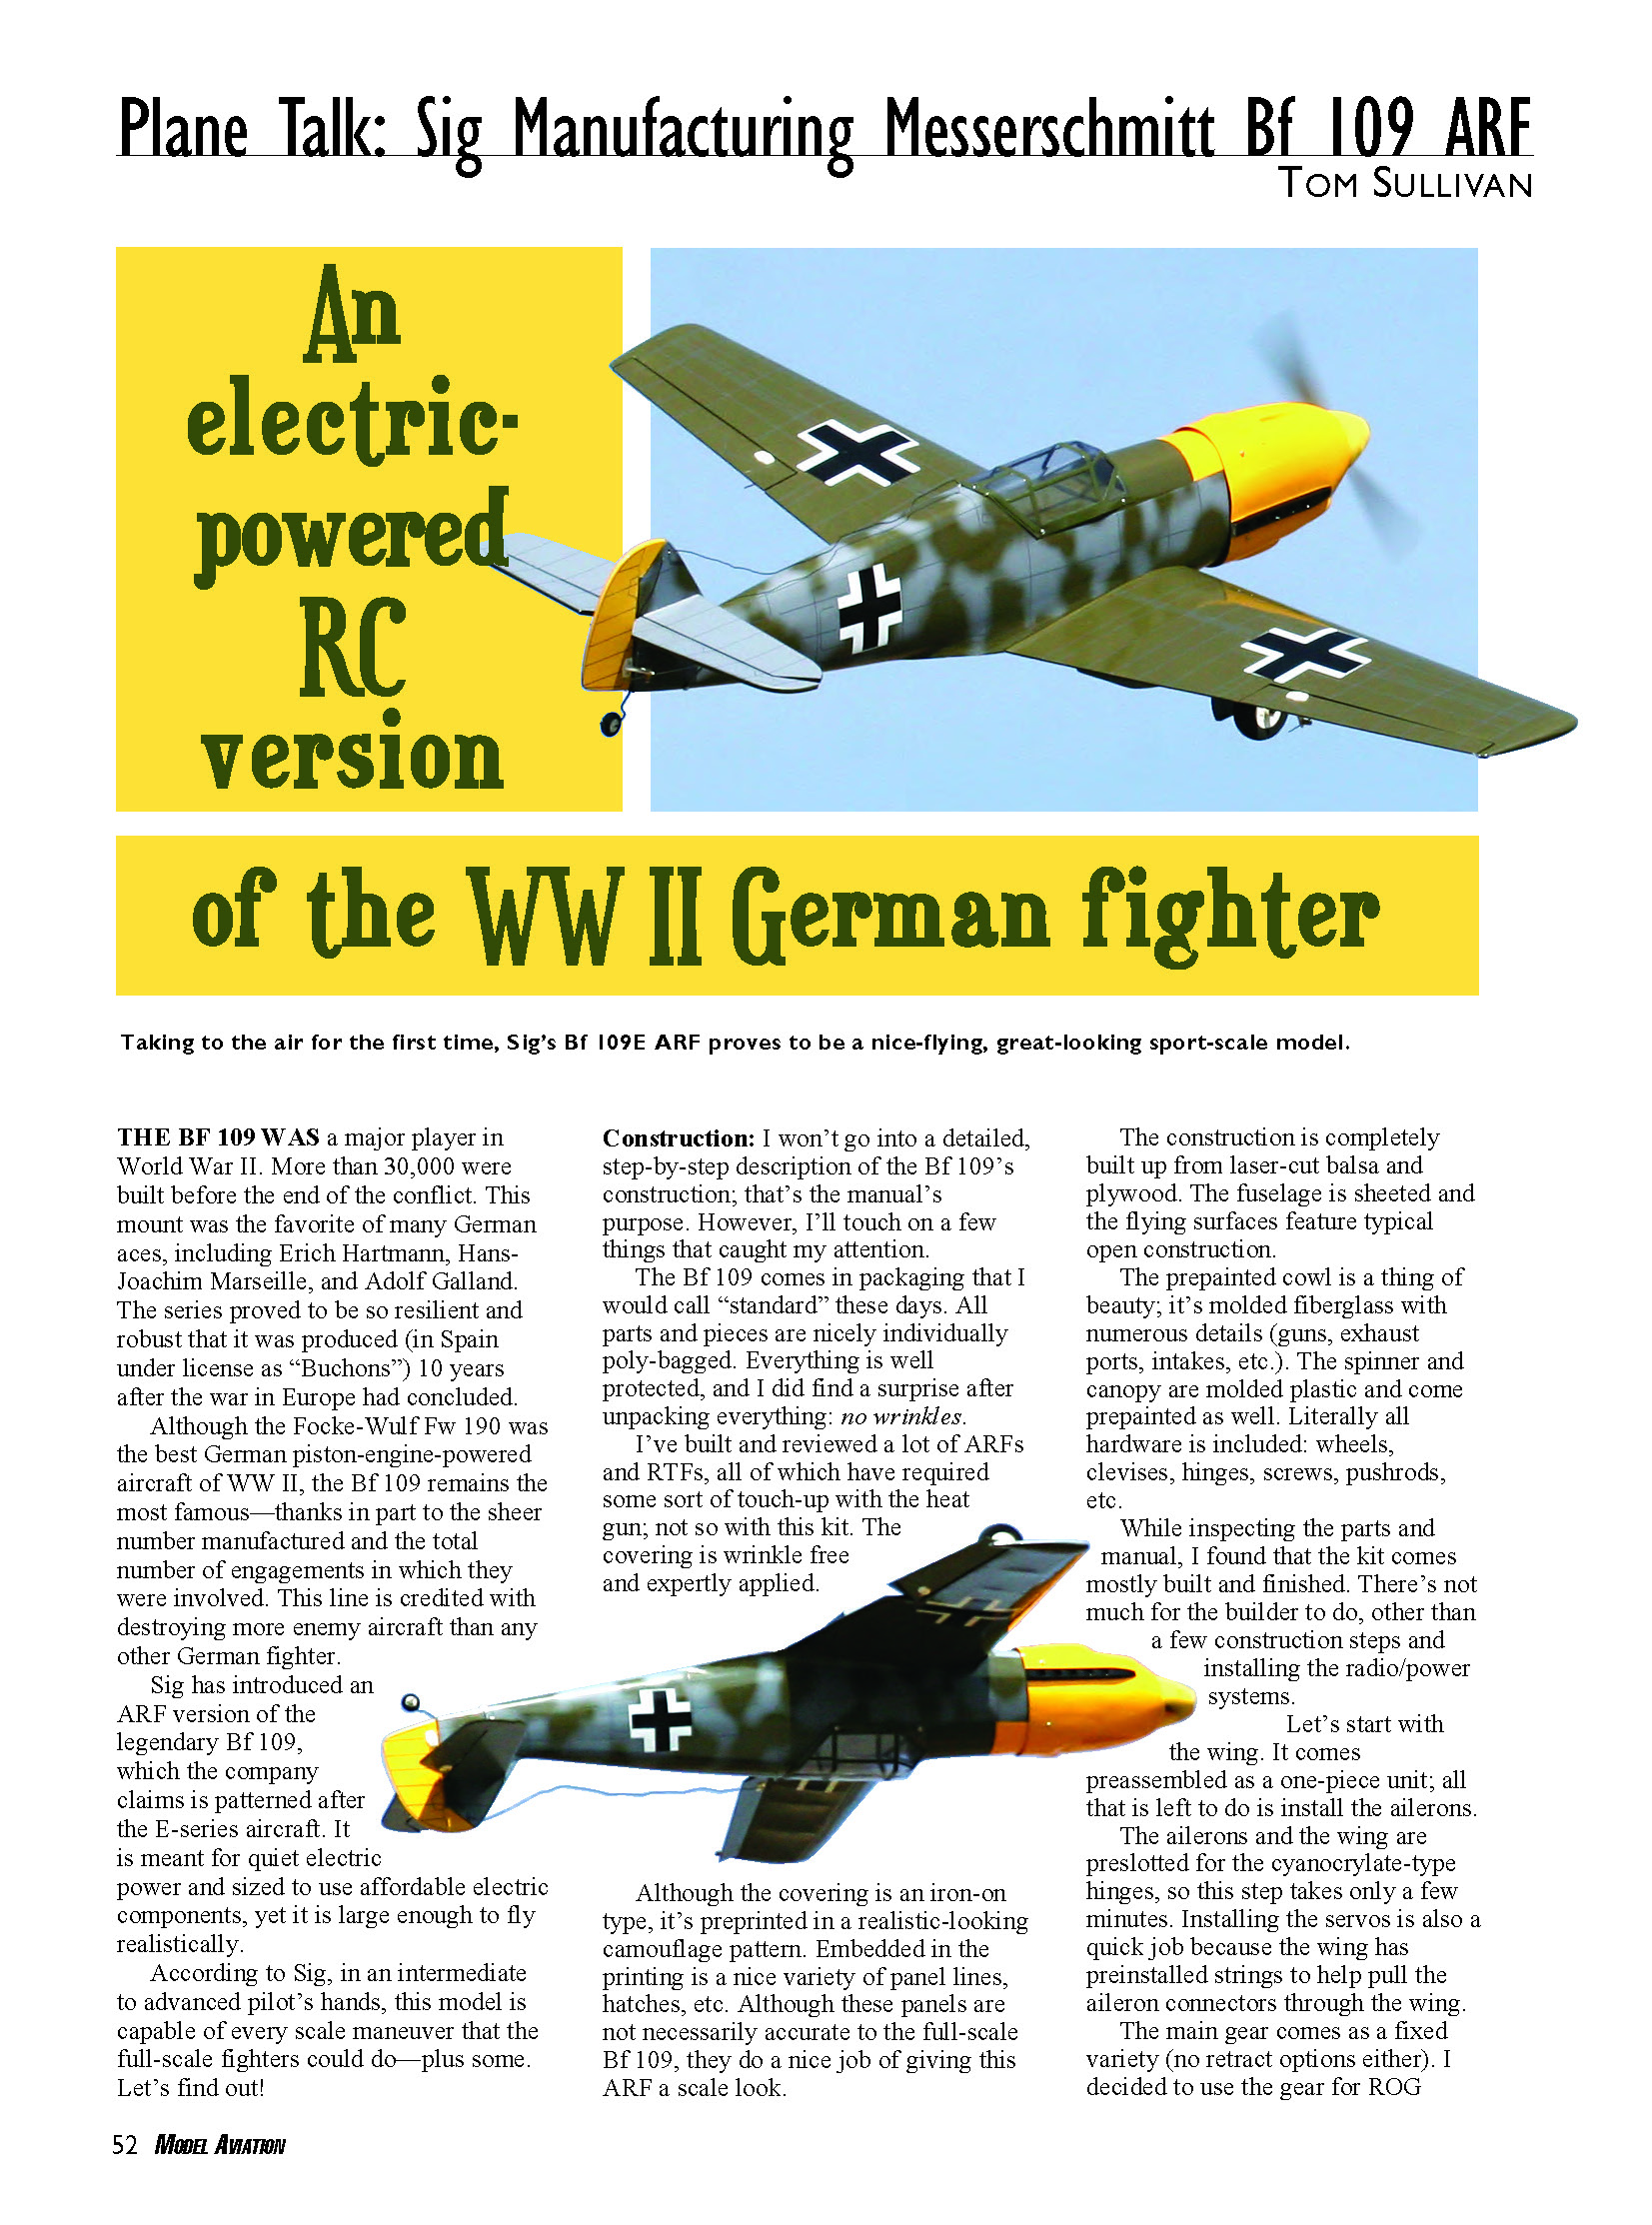
THE Bf 109 WAS a major player in World War II. More than 30,000 were built before the end of the conflict. This mount was the favorite of many German aces, including Erich Hartmann, Hans-Joachim Marseille, and Adolf Galland. The series proved to be so resilient and robust that it was produced (in Spain under license as "Buchons") 10 years after the war in Europe had concluded.
Although the Focke-Wulf Fw 190 was the best German piston-engine-powered aircraft of WWII, the Bf 109 remains the most famous—thanks in part to the sheer number manufactured and the total number of engagements in which they were involved. This line is credited with destroying more enemy aircraft than any other German fighter.
Sig has introduced an ARF version of the legendary Bf 109, which the company claims is patterned after the E-series aircraft. It is meant for quiet electric power and sized to use affordable electric components, yet it is large enough to fly realistically. According to Sig, in an intermediate to advanced pilot's hands, this model is capable of every scale maneuver that the full-scale fighters could do—plus some.
Construction
I won't go into a detailed, step-by-step description of the Bf 109's construction; that's the manual's purpose. However, I'll touch on a few things that caught my attention.
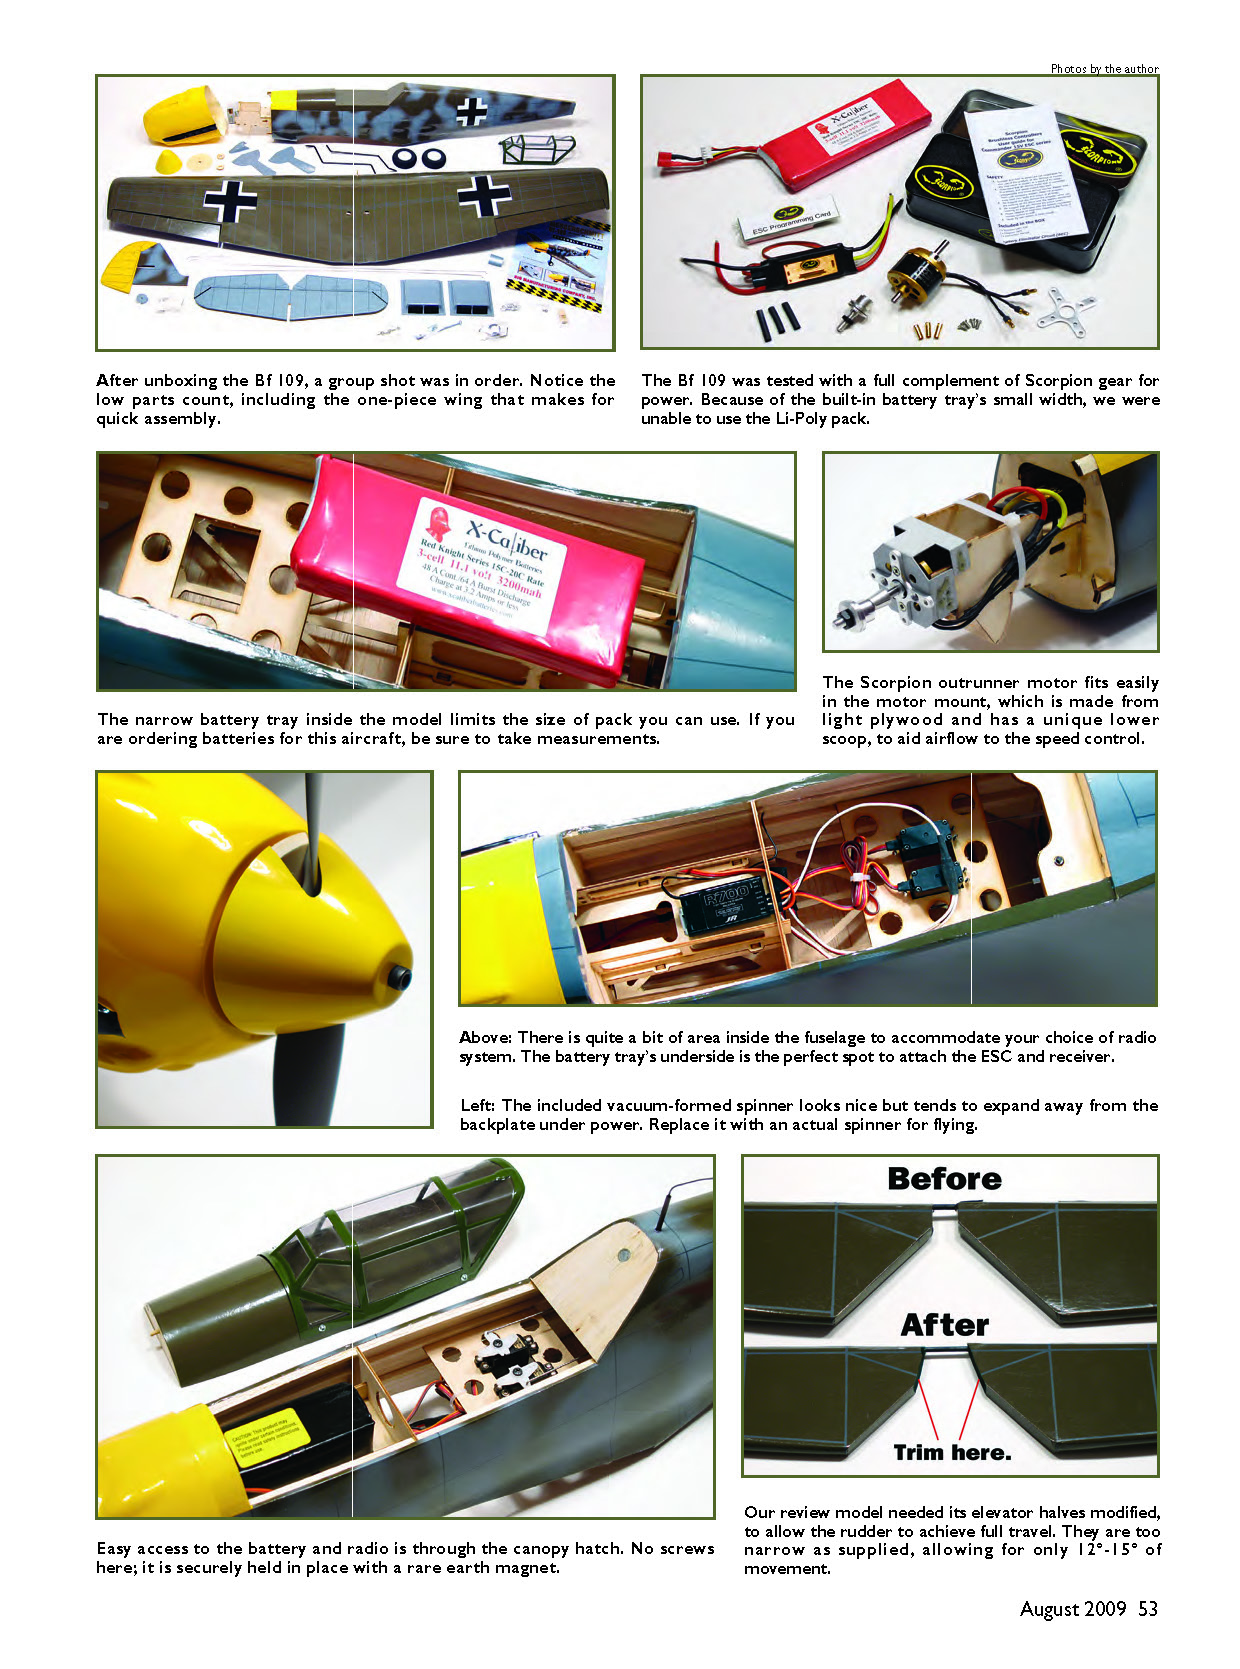
The Bf 109 comes in packaging that I would call "standard" these days. All parts and pieces are nicely individually poly-bagged and well protected. After unpacking everything I found a pleasant surprise: no wrinkles. I've built and reviewed a lot of ARFs and RTFs, all of which have required some touch-up with a heat gun; not so with this kit. The covering is wrinkle free and expertly applied.
Construction is entirely built up from laser-cut balsa and plywood. The fuselage is sheeted and the flying surfaces feature typical open construction. Literally all hardware is included: wheels, clevises, hinges, screws, pushrods, etc. The prepainted cowl is a thing of beauty; it's molded fiberglass with numerous details (guns, exhaust ports, intakes, etc.). The spinner and canopy are molded plastic and come prepainted as well.
Most of the kit comes mostly built and finished. There's not much for the builder to do beyond a few assembly steps and installing the radio/power systems.
Wing
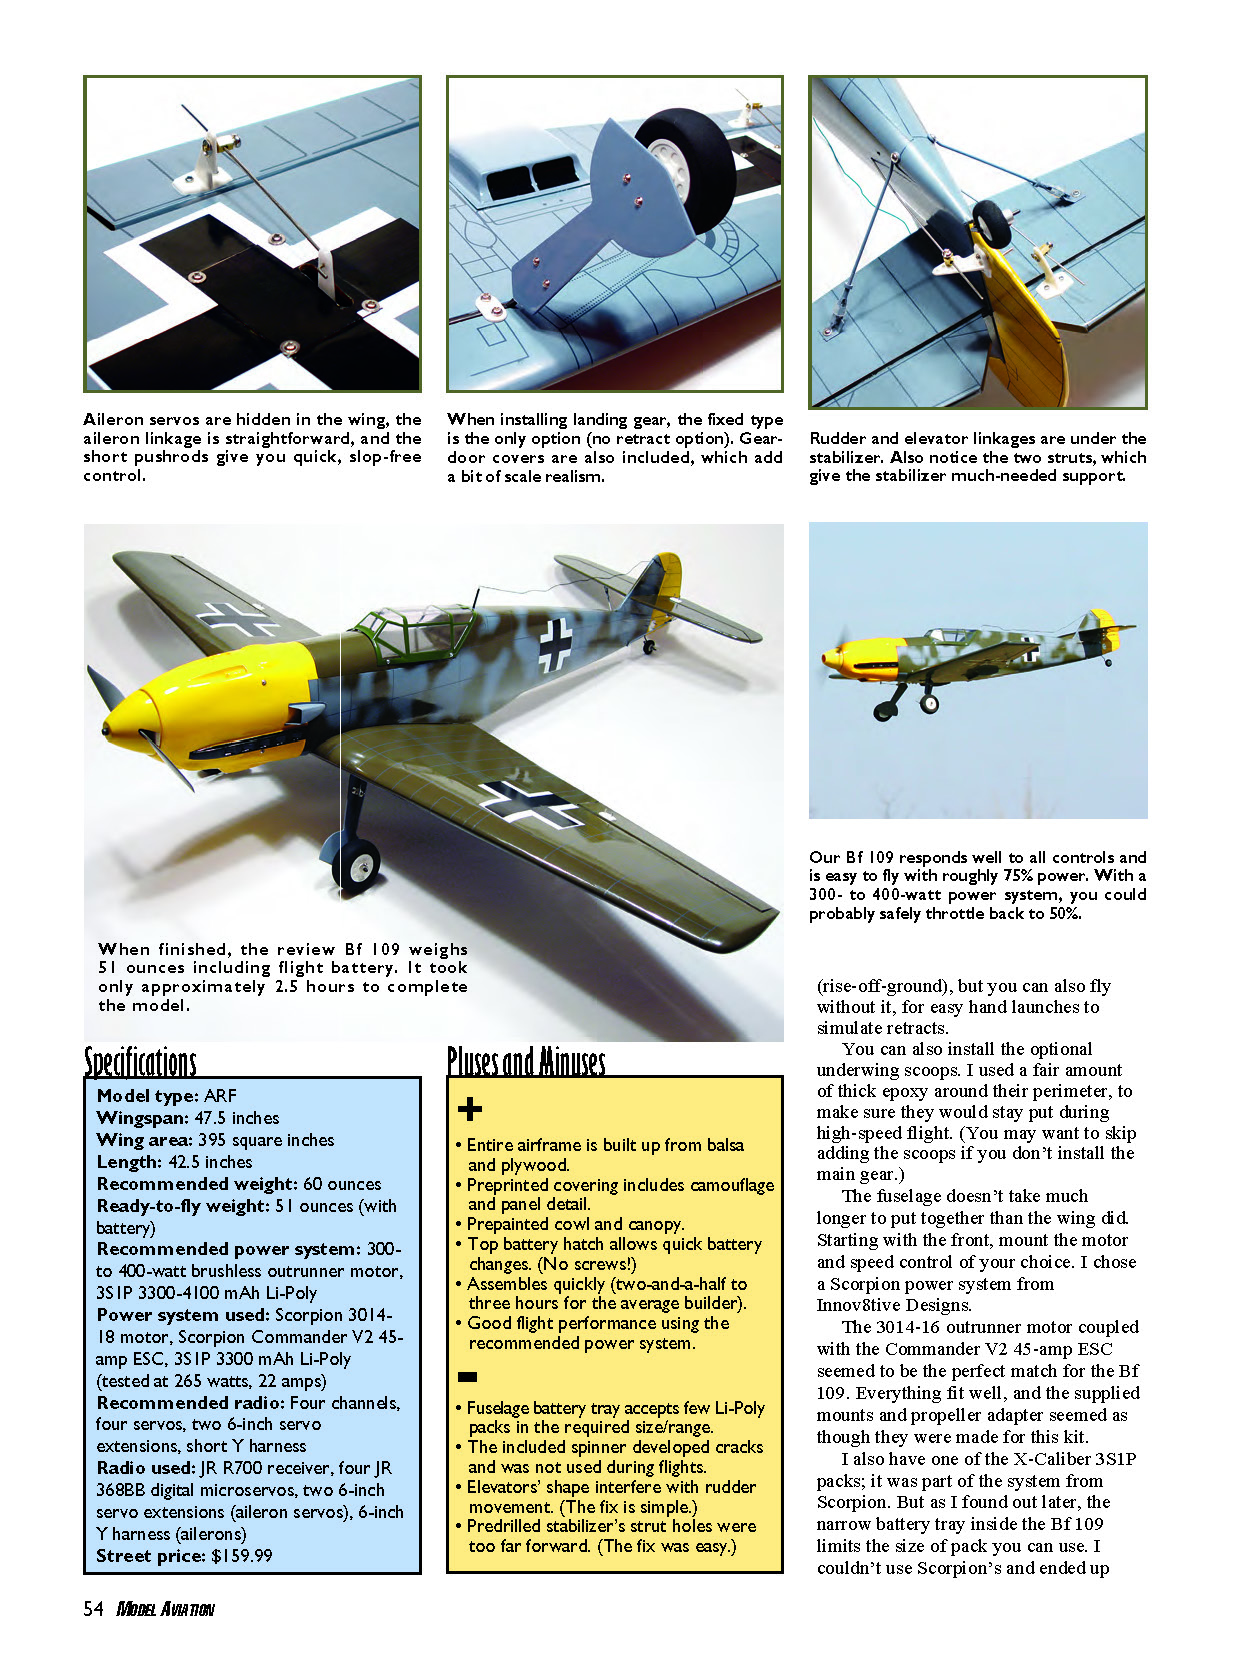
- The wing comes preassembled as a one-piece unit; all that is left to do is install the ailerons.
- The ailerons and wing are preslotted for cyanoacrylate-type hinges, so hinge installation takes only a few minutes.
- Installing the servos is a quick job because the wing has preinstalled strings to help pull the aileron connectors through the wing.
The main gear is fixed (no retract options). I decided to use the gear for ROG (rise-off-ground) operations, but you can also fly without it for hand launches to simulate retracts.
You can also install the optional underwing scoops. I used a fair amount of thick epoxy around their perimeter to ensure they would stay put during high-speed flight. (You may want to skip adding the scoops if you don't install the main gear.)
Fuselage and Power
Starting with the front, mount the motor and speed control of your choice. I chose a Scorpion power system from Innov8tive Designs. The 3014-16 outrunner motor coupled with the Commander V2 45-amp ESC seemed to be the perfect match for the Bf 109. Everything fit well, and the supplied mounts and propeller adapter seemed as though they were made for this kit.
The model was tested with a full complement of Scorpion gear for power. However, the narrow battery tray inside the model limits the size of pack you can use. Because of the built-in tray’s small width, I was unable to use Scorpion's Li-Poly pack and ended up using a slightly narrower Li-Poly pack from Sig. If you are ordering batteries for this aircraft, be sure to take measurements.
Spinner and Cowl
Attaching the cowl is straightforward. The spinner assembly is supplied but nonstandard: the cone is a molded plastic piece and the backplate is a precut light-plywood piece. The manual includes a full-size template to trim the holes for the propeller. The cone is held in place via a single bolt through the center.
During testing the included spinner tended to separate from the backplate and a small crack began developing due to flex. I substituted a plastic spinner from the local hobby shop and cut a small piece off the front portion (Sig’s manual includes instructions for this). Once resolved, the motor produced roughly 260 watts with an APC 11 x 5E propeller—less than the recommended 300–400 watts, but acceptable since my model was a bit lighter than specified.
Radio and Tail
- The receiver mounts to the underside of the battery tray.
- The elevator and rudder servos mount immediately to the rear of the tray in their own laser-cut mount.
Attaching the tail surfaces is quick. The stabilizer is supported by supplied rods that simulate scale struts. The holes to attach the supports are predrilled, but on my kit the fuselage holes were too far forward. After marking the correct locations, I used a 1/16-inch drill to make new openings, test-threaded the screw, and hardened the wood with a few drops of thin cyanoacrylate.
Control-surface modification
Before attaching the elevator and rudder, test-fit them to the model. My review kit was an early production model and the rudder would hit the elevator halves, allowing only approximately 12°–15° of travel. This is a design or manufacturing issue, but there's a simple fix: use a hobby knife to trim the inside surfaces of the elevator halves a bit to widen the gap for the rudder and open the angle.
With the control surfaces in place, install the pushrods (held in place by setscrews).
The canopy (held in place by four screws) attaches to the top hatch. The prepainted framework adds a great deal to the Bf 109’s looks.
Final assembly and weight
All finished, my ARF came in at 3 pounds, 8 ounces with the battery in place. The center of gravity was a touch aft, so I added close to 1½ ounces of nose weight directly behind the motor. I adjusted the control throws to match the instructions and then tested the motor.
Total time from opening the box to this point was two hours and 35 minutes—showing how far electric-powered ARFs have come.
Flying
With the battery fully charged and a quick preflight check completed, I throttled up for an initial taxi test. Ground handling at low speeds is spot on, but the model can dance around a bit when accelerating to takeoff speeds. Be careful when the tail comes off the ground; the small rudder can be partially blanked by the fuselage and become less effective.
Once airborne, the Bf 109 is a lively warbird. It required a significant amount of aileron trim to keep the wings level, but the rudder and elevator needed only small adjustments. The airplane responds well to all controls and is easy to fly with close to 75% power. With a 300- to 400-watt power system, you could probably throttle safely back to 50%.
The Bf 109 handles similarly to any sport model: it tracks straight and true and is surprisingly aerobatic for its size. Landings are straightforward—the model settles down and can even handle a bit of rough grass on rollout.
Conclusion
Sig’s Bf 109 ARF is an excellent little electric warbird. The large amount of prebuilt parts makes assembly speedy, and the preprinted and prepainted parts present a great scale look. Although too large for AMA’s Park Pilot Program, it is small enough to fly comfortably on larger fields.
Tom Sullivan [email protected]
Manufacturer/Distributor
- Sig Manufacturing Co., Inc.
- Box 520
- Montezuma, IA 50171
- (641) 623-5154
- www.sigmfg.com
Items Used in Review
- Scorpion products
- Innov8tive Designs
- (760) 468-8838
- www.innov8tivedesigns.com
- Batteries
- Sig Manufacturing Company
- (641) 623-5154
- www.sigmfg.com
- JR radio system
- Horizon Hobby Distributors
- (800) 338-4639
- www.horizonhobby.com
- APC propeller
- Landing Products
- (530) 661-0399
- www.apcprop.com
Other Published Reviews
- Fly RC: May 2009
Transcribed from original scans by AI. Minor OCR errors may remain.

