
Plane Talk: Troy Built Models Shock Jet ARF
Gerry J. Hinshaw
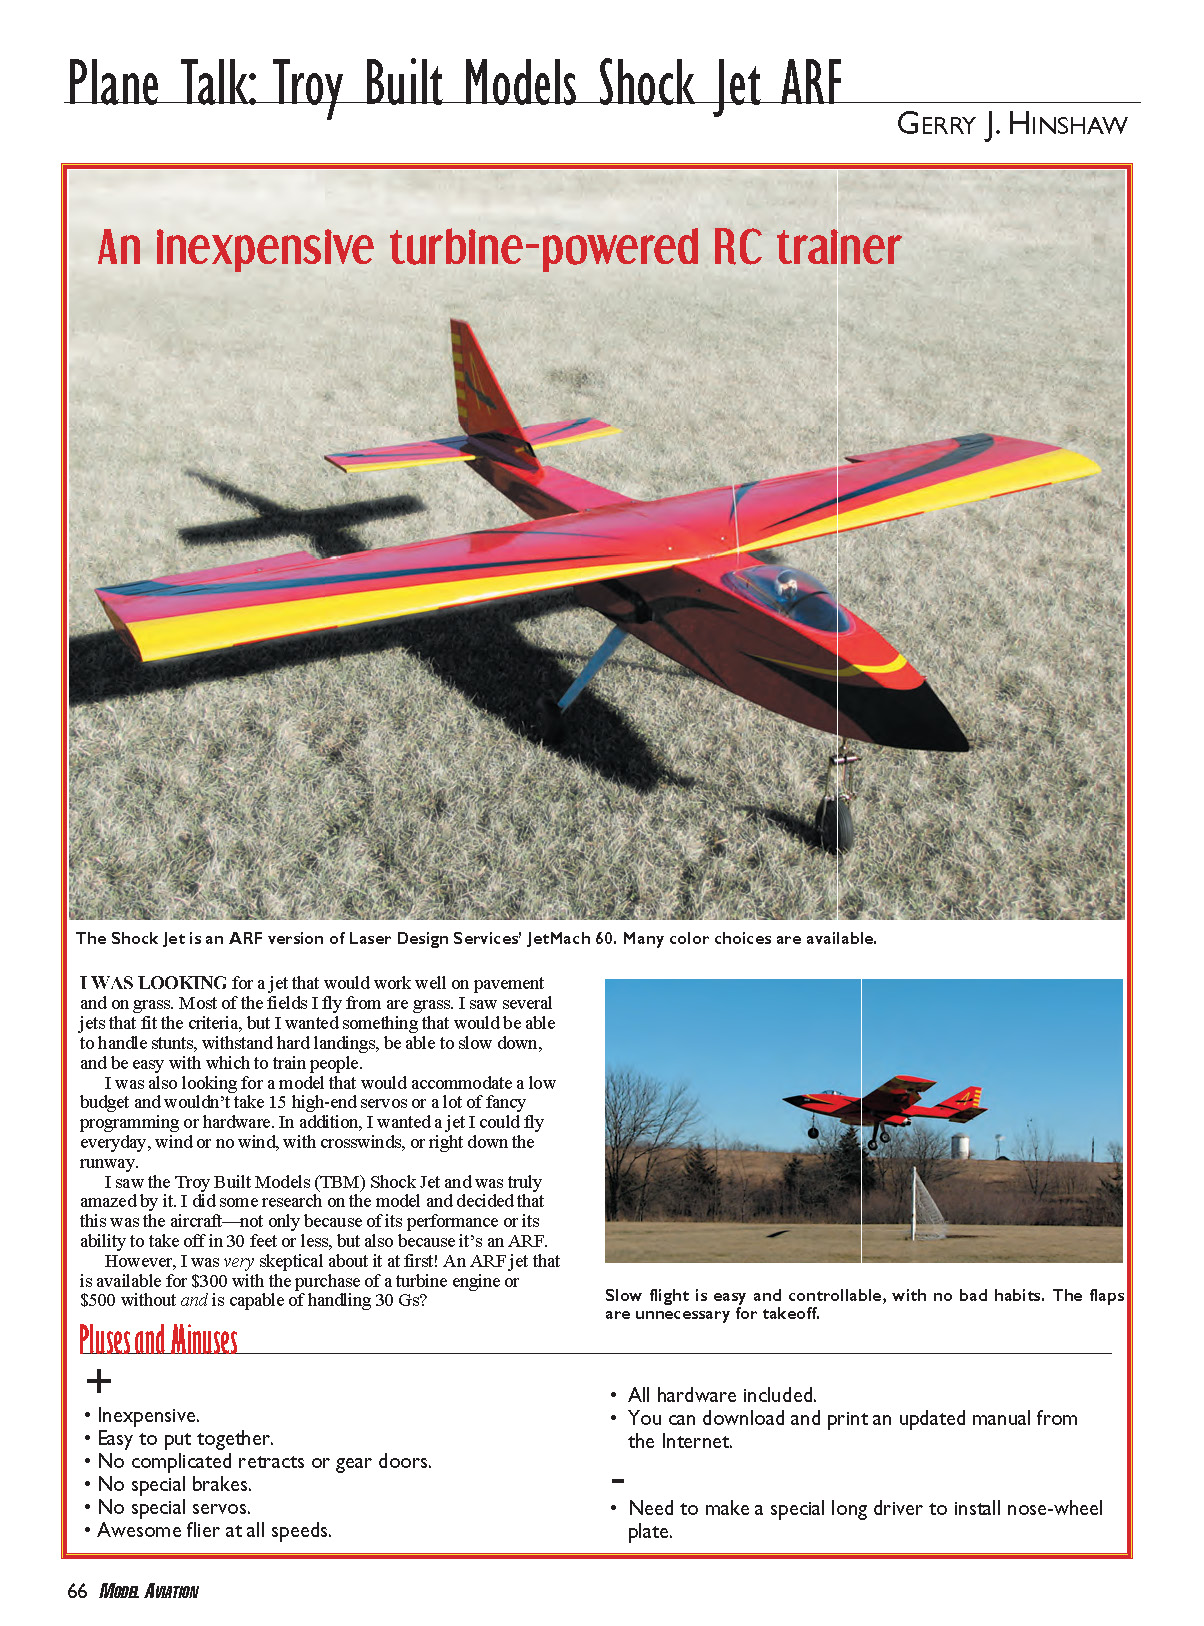
An inexpensive turbine-powered RC trainer
I was looking for a jet that would work well on pavement and on grass. Most of the fields I fly from are grass. I saw several jets that fit the criteria, but I wanted something that would be able to handle stunts, withstand hard landings, be able to slow down, and be easy with which to train people.
I was also looking for a model that would accommodate a low budget and wouldn't take 15 high-end servos or a lot of fancy programming or hardware. In addition, I wanted a jet I could fly every day, wind or no wind, with crosswinds, or right down the runway.
I saw the Troy Built Models (TBM) Shock Jet and was truly amazed by it. I did some research on the model and decided that this was the aircraft—not only because of its performance or its ability to take off in 30 feet or less, but also because it's an ARF.
However, I was very skeptical about it at first! An ARF jet that is available for $300 with the purchase of a turbine engine or $500 without and is capable of handling 30 Gs?
Pluses and Minuses
- Inexpensive.
- Easy to put together.
- No complicated retracts or gear doors.
- No special brakes required.
- No special servos required.
- Awesome flier at all speeds.
- All hardware included.
- You can download and print an updated manual from the Internet.
- Need to make a special long driver to install nose-wheel plate.
Specifications
- Model type: ARF sport turbine-powered jet (waiver required)
- Skill level: Intermediate builder, advanced pilot
- Wingspan: 80.5 inches
- Length: 73 inches
- Weight: 13 pounds
- Engine: 14- to 18-pound-thrust turbine
- Radio: Six channels (minimum), eight servos
- Construction: Laser-cut plywood and balsa
- Covering/finish: UltraCote
- Price: $499
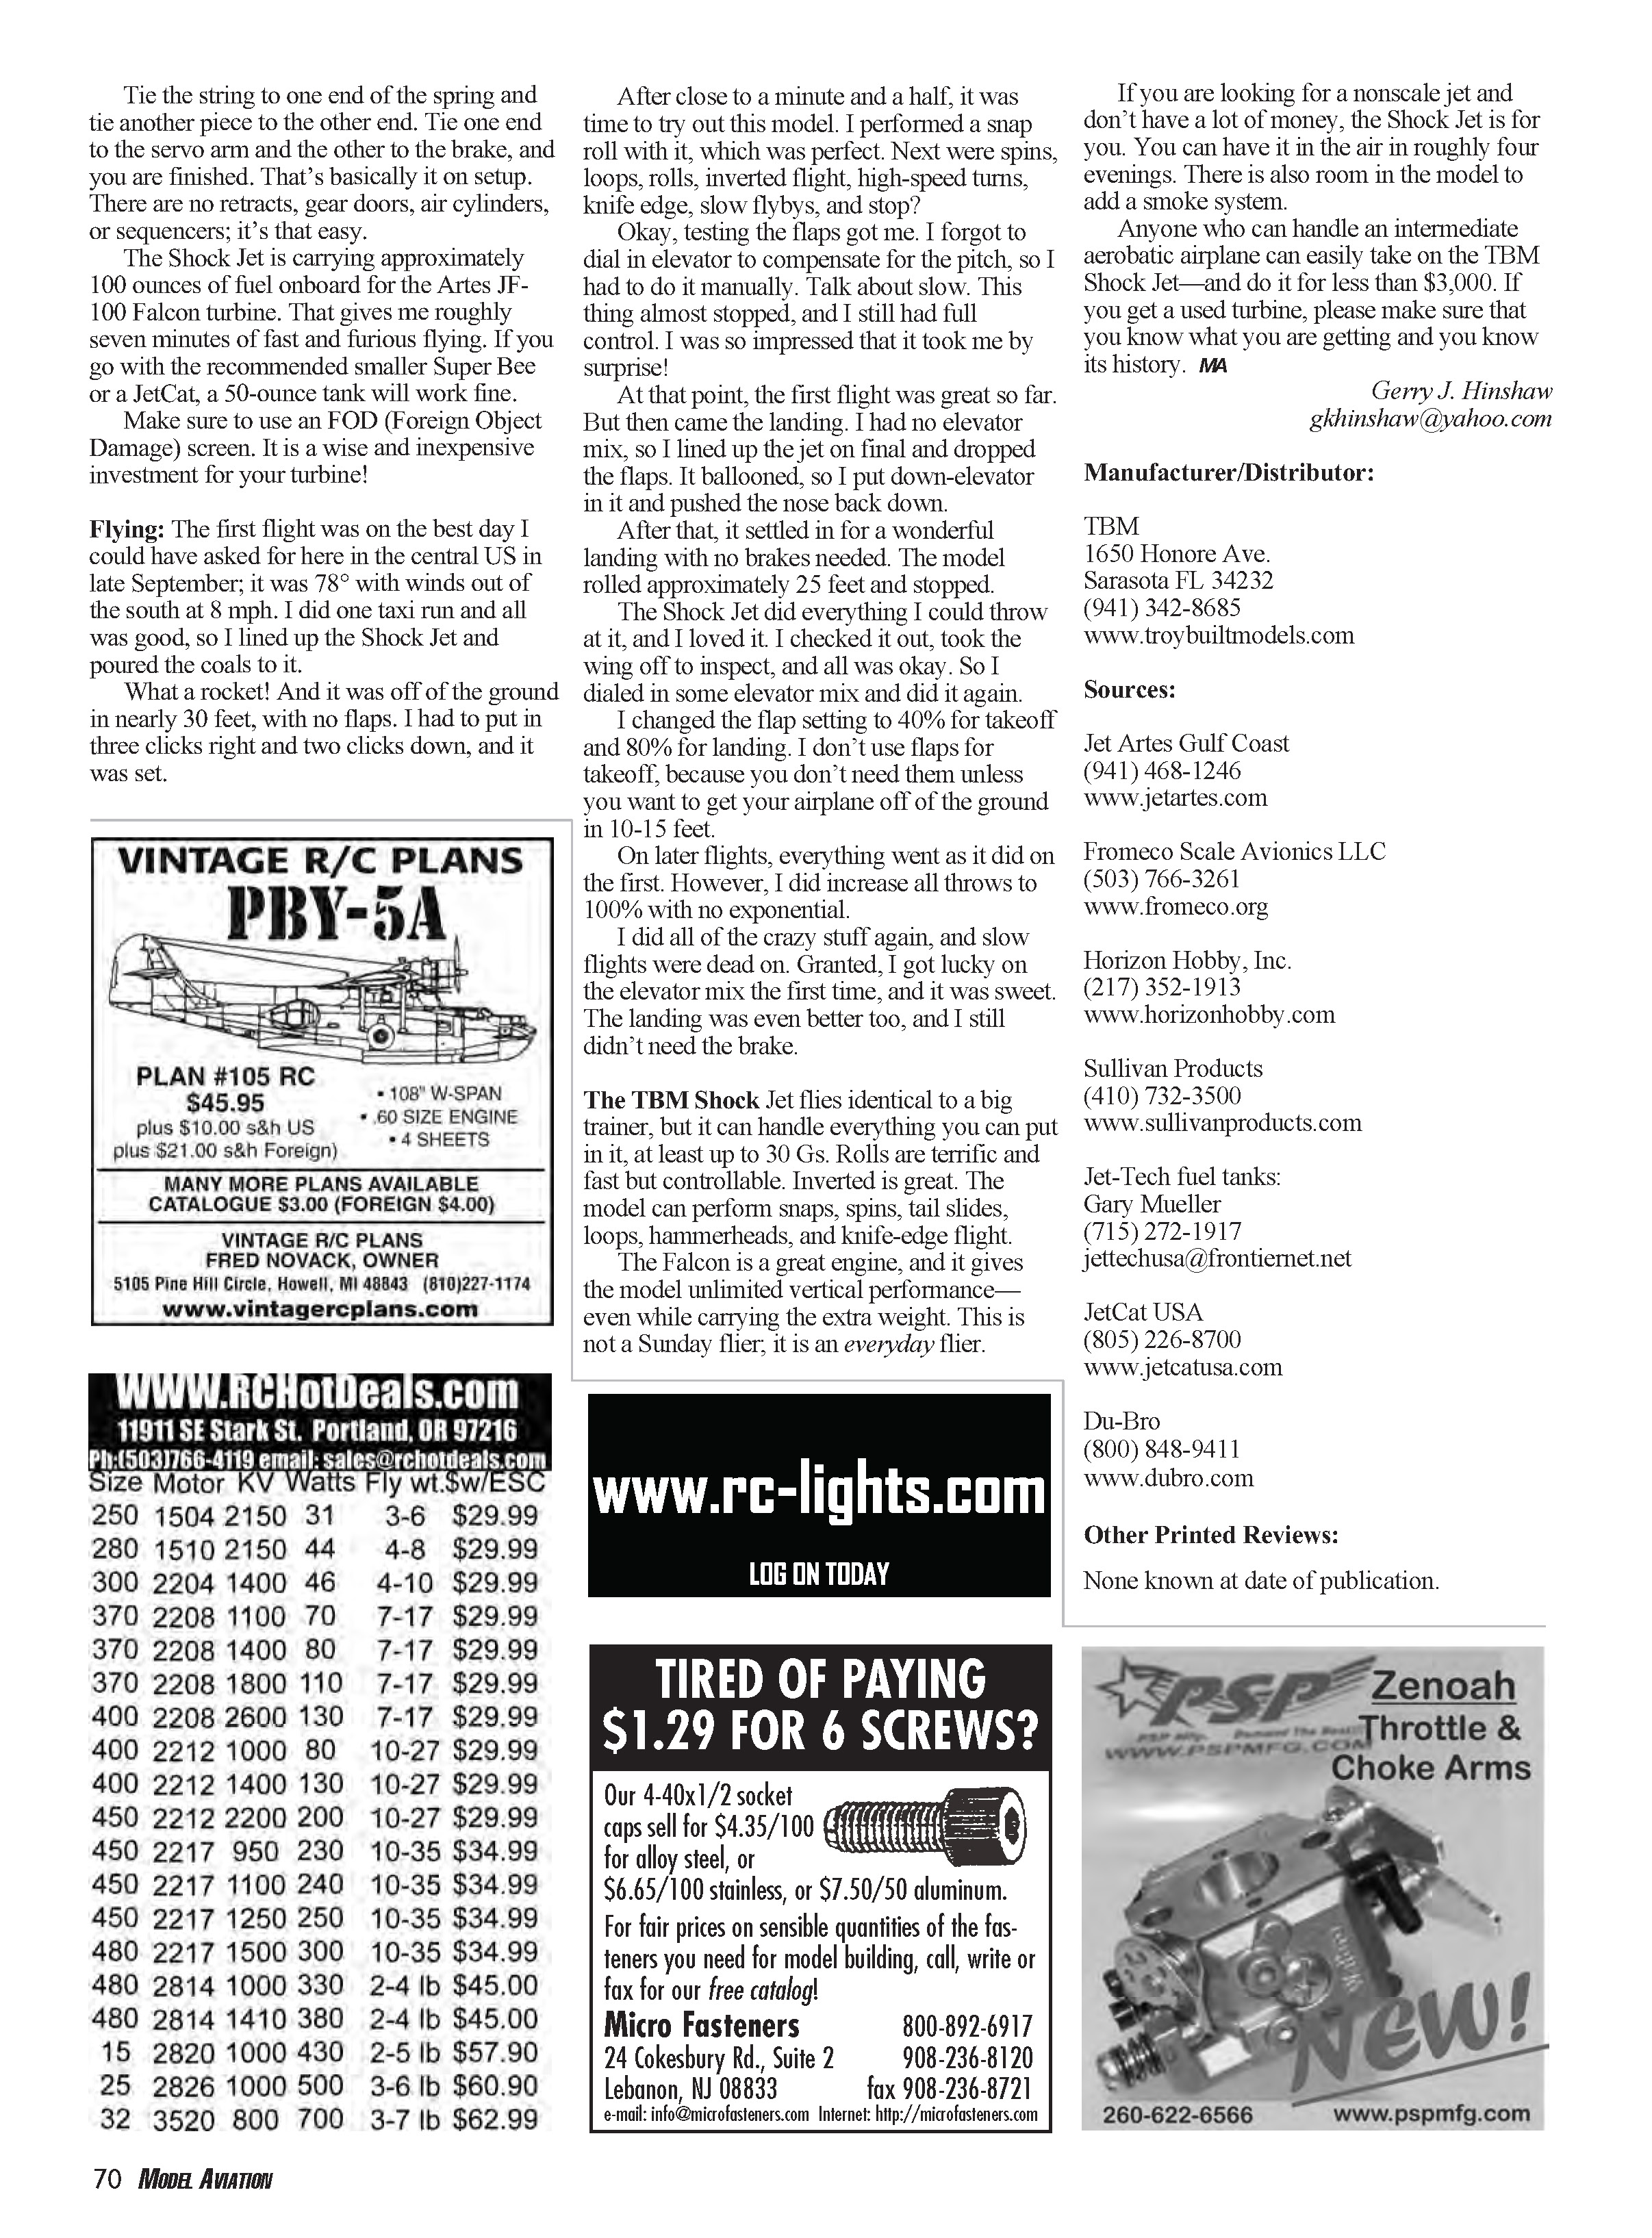
I was surprised by the fast shipping, and the box was huge. I got it late on a Monday afternoon. When I opened the box, I was surprised by the packing; it was top-notch. When I started going over the aircraft piece by piece, I was shocked. The construction was high in quality, and so was the covering. I received a generous hardware bag, and the control horns and links were nice. The Shock Jet was going to be great!
It is designed to take a turbine that has 10 to 18 pounds of thrust, but I did not buy the Jet Central JF-50 Super Bee that was offered with the aircraft. I opted to install Jet Central’s Artes JF-100 Falcon. Yes, I know that it is way too much power, but I turned it down to 18 pounds of thrust. The Shock Jet is capable of 150 mph speeds.
Construction and assembly
The model doesn’t come with a printed assembly manual; TBM makes the manual available for download on its Web site, which was nice to review before purchasing.
I started on the jet the day it arrived and was surprised by how fast it went together. The Shock Jet is made from laser-cut wood and is covered with real UltraCote. All control surfaces are already installed and glued. Most of the holes are predrilled, but I did have to drill some; that was not a major deal. I tested all of the hinges, which are the CA type, to make sure they were tight.
I started by gluing the wings together with 5-minute epoxy. I sanded the aluminum spar so that the epoxy would bond to it. After that, I started on the tail section. That was easy to do too; everything fit perfectly. TBM even supplied side rails for the elevator for extra support.
The next night I started installing the servos and all linkages in the wing. I used a hot piece of wire to cut all the servo holes. This process works well because it seals the covering as you go along. TBM recommends Hitec HS-645MG servos on all surfaces.
You have to drill the holes for the control horns. The ball-joint linkages are heavy-duty. The wing went together in probably an hour. I used 5-minute epoxy on the tail section, too. I put one servo on each elevator half, which is overkill, but the extra safety is worth it.
You must glue two of the control links together: one for the rudder and one for the elevator—not a big deal. The whole tail section snaps together in place and fits great the first time.
Installing the front nose assembly was difficult because I had to build a long extension to screw in the front nose-gear support. That is a difficult task if you don't have the right tool. This could have been done during assembly at the factory.
The Shock Jet comes with 3-inch wheels with aluminum hubs. Nice! Bolts and nuts are used to install the wheels. I did upgrade them to heavy-duty wheel axles and 4-inch Sullivan Products Skylite wheels.
The nose wheel itself was easy to install. The jet uses a Fults brake system on the nose wheel. The brake is a simple design; there is nothing high-tech about it. I have been told that this model doesn't need a brake, but it has to be there according to AMA turbine rules (refer to Document 510-D on the AMA Web site). The system is basically a line with a spring between the two and is activated with a mini servo. The brake part is just a flapper that presses against the wheel.
The Shock Jet comes with a 45° UAT (Universal Air Trap) holder that you glue in place. There is plenty of room for everything up front. There is also a battery compartment in the front, with a trap door on the bottom side; it has a spring hinge installed. Even the canopy has two spring-loaded hinges installed.
Fuel tank and engine installation
The Shock Jet calls for a Du-Bro 50-ounce fuel tank with the Super Bee. Since I was going to use the Jet Central Super Falcon, I needed something much bigger. I called Jet-Tech to see what we could do. I gave the company the measurements, and the staff came up with a 93-ounce fuel cell for me. I had to do some cutting to get it to fit on the front tray, but it was minimal. You must mount the tank before the engine.
Installing the engine took a bit of modification too. The Super Bee and JetCat turbines are a drop-in fit. I had to cut a section from the bottom for the Falcon—it was easy to do. I also had to redrill one set of holes to mount the engine. That was all that was needed.
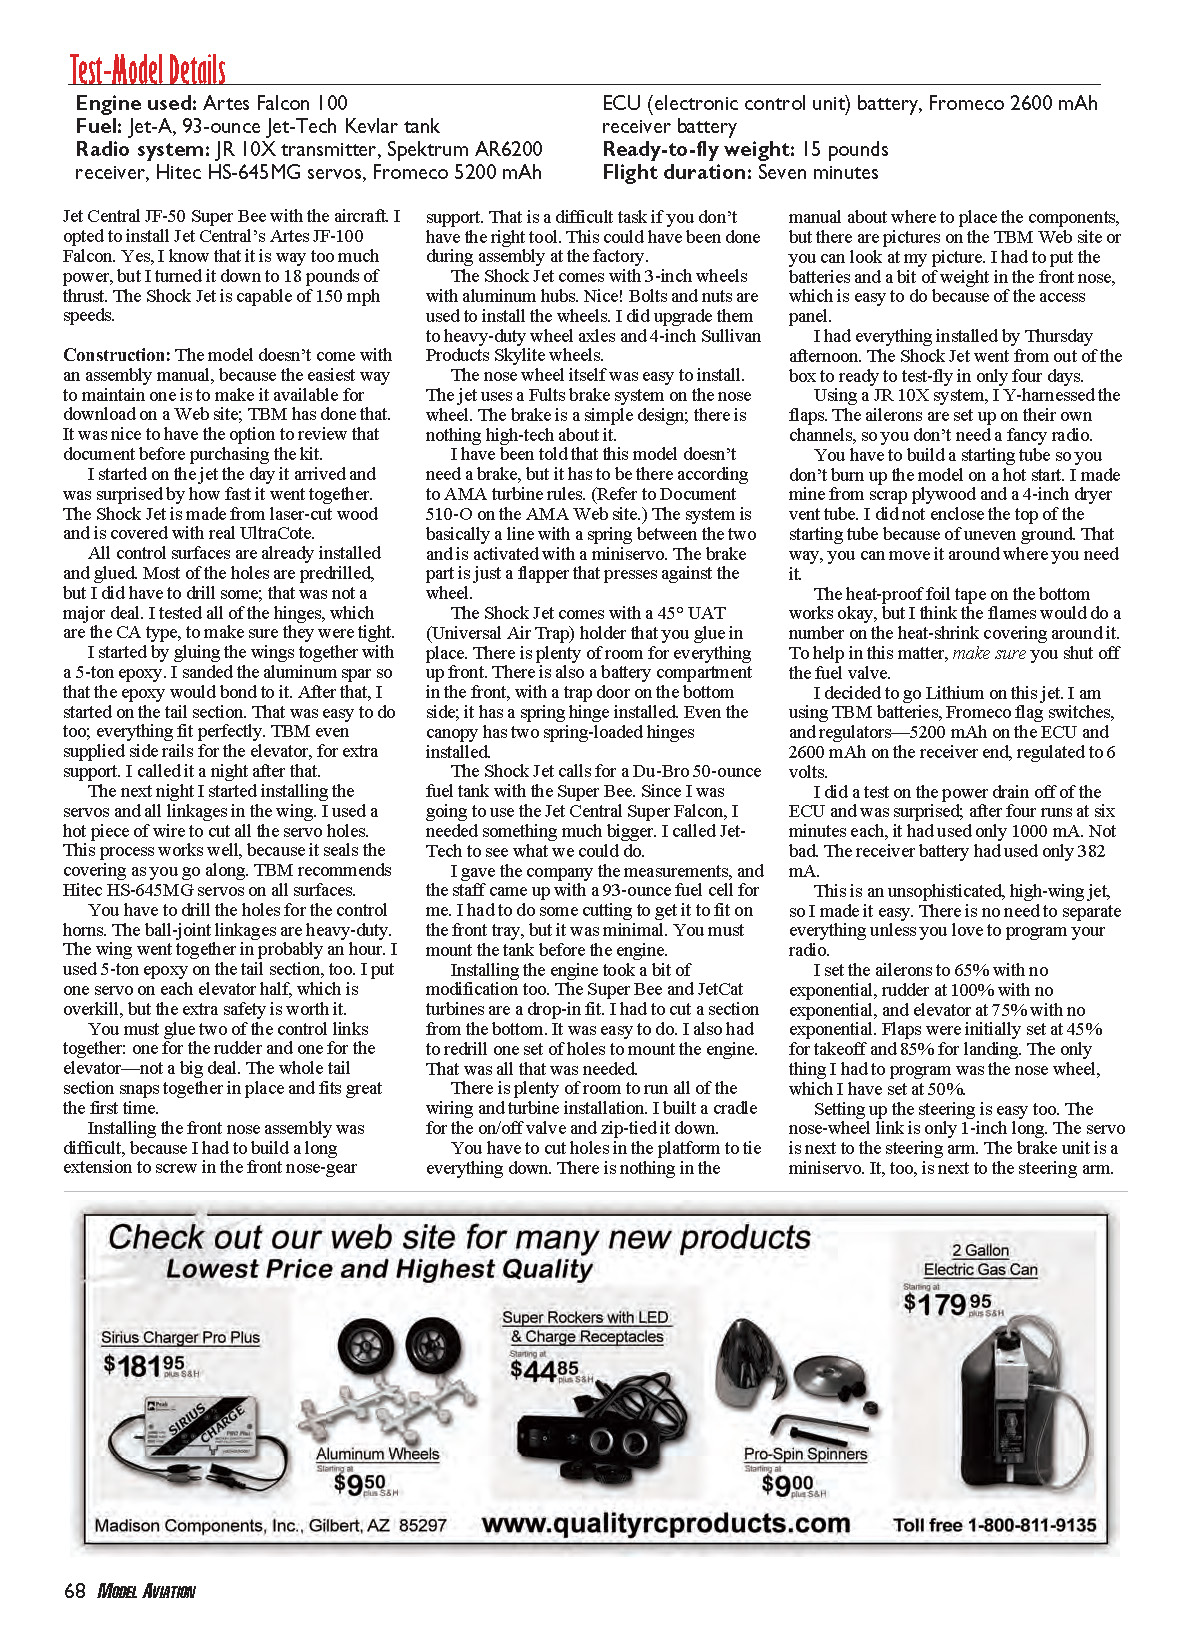
There is plenty of room to run all of the wiring and for turbine installation. I built a cradle for the on/off valve and zip-tied it down. You have to cut holes in the platform to tie everything down. There is nothing in the manual about where to place the components, but there are pictures on the TBM Web site or you can look at my picture. I had to put the batteries and a bit of weight in the front nose, which is easy to do because of the access panel.
I had everything installed by Thursday afternoon. The Shock Jet went from out of the box to ready to test-fly in only four days.
Radio, starting and electricals
Using a JR 10X system, I Y-harnessed the flaps. The ailerons are set up on their own channels, so you don't need a fancy radio.
You have to build a starting tube so you don't burn up the model on a hot start. I made mine from scrap plywood and a 4-inch dryer vent tube. I did not enclose the top of the starting tube because of uneven ground. That way, you can move it around where you need it. The heat-proof foil tape on the bottom works okay, but I think the flames would do a number on the heat-shrink covering around it. To help in this matter, make sure you shut off the fuel valve.
I decided to go Lithium on this jet. I am using TBM batteries, Fromeco flag switches, and regulators—5200 mAh on the ECU and 2600 mAh on the receiver end, regulated to 6 volts. I did a test on the power drain off of the ECU and was surprised; after four runs at six minutes each, it had used only 1000 mA. Not bad. The receiver battery had used only 382 mA.
This is an unsophisticated, high-wing jet, so I made it easy. There is no need to separate everything unless you love to program your radio.
I set the ailerons to 65% with no exponential, rudder at 100% with no exponential, and elevator at 75% with no exponential. Flaps were initially set at 45% for takeoff and 85% for landing. The only thing I had to program was the nose wheel, which I have set at 50%.
Setting up the steering is easy too. The nose-wheel link is only 1 inch long. The servo is next to the steering arm. The brake unit is a mini servo next to the steering arm. Tie the string to one end of the spring and tie another piece to the other end. Tie one end to the servo arm and the other to the brake, and you are finished. That’s basically it on setup. There are no retracts, gear doors, air cylinders, or sequencers; it’s that easy.
Performance and flying impressions
The Shock Jet is carrying approximately 100 ounces of fuel onboard for the Artes JF-100 Falcon turbine. That gives me roughly seven minutes of fast and furious flying. If you go with the recommended smaller Super Bee or a JetCat, a 50-ounce tank will work fine.
Make sure to use an FOD (Foreign Object Damage) screen. It is a wise and inexpensive investment for your turbine!
After close to a minute and a half (warm-up and checks), it was time to try out this model. I performed a snap roll with it, which was perfect. Next were spins, loops, rolls, inverted flight, high-speed turns, knife edge, slow flybys, and stops!
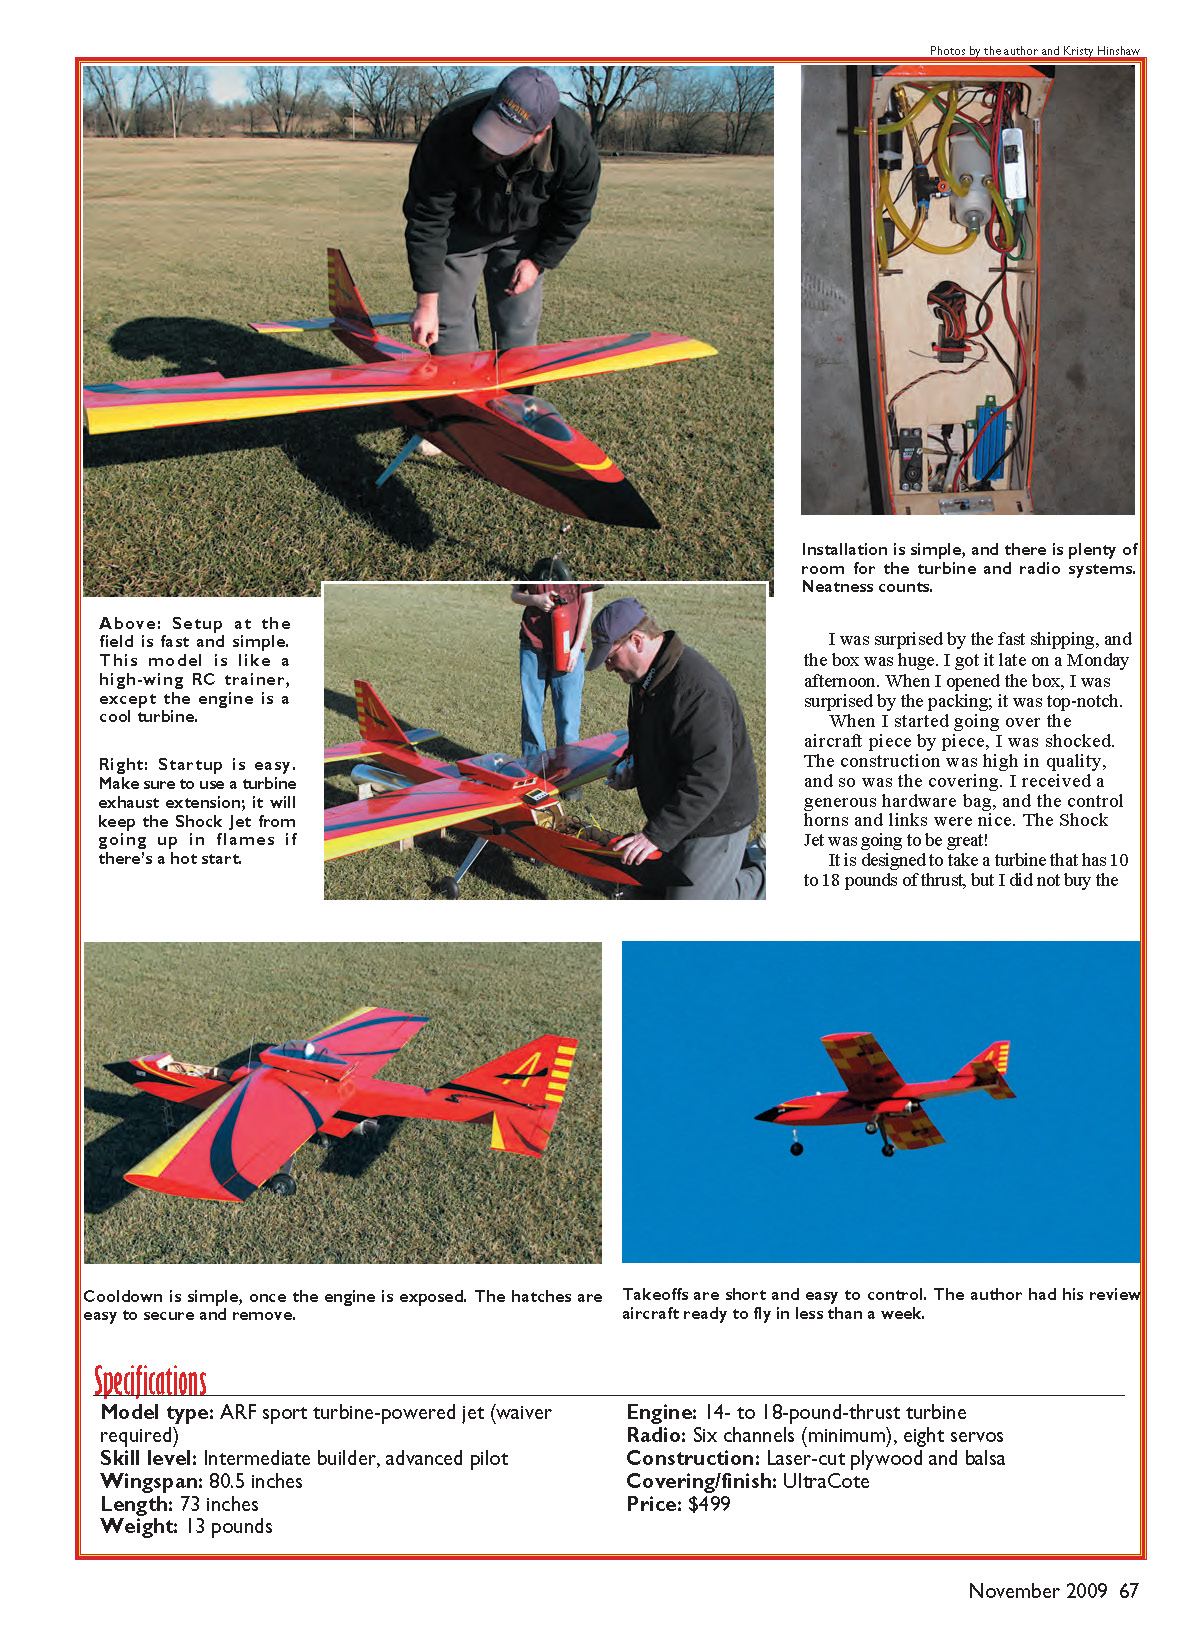
Testing the flaps caught me on the first flight. I forgot to dial in elevator compensation for the flap-induced pitch change, so I had to correct it manually. Talk about slow—this thing almost stopped in the pattern, and I still had full control. I was so impressed that it took me by surprise!
The first flight went great until landing. I had no elevator mix set, so I lined up the jet on final and dropped the flaps. It ballooned, so I added down-elevator and pushed the nose back down. After that it settled in for a wonderful landing with no brakes needed. The model rolled approximately 25 feet and stopped.
I checked it out, took the wing off to inspect, and all was okay. So I dialed in some elevator mix and flew again. I changed the flap setting to 40% for takeoff and 80% for landing. I don’t use flaps for takeoff, because you don’t need them unless you want to get your airplane off the ground in 10–15 feet.
On later flights, everything went as on the first. I increased all throws to 100% with no exponential. I did all of the crazy stuff again, and slow flights were dead on. The landing was even better too, and I still didn’t need the brake.
The TBM Shock Jet flies like a big trainer, but it can handle everything you can put into it, at least up to 30 Gs. Rolls are terrific and fast but controllable. Inverted flight is great. The model can perform snaps, spins, tail slides, loops, hammerheads, and knife-edge flight.
The Falcon is a great engine, and it gives the model unlimited vertical performance—even while carrying the extra weight. This is not a Sunday flier; it is an everyday flier.
If you are looking for a nonscale jet and don’t have a lot of money, the Shock Jet is for you. You can have it in the air in roughly four evenings. There is also room in the model to add a smoke system.
Anyone who can handle an intermediate aerobatic airplane can easily take on the TBM Shock Jet—and do it for less than $3,000. If you get a used turbine, please make sure that you know what you are getting and you know its history.
Gerry J. Hinshaw [email protected]
Manufacturer/Distributor:
- TBM
1650 Honore Ave. Sarasota, FL 34232 (941) 342-8685 www.troybuiltmodels.com
Sources:
- Jet Artes Gulf Coast
(941) 468-1246 www.jetartes.com
- Fromeco Scale Avionics LLC
(503) 766-3261 www.fromeco.org
- Horizon Hobby, Inc.
(217) 352-1913 www.horizonhobby.com
- Sullivan Products
(410) 732-3500 www.sullivanproducts.com
- Jet-Tech fuel tanks: Gary Mueller
(715) 272-1917 [email protected]
- JetCat USA
(805) 226-8700 www.jetcatusa.com
- Du-Bro
(800) 848-9411 www.dubro.com
Other Printed Reviews:
- None known at date of publication.
Transcribed from original scans by AI. Minor OCR errors may remain.

