
Power Switch: Graupner MX-16 iFS
Greg Gimlick
THE NEW GRAUPNER MX-16 iFS offers a way to take part in the 2.4 GHz revolution for a reasonable price and offers programmability that may shock you. Although it might not be a complete paradigm shift, it is different from most radios available in the US today.
This eight-channel system comes out of the box with four defined functions assigned to the two gimbal sticks. Beyond that, you’re on your own to define the other switches and functions. For those of us coming from radios such as the Multiplex Evo, this is a gift: we’re used to being able to assign functions to whatever switch or dial we want, and this feature of the MX-16 iFS feeds that desire.
If you’re coming from radio brands that have predefined controls and switches, it might be confusing at first. Once you work through the manual and realize the benefits, you’ll likely never go back.
The Graupner case may be familiar to JR radio users; it’s the same case used by JR. The MX-16 arrives foam-encased in a colorful box. A compatible charger is required. The manual is included in paper and CD form.
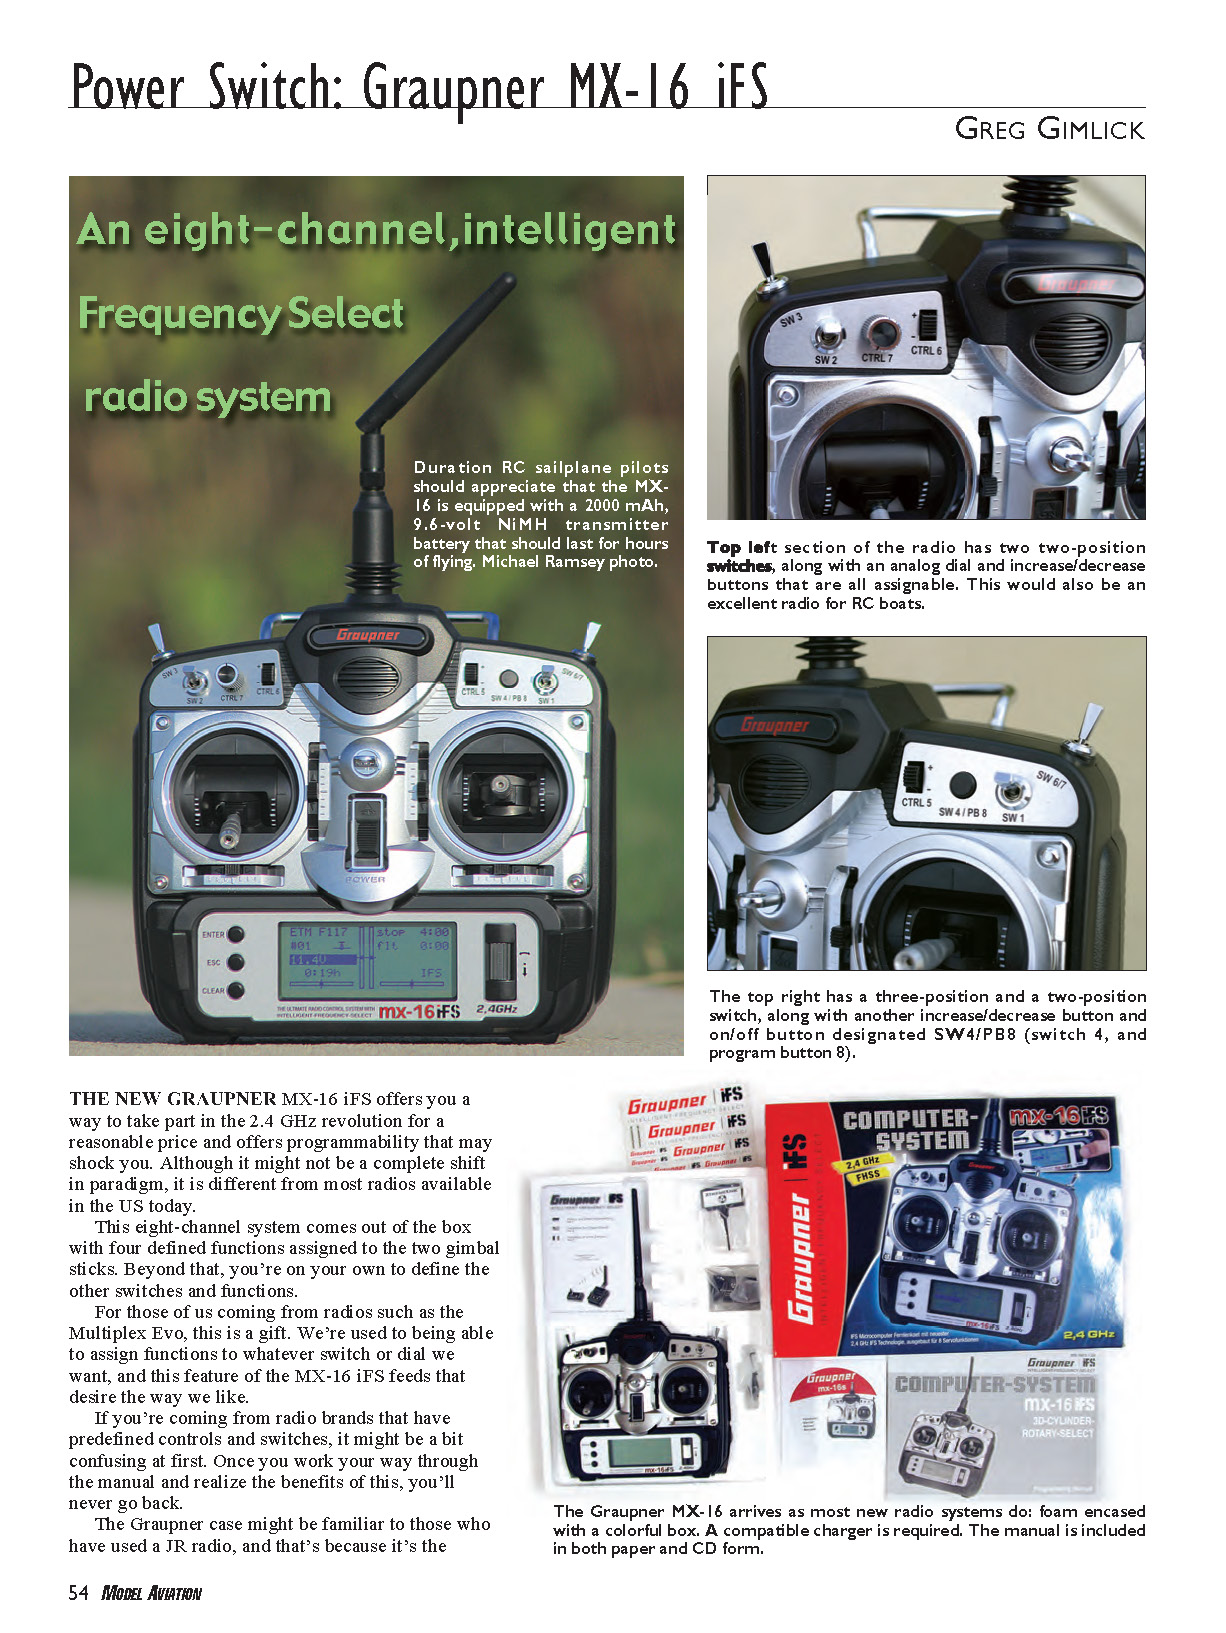
An eight-channel, intelligent-frequency-select radio system, the MX-16 is equipped with a 2000 mAh, 9.6 V NiMH transmitter battery that should last for hours of flying — duration RC sailplane pilots should appreciate that.
Pressing the ENTER button once brings up the main programming window menu. Actuate the roller right or left to highlight a submenu, and press the roller to access it. From the start-up screen, pressing down on the roller shows servo positions and indicates whether dual elevator and/or dual aileron servos are correctly linked.
Pluses and Minuses
- Assignable switches and controls.
- Easy-to-read screen.
- Plenty of predefined mixes.
- Adjustable modes to comply with international travel.
- Easy to program.
- Rock-solid 2.4 GHz link and response.
- Only 12 model memories.
- No transmitter charger (wall wart).
Transmitter Specifications
- Frequency band: 2.400–2.4835 GHz
- Control functions: Eight
- Servo resolution: 65,536 steps (16-bit)
- Temperature range: −25°C to +125°C
- Operating voltage: 9.6–12.4 V
- Battery: 2000 mAh, 9.6 V NiMH pack
- Current drain (approx.): 185 mA
- Dimensions (approx.): 195 × 190 × 85 mm
- Weight (approx.): 850 g including transmitter battery
XR-16 iFS Receiver Specifications
- Operating voltage: 2.9–25 V
- Current drain (approx.): 70 mA
- Frequency band: 2.4–2.4835 GHz
- Servo resolution: 65,536 steps (16-bit)
- Servo signal accuracy: ±10 ns
- Aerial length (approx.): 3 cm, completely enclosed in receiver case
- Servo functions: Eight
- Temperature range: −15°C to +55°C
- Dimensions (approx.): 54 × 29 × 14 mm
- Weight (approx.): 19 g
Program Features
- Bidirectional communication between transmitter and receiver.
- Tremendously fast transmission rate for extremely fast system response, and 16-bit encoding for exceptionally high resolution of 65,536 steps per control channel.
- Virtual elimination of interference caused by motors, servos, and electrical-charge effects (metal-to-metal noise).
- Removable folding stub aerial antenna.
- Methods of operation and programming based on proven concepts of the MC-19 to MC-24 Graupner radios.
- High-contrast graphic screen for setup parameters, operating modes, timers, and operating voltage.
- Eight control functions with a simplified method of assigning auxiliary functions such as switches and proportional controls.
- Twelve model memories for storing all model-specific programming and setup parameters.
- Transmitter case includes four switches (one three-position), one momentary button, one analog control, two digital controls — all freely programmable.
- Function encoder with rotary cylinder and three momentary buttons for programming and accurate setup.
- When you change modes, all affected settings are switched at the same time.
- Graphical servo display provides a clear overview of servo setup and a quick method of checking servo travels.
- Receiver output swap (reassign outputs).
- Fixed-wing menu for: 1 AIL, 2 AIL, 2 AIL + 2 FLAP, V-tail, delta/flying wing, two elevator servos.
- Fixed-wing mixer options: diff/ail, diff/flaps, ail->rud, ail->flaps, brake/elev, brake/flap, brake/ail, elev/flap, elev/ail, flap/elev, flap/ail, and diff reduction.
- Helicopter menu: 1-point, 2-point, 3-point, and 4-point linkages (1-servo, 2-servo, 3-servo — including configurations with two roll servos or two pitch servos — and 4-servo at 90°).
- Servo travel adjustment ±150% for all servo channels, variable for each end point separately (Single Side Servo Throw).
- Subtrim for fine-tuning the neutral position of all servos.
- Servo reverse, programmable for all servos.
- EXPO/DUAL-RATE system, separately variable and switchable in flight.
- Mixer functions: aileron differential mixer, butterfly mixer, flaperon mixer, and three freely programmable mixers.
- Programmable fail-safe function in receiver with "hold mode" and "move to preset position" options, variable separately for each servo channel.
- Stopwatch/countdown timer with alarm function.
System Overview and Operation
Graupner utilizes 2.4 GHz intelligent-frequency-select technology to give its bi-directional receiver a rock-solid link. That makes future expansion of capabilities and telemetry possible. Graupner employs a full-time frequency-hopping mode as the default, which can be changed to adaptive if desired.
The system comes with the MX-16 transmitter and one eight-channel receiver (no servos, charger, or receiver battery/pack) for a retail price of $299. You’ll need to get a charger or use one of your fast chargers with an appropriate connector for the 2000 mAh, 9.6 V transmitter battery. If you have a JR wall-wart charger, you can use it. Since many fliers already have dozens of chargers and seldom use the receiver packs or servos that come with radio systems, I see this as a bonus rather than an omission.
From the beginning: when you turn on the radio, you go through normal steps of setting up a new model, similar to most radios, with some slight but significant differences. You can easily select one of four transmitter modes instead of having to order one set up that way from the manufacturer. Most US fliers use Mode 2, but Modes 1, 3, and 4 are also available.
Stick length is adjustable, and you can change self-neutralizing/spring tension by opening the back of the transmitter case and adjusting screws and springs. You adjust screen contrast using the rotary cylinder. Pushing ENTER takes you to the main menu, and the rotary cylinder scrolls choices. If you get confused, hitting ESC returns you to the main menu. The Clear button zeroes out a setting without having to spin a wheel back to zero.
When learning a new radio, I like to "breadboard" it: set up the receiver and plug servos into each slot while laying them out on a large sheet of paper and labeling each servo’s purpose. This helps you work through each setup step and observe what happens on the receiver end.
The Base Menu sets up primary settings for the aircraft: stick mode, tail type, aileron/flap type, clock style, and flight phases. The wheel scrolls choices and configures the radio for things like two aileron servos automatically.
There is a setting for "receiver out" which allows reassignment of transmitter channel outputs to receiver channel numbers. The default maps channel 1→1, channel 2→2, etc., but you can tell channel 1 to drive channels 1, 2, and 3 on the receiver if desired.
After the Base Menu, go to Control Settings to define which switches control which servos beyond the preprogrammed ones. You can assign functions to whatever switches you prefer, so flight mode or gyro switches can be relocated to suit your tastes.
Servo, Rates, and Phases
In the Servo Settings menu you can adjust subtrim, reversal, and travel percentage. You can choose symmetrical or asymmetrical travel around neutral.
From Servo Settings, check Dual Rates and Exponential (EXPO). You can assign the switch you want to control dual rates and can make one switch handle both aileron and elevator dual rates, or assign the same for rudder.
Phase Trim functions are particularly handy for advanced airplanes and helicopters. You can define three flight phases for takeoff, speed, thermal, landing, aerobatics, tow, etc. With a switch flip you can go into a preprogrammed landing mode without making changes mid-flight.
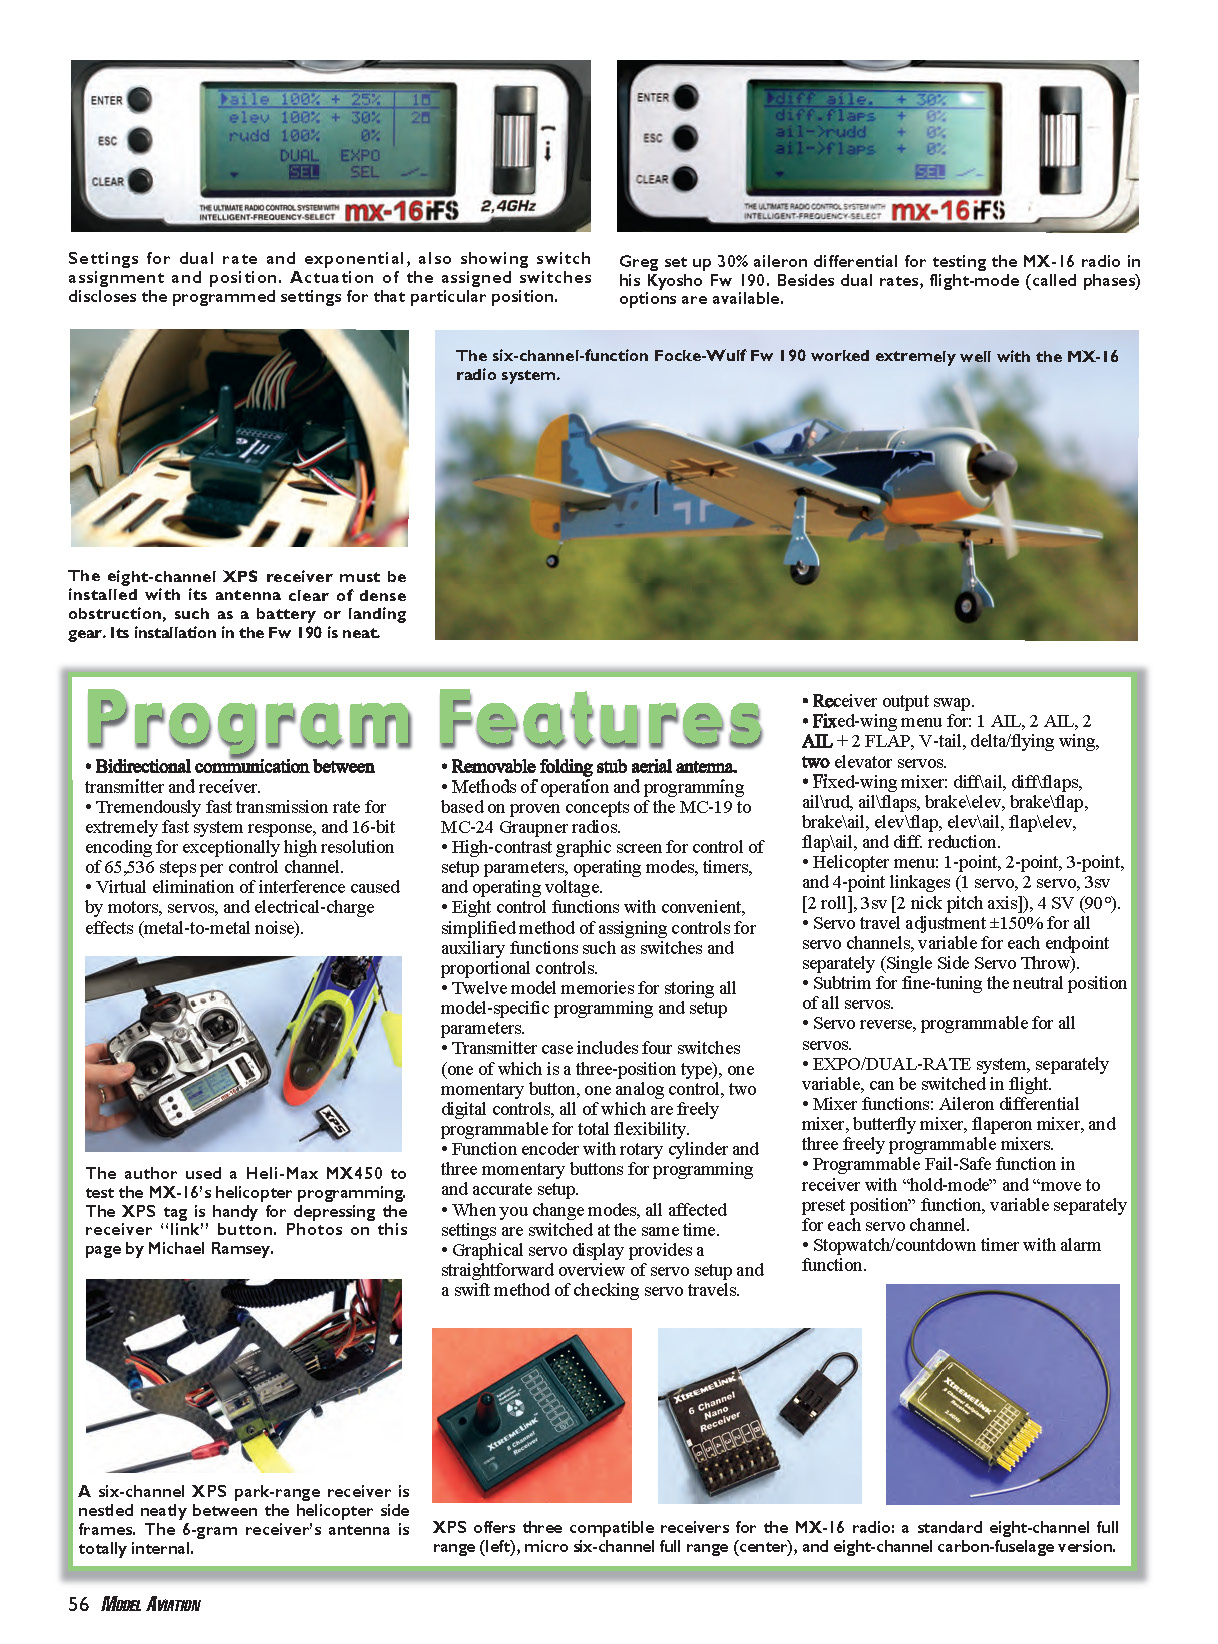
Helicopter users: note that throttle and collective channel assignments are swapped compared to airplane programming. This keeps aileron, elevator, and cyclic servos grouped closely for CCPM mechanics. Once you remember the difference, programming helicopters is as comfortable as programming airplanes.
Mixes and Differential
The MX-16 simplifies setting mixes: many predefined mixes exist for helicopter and fixed-wing aircraft. Select the mixes you want and set the percentage. For example, to get 15% elevator when flaps are full down, select the "brake→elevator" option and choose the flap (brake) switch. To add rudder with aileron turns, select "ail→rud" and set the percentage.
Differential is predefined: select the differential mix and dial in the percentage—no mechanical changes to the wing are required. Differential can be given positive or negative values so you can set the correct direction for your setup.
Sailplane pilots will appreciate predefined mixes for crow, butterfly, brakes, etc., with options for differential flaps and reduced differential. Most of the work is done for you.
A major plus is the three freely programmable mixes left for custom use. Few radios in this price range offer that many free mixes. Most pilots won’t need them, but they’re invaluable for experiments and unusual control arrangements.
Model Memories
The transmitter holds 12 model memories, which can be any mix of model types; programming and mix setups are kept with each memory. Every memory starts as a clean slate (in Mode 1). If you fly Mode 2, a time-saving trick is to select Mode 2 in the first memory and copy that model to every model slot. Helicopter users should also change the pitch-movement direction (low pitch default is with the stick reversed—full forward).
For safety, an alarm sounds if the throttle is above idle when the transmitter is turned on. In helicopter mode, an alarm will sound if the idle-up switch is out of the normal mode to help prevent a hot start. There are three idle-up choices.
Receiver and Installation
The MX-16 iFS comes with an eight-channel XR-16 receiver with a single stub antenna on the top. Each plug is labeled with its number, and the receiver arrives bound to the transmitter. You can add more receivers and follow simple binding instructions in the manual.
Once bound, the link is acquired extremely fast. In advanced programming modes you can change many receiver parameters, such as hopping mode; these must match the transmitter’s settings.
A useful diagnostic feature is the receiver’s glowing LED: if it changes from green to orange during operation, voltage has dropped below acceptable levels. Do not operate until you diagnose and correct the issue. Most occurrences are due to an undersized receiver battery or insufficient BEC. A voltage dip below 4.4 V for longer than 25 ms triggers the low-voltage warning.
When installing the receiver, ensure no wires contact or come close to the receiver antenna. This can cause interference regardless of the system type. The switch to 2.4 GHz did not eliminate the need for careful installation; secure wires and you’ll avoid problems.
Because the MX-16 uses Xtreme Power Systems (XPS) iFS radio technology, any XPS receiver works with the Graupner radio. Besides the standard eight-channel XtremeLink receiver (identical to the XR-16 included), an eight-channel sailplane receiver for lighter-weight, low-vibration applications is available; it includes an antenna extension for use outside carbon-fiber fuselages. For park flyers, a six-channel XtremeLink receiver is available for shorter-range applications; it does not have an external antenna. All XPS receivers are FCC-licensed.
International Use
The MX-16 is well suited for international travel: you can set output power and hopping modes to comply with country-specific regulations by changing transmitter and receiver advanced programming modes as described in the manual. The radio arrives programmed to the US standard, so you’re set domestically.
In-Flight Performance and Conclusion
The bottom line is how a system performs in the air and how easy it is to set up. In both respects, the MX-16 is a winner. Setup is simple, and the predefined mixes and settings cover about 90% of needs. The radio-to-model link is solid, even in crowded environments.
In one field test with a foam trainer at roughly 50 feet in level cruise, I turned the transmitter off and then back on. The model went into fail-safe mode and then rapidly regained control when the link was re-established. That recovery was quick and barely noticeable (do not test your system this way except under controlled conditions).
My only wish is that the MX-16 held more than 12 models in memory. If that’s my only complaint, this radio is still a clear winner.
MA
Greg Gimlick [email protected]
Manufacturer/Distributor
Graupner / Xtreme Power Systems 2440 Kiowa Blvd. N. #102 Lake Havasu City, AZ 86403 [email protected] www.xtremepowersystems.net
Transcribed from original scans by AI. Minor OCR errors may remain.

