
PRECISION AEROBATICS ADDICTION XL
Jay Smith [email protected] Tom Sullivan [email protected]
First Impressions
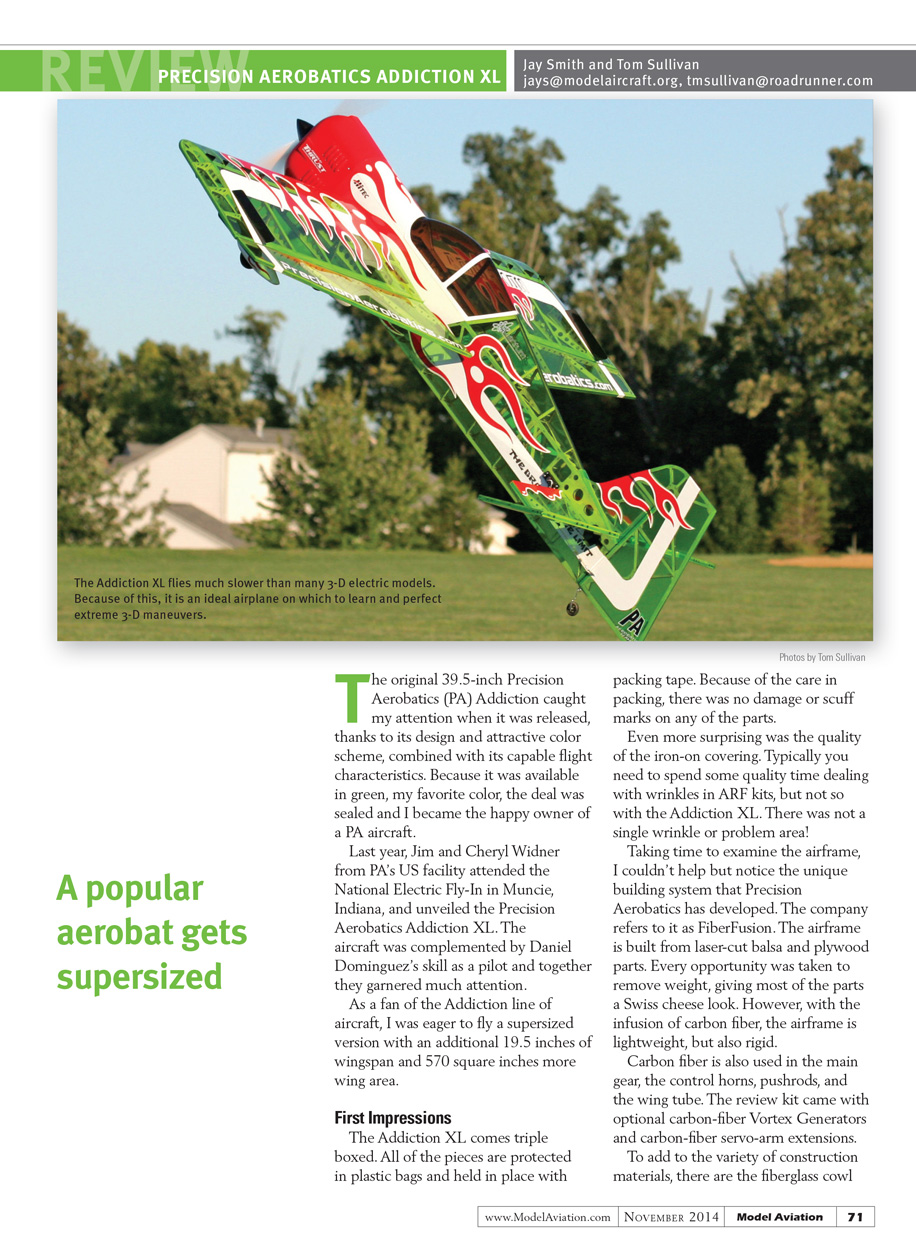
The original 39.5-inch Precision Aerobatics (PA) Addiction caught my attention when it was released because of its design and attractive color scheme. Because it was available in green, my favorite color, I became the happy owner of a PA aircraft.
Last year, Jim and Cheryl Widner from PA’s U.S. facility attended the National Electric Fly-In in Muncie, Indiana, and unveiled the Precision Aerobatics Addiction XL. The aircraft was complemented by Daniel Dominguez’s skill as a pilot and together they garnered much attention.
As a fan of the Addiction line, I was eager to fly the supersized version with an additional 19.5 inches of wingspan and 570 square inches more wing area.
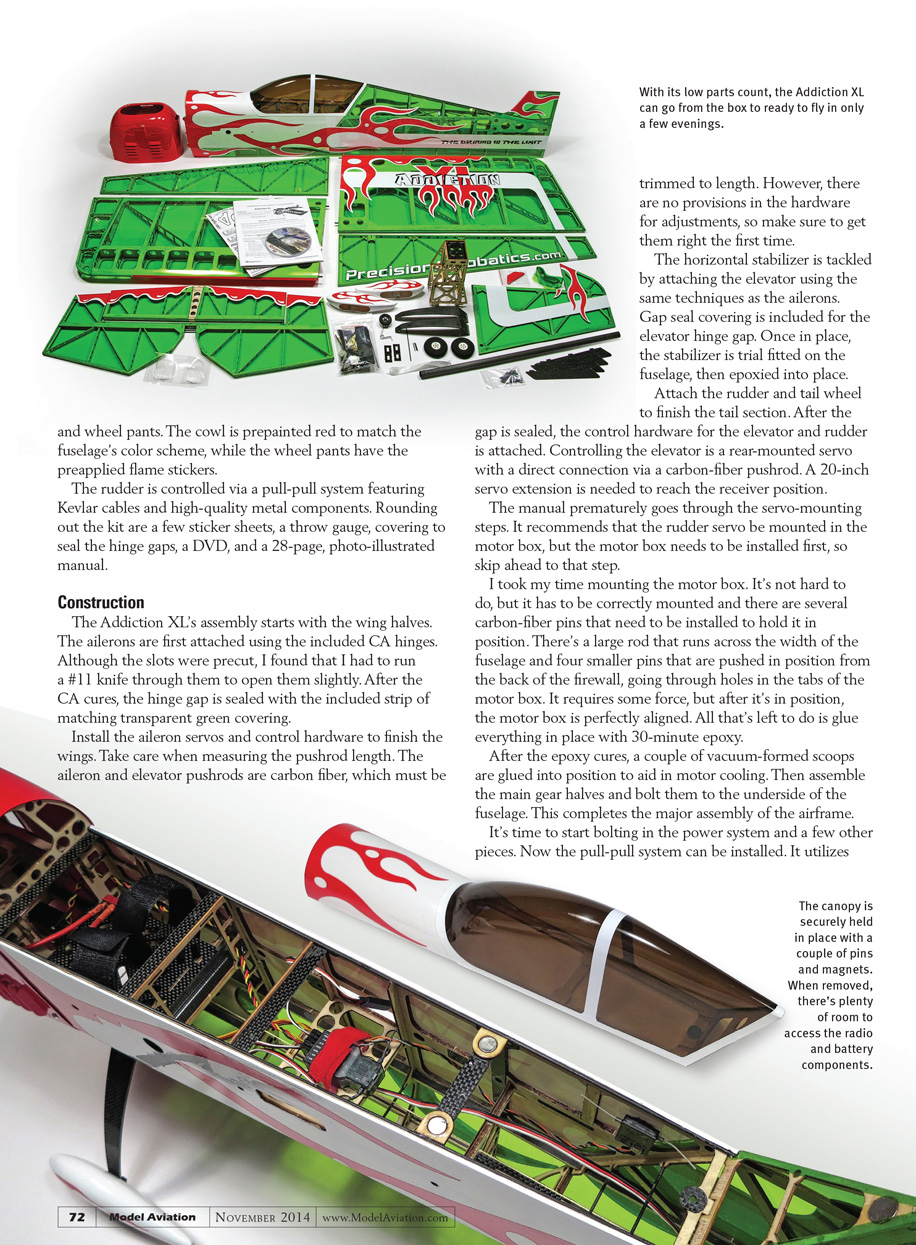
The Addiction XL comes triple boxed. All parts are protected in plastic bags and held in place with packing tape, and I found no damage or scuff marks on any components. I was also impressed by the quality of the iron-on covering—there were no wrinkles or problem areas.
The airframe uses Precision Aerobatics’ FiberFusion building system. It’s built from laser-cut balsa and plywood parts, with many lightening holes, and is reinforced with carbon fiber for rigidity and low weight. Carbon fiber is also used in the main gear, control horns, pushrods, and wing tube. The review kit included optional carbon-fiber vortex generators and carbon-fiber servo-arm extensions.
To add variety, the kit includes a fiberglass cowl and wheel pants. The cowl is prepainted red to match the fuselage color scheme, while the wheel pants have preapplied flame stickers. The rudder is controlled via a pull-pull system using Kevlar cables and quality metal hardware. The kit also includes sticker sheets, a throw gauge, hinge-gap covering, a DVD, and a 28-page photo-illustrated manual.
Construction
Assembly starts with the wing halves. The ailerons are attached using the included CA hinges. Although the hinge slots were precut, I opened them slightly with a #11 knife. After the CA cures, the hinge gap is sealed with the included strip of matching transparent green covering.
Install the aileron servos and control hardware to finish the wings. Take care when measuring pushrod length: the aileron and elevator pushrods are carbon fiber and must be trimmed to length. There are no provisions in the hardware for adjustments on these carbon pushrods, so get the lengths right the first time.
Attach the horizontal stabilizer and elevator using the same techniques as the ailerons. Gap-seal covering is provided for the elevator hinge gap. Once in place, trial-fit the stabilizer on the fuselage and epoxy it into position.
Attach the rudder and tailwheel to finish the tail section. Control hardware for the elevator and rudder is then installed. The elevator is driven by a rear-mounted servo connected directly by a carbon-fiber pushrod; a 20-inch servo extension is needed to reach the receiver.
The manual walks through servo-mounting steps prematurely: it recommends mounting the rudder servo in the motor box, but the motor box must be installed first. Skip ahead and install the motor box before mounting that servo.
Mounting the motor box requires care. Several carbon-fiber pins are installed to hold it in position: one large rod runs across the fuselage width, and four smaller pins are pushed in from the back of the firewall through tabs on the motor box. The fit is snug and requires force; once seated, the motor box is perfectly aligned. Glue everything in place with 30-minute epoxy.
After the epoxy cures, glue in a couple of vacuum-formed scoops to aid motor cooling. Assemble the main-gear halves and bolt them to the fuselage underside. That completes the major airframe assembly.
Now bolt in the power system and other components, then install the pull-pull rudder system. The pull-pull system uses Kevlar cables, which won’t stretch over time. Trim the cables to length; once routed through the fuselage, the included hardware allows for a quick, secure installation.
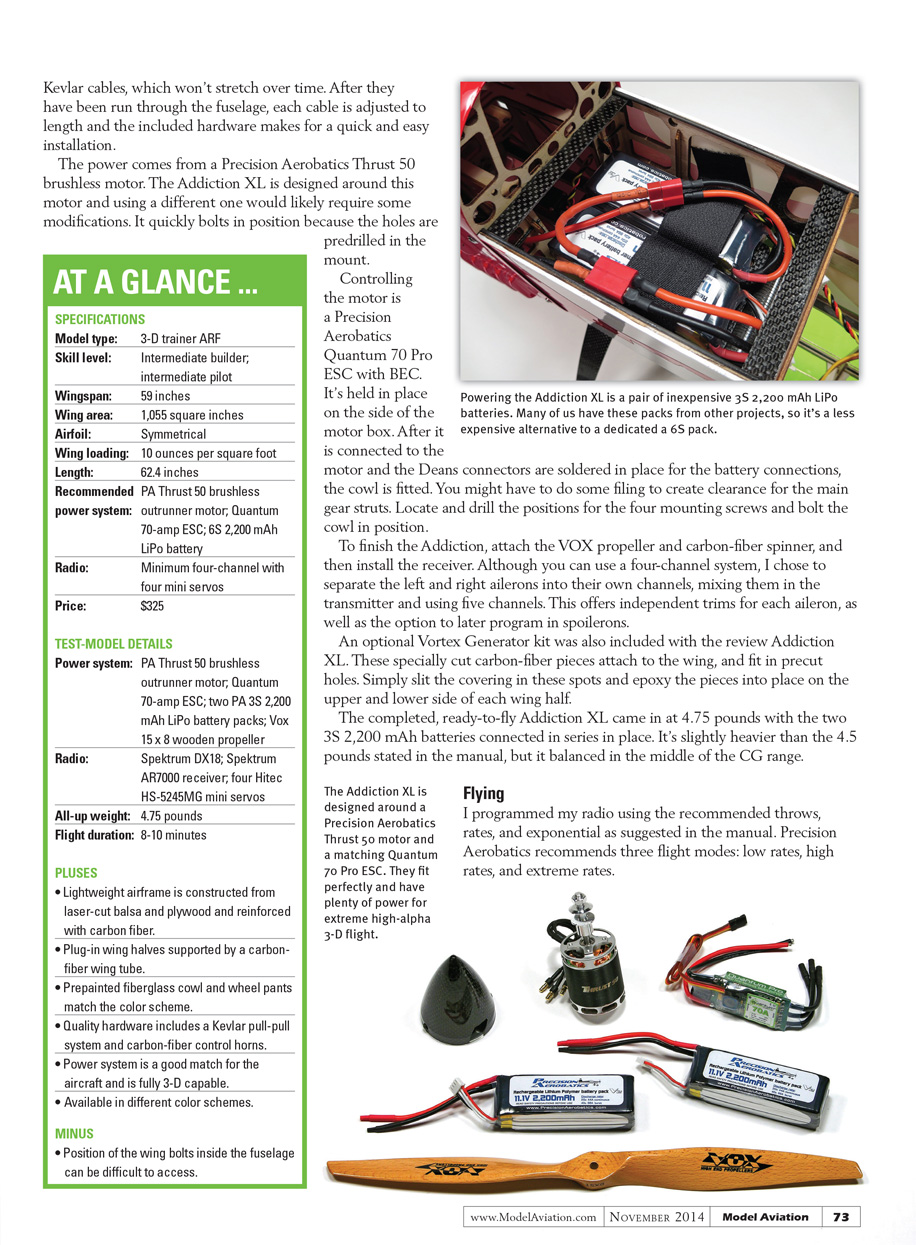
The powerplant is a Precision Aerobatics Thrust 50 brushless motor. The Addiction XL is designed around this motor, and using a different motor would likely require modifications. The motor bolts in quickly because the mount holes are predrilled.
The motor is controlled by a Precision Aerobatics Quantum 70 Pro ESC with BEC, mounted on the motor box side. After connecting the motor and soldering Deans connectors for the battery, fit the cowl. You may need to file clearance for the main-gear struts. Drill positions for the four cowl-mounting screws and bolt the cowl in place.
Finish the model by attaching the VOX propeller and carbon-fiber spinner, then install the receiver. Although a four-channel radio is possible, I separated the left and right ailerons into their own channels and mixed them in the transmitter, using five channels. This gives independent trim for each aileron and the option to program spoilerons later.
An optional vortex-generator kit was included with the review model. These specially cut carbon-fiber pieces fit in precut holes in the wing; slit the covering at those spots and epoxy the pieces into place on the upper and lower surfaces of each wing half.
The completed ready-to-fly Addiction XL weighed 4.75 pounds with two 3S 2,200 mAh batteries connected in series. That’s slightly heavier than the 4.5 pounds stated in the manual, but the model balanced in the middle of the CG range.
AT A GLANCE ...
- SPECIFICATIONS
- Model type: 3-D trainer ARF
- Skill level: Intermediate builder; intermediate pilot
- Wingspan: 59 inches
- Wing area: 1,055 square inches
- Airfoil: Symmetrical
- Wing loading: 10 ounces per square foot
- Length: 62.4 inches
- Recommended power system: PA Thrust 50 brushless outrunner motor; Quantum 70-amp ESC; 6S 2,200 mAh LiPo battery
- Radio: Minimum four-channel with four mini servos
- Price: $325
- TEST-MODEL DETAILS
- Power system: PA Thrust 50 brushless outrunner motor; Quantum 70-amp ESC; two PA 3S 2,200 mAh LiPo battery packs; VOX 15 x 8 wooden propeller
- Radio: Spektrum DX18; Spektrum AR7000 receiver; four Hitec HS-5245MG mini servos
- All-up weight: 4.75 pounds
- Flight duration: 8–10 minutes
- PLUSES
- Lightweight airframe constructed from laser-cut balsa and plywood reinforced with carbon fiber
- Plug-in wing halves supported by a carbon-fiber wing tube
- Prepainted fiberglass cowl and wheel pants match the color scheme
- Quality hardware, including Kevlar pull-pull system and carbon-fiber control horns
- Power system is a good match and fully 3-D capable
- Available in different color schemes
- MINUS
- Position of the wing bolts inside the fuselage can be difficult to access
Flying
I programmed my radio using the recommended throws, rates, and exponential as suggested in the manual. Precision Aerobatics recommends three flight modes: low rates, high rates, and extreme rates.
For the maiden, I had a helper hold the Addiction XL similar to a vertical hand launch to gauge hover throttle, which proved to be about half throttle. In low rates it needed only a few trim clicks.
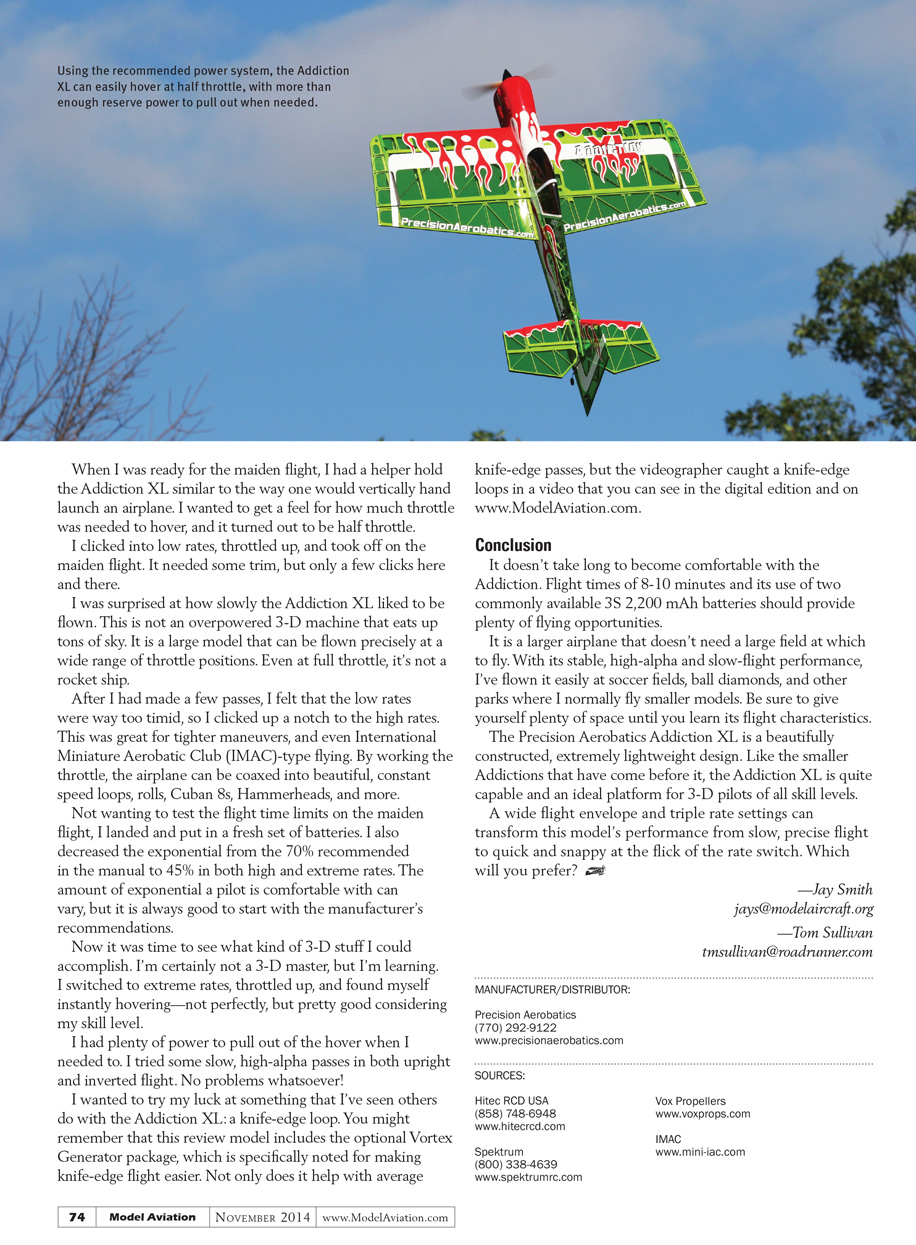
I was surprised at how slowly the Addiction XL likes to be flown. This is not an overpowered 3-D machine that eats up the sky; it’s a large model that can be flown precisely across a wide range of throttle settings. Even at full throttle, it’s not a rocket ship.
After a few passes I switched to high rates for tighter maneuvers and IMAC-type flying. By working the throttle, the airplane produces beautiful, constant-speed loops, rolls, Cuban 8s, hammerheads, and more.
Not wanting to test flight-time limits on the maiden, I landed and installed fresh batteries. I also reduced exponential from the manual’s 70% to 45% in both high and extreme rates. Pilot comfort with exponential varies, but starting with the manufacturer’s recommendations is wise.
On extreme rates I found myself hovering almost instantly—good enough for my skill level. I had ample power to pull out of the hover when needed and tried slow high-alpha passes upright and inverted with no issues.
I also tested a knife-edge loop. The optional vortex generators make knife-edge flight easier; they improved knife-edge passes and enabled the knife-edge loop you can see in the video on ModelAviation.com and in the digital edition.
Conclusion
It doesn’t take long to become comfortable with the Addiction XL. Flight times of 8–10 minutes using two commonly available 3S 2,200 mAh batteries provide plenty of flying opportunities.
It’s a larger airplane that doesn’t require a large field. With stable high-alpha and slow-flight performance, I’ve flown it at soccer fields, ball diamonds, and other parks where I normally fly smaller models—though give yourself plenty of space until you learn its characteristics.
The Precision Aerobatics Addiction XL is a beautifully constructed, extremely lightweight design. Like the smaller Addictions before it, the XL is quite capable and an ideal 3-D platform for pilots of many skill levels. A wide flight envelope and triple-rate settings let the model transform from slow, precise flight to quick and snappy at the flick of the rate switch—your preference will guide how you set it up.
—Jay Smith [email protected]
—Tom Sullivan [email protected]
Manufacturer / Distributor
- Precision Aerobatics
(770) 292-9122 www.precisionaerobatics.com
Sources
- Hitec RCD USA
(858) 748-6948 www.hitecrcd.com
- Spektrum
(800) 338-4639 www.spektrumrc.com
- Vox Propellers
- IMAC
Transcribed from original scans by AI. Minor OCR errors may remain.

