

Product Review
Eloy Marez 2626 W. Northwood, Santa Ana, CA 92704
Dymond Modelsports USA Ltd., in Oshkosh, Wisconsin, is a relatively new supplier to the radio-control modeler compared to pioneers such as Goldberg Models, Sig Manufacturing, Sullivan Products, and other household names. In its relatively short life, Dymond has established itself as a supplier of high-quality model products, mostly of European manufacture. Their range includes Almost Ready-to-Fly airplanes, small hardware items, and many products for electric flight enthusiasts.
Dymond Modelsports USA Super Turbo Charger
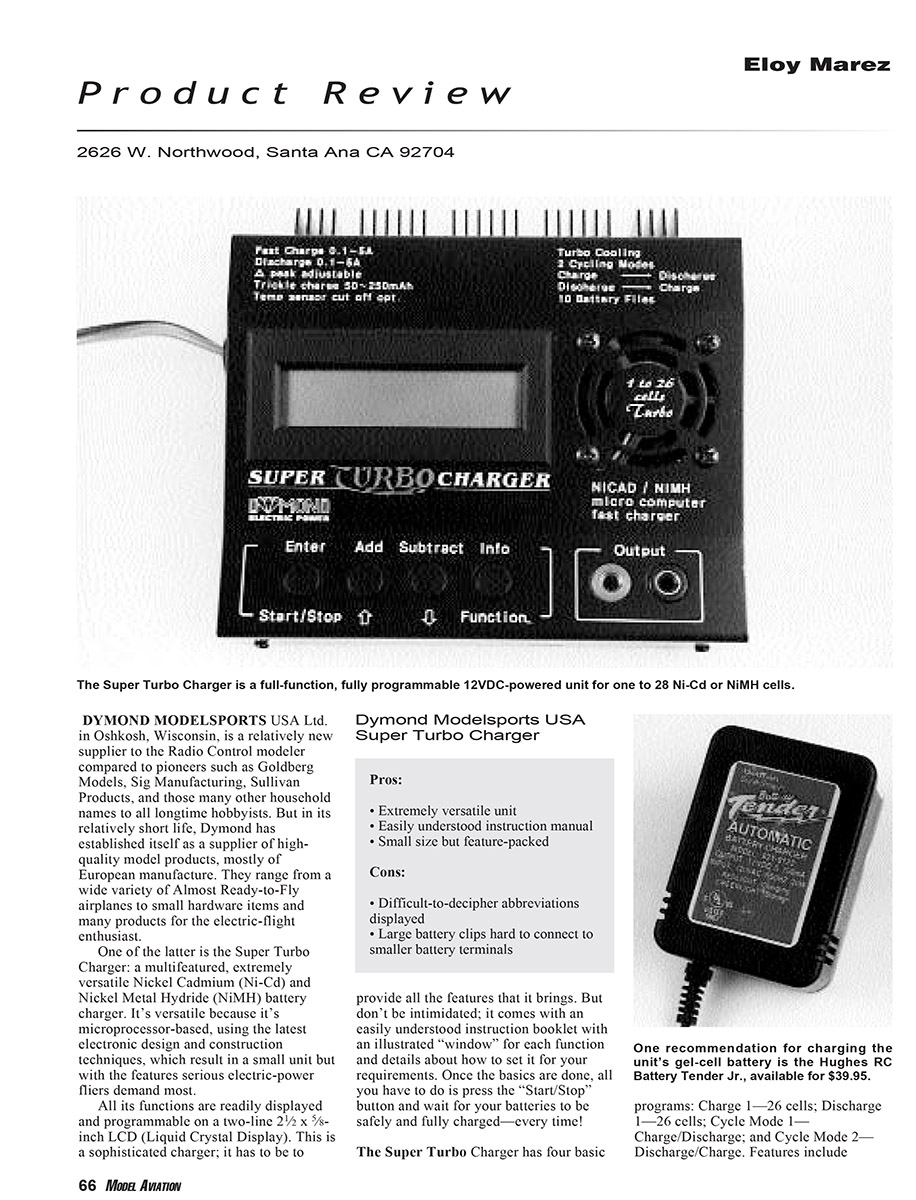
The Super Turbo Charger is a multifeatured, microprocessor-based charger for Nickel Cadmium (NiCd) and Nickel Metal Hydride (NiMH) batteries. It is compact yet feature-packed, aimed at serious electric-power fliers who need flexible, reliable charging.
All functions are displayed and programmable on a two-line 2-1/2 x 5/8-inch LCD. The charger ships with an illustrated instruction booklet that explains each function and how to program the unit. Once basics are set, charging is a matter of pressing the Start/Stop button and letting the charger do the work.
Features:
- Four basic programs: Charge (1–26 cells), Discharge (1–26 cells), Cycle Mode 1 (Charge/Discharge), Cycle Mode 2 (Discharge/Charge).
- Automatic mode, over-temperature protection, overcharge protection.
- Optional battery-temperature probe.
- Short-circuit protection.
- Programmable delta-peak detection for NiCd and NiMH.
- Trickle charge with adjustable rate.
- On/off audio signal.
- Automatic fan cooling.
Specifications:
- Physical size: 5-1/2 x 5 x 2 inches.
- Weight: 16 ounces.
- Cabinet: all-metal.
- Power: DC input required (10.5–15.0 V battery or regulated power supply). Do not use unregulated car-battery chargers as their output may be too noisy or unstable.
- Charge/discharge rate: user-adjustable from 0.1–5.0 A (100–5000 mA).
- Delta-peak sensitivity: 5–15 mV for NiCd; 3–10 mV for NiMH (instructions include recommendations).
- Trickle-charge rate: adjustable 0–250 mA.
- Output connections: banana jacks (user must provide mating harnesses/connectors).
Display and information:
- Shows charge time, charge/discharge capacity, delta-peak voltage, average discharge voltage under load.
- Displays error messages if a problem is detected.
Usage notes and safety
- Follow battery manufacturers’ recommended charge rates. Rule of thumb: 2× capacity for NiCd, 1× capacity for NiMH. Do not exceed about 1.3 A for transmitter/receiver packs — their wiring may overheat.
- Transmitters with diode protection in the battery circuit cannot be discharged through the charger connector; you must connect directly to the battery.
- Avoid "no-name" batteries; they are often lower quality. Use lower settings and careful monitoring until a battery’s behavior is known—delta-peak may be less pronounced and charging may not stop automatically. Always rely on temperature-probe and maximum-charge/time safety features when battery characteristics are uncertain.
- The Super Turbo includes a safety feature that cuts off charging if the input battery (e.g., a vehicle battery) experiences a substantial voltage drop. This protects the input source from full depletion.
Pros and Cons
Pros:
- Extremely versatile unit.
- Clear, illustrated instruction manual.
- Small size yet feature-packed.
- Solid feel push-button switches.
Cons:
- Abbreviations on the small display can be hard to decipher (instructions cover them).
- Large input battery clips are awkward for smaller field batteries and can cause poor contact.
- Requires user-supplied wiring harnesses and connectors for battery outputs.
Practical wiring advice:
- Use banana-jack output wiring tailored to your connector choice; banana plugs are readily available for the charger end.
- For all uses except transmitter/receiver packs, use heavy wiring (at least 12-gauge) and solder the banana plugs. Solderless plugs are less reliable and can cause erratic operation.
- High-quality plugs (for example, RadioShack 278-321) are recommended; crimp-style plugs should be soldered.
There is a small ferrite cylinder on the input wires to suppress RFI (radio-frequency interference) from the charger or power supply.
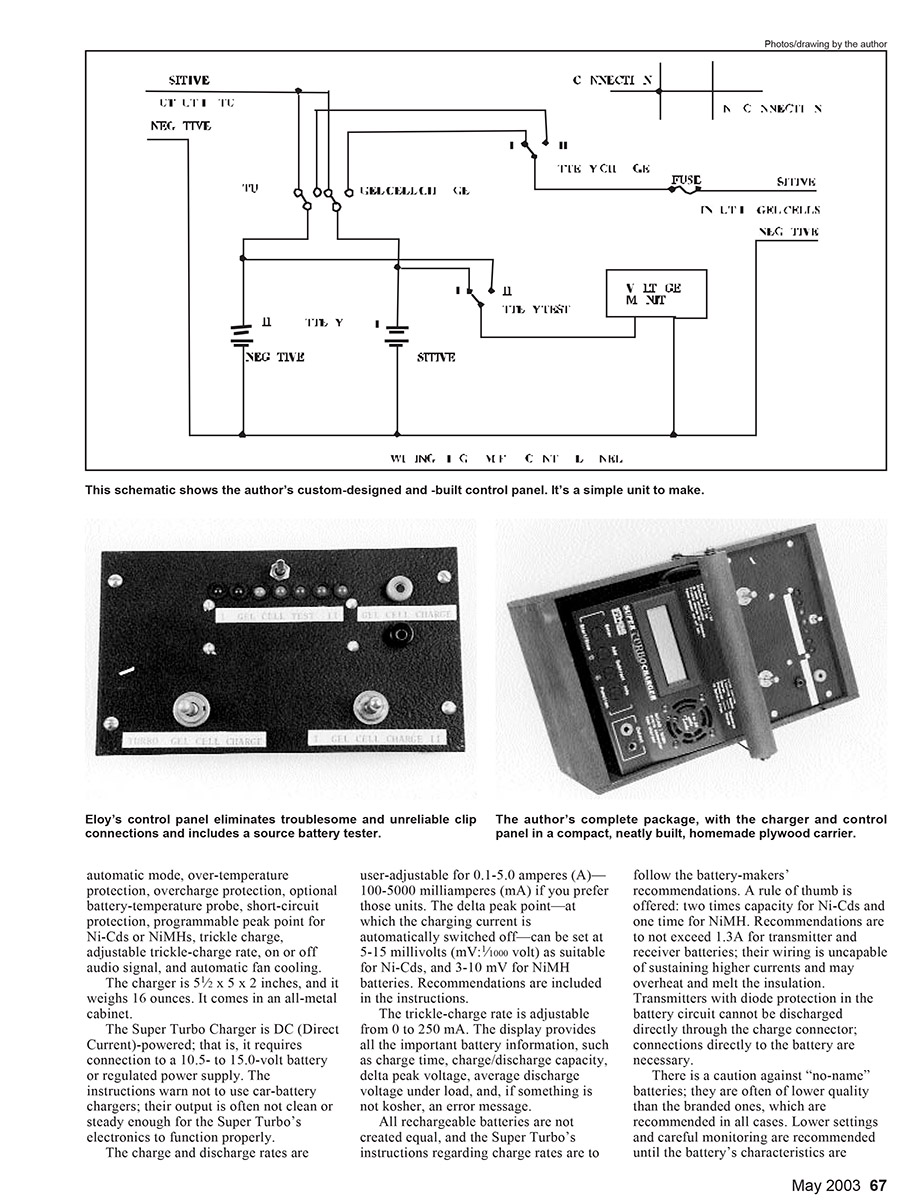
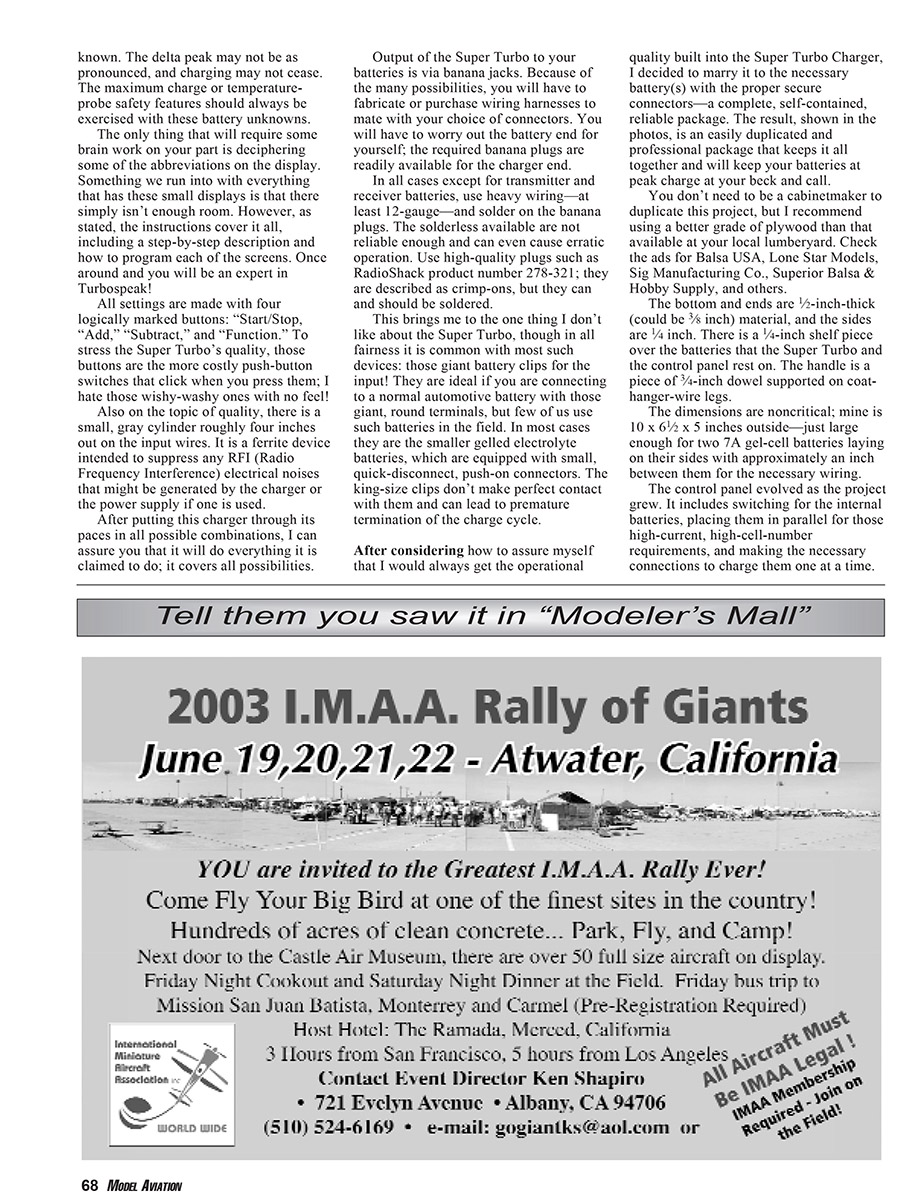
Field-box project (keeping the charger and batteries together)
To avoid poor contact from the large input clips and to ensure reliable operation, the reviewer built a custom field box to house the Super Turbo and its batteries. The project is straightforward and durable; construction recommendations:
- Material: use better-grade plywood (not low-grade lumberyard stock).
- Bottom and ends: 1/2-inch thick (3/8 inch could work).
- Sides: 1/4 inch.
- Shelf over batteries: 1/4 inch; the Super Turbo and control panel rest on this shelf.
- Control-panel support: use coat-hanger wire legs.
- Recommended outside dimensions (noncritical): about 10 x 6-1/2 x 5 inches — enough to hold two 7 A gel-cell batteries on their sides with ~1 inch between them for wiring.
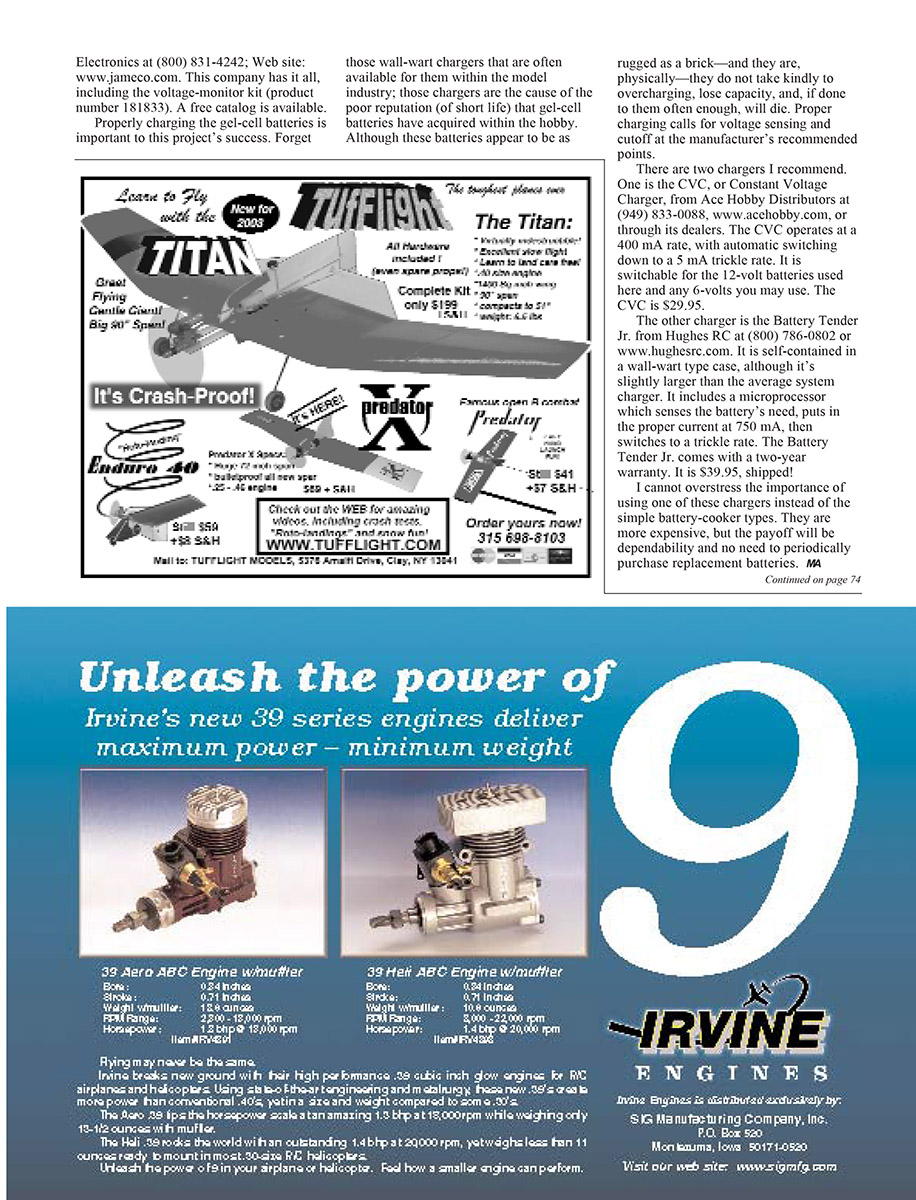
Properly charging gel-cell batteries is essential. Avoid simple "wall-wart" chargers commonly sold in the hobby; they often cause overcharging and shortened battery life. Use chargers with voltage sensing and proper cutoff.
Recommended chargers for 12 V gel cells:
- CVC (Constant Voltage Charger) from Ace Hobby Distributors
- Rate: 400 mA with automatic switch to 5 mA trickle
- Suitable for 12 V and 6 V batteries
- Price: $29.95
- (949) 833-0088, www.acehobby.com
- Battery Tender Jr. from Hughes RC
- Microprocessor-controlled, 750 mA charge then trickle, two-year warranty
- Price: $39.95 (shipped)
- (800) 786-0802, www.hughesrc.com
Electronics parts supplier:
- Jameco Electronics — (800) 831-4242; www.jameco.com
- Carries voltage monitor kit (product number 181833) and related parts; free catalog available.
Final impressions
After extensive testing, the Super Turbo Charger performs as claimed and covers virtually all charging/discharging/cycling needs for NiCd and NiMH packs. The primary user tasks are fabricating or buying appropriate harnesses and addressing the large input clips for field batteries. Once familiar with the display abbreviations and programming, the unit is a powerful, reliable tool for electric flight enthusiasts.
Manufacturer's note
- Batteries of at least 18 A capacity are recommended to make full use of all features. Experience indicates that small 7 A gel batteries may not sustain the input load for multiple charges, especially with heavier demands.
- Remember that charging a pack draws current from the input battery. For example, a 2400 mAh, 12-cell pack may draw roughly 4 A during a single charge; a small 7 A gel input battery could show a voltage drop and trigger the charger to indicate input depletion.
- The Super Turbo includes a safety cutoff that stops charging when it senses a substantial voltage drop in the input battery, protecting the input source (typically a car battery) from full depletion. The intention is to allow the user to safely start a vehicle after a day of flying.
Suppliers
- Dymond Modelsports USA Ltd.
683 N. Main St. Oshkosh, WI 54901 (920) 303-1100 Fax: (920) 303-2021 www.rc-dymond.com
- Dymond of San Diego
3904 Convoy St. San Diego, CA 92111 (858) 495-0092 Fax: (858) 495-0096 [email protected]
Price
- Super Turbo Charger: $109
- Optional temperature probe: $14.95
Transcribed from original scans by AI. Minor OCR errors may remain.

