


Product Review
David Adams [email protected]
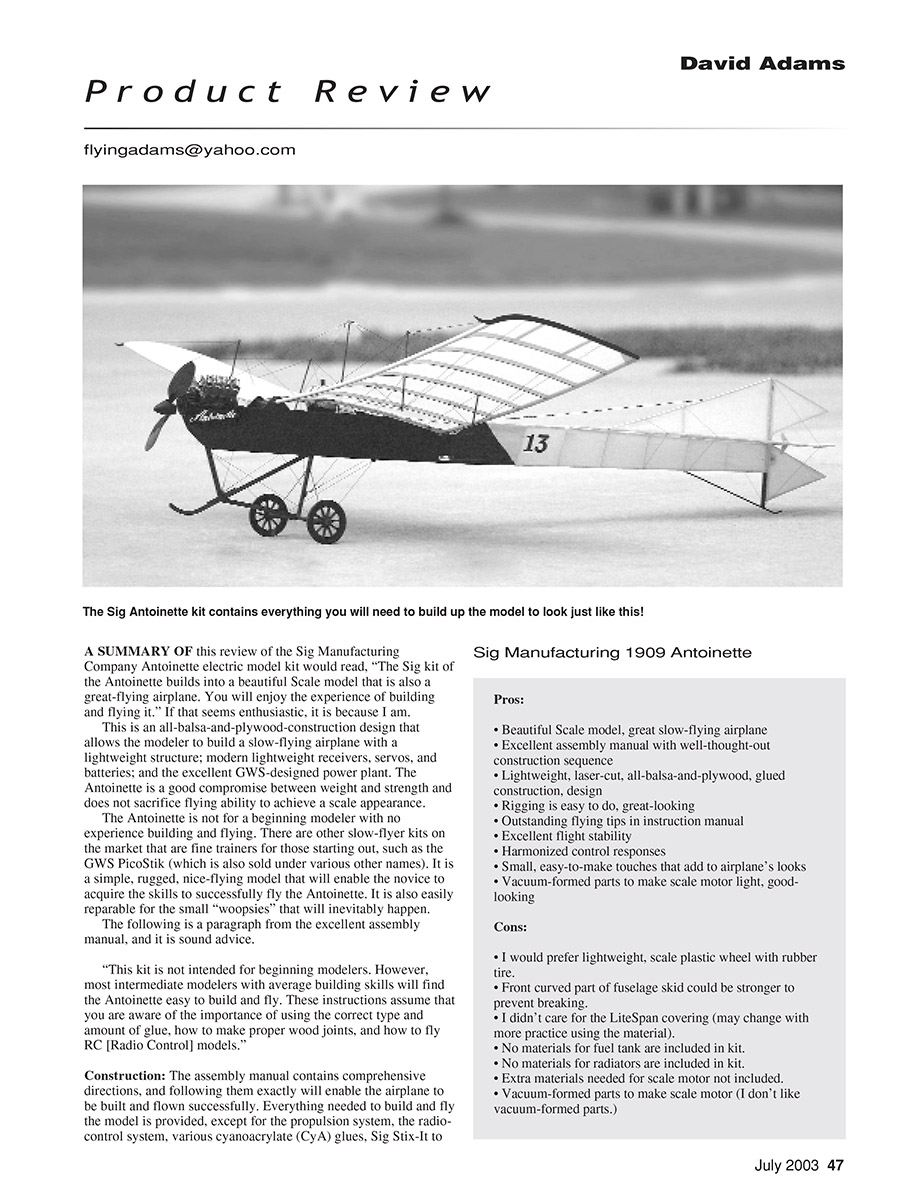
A summary of this review of the Sig Manufacturing Company Antoinette electric model kit would read: "The Sig kit of the Antoinette builds into a beautiful scale model that is also a great-flying airplane. You will enjoy the experience of building and flying it." If that seems enthusiastic, it is because I am.
This is an all-balsa-and-plywood construction that allows the modeler to build a slow-flying airplane with a lightweight structure; modern lightweight receivers, servos, and batteries; and the excellent GWS-designed power plant. The Antoinette is a good compromise between weight and strength and does not sacrifice flying ability to achieve a scale appearance.
The Antoinette is not for a beginning modeler with no experience building and flying. There are other slow-flyer kits on the market that are fine trainers for those starting out, such as the GWS PicoStik. The PicoStik (sold under various other names) is a simple, rugged, nice-flying model that will enable the novice to acquire the skills to successfully fly the Antoinette. It is also easily reparable for the small "woopsies" that will inevitably happen.
The following paragraph from the assembly manual is sound advice:
"This kit is not intended for beginning modelers. However, most intermediate modelers with average building skills will find the Antoinette easy to build and fly. These instructions assume that you are aware of the importance of using the correct type and amount of glue, how to make proper wood joints, and how to fly RC [Radio Control] models."
Construction
The assembly manual contains comprehensive directions, and following them exactly will enable the airplane to be built and flown successfully. Everything needed to build and fly the model is provided, except for the propulsion system, the radio-control system, various cyanoacrylate (CyA) glues, Sig Stix-It to attach the covering, and a selection of modeler's tools.
Although many suitable microsize RC components on the hobby market will perform well in the Antoinette, Sig makes specific recommendations and mentions manufacturers that have worked well for them. Sig recommends using various types of its own brand of CyAs, which make building the model enjoyable and quick when employed as called for in the instructions. The model can be built in a couple of days when using CyA. However, it can be assembled using more traditional hobby glues such as Sig-Ment if that is your preference. Be sure to apply good practices, such as pregluing and filleting joints for maximum strength.
The kit's wooden parts are laser-cut and fit perfectly. It is a welcome change from the model-airplane kits of my youth that were ink-printed parts on rock-hard balsa. In the past, getting parts ready to build was frustrating: parts were cut out with a razor blade, many broke and had to be glued back together, and the work consumed a lot of time. That is just a faded memory with the Antoinette's laser-cut parts. They need only minor touch-ups with sandpaper to remove any balsa left from bridges holding the parts in the sheet. As recommended in the manual, I marked the parts before removing them from the sheet so I could easily identify them later.
Before starting the building process, at least look through the assembly manual if you don't read it thoroughly. The writers carefully thought out the sequence of construction and lead the modeler through the steps in a smooth manner. The basic construction is straightforward, with no complex structures or unpleasant surprises. Glue one part to another in the sequence presented, and you will have success and enjoy the feeling that comes with a successful effort.
The wheels were interesting to construct. With many parts and a little glue you get nice, scale-like wheels that track true and look great. I had some misgivings concerning my ability to make the rubber tires look good, but the technique presented in the manual works flawlessly.
The manual suggests paint colors for the motor, but I used some artist's acrylic paints I had available; they worked well. I would have liked more pictures of the full-scale motor to help with detailing. No materials for the "fake" fuel tank were included in the kit; I used some 1/32" balsa from my scrap box. Other extremely lightweight materials can be used if available. Using artist's acrylic paints, I painted the fuel tank to look like a reflective metal cylinder and added straps and a fuel cap—it's a great scale touch with little work.
The radiators along the side of the fuselage are made from balsa scraps that are rounded and painted to look like metal tubes. I would pay a little extra to have the rounded balsa strips included in the kit. I have not added the fuselage side radiators because my Antoinette's weight came out on the heavy side of the suggested range. I think this is because I painted the fuselage with several coats of acrylic inside and out using a heavy-handed brush technique. I wanted to evaluate the model's flying qualities before adding any more weight. Since the airplane flew beautifully, the radiators remain on the building board.
The supplied nylon cord used for the pull-pull control system works well, and the Antoinette's wooden control wheel attached to the elevator servo arm adds realism. The pilot's hands glued to the control wheel make his arm move as if he is doing all of the flying.
My ready-to-fly Antoinette weighs 8-1/2 ounces without the battery. Sig gives a weight range of 7-1/2–8 ounces (without battery). I probably gained weight from paint and using a bit too much glue. Keep in mind that this is a big model, and a target weight of 8 ounces is excellent. When using the 280 mAh battery, I needed to add a slight amount of nose weight to balance the model at the recommended point. With a 500 mAh battery the center of gravity was perfect without extra nose weight.
Covering
The only problem I had with the kit was my unskilled use of the supplied LiteSpan. This was my first covering job with this material, and I didn't produce the wrinkle-free finish I would have had with silk, silkspan, or tissue paper. Although the instructions mention not to worry about wrinkles since the full-scale Antoinette had wrinkles, I would still have preferred a smoother look.
The instructions warned about the potential hazard of warping the LiteSpan when tightening it with heat. Even though I tried to be careful, I managed to warp the horizontal tail during covering. I straightened everything during assembly by substituting carpet thread for the elastic rigging cord on the tail surfaces and carefully using CyA to tack the thread in place.
Rigging and Scale Details
I have only one thought about the airplane rigging: by all means do it! It is fun and only takes a couple of easy hours to rig everything. Resist the impulse to build and fly the model without the rigging; it is a part of its character. Following the directions exactly will give you a great-looking rigging job that allows the wings to be mounted or removed in less than a minute without tools.
One of the features that gives the Antoinette a unique look is its motor, fake fuel tank, and pilot seemingly sitting on top of the fuselage. The motor is well worth the small amount of work required. Although I don't normally care for small vacuum-formed parts, following the assembly-manual directions resulted in a light, realistic motor. The kit does not include some extra materials for scale detailing (fuel tank, radiators, etc.), so plan to provide lightweight scraps or other materials for those items.
Radio and Power Installation
I installed the radio per the assembly instructions with no problems. I used:
- GWS microreceiver
- Two Hitec HS-50 servos
- GWS 5-amp motor controller
- Seven-cell 280 mAh NiMH battery for power
Resist the urge to use an eight-cell pack; that will greatly reduce the GWS motor's life because of overheating. The airplane flies very scale-like with the seven-cell battery pack.
Flying
The flying tips in the instruction manual are written well, easy to follow, and should allow the experienced modeler to achieve flying success. I have seen video of the original Sig model flying; the word I would use to describe it is "stately." It performed perfect takeoffs, touch-and-gos, and landings, and my Antoinette flew equally well.
On my first calm-day test I taxied down the street, applied power, and it lifted off. I immediately throttled back and it settled smoothly back down to the street—the recommended procedure for a first flight. On subsequent attempts I climbed to about 15 feet and flew a racetrack pattern down the street. The Antoinette required just a click of up-trim and flew nicely. With dead-calm wind the model seemed to fly slightly faster than idle throttle. I made a descending turn into my driveway and a nice landing. My first impression was of stable, controllable flight characteristics; it was a real joy to fly.
On a later flight the motor (rubber motor—not electric) fell off just as the airplane lifted off because a small rubber band between two hooks failed that time. The band did not break and has worked flawlessly since. The model looked incomplete without the motor, so I landed, reinstalled it, and flew again.
In the air, stability is excellent, control responses feel right and are coordinated, the Antoinette responds well to throttle for altitude control, and landings can be made at low airspeeds. Wheel landings are easy to execute. I have not tried aerobatics and don't expect much more than mild wingovers.
The only recurring problem is that if I try to land with power off (not recommended by Sig) and miss the altitude required to begin the flare, I tend to knock the front part of the fuselage skid off. Landing correctly with a little power on and two clicks of up-elevator results in a smooth landing. If you do break the front skid, it is strong enough that a small repair will quickly restore it.
You need to have a tape of Those Magnificent Men in Their Flying Machines theme playing in the background when you fly this aircraft. As the Antoinette flies, it is easy to imagine the delightful model is the full-scale version. The pros far outweigh the cons; I love the way this airplane looks on the ground and in flight. I highly recommend it.
Pros:
- Beautiful scale model; great slow-flying airplane
- Excellent assembly manual with well-thought-out construction sequence
- Lightweight, laser-cut, all-balsa-and-plywood construction
- Rigging is easy to do and looks great
- Outstanding flying tips in the instruction manual
- Excellent flight stability
- Harmonized control responses
- Small, easy-to-make touches that add to the airplane’s looks
- Vacuum-formed parts make the scale motor light and good-looking
Cons:
- I would prefer lightweight, scale plastic wheels with rubber tires
- Front curved part of fuselage skid could be stronger to prevent breaking
- I didn’t care for the LiteSpan covering (may improve with practice)
- No materials for the fuel tank are included in the kit
- No materials for the radiators are included in the kit
- Extra materials needed for scale motor detailing are not included
- I have a personal dislike of vacuum-formed parts
Contact information
Sig Manufacturing Inc. Box 520 Montezuma, IA 50171 (641) 623-5154 Fax: (641) 623-3922 [email protected] www.sigmfg.com
Specifications
- Stock number: SIGRC91
- Wingspan: 50 inches
- Wing area: 509 square inches
- Weight: 7-1/2–8 ounces (without battery)
- Length: 47 inches
- Radio required: Three-channel microsystem with two servos
Products used / Manufacturers referred to in this review
- GWS radio system
- Horizon Hobby Inc.
- 4105 Fieldstone Rd.
- Champaign, IL 61822
- (800) 338-4639
- www.horizonhobby.com
- Hitec RCD Inc.
- 12115 Paine St.
- Poway, CA 92064
- (858) 748-6948
- www.hitecrcd.com
Transcribed from original scans by AI. Minor OCR errors may remain.

