


Product Review
Bob Aberle
You may have already seen photos of this new Hitec RCD Neon FM three-channel Radio Control (RC) system in previous installments of Model Aviation’s “From the Ground Up” beginners’ series.
A three-channel RC system can provide the beginner with an excellent starting point. These systems are usually the simplest to operate, they provide more than enough control functions, and the overall cost is held to a minimum.
Hitec engineers have come up with an even better idea: they have configured the transmitter so that more advanced control features can be added as you gain experience in the hobby. You purchase a basic three-channel-function system first, then you can add as many as four additional control options, which will increase the system’s overall versatility. This engineering/marketing concept makes for an attractive initial purchase price.
When you go to purchase the basic system, you will learn that two models, or variations, are available. The transmitter in both is identical. Hitec stock number 148721 is the more deluxe of the two models. That is the system I am reviewing here.
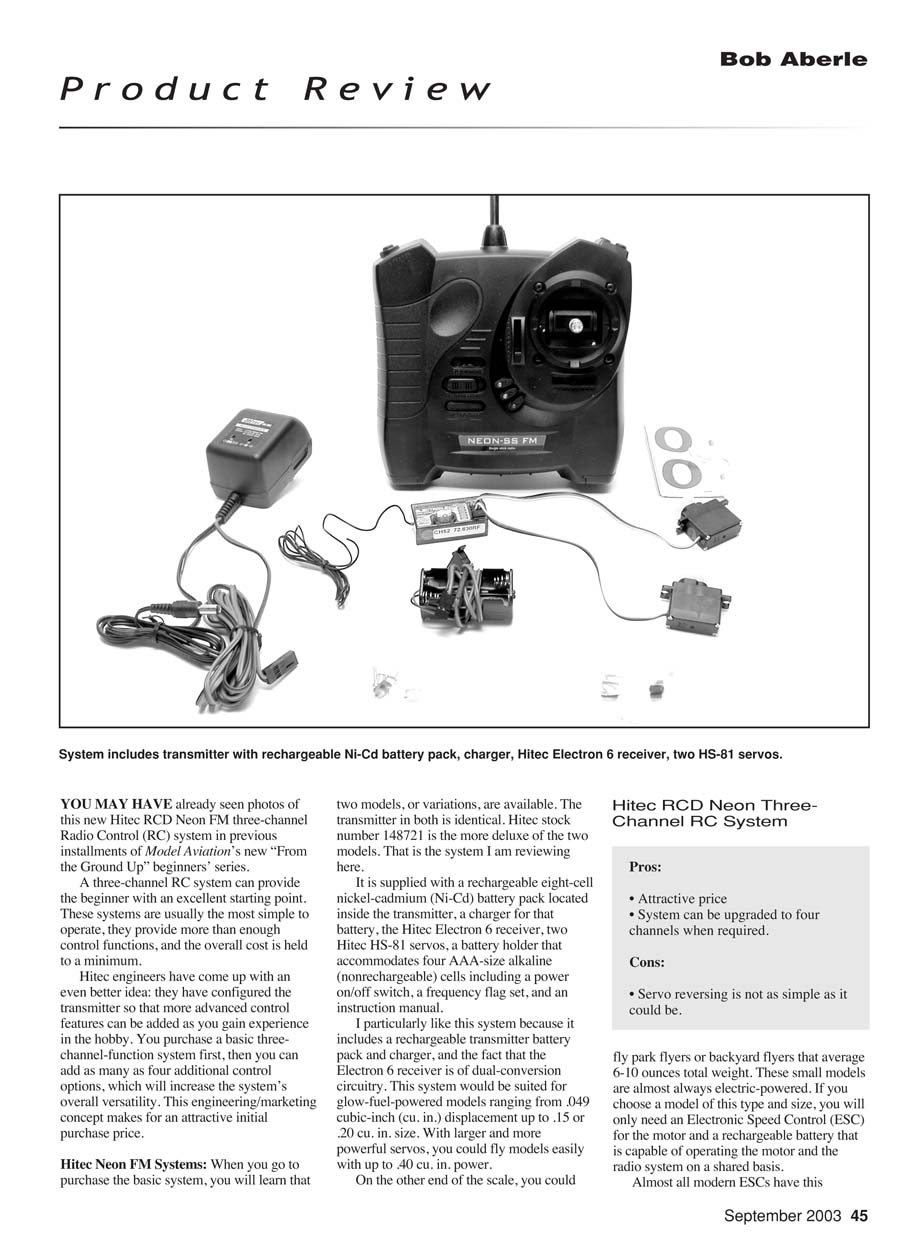
The deluxe package is supplied with a rechargeable eight-cell nickel-cadmium (Ni-Cd) battery pack located inside the transmitter, a charger for that battery, the Hitec Electron 6 receiver, two Hitec HS-81 servos, a battery holder that accommodates four AAA-size alkaline (nonrechargeable) cells including a power on/off switch, a frequency flag set, and an instruction manual.
I particularly like this system because it includes a rechargeable transmitter battery pack and charger, and because the Electron 6 receiver uses dual-conversion circuitry. This system would be suited for glow-fuel-powered models ranging from .049 cubic-inch (cu. in.) displacement up to .15 or .20 cu. in. With larger and more powerful servos, you could fly models easily with up to .40 cu. in. power.
On the other end of the scale, you could fly park flyers or backyard flyers that average 6–10 ounces total weight. These small models are almost always electric-powered. If you choose a model of this type and size, you will only need an Electronic Speed Control (ESC) for the motor and a rechargeable battery capable of operating the motor and the radio system on a shared basis. Almost all modern ESCs have this sharing circuit known as a Battery Eliminator Circuit (BEC). So if you do decide to fly a small electric-powered model, the motor-control unit takes the place of that third (engine throttle) servo.
The other Neon system is identified as stock number 148722, which Hitec calls its “micro” version. Although the same transmitter is employed, this model does not come with rechargeable batteries. You will have to purchase eight AA alkaline cells to operate the transmitter. These cells generally provide at least 10 hours of operating time before they need to be replaced. The Hitec HFS-04MG single-conversion FM receiver is supplied, as are two Hitec HS-55 submicroservos. The other items in the system are identical to those in the deluxe model. This micro version is intended for use with small RC models such as park or backyard flyers and the .049 cu. in. (Class 1/2A) glow-fuel-powered aircraft. This system will cost less because it does not have rechargeable batteries or a charger, yet in the long run it can be upgraded easily to the same status as the deluxe version. Best of all, the four optional transmitter add-on features can be added to either system.
Neon Three-Channel FM Transmitter
The transmitter is available on any of the 50 channels assigned by the Federal Communications Commission between 72 and 73 MHz expressly for the control of model aircraft.
This is an FM system and the deviation is on the low side (also called negative shift), which means that this system is compatible with other RC systems manufactured by Futaba, GWS, and FMA Direct.
As is typical with most three-channel transmitters, there is only one dual-axis control-stick assembly, and it is located at the right side of the case. This stick assembly is intended to control rudder/elevator or aileron/elevator on your model.
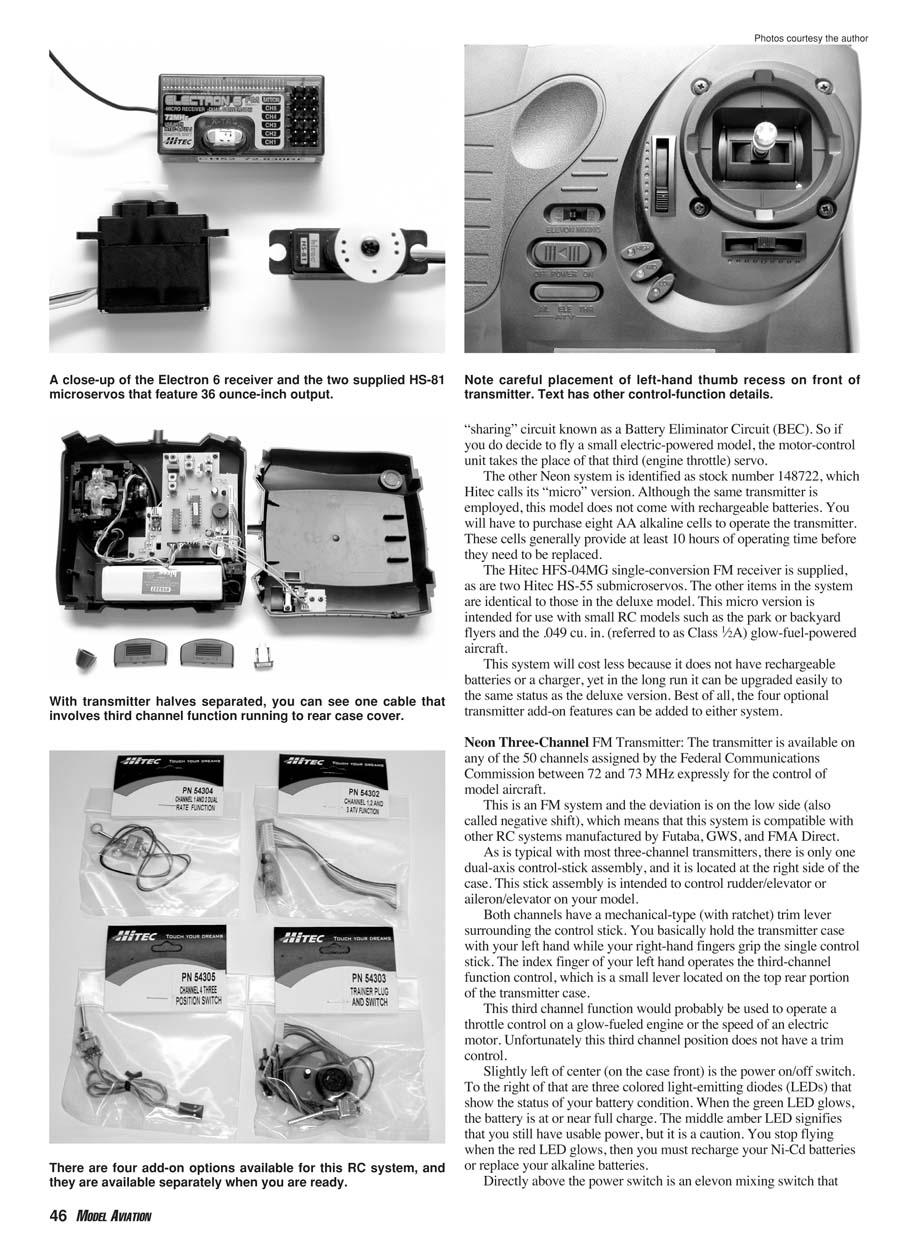
Both channels have a mechanical-type (with ratchet) trim lever surrounding the control stick. You basically hold the transmitter case with your left hand while your right-hand fingers grip the single control stick. The index finger of your left hand operates the third-channel function control, which is a small lever located on the top rear portion of the transmitter case.
This third-channel function would probably be used to operate a throttle control on a glow-fueled engine or the speed of an electric motor. Unfortunately this third-channel position does not have a trim control.
Slightly left of center on the case front is the power on/off switch. To the right of that are three colored light-emitting diodes (LEDs) that show the status of your battery condition. When the green LED glows, the battery is at or near full charge. The middle amber LED signifies that you still have usable power, but it is a caution. You should stop flying when the red LED glows; then you must recharge your Ni-Cd batteries or replace your alkaline batteries.
Directly above the power switch is an elevon-mixing switch that can be turned on or off. When it's on, the transmitter will automatically mix the controls from the first two channels. This will enable you to fly models with "V" tails (ruddervators) or elevons, as is the case with delta- or flying-wing designs. It mixes or integrates the two control functions. This feature is supplied with the basic transmitter.
Servo-reverse is provided, but it isn't done with external switches. The transmitter case has been designed so that it can be opened (or separated in halves) without the need for tools. You slide out the two bottom latches, remove the crystal and its holder, pull off the plastic antenna base, and the case opens.
Inside you will be directed to four separate cables—one for each channel function (the fourth if you add that option). To reverse the servo direction, unplug the particular cable, rotate the connector 180°, plug it back in, and the servo is reversed. While you have the transmitter open, you can adjust the control stick's spring tension (stick length is adjustable from the outside).
On one side of the transmitter case you will find the battery-charging jack. A standard Hitec dual-output-system charger is supplied with the deluxe version of this system, as is an eight-cell, 600 mAh-capacity Ni-Cd battery pack.
The charging jack circuit contains a protective diode. As such, battery voltage is unavailable at the jack for testing purposes. If you want to discharge-test your battery to determine the actual capacity, you will have to open the case and physically remove the pack. Hitec cautions you not to use a field-type peak-detect charger on this transmitter since the higher current might burn out the diode and open the battery circuit.
Neon Deluxe System Airborne Components
The Hitec Electron 6 dual-conversion FM receiver is supplied with the deluxe system. This is a relatively small and lightweight unit measuring 1 3/4 inches long × 7/8 inch wide × 9/16 inch thick (with a crystal projection of an additional 5/16 inch). Weight on my digital scale is 0.64 ounce (18.2 grams). That weight could be further reduced by carefully removing the molded plastic case.
One thing I learned the first time I hooked up the servos to the receiver is that the connectors can be plugged in either way. You won't damage anything when you reverse them, but the servo or system, if it is the power plug, won't work. So when plugging any connector into the Electron 6 receiver, always make sure that the black wire faces the outside of the case.
The antenna is a full-length approximately 40-inch wire. Keep in mind that this receiver has six-channel-function capability, even though the standard transmitter has only three-channel function.
The two servos supplied are Hitec HS-81s, which are semimicro servos. They measure 1 1/8 inches long × 1 1/8 inches high × 7/16 inch thick, less mounting flanges and output arm. Each servo weighs 0.6 ounce (17.1 grams). Rated output is an impressive 36 ounce-inches (at 4.8 volts), and the transit time is a fast 0.11 second for 60° rotation.
My system came with a battery box and a switch harness (no charging jack!). The box holds four AAA alkaline cells. Hitec offers a line of four-cell Ni-Cd battery packs to suit all kinds of flying needs. If you do substitute a rechargeable battery pack, make sure you also purchase a switch harness with a charging jack. Otherwise you will have to unplug the pack every time you want to charge it.
Add-On Options
Now we get to this Neon's important new feature. After purchasing the basic system (either model), you can buy as many as four add-on options. You can install these easily, and it will require no soldering on your part. As mentioned, the transmitter case has been designed so that it can be opened without screws or tools.
The four options are:
- Trainer-cable provisions.
- Adjustable Travel Volume (ATV), actually endpoint adjustment, for all three basic channel functions.
- Dual-rate control of the two primary flight-control channels.
- A fourth channel function that is not proportional; it is operated by a three-position switch located on the top rear of the transmitter (suitable for retractable landing gear, bomb doors, or other on/off functions).
To install any of the options, remove the plastic antenna base and the two latches on the bottom of the case. Slide the case apart, add the option, and reassemble. Each option comes packaged separately with instructions and mounting hardware.
Radio-gear installers will like the flexibility the Electron 6 receiver offers in that its six-channel capability permits you to use three more channels if you wish. However, these options are actually applied at the transmitter end and not incorporated in the basic receiver supplied with the deluxe package. Hitec supplies a special plug-in board that accepts the option modules. The board simply plugs into an opening on the transmitter circuit board.
The Electron 6's dual-conversion circuitry helps to reduce noise and provide better sensitivity and selectivity than single-conversion receivers do. It also has a fail-safe function that may be set to hold the existing servo position, give a neutral position, or shut off the engine, depending on your selection. For more on this topic, consult the receiver's manual.
My range tests were excellent. I was able to maintain full control well beyond normal flying distances with no dropouts. The receiver performed reliably in all flight maneuvers I attempted.
Each option came packaged separately with instructions and mounting hardware. The installation instructions were thorough, but I was disappointed because no application information was supplied (such as what is the purpose of each option?). My understanding is that that information will be included before this review is printed.
Be aware that two of the options are interrelated. If you purchase the ATV, you will be able to adjust the control throw individually for each of the three channel functions. The three small adjustment controls are located on the transmitter’s front panel just below the power switch.
Here is the trick: if you then buy the dual-rate option, you will learn that the single dual-rate switch turns the function on for CH-1 (rudder) and CH-2 (elevator) simultaneously. When you want to adjust the amount of dual-rate cutback (control reduction), turn the dual-rate switch on, then use those same ATV controls on the front panel.
However, keep in mind that the minute you install the dual-rate switch, you lose the regular ATV controls for those first two channels. The ATV control for CH-3 (throttle) will continue to work as normal. This slight limitation will be discussed in more depth when the operations manual is revised.
The trainer-cable jack and switch are straightforward. If you want to use that function to join two Hitec transmitters for training purposes, you will need to purchase the cable from Hitec. If both Hitec transmitters have the trainer jack, you will be able to use the cable.
The fourth-option function is operated by a three-position switch and could be used for deploying flaps or spoilers on a sailplane, operating a retract landing-gear system, or a bomb-drop release. The ATV does not cover the fourth channel, but a servo-reversing cable is provided.
When installing these options, be aware that each item has its own cabling and connectors. When you are finished installing all four options, that’s a great deal of new cabling that has been added inside your transmitter. Dress your cable routing and use small nylon ties to keep everything neat and in place. If you get careless you might wrap a cable around the control stick or a trim lever, so be careful.
The entire Neon FM three-channel system and the add-on options worked well and should be popular with beginners and sport fliers. It will even find a home with many sailplane or electric sailplane enthusiasts. Best of all is the attractive selling price.
Pros and Cons
Pros:
- Attractive price.
- System can be upgraded with up to four add-on options.
- Rechargeable-transmitter option and dual-conversion receiver in deluxe version.
- Electron 6 receiver offers six-channel capability and a useful fail-safe.
Cons:
- Servo reversing requires opening the transmitter and rotating connectors (not as convenient as external switches).
- Installing multiple options increases internal cabling complexity.
- Some initial documentation for option applications was not supplied with the review unit.
Manufacturer: Hitec RCD 12115 Paine St. Poway, CA 92064 (858) 748-6948 www.hitecrcd.com
Transcribed from original scans by AI. Minor OCR errors may remain.

