
Product Review — Experimental Aircraft Models Zenith Zodiac XL
Tom Sullivan
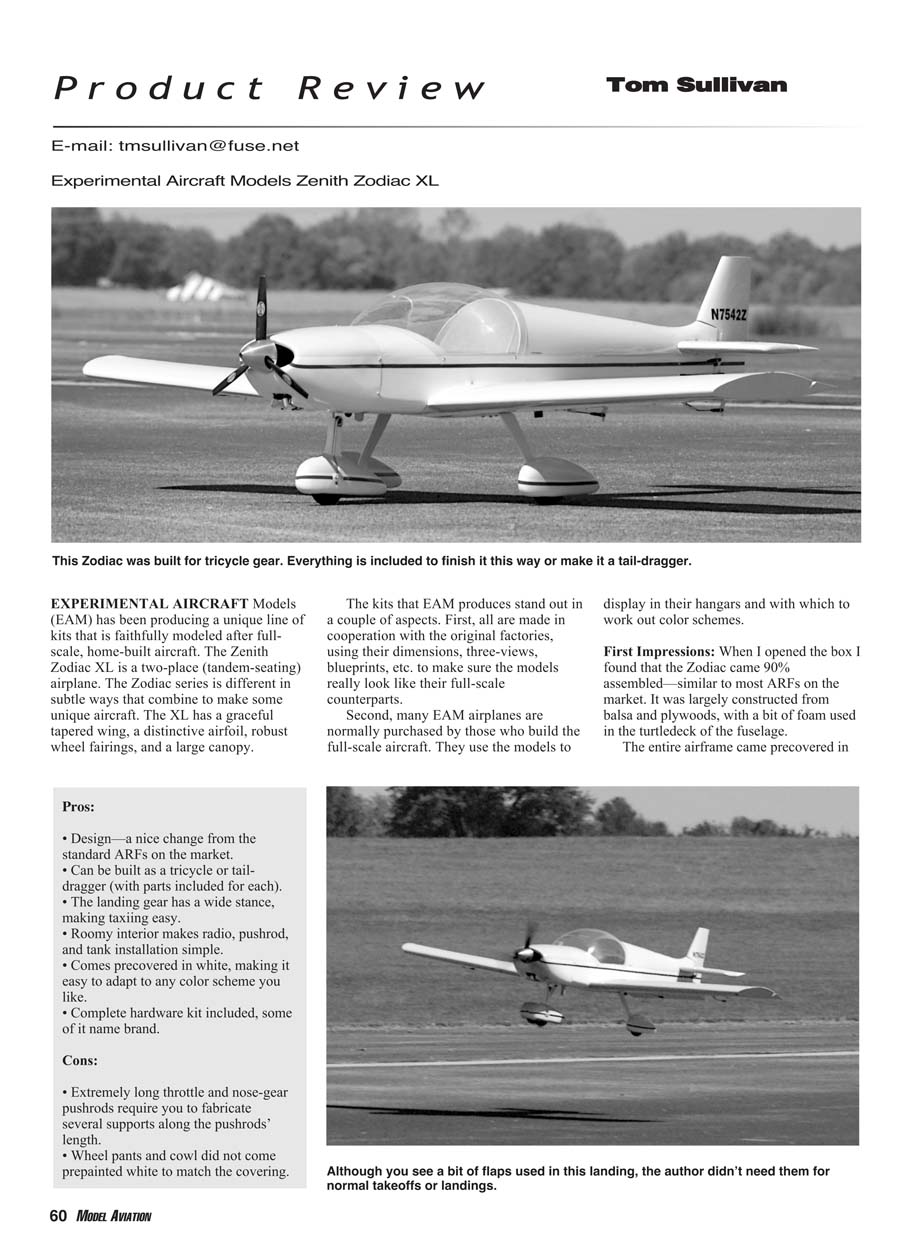
EXPERIMENTAL AIRCRAFT Models (EAM) has been producing a unique line of kits that is faithfully modeled after full-scale, home-built aircraft. The Zenith Zodiac XL is a two-place (tandem-seating) airplane. The Zodiac series is different in subtle ways that combine to make some unique aircraft. The XL has a graceful tapered wing, a distinctive airfoil, robust wheel fairings, and a large canopy.
The kits that EAM produces stand out in a couple of aspects. First, all are made in cooperation with the original factories, using their dimensions, three-views, blueprints, etc. to make sure the models really look like their full-scale counterparts.
Second, many EAM airplanes are normally purchased by those who build the full-scale aircraft. They use the models to display in their hangars and with which to work out color schemes.
First Impressions: When I opened the box I found that the Zodiac came 90% assembled—similar to most ARFs on the market. It was largely constructed from balsa and plywood, with a bit of foam used in the turtledeck of the fuselage.
The entire airframe came precovered in white. About a color choice, a three-color trim package is included.
Pros:
- Design—a nice change from the standard ARFs on the market.
- Can be built as a tricycle or taildragger (with parts included for each).
- The landing gear has a wide stance, making taxiing easy.
- Roomy interior makes radio, pushrod, and tank installation simple.
- Comes precovered in white, making it easy to adapt to any color scheme you like.
- Complete hardware kit included, some of it name brand.
Cons:
- Extremely long throttle and nose-gear pushrods require you to fabricate several supports along the pushrods' length.
- Wheel pants and cowl did not come prepainted white to match the covering.
The fiberglass cowl and wheel pants were superbly made. They were extremely light but did not come prepainted. I would have preferred that they be painted white to match the glossy UltraCote finish.
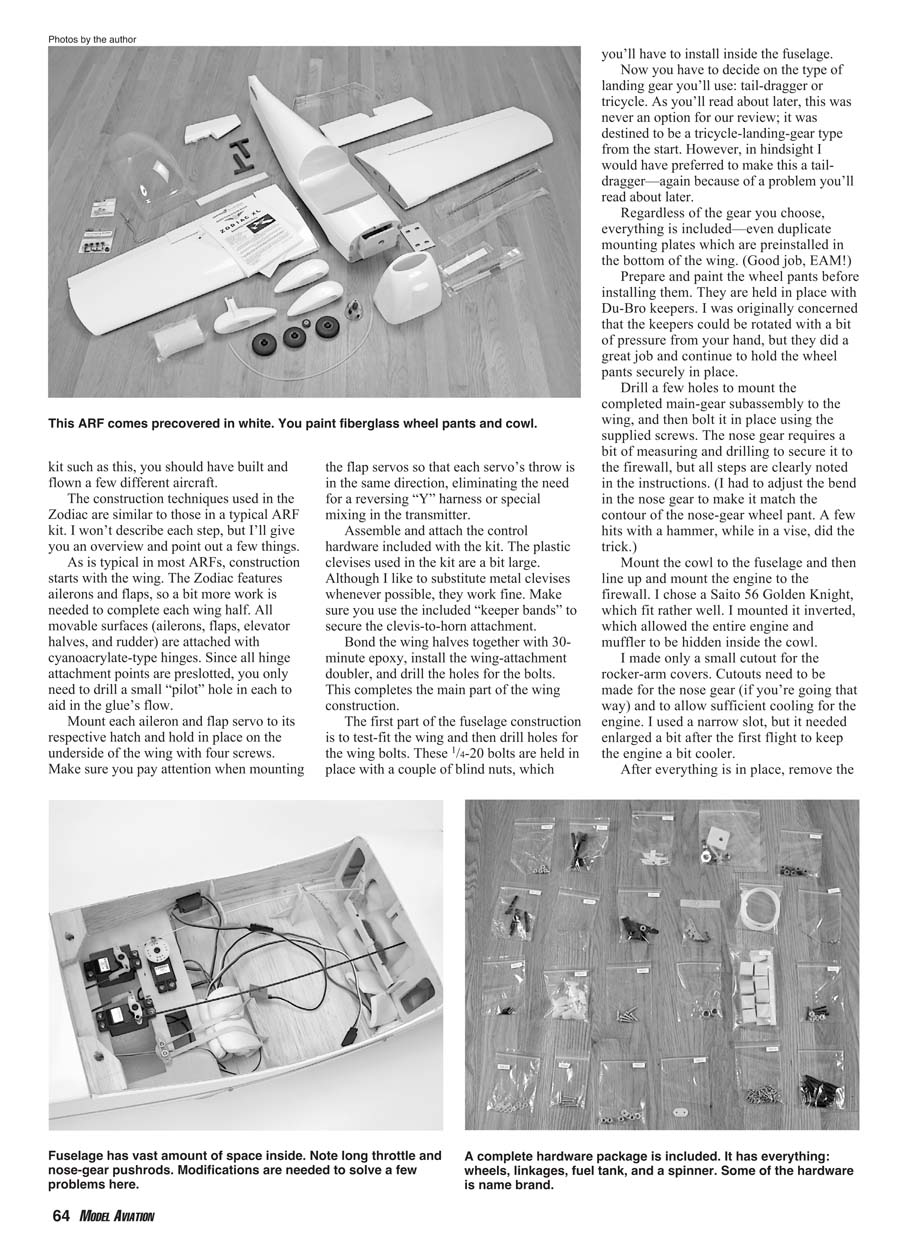
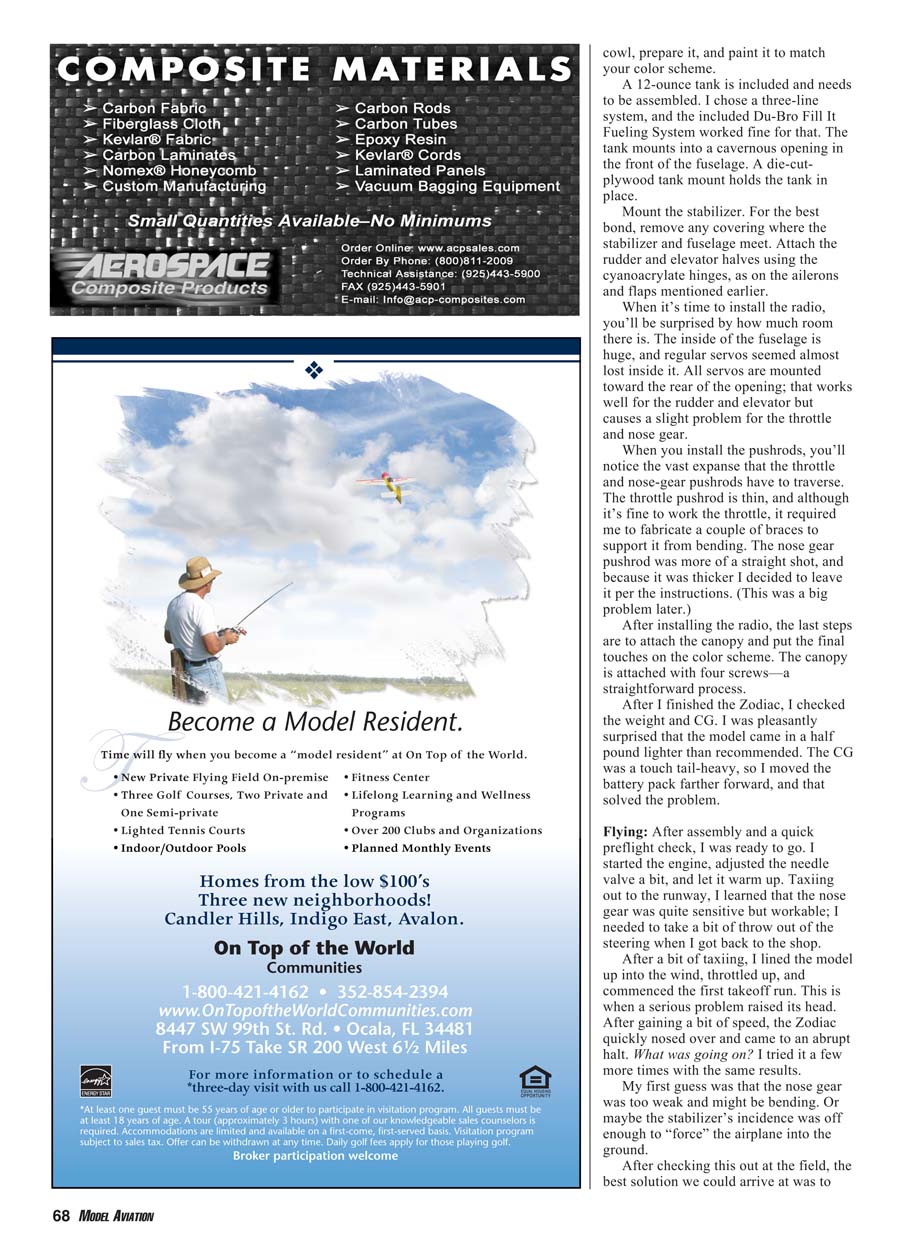
Kit hardware included pushrods, control-surface horns, a fuel tank, wing and landing-gear fasteners, and a formed main aluminum landing gear. Also included were a polished aluminum spinner, US standard machine threaded hardware, and Du-Bro remote fuel fill, axles, wheel-pant retainers, and fuel line.
Construction: This is definitely not a beginners' kit. By the time you purchase a kit such as this, you should have built and flown a few different aircraft.
The construction techniques used in the Zodiac are similar to those in a typical ARF kit. I won't describe each step, but I'll give you an overview and point out a few things.
As is typical in most ARFs, construction starts with the wing. The Zodiac features ailerons and flaps, so a bit more work is needed to complete each wing half. All movable surfaces (ailerons, flaps, elevator halves, and rudder) are attached with cyanoacrylate-type hinges. Since all hinge attachment points are preslotted, you only need to drill a small "pilot" hole in each to aid in the glue's flow.
Mount each aileron and flap servo to its respective hatch and hold in place on the underside of the wing with four screws. Make sure you pay attention when mounting the flap servos so that each servo's throw is in the same direction, eliminating the need for a reversing "Y" harness or special mixing in the transmitter.
Assemble and attach the control hardware included with the kit. The plastic clevises used in the kit are a bit large. Although I like to substitute metal clevises whenever possible, they work fine. Make sure you use the included "keeper bands" to secure the clevis-to-horn attachment.
Bond the wing halves together with 30-minute epoxy, install the wing-attachment doubler, and drill the holes for the bolts. This completes the main part of the wing construction.
The first part of the fuselage construction is to test-fit the wing and then drill holes for the wing bolts. These 1/4-20 bolts are held in place with a couple of blind nuts, which you'll have to install inside the fuselage.
Now you have to decide on the type of landing gear you'll use: tail-dragger or tricycle. As you'll read about later, this was never an option for our review; it was destined to be a tricycle-landing-gear type from the start. However, in hindsight I would have preferred to make this a tail-dragger—again because of a problem you'll read about later.
Regardless of the gear you choose, everything is included—even duplicate mounting plates which are preinstalled in the bottom of the wing. (Good job, EAM!)
Prepare and paint the wheel pants before installing them. They are held in place with Du-Bro keepers. I was originally concerned that the keepers could be rotated with a bit of pressure from your hand, but they did a great job and continue to hold the wheel pants securely in place.
Drill a few holes to mount the completed main-gear subassembly to the wing, and then bolt it in place using the supplied screws. The nose gear requires a bit of measuring and drilling to secure it to the firewall, but all steps are clearly noted in the instructions. (I had to adjust the bend in the nose gear to make it match the contour of the nose-gear wheel pant. A few hits with a hammer, while in a vise, did the trick.)
Mount the cowl to the fuselage and then line up and mount the engine to the firewall. I chose a Saito 56 Golden Knight, which fit rather well. I mounted it inverted, which allowed the entire engine and muffler to be hidden inside the cowl.
I made only a small cutout for the rocker-arm covers. Cutouts need to be made for the nose gear (if you're going that way) and to allow sufficient cooling for the engine. I used a narrow slot, but it needed enlarged a bit after the first flight to keep the engine a bit cooler. Cowl: prepare it, and paint it to match your color scheme.
A 12-ounce tank is included and needs to be assembled. I chose a three-line system, and the included Du-Bro Fill It Fueling System worked fine for that. The tank mounts into a cavernous opening in the front of the fuselage. A die-cut-plywood tank mount holds the tank in place.
Mount the stabilizer. For the best bond, remove any covering where the stabilizer and fuselage meet. Attach the rudder and elevator halves using the cyanoacrylate hinges, as on the ailerons and flaps mentioned earlier.
When it's time to install the radio, you'll be surprised by how much room there is. The inside of the fuselage is huge, and regular servos seemed almost lost inside it. All servos are mounted toward the rear of the opening; that works well for the rudder and elevator but causes a slight problem for the throttle and nose gear.
When you install the pushrods, you'll notice the vast expanse that the throttle and nose-gear pushrods have to traverse. The throttle pushrod is thin, and although it's fine to work the throttle, it required me to fabricate a couple of braces to support it from bending. The nose gear pushrod was more of a straight shot, and because it was thicker I decided to leave it per the instructions. (This was a big problem later.)
After installing the radio, the last steps are to attach the canopy and put the final touches on the color scheme. The canopy is attached with four screws—a straightforward process.
After I finished the Zodiac, I checked the weight and CG. I was pleasantly surprised that the model came in a half pound lighter than recommended. The CG was a touch tail-heavy, so I moved the battery pack farther forward, and that solved the problem.
Flying: After assembly and a quick preflight check, I was ready to go. I started the engine, adjusted the needle valve a bit, and let it warm up. Taxiing out to the runway, I learned that the nose gear was quite sensitive but workable; I needed to take a bit of throw out of the steering when I got back to the shop.
After a bit of taxiing, I lined the model up into the wind, throttled up, and commenced the first takeoff run. This when a serious problem raised its head. After gaining a bit of speed, the Zodiac quickly nosed over and came to an abrupt halt. What was going on? I tried it a few more times with the same results.
My first guess was that the nose gear was too weak and might be bending. Or maybe the stabilizer's incidence was off enough to "force" the airplane into the ground.
After checking this out at the field, the best solution we could arrive at was to attempt a takeoff at a slower speed and use a bit more of the flaps. It was hoped that this would allow the model to lift off before reaching the nose-over speed.
If it was luck, skill, or whatever, it worked. The Zodiac finally took to the skies and we were off on the maiden voyage. It was immediately apparent how the Zodiac's short-coupled nature made it maneuverable. After a few laps around the field to trim in the airplane, I found it to be an easy model to fly.
The first flight was timid to say the least. With the airplane trimmed in, I brought it in for the usual photo passes then experimented a bit with the flaps.
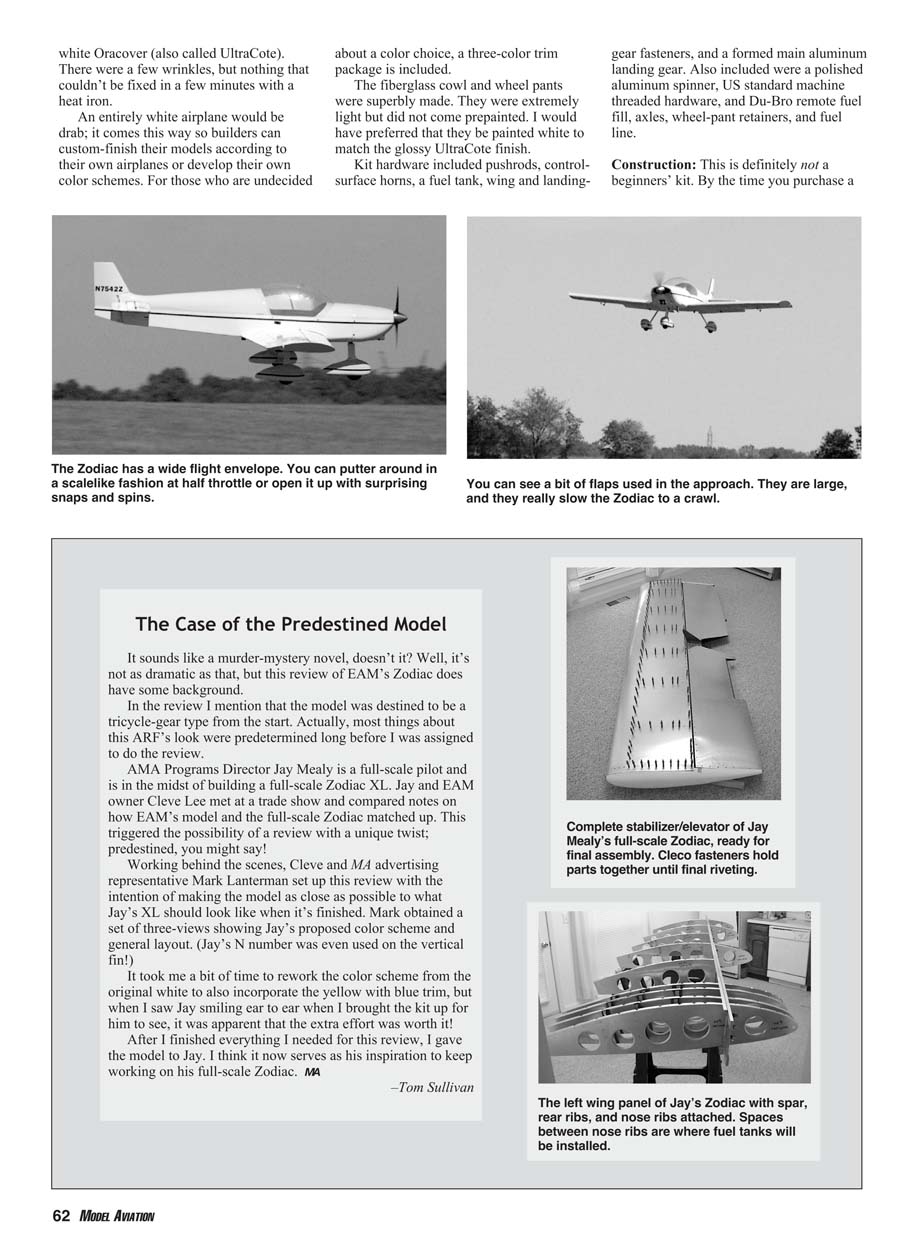
I set up for the first landing by doing an overshoot to get my bearings and see how the Zodiac slowed, and then by doing it for real. The model slowed nicely and was controllable all the way down to the runway. I set the main gears down first, and then the nose touched. The model instantly nosed over, breaking the propeller and coming to a screeching halt.
Upon inspection, the problem we found was that the nose-gear wire was bending enough that it allowed the front wheel to twist. When it twisted, it grabbed the runway and caused the airplane to nose over.
Back at the shop I fixed the scrapes and worked out those problems. To fix the nose gear, I built several supports (similar to the throttle pushrod) which kept the nose gear firmly pointed where it needed to be. An alternative solution was a thicker pushrod—4-40 maybe.
With that fixed, I went back to the field a few days later and was relieved to see that the Zodiac behaved properly on the ground. What a relief! It was time to see how big the model's flight envelope is.
Keep in mind that this is a scale model of a home-built. The occasional loop, roll, or spin is basically all the full-scale aircraft will do. So if you want to be realistic, you can put around the field at half throttle with no problem—or you can throttle up and do some amazing aerobatics.
If you consider the short coupling and generous areas of the control surfaces, this model can do snaps and spins that go far beyond the full-scale XL's capabilities. The G forces in some of the snaps would have you mopping up a full-scale pilot with a sponge! Even with this wide (fat) fuselage, the rudder area was plenty for pointable Point Rolls and even a semirecognizable knife edge.
Although I didn't need to use the flaps for landings and takeoffs, they work well. They are large and provide a good amount of lift, allowing you to slow the model substantially. However, with the slow flight you do risk snapping the airplane if you are using more of an aerobatic setup.
The Zodiac's construction was light, straight, and true. The complete hardware package worked well. (A sharp eye might notice that we didn't use the included spinner. That is because I went the three-blade route to match the full-scale design.)
Making the XL as a tail-dragger would have eliminated the taxiing problems. But then I couldn't have passed the solutions along to you. Maybe it's a good thing I went this way with the review kit.
I've put many flights on the Zodiac, and it's a unique airplane. Although it may not appeal to everyone, it's a nice change of pace from the typical ARF and flies quite well. You will need to work the throttle and nose-gear pushrods to avoid the problems I related, but other than that this model is good and easy to fly. MA
—Tom Sullivan
The Case of the Predestined Model
It sounds like a murder-mystery novel, doesn't it? Well, it's not as dramatic as that, but this review of EAM's Zodiac does have some background.
In the review I mention that the model was destined to be a tricycle-gear type from the start. Actually, most things about this ARF's look were predetermined long before I was assigned to do the review.
AMA Programs Director Jay Mealy is a full-scale pilot and is in the midst of building a full-scale Zodiac XL. Jay and EAM owner Cleve Lee met at a trade show and compared notes on how EAM's model and the full-scale Zodiac matched up. This triggered the possibility of a review with a unique twist; predestined, you might say!
Working behind the scenes, Cleve and MA advertising representative Mark Lanterman set up this review with the intention of making the model as close as possible to what Jay's XL should look like when it's finished. Mark obtained a set of three-views showing Jay's proposed color scheme and general layout. (Jay's N number was even used on the vertical fin!)
It took me a bit of time to rework the color scheme from the original white to also incorporate the yellow with blue trim, but when I saw Jay smiling ear to ear when I brought the kit up for him to see, it was apparent that the extra effort was worth it!
After I finished everything I needed for this review, I gave the model to Jay. I think it now serves as his inspiration to keep working on his full-scale Zodiac. MA
Specifications:
Wingspan: 60.5 inches Recommended weight: 7.5-8.5 pounds Review model's weight (ready to fly): 7.125 pounds Recommended engine: Two-stroke .40-.60 cu. in. or four-stroke 45-70 cu. in. Engine used: Saito 56 Golden Knight Recommended radio: Five-channel, seven servos Radio equipment used: JR 8103 transmitter, JR NER-226X receiver, seven Expert 5L71 servos, JR 600 mah battery, two 12-inch extensions, two "Y" harnesses for ailerons and flaps Materials used in construction: Balsa, plywood, foam, fiberglass
Manufacturer/Distributor: Experimental Aircraft Models 32009 Leelane Farmington MI 48336 (800) 297-1707 www.rchomebuilts.com Street price: $289
Products used in review: JR 8103 radio system, Saito 56 four-stroke engine: Horizon Hobby Distributors 4105 Fieldstone Rd. Champaign IL 61822 www.horizonhobby.com
Vortech 2.25-inch Ultimate spinner: Dave Brown Products 4560 Layhigh Rd. Hamilton OH 45013 www.dbproducts.com
Fill It Fuel System, R/C Protective Foam Rubber: Du-Bro Products Box 815 Wauconda IL 60084 www.dubro.com
Transcribed from original scans by AI. Minor OCR errors may remain.

