
Radio Control Giants - 2006/01
Sal Calvagna [[email protected]]
How to construct a removable firewall assembly
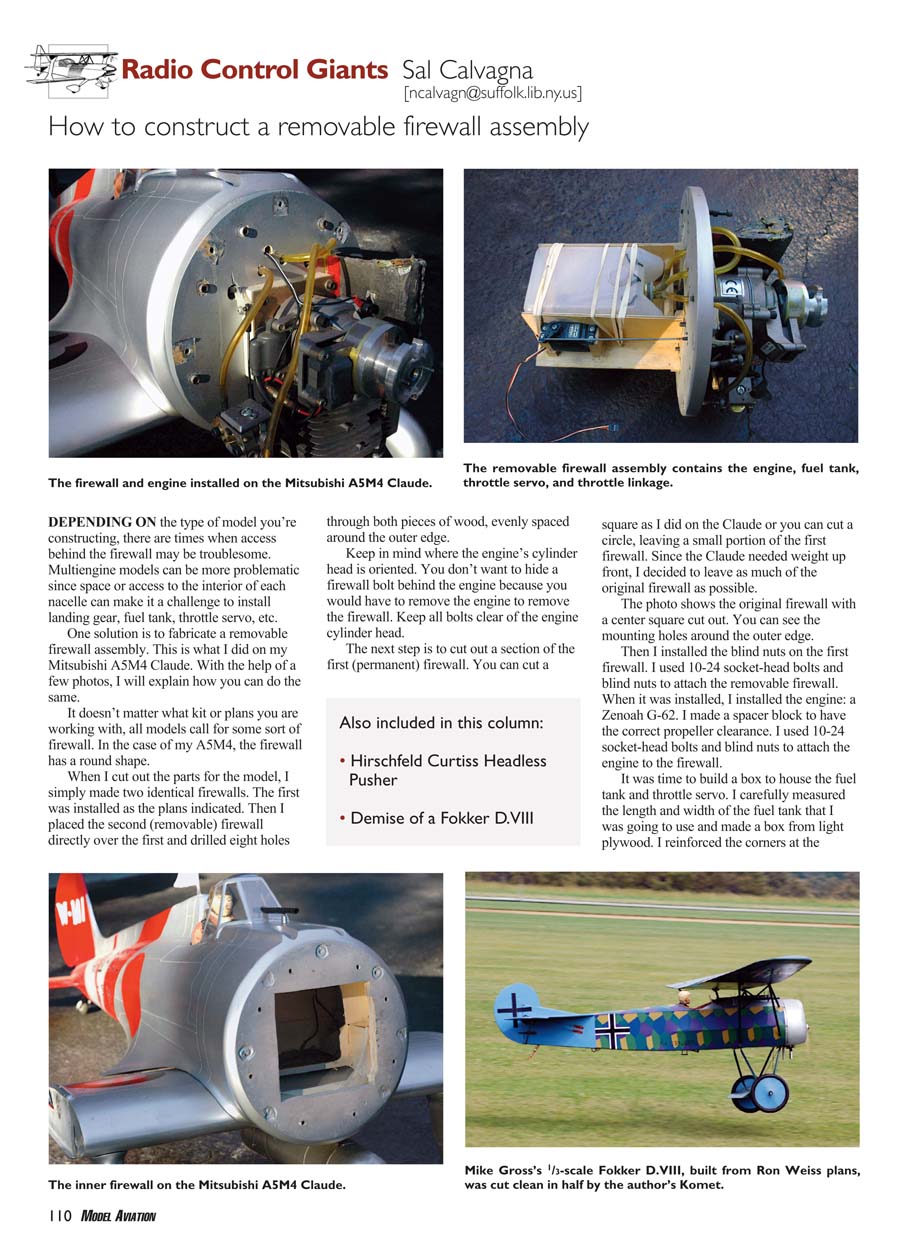
Depending on the type of model you're constructing, there are times when access behind the firewall may be troublesome. Multiengine models can be more problematic since space or access to the interior of each nacelle can make it a challenge to install landing gear, fuel tank, throttle servo, etc. One solution is to fabricate a removable firewall assembly. This is what I did on my Mitsubishi A5M4 Claude. With the help of a few photos, I will explain how you can do the same.
It doesn't matter what kit or plans you are working with — all models call for some sort of firewall. In the case of my A5M4, the firewall has a round shape.
Steps I followed:
- Cut two identical firewalls when you cut out the parts for the model. Install the first (permanent) firewall as the plans indicate.
- Place the second (removable) firewall directly over the first and drill eight holes through both pieces of wood, evenly spaced around the outer edge.
- Keep in mind where the engine's cylinder head is oriented. You don't want to hide a firewall bolt behind the engine because you would have to remove the engine to remove the firewall. Keep all bolts clear of the engine cylinder head.
- Cut out a section of the first (permanent) firewall. You can cut a square (as I did on the Claude) or a circle, leaving a small portion of the first firewall. Because the Claude needed weight up front, I decided to leave as much of the original firewall as possible.
- Install blind nuts on the first firewall. I used 10-24 socket-head bolts and blind nuts to attach the removable firewall.
- Install the engine. In my case I installed a Zenoah G-62 and made a spacer block to get correct propeller clearance. I used 10-24 socket-head bolts and blind nuts to attach the engine to the firewall.
- Build a box to house the fuel tank and throttle servo. Carefully measure the length and width of the fuel tank you plan to use and make a box from light plywood. Reinforce the corners at the firewall with 1/4 x 1/4 stock.
- After the tank is installed, attach the throttle servo on the outside of the box so you have a straight run to the bellcrank on the front of the firewall.
For the fuel-tank setup I used a three-line system:
- One line for the vent
- One line to the carburetor
- One line for filling and defueling the tank
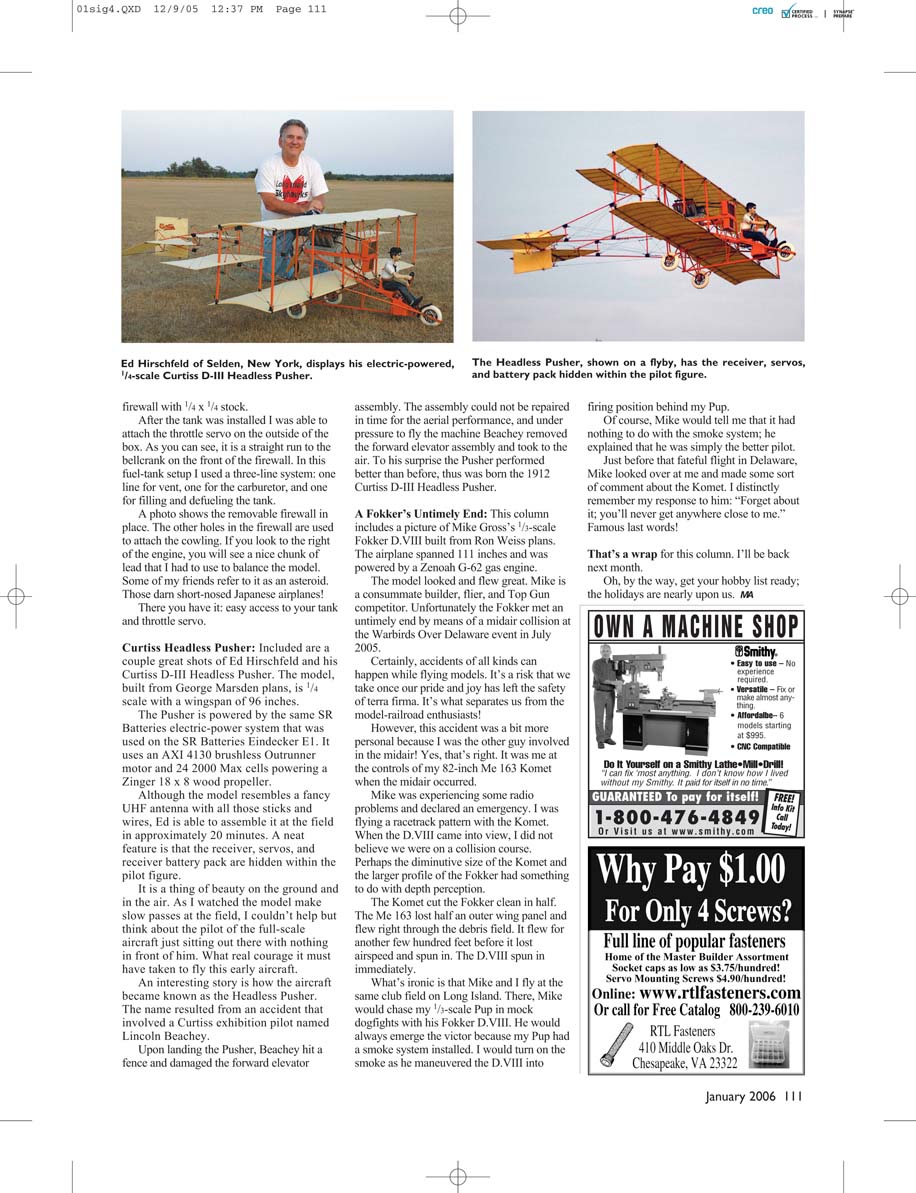
The photo shows the original firewall with a center square cut out. You can see the mounting holes around the outer edge. There you have it: easy access to your tank and throttle servo.
Curtiss Headless Pusher
Included are a couple of great shots of Ed Hirschfeld and his Curtiss D-III Headless Pusher. The model, built from George Marsden plans, is 1/4 scale with a wingspan of 96 inches. The Pusher is powered by the SR Batteries electric power system used on the SR Batteries Eindecker E1. It uses an AXI 4130 brushless outrunner motor and 24 2000 Max cells powering a Zinger 18 x 8 wood propeller.
Although the model resembles a fancy UHF antenna with all those sticks and wires, Ed is able to assemble it at the field in approximately 20 minutes. A neat feature is that the receiver, servos, and receiver battery pack are hidden within the pilot figure. It is a thing of beauty on the ground and in the air. As I watched the model make slow passes at the field, I couldn’t help but think about the pilot of the full-scale aircraft just sitting out there with nothing in front of him. What real courage it must have taken to fly this early aircraft.
An interesting story is how the aircraft became known as the Headless Pusher. The name resulted from an accident that involved a Curtiss exhibition pilot named Lincoln Beachey. Upon landing the Pusher, Beachey hit a fence and damaged the forward elevator assembly. The assembly could not be repaired in time for the aerial performance, and under pressure to fly the machine Beachey removed the forward elevator assembly and took to the air. To his surprise the Pusher performed better than before — thus was born the 1912 Curtiss D-III Headless Pusher.
A Fokker’s Untimely End
This column includes a picture of Mike Gross’s 1/3-scale Fokker D.VIII built from Ron Weiss plans. The airplane spanned 111 inches and was powered by a Zenoah G-62 gas engine. The model looked and flew great. Mike is a consummate builder, flier, and Top Gun competitor. Unfortunately the Fokker met an untimely end due to a midair collision at the Warbirds Over Delaware event in July 2005.
Certainly, accidents of all kinds can happen while flying models. It’s a risk that we take once our pride and joy has left the safety of terra firma. It’s what separates us from the model-railroad enthusiasts! However, this accident was a bit more personal because it was the other guy involved in the midair! Yes, that’s right: it was me at the controls of my 82-inch Me 163 Komet when the midair occurred.
Mike was experiencing some radio problems and declared an emergency. I was flying a racetrack pattern with the Komet. When the D.VIII came into view, I did not believe we were on a collision course. Perhaps the diminutive size of the Komet and the larger profile of the Fokker had something to do with depth perception. The Komet cut the Fokker clean in half. The Me 163 lost half an outer wing panel and flew right through the debris field. It flew for another few hundred feet before it lost airspeed and spun in. The D.VIII spun in immediately.
What’s ironic is that Mike and I fly at the same club field on Long Island. There, Mike would chase my 1/3-scale Pup in mock dogfights with his Fokker D.VIII. He would always emerge the victor because my Pup had a smoke system installed. I would turn on the smoke as he maneuvered the D.VIII into firing position behind my Pup.
Of course, Mike would tell me that it had nothing to do with the smoke system; he explained that he was simply the better pilot. Just before that fateful flight in Delaware, Mike looked over at me and made some sort of comment about the Komet. I distinctly remember my response to him: "Forget about it; you’ll never get anywhere close to me." Famous last words!
That’s a wrap for this column. I’ll be back next month.
By the way, get your hobby list ready; the holidays are nearly upon us.
MA
Transcribed from original scans by AI. Minor OCR errors may remain.

