

Nitrate and butyrate dopes revisited: a reader's great tips
Sal Calvagna [[email protected]]
WELCOME BACK! In the February column, I touched on how to use nitrate or butyrate dope to keep your favorite model’s covering material taut throughout the flying season.
Doug Dahlke of Oshkosh, Wisconsin, took the time to write in and offer these great tips when using dope. They are as follows.
- Nitrate dope stops shrinking after two or three days. Butyrate dope never stops shrinking.
- Nitrate dope tends to be more brittle than butyrate dope.
- Plasticizing nitrate dope with one to four drops of castor oil per ounce solves the brittleness issue.
- Warming dope under hot water or warm air gives each coat a smoother flow, resulting in less sanding, regardless of brush or spray application. Approximately 105° F works well.
- Warm dope doesn't sink in as deeply; therefore, it needs less dope, resulting in a lighter finish.
- Don't be afraid to use retarder.
- Keep dope bottle lids and caps free and easy to remove by applying a thin coat of castor oil to the threads.
Thanks for taking the time to assist your fellow modelers, Doug.
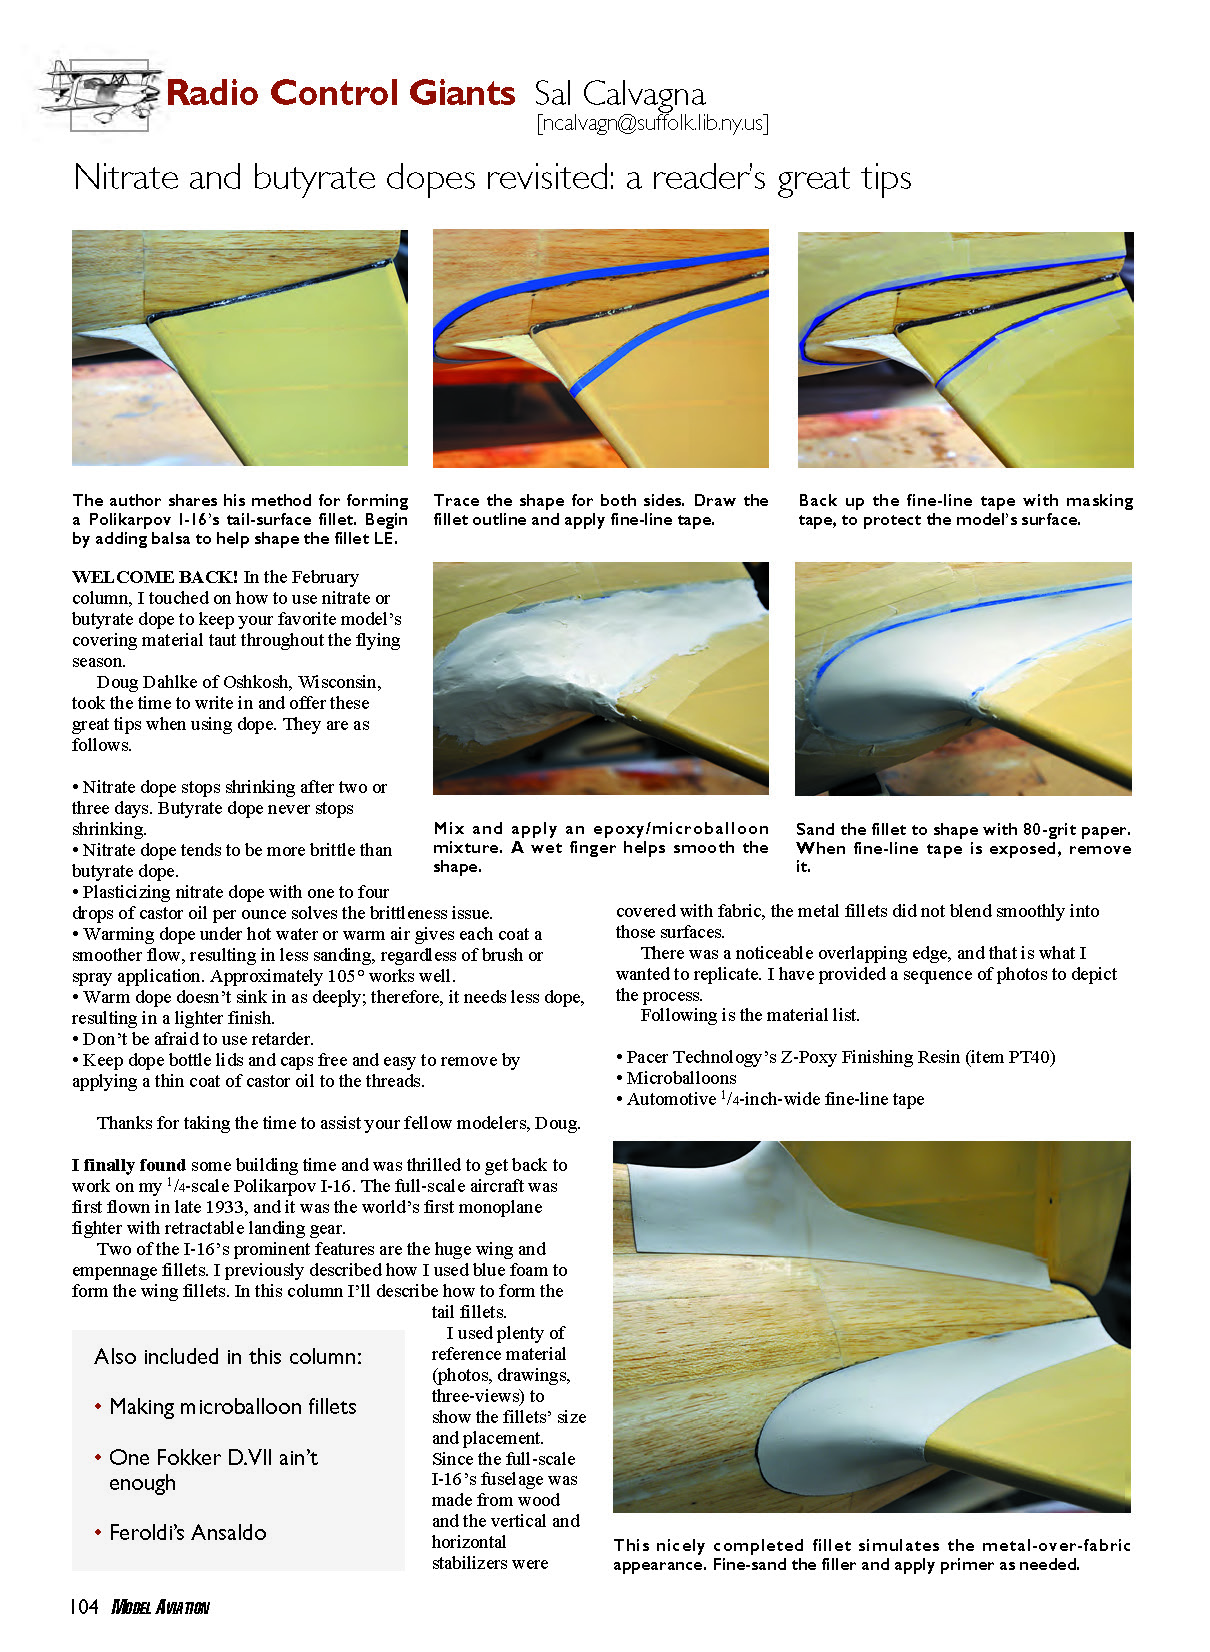
Tail fillets on my 1/4-scale Polikarpov I-16
I finally found some building time and was thrilled to get back to work on my 1/4-scale Polikarpov I-16. The full-scale aircraft was first flown in late 1933, and it was the world's first monoplane fighter with retractable landing gear.
Two of the I-16's prominent features are the huge wing and empennage fillets. I previously described how I used blue foam to form the wing fillets. In this column I'll describe how to form the tail fillets.
I used plenty of reference material (photos, drawings, three-views) to show the fillets' size and placement. Since the full-scale I-16's fuselage was made from wood and the vertical and horizontal stabilizers were covered with fabric, the metal fillets did not blend smoothly into those surfaces.
There was a noticeable overlapping edge, and that is what I wanted to replicate. I have provided a sequence of photos to depict the process.
Materials
- Pacer Technology's Z-Poxy Finishing Resin (item PT40)
- Microballoons
- Automotive 1/4-inch-wide fine-line tape
- Ordinary 1-inch-wide masking tape
- 80- and 150-grit sandpaper
Fillet construction steps
- Draw the fillet's outline on the model. When you are happy with placement and shape, apply the automotive fine-line tape against the outline. If you want a more pronounced raised edge, use two layers of the fine-line tape. I also attached a balsa guide to the front of the stabilizer. This helped me achieve the fillet's leading-edge (LE) shape.
- Back the fine-line tape with ordinary masking tape (standard 1-inch-wide). This will protect the model's surface when you apply the microballoon mix, and especially during sanding.
- Make a mixture of finishing resin and microballoons. To do this, combine the two parts of resin and then slowly add the microballoons. At first, you will probably notice that the mixture has a shine to it. Keep adding and mixing microballoons until the blend has a flat finish. The firmer, the better. Also, the more microballoons you add, the easier it will be to sand to shape later.
- Apply the microballoon mix to the desired area. You want to mold the general shape of the fillet. You might notice that it is difficult to spread the microballoons; a helpful hint is to use a wet finger to do this. Keep a cup of water close by and keep dipping.
- Peel the masking tape away (not the fine-line tape) before the filler has a chance to completely cure. Allow the mixture to dry overnight, and sand it using the heavier, 80-grit paper. The fillet will sand easily.
- Keep sanding to shape until you see the fine-line tape show through, then switch to 150-grit paper for fine sanding. When the fine-line tape is fully visible, you can peel it off. The result is a great-looking fillet with a raised edge. If your model does not require a raised edge, you can sand the fillet and blend it smoothly.
Good luck with your fillets!
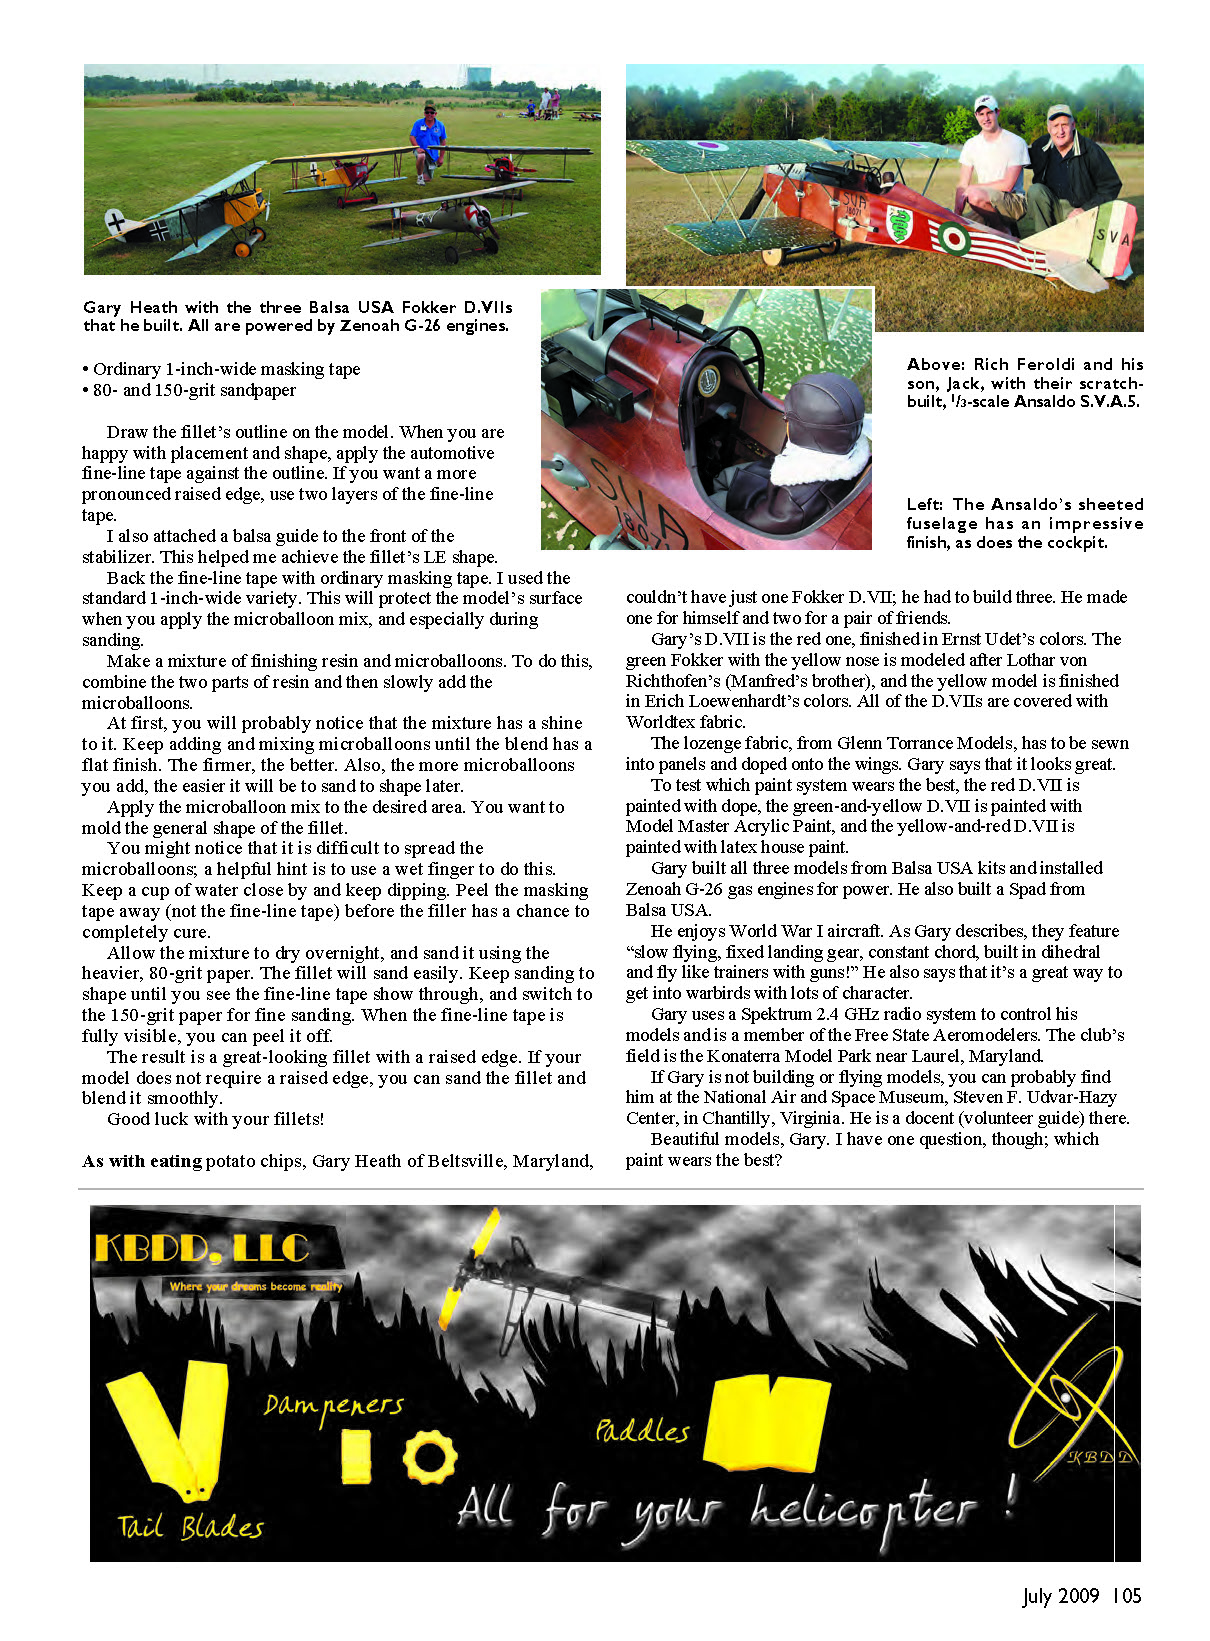
Gary Heath's trio of Fokker D.V.IIs
As with eating potato chips, Gary Heath of Beltsville, Maryland, couldn't have just one Fokker D.VII; he had to build three. He made one for himself and two for a pair of friends.
Gary's D.VII is the red one, finished in Ernst Udet's colors. The green Fokker with the yellow nose is modeled after Lothar von Richthofen's (Manfred's brother), and the yellow model is finished in Erich Loewenhardt's colors. All of the D.VIIs are covered with Worldtex fabric.
The lozenge fabric, from Glenn Torrance Models, has to be sewn into panels and doped onto the wings. Gary says that it looks great.
To test which paint system wears the best, the red D.VII is painted with dope, the green-and-yellow D.VII is painted with Model Master Acrylic Paint, and the yellow-and-red D.VII is painted with latex house paint.
Gary built all three models from Balsa USA kits and installed Zenoah G-26 gas engines for power. He also built a Spad from Balsa USA.
He enjoys World War I aircraft. As Gary describes, they feature "slow flying, fixed landing gear, constant chord, built in dihedral and fly like trainers with guns!" He also says that it's a great way to get into warbirds with lots of character.
Gary uses a Spektrum 2.4 GHz radio system to control his models and is a member of the Free State Aeromodellers. The club's field is the Konterra Model Park near Laurel, Maryland.
If Gary is not building or flying models, you can probably find him at the National Air and Space Museum, Steven F. Udvar-Hazy Center, in Chantilly, Virginia. He is a docent (volunteer guide) there.
Beautiful models, Gary. I have one question, though: which paint wears the best?
Rich Feroldi's Ansaldo S.V.A.5
If it's 1/3 scale, represents the World War I era, and is masterfully constructed, there's a good chance that Rich Feroldi of Winter Springs, Florida, built it. He constructed the outstanding Italian Ansaldo S.V.A.5 from his plans, referenced from the Windsock Datafile on the aircraft.
The model spans 121 inches, is 105 inches long, weighs 50 pounds, and is powered by a Quadra 100 gas engine. Its authentic structure is emphasized with 1/64 aircraft-grade plywood and has a polyurethane-varnish finish. The wings are covered with Koverall, coated with nitrate dope, and painted with Williams latex paint.
Some of the Ansaldo’s features are bomb drop, reconnaissance camera, and an articulated pilot. Rich is a member of the Sanford Aeromodellers. Very nice, Rich.
So ends another RC Giants column. Don't let the dog days of summer get you down. Load up your favorite Giant Scale model, throw some refreshments in the cooler, and head out to the nearest flying event. I bet you'll have some fun!
MA
Sources
- Pacer Technology — (800) 538-3091 — http://zap.supergluecorp.com
- Glenn Torrance Models — (919) 765-0814 — www.flygtm.com
- International Miniature Aircraft Association — www.fly-imaa.org
- Balsa USA — (800) 225-7287 — www.balsausa.com
Transcribed from original scans by AI. Minor OCR errors may remain.

