
RADIO CONTROL HELICOPTERS
Eric Hawkinson 319 Yellowstone Ave., Billings MT 59101 E-mail: [email protected]
IT'S ANOTHER GREAT month to be enjoying the sport of radio control helicopters! And for us northerners it's a good month to savor every possible opportunity to fly in good weather because soon we'll be flying over snow again.
Important notice about JR DS8411 / DS8411SA servos
JR/Horizon notice to pilots using the DS8411/DS8411SA servos:
Although there are thousands of 8411 servos being used successfully without incident, we have learned through extensive testing and research on this issue that our DS8411 and DS8411SA servos are prone to experiencing a higher-than-average failure rate when in a helicopter application.
Our findings have shown that these failures are primarily attributed to an increase in the availability and use of .80–.90 size heli engines and the extreme 3D maneuvers becoming more prevalent in today's typical heli environment. These recent changes have in turn added new loads to the model and control system, and most importantly, the servos. This increase in load has been determined as the primary cause of the increase in 8411 servo failures.
JR has determined that a new heli-specific servo is needed, with a motor that is specifically designed to handle the strains of this environment. This new servo, the DS8311, will have the following performance specifications:
- Torque: 125 oz
- Speed: 0.18 sec/60 degrees
- Gears: All nylon
- Part Number: JRPS8311
- MAP Price: $99.99
- Open stock availability: November 2002
JR now recommends that the current DS8411 and DS8411SA servos be used only for airplane applications.
For our heli customers that are currently using the DS8411 or DS8411SA servos in their models, JR and Horizon will be offering a free servo update. The Horizon Service Center will convert existing DS8411 and DS8411SA servos for our heli customers to the new DS8311 specifications by performing a motor and servo label change to your existing equipment.
JR and Horizon strongly suggest that all helicopter pilots using DS8411 and DS8411SA servos take advantage of this free update offer by contacting the Horizon Service Center at (877) 504-0233.
I commend Horizon Hobby for taking this step — it will cost the company a lot of money to convert all the existing helicopter servos at no charge.
Raptor 60 with O.S. .70SZ — my impressions
I had a chance to spend some time with a new (for me) helicopter and engine, and I have been having a blast. I got one of the first O.S. .70SZ heli-ported engines and needed something to put it in, so I bought a Raptor 60 almost ready-to-fly (ARF) with a Mavrik muffler, and a day later I had what turned out to be an enjoyable, low-cost 3D monster.
The Raptor 60 is not new, but I hadn't flown one except to hover around with co-worker Joel Atkins a few times. I was expecting a moderately agile helicopter, but it turns out I was expecting too little. With the stock gear ratio in the Raptor, after two tanks the O.S. .70SZ-H was tuned to a smooth, slightly rich setting. The stock Raptor 60 paddles were removed to make room for a set of V-paddles. By the third tank I had a new 3D machine with an engine that is easily the best on the market in the 60–80 range.
I had to re-tune the idle slightly from the standard setting to get a good, smooth transition. The carburetor is new, looking like the three-needle carburetor to the .61 W/C, but it works out to be a much more friendly unit.
There is no doubt that the .70SZ is a much more powerful engine than the O.S. .61 SX-HWC, and it's a peer to the YS 80 (without the need for the gear change the YS needs). The .70 is also extremely consistent, unlike the W/C.
The street price is approximately $40 more than the W/C — closer to the O.S. .91 — but you can use any modern, well-designed 60 muffler, so that may make it much less expensive if you already have the muffler. I flew mine with the Mavrik 60 muffler and an expensive Hatori O.S. .91 muffler, and there was no change in power. The O.S. .70 is an extremely good engine.
The Raptor 60 is almost stock. I did use the metal swash upgrade and the metal bearing blocks along with a DBC boom mount for the tail servo, and I immediately discarded the stock paddles as mentioned earlier. The only nicer-flying helicopter I have ever flown is my O.S. .91-powered Vigor S, which is not in the same price range. With the O.S. .70 the Raptor can fly huge loops, tight multiple flips, and climb with the best of them.
Main rotor damping issue
So far the only thing I haven't been completely happy with is the dampening system on the main rotor head; as did Joel's, the stock setup had more load than a prize fighter. Changing paddles (to almost any paddles aside from the stock ones) solves most of this, but a bit of oscillating after quick maneuvering persists as soon as I get a gallon or so on the rubber dampeners.
Joel had just changed his Raptor's head block to the Revolution O-ring damper set designed for the Vigor/Exos; it's an easy upgrade that requires only a bit of shimming to adapt to the Raptor head. It fits pretty well. Joel was finally able to completely stop the head bob by a generous application of dirt (he got disoriented while working on an inverted hover and pushed full up collective — oops!).
I'll be converting my Raptor to the O-ring dampeners, and I'll let you know how it holds up.
O.S. .91 SX-H — pump fix for shaking or roughness
Some people have experienced problems getting the O.S. .91 SX-H to run smoothly. I'm not sure why some do and some don't, but there is a fix if you are having problems.
Both of our shop helicopters running the .91 have been converted to the Perry P30 pump setup, and on Kurt Kreiger's the pump solved a "shake" problem that had been pestering him since he installed the engine. My Vigor didn't have any shaking problems with the O.S. .91 (nor did two other local pilots'), but the engine seems slightly smoother after installing the pump. This is not a power enhancement. If your .91 is running smooth and happy, you probably shouldn't spend the time or money to install the pump. If, on the other hand, you have a shake that is not related to a bad part or improper gearing (the .91 likes 8.1 to 8.4 gear ratios just fine), this will likely solve your problem.
The most secure way to mount the pump itself is:
- Scuff the plastic clamp and clean the pump with alcohol.
- Position the pump as desired, mix a few drops of J.B. Weld and spot it on the pump, clamp it in place, and let it dry.
- Remove the backplate, and carefully drill the center section and tap it with a 6-32 tap for the pressure tap. Do not do this while the backplate is on the engine!
- After drilling, make sure you remove all metal filings from the backplate.
- Use J.B. Weld to secure the pressure tap. If you drill the hole in the center of the backplate, the tap will not stick through the backplate. It must not protrude inside, or it will interfere with the crank and/or rod.
- Use the stiff, red tubing that comes with the P30 pump between the pressure tap on the backplate and the pressure inlet on the back end of the P30 pump.
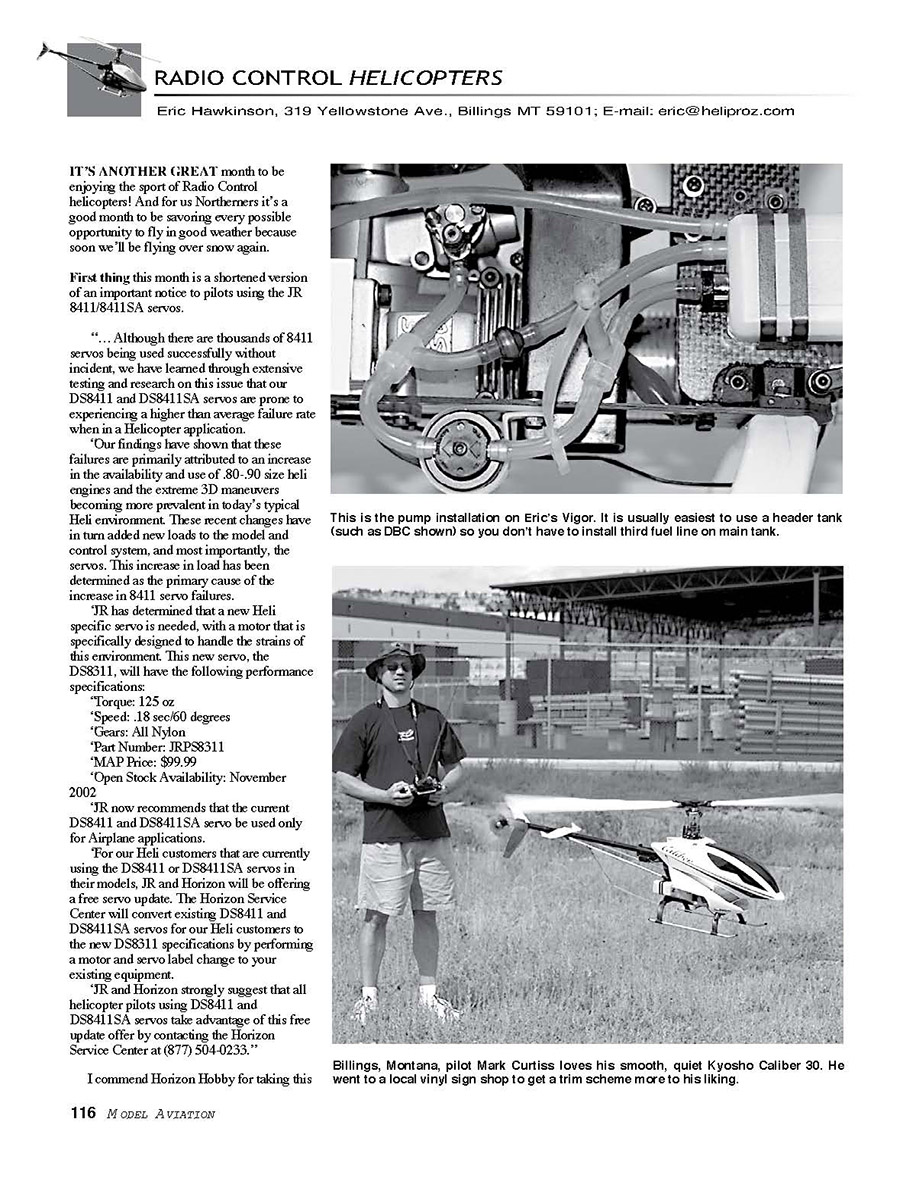
See the accompanying photograph to make sense of these installation instructions. The top (pressure) line is the pressure line from the muffler to the tank vent. The thin line, of course, with a header tank is attached to the clunk line of the main tank.
Fuel line routing and pump plumbing:
- The bottom fuel line goes from the clunk line outlet of the tank through a "T" to a fuel filter, then into the P30 pump inlet.
- Note that the bottom of the pump has arrows that mark the travel direction of the fuel.
- Another chunk of line goes from the outlet of the pump through another T-fitting and on to the carburetor.
- The third line from that T-fitting goes back to the fuel tank to return any excess fuel into the tank via that third inlet.
- This return line has a check valve oriented so that fuel can go from the T to the tank and not the other way.
We have been doing, as Curtis Youngblood suggests, removing the internal spring on the pump (under the hex-head grub screw with which you adjust pressure), stretching it to roughly twice its original length, and then reinstalling it.
It appears—based on the fact that the installation really does improve the smoothness—that the .91 may have a slight leaning tendency in the mid range or maybe just marginal fuel flow in the upper ranges.
Until next time, fly safely and happy rotoring,
EH
Transcribed from original scans by AI. Minor OCR errors may remain.

