
RADIO CONTROL HELICOPTERS
Dan Williams, 27 Treeline Dr., Liverpool NY 13090; E-mail: [email protected]
Before I start and someone decides to get all twisted up, I know this is a helicopter column, but I’m using my fixed-wing club as an example to make my point.
This year I decided to help my fixed-wing club as a flight instructor. (I don’t have enough to do already.) Our club has taught the art of flying RC airplanes for approximately 14 years, and I’ve assisted most of that time.
In the last few years I’ve been so wrapped up with helicopters that I haven’t taken the time to help out. It feels good to fly airplanes again, but it has also made me realize just how valuable a flight-instruction program is to a club.
Since my model club has taken on the burden of teaching flight school, its ranks are always being filled with new pilots and new ideas. It keeps the roster fresh and does a proper service to the modeling community.
Without it, most would buy that ARF combo kit for several hundred dollars, go out and crash it, and decide that next time the money might be better spent on something like computer games. If we don’t continue to bring fresh blood into the sport, we can’t expect it to continue to grow and advance as it has.
I have discussed what is happening in my airplane club to show what can be done in your helicopter club. We all try to help the newbie (at least we should!), but perhaps we can do more. My airplane club has put together an extensive booklet that not only covers the aspects of flying, but, more important, the club’s safety rules. We go over the safety rules as part of our “ground school” and we have a set of courtesy guidelines. All of this is important if the new students are to integrate properly into the fold of the club. The safety issue has become front-page worthy to all clubs lately, and all new pilots should know the rules of the club with which they are involved. Work with them as they’re starting to learn.
Chad Middlebrook — a good friend of mine from the Rochester, New York, area — contacted me recently about a new little electric-powered helicopter that he purchased. He was duly impressed and wanted to share his thoughts about it through my column. Following are Chad’s words.
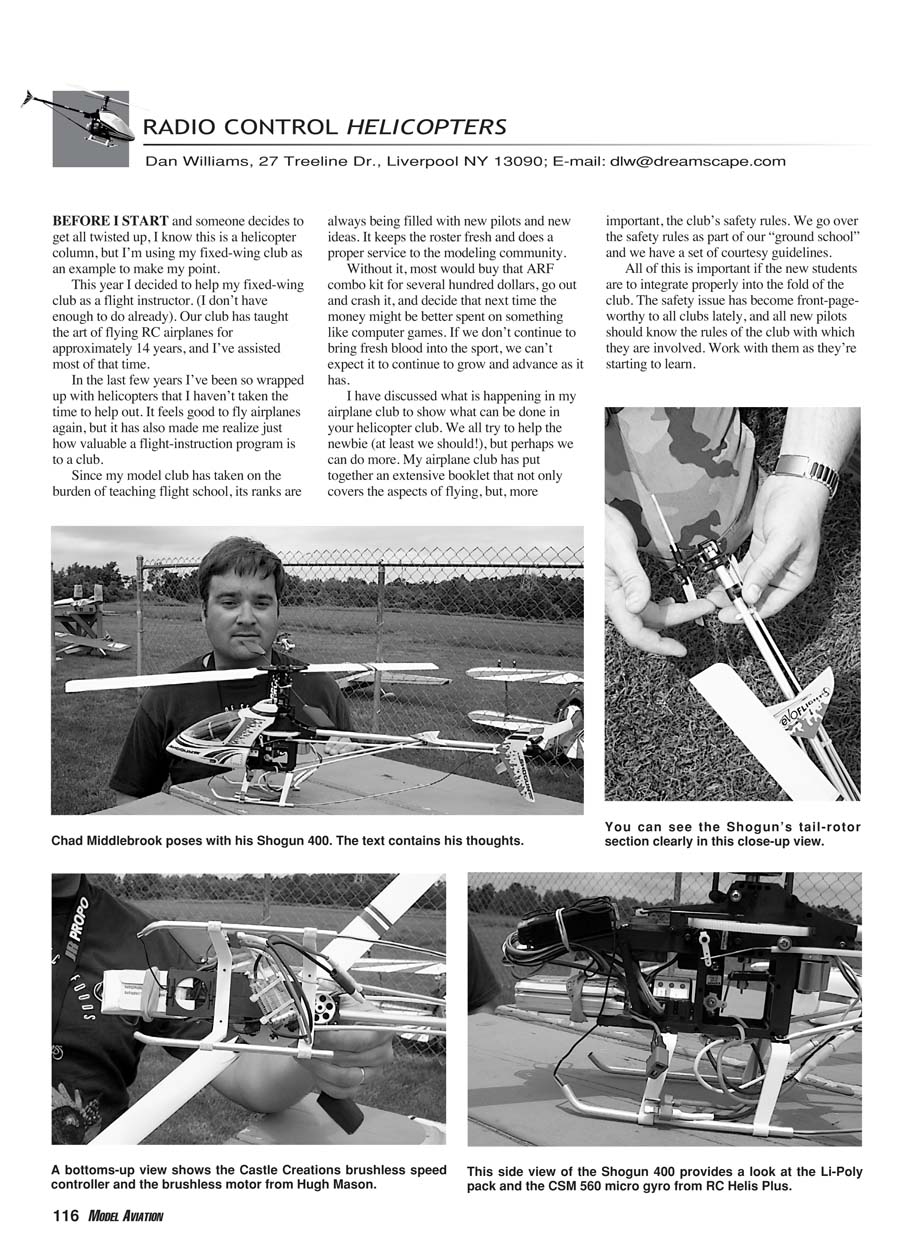
Shogun 400 (Chad Middlebrook review)
I have been looking for a small electric helicopter to add to my fleet. After spending a lot of time with both a fixed- and collective-pitch Piccolo, and looking at the various Hornets, I decided I wanted something a little bigger. The Eco 10-sized machines were too big. My new helicopter also needed to have the same Bell-Hiller control system as the larger machines. Price was also considered. The new Shogun 400 seemed like just what I was looking for!
The Shogun 400 is a small (24-inch rotor span), collective-pitch, Speed 400-powered, remote-control helicopter. It is distributed by Global Hobby Distributors (www.globalhobby.com) and is available through your local hobby shop or other hobby source for around $200.
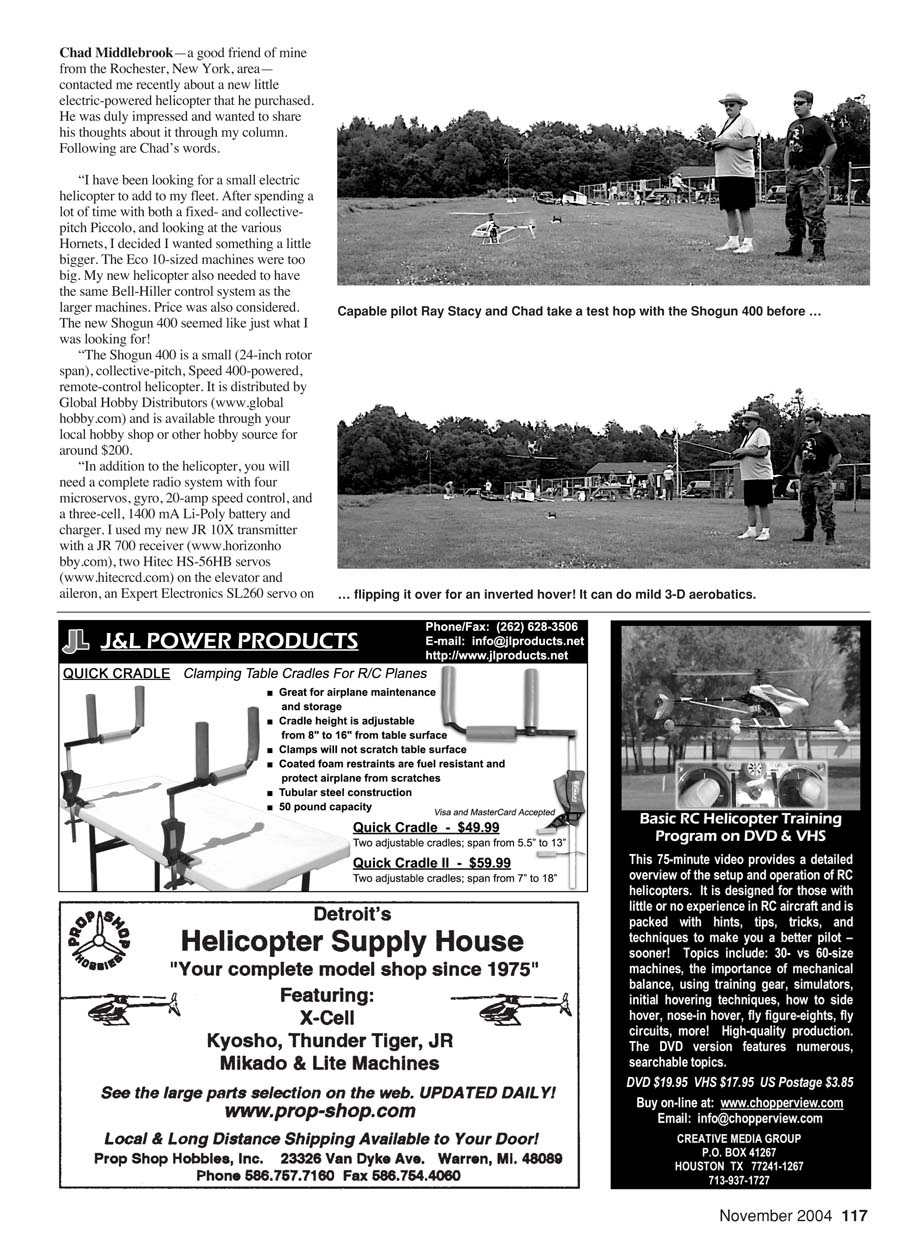
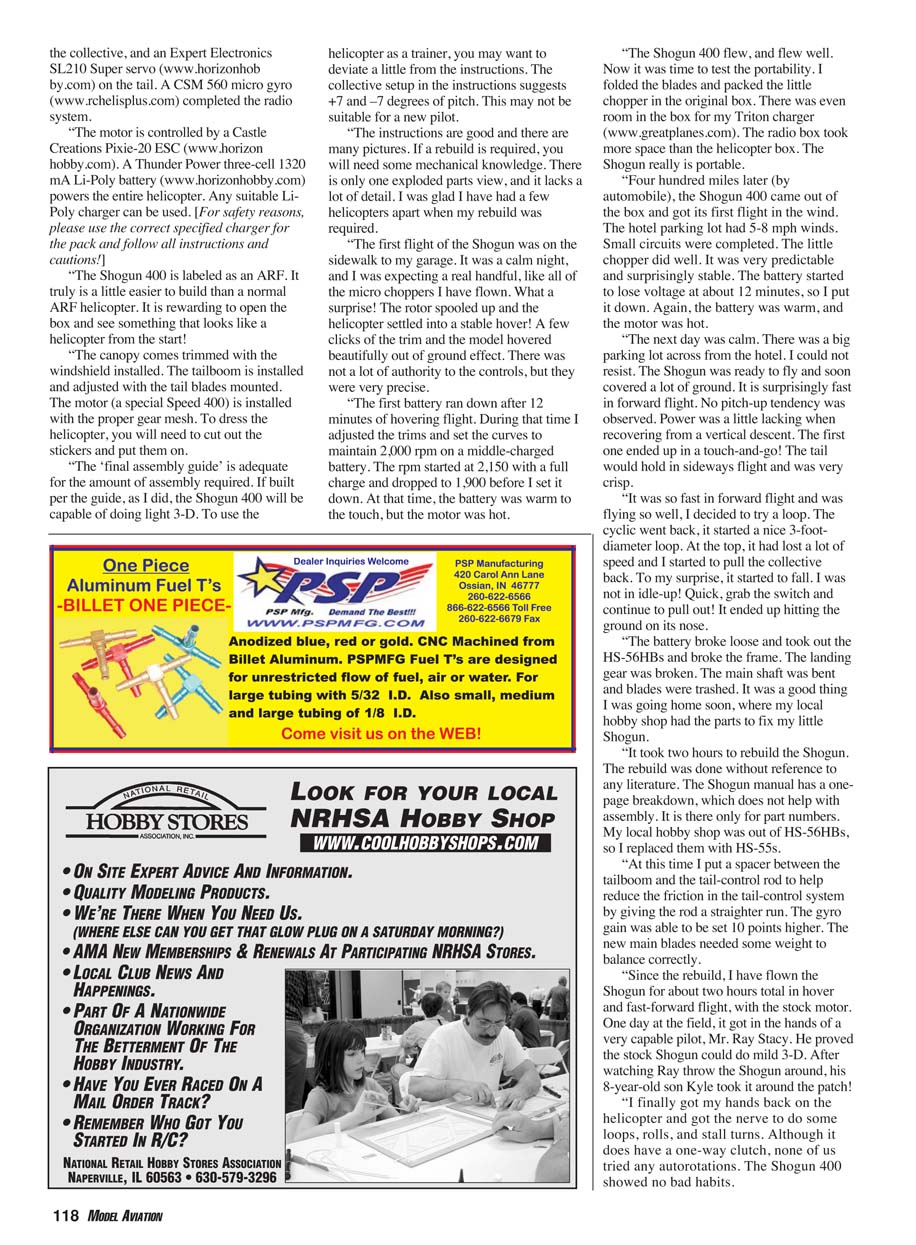
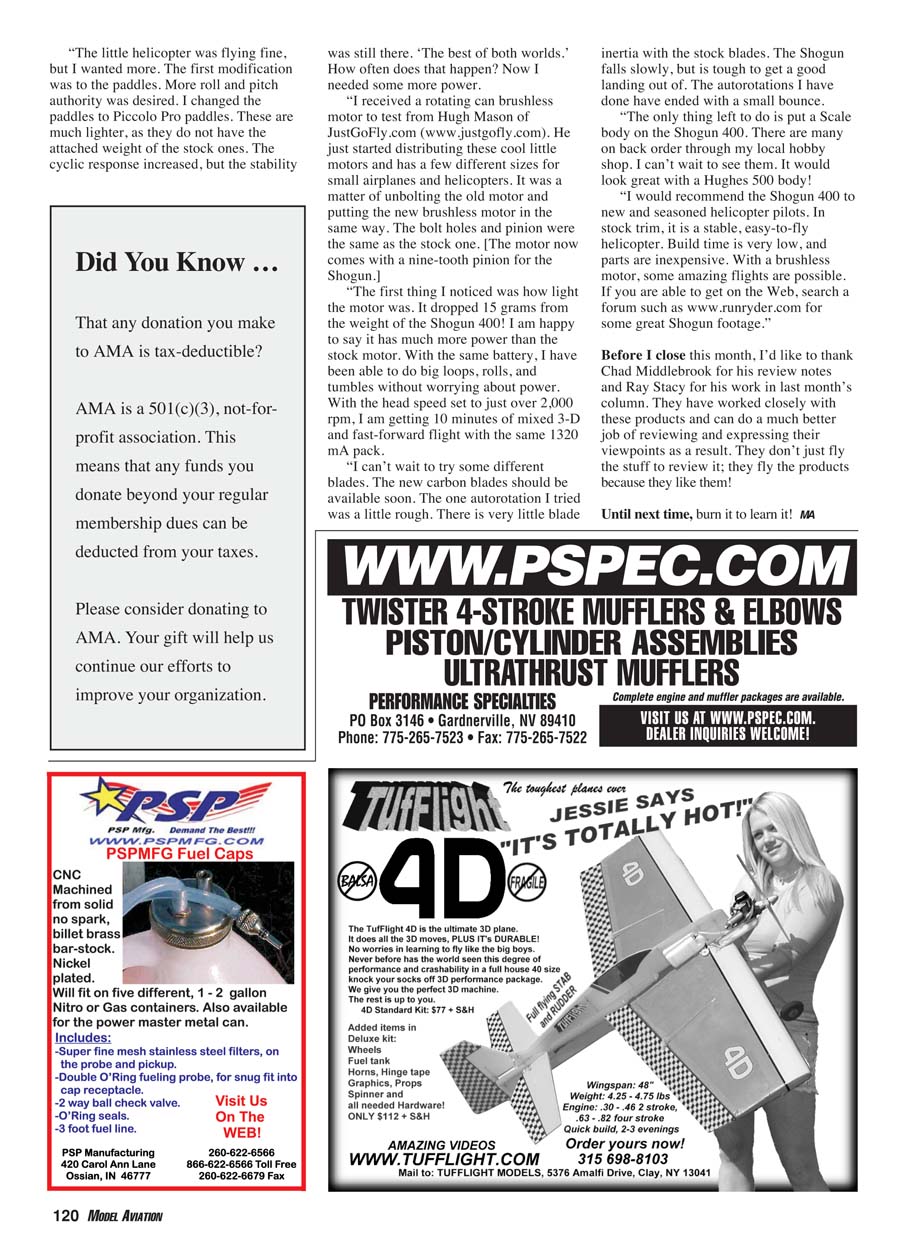
In addition to the helicopter, you will need a complete radio system with four microservos, a gyro, a 20-amp speed control, and a three-cell, 1400 mA Li-Poly battery and charger. I used my new JR 10X transmitter with a JR 700 receiver (www.horizonhobby.com), two Hitec HS-56HB servos (www.hitecrcd.com) on the elevator and aileron, an Expert Electronics SL260 servo on the collective, and an Expert Electronics SL210 Super servo (www.horizonhobby.com) on the tail. A CSM 560 micro gyro (www.rchelisplus.com) was used for tail control. The motor is controlled by a Castle Creations Pixie-20 ESC (www.horizonhobby.com). A Thunder Power three-cell 1320 mA Li-Poly battery (www.horizonhobby.com) powers the entire helicopter. Any suitable Li-Poly charger can be used.
- For safety reasons, please use the correct specified charger for the pack and follow all instructions and cautions.
The Shogun 400 is labeled as an ARF. It truly is a little easier to build than a normal ARF helicopter. It is rewarding to open the box and see something that looks like a helicopter from the start!
The canopy comes trimmed with the windshield installed. The tailboom is installed and adjusted with the tail blades mounted. The motor (a special Speed 400) is installed with the proper gear mesh. To finish the helicopter, you will need to cut out the stickers and put them on.
The final assembly guide is adequate for the amount of assembly required. If built per the guide, as I did, the Shogun 400 will be capable of doing light 3-D. To use the helicopter as a trainer, you may want to deviate a little from the instructions. The collective setup in the instructions suggests +7 and -7 degrees of pitch. This may not be suitable for a new pilot.
The instructions are good and there are many pictures. If a rebuild is required, you will need some mechanical knowledge. There is only one exploded parts view, and it lacks a lot of detail. I was glad I had a few helicopters apart when my rebuild was required.
The first flight of the Shogun was on the sidewalk to my garage. It was a calm night, and I was expecting a real handful, like all of the micro choppers I have flown. What a surprise! The rotor spooled up and the helicopter settled into a stable hover! A few clicks of the trim and the model hovered beautifully out of ground effect. There was not a lot of authority to the controls, but they were very precise.
The first battery ran down after 12 minutes of hovering flight. During that time I adjusted the trims and set the cyclics to maintain 2,000 rpm on a middle-charged battery. The rpm started at 2,150 with a full charge and dropped to 1,900 before I set it down. At that time, the battery was warm to the touch, and the motor was hot.
The Shogun 400 flew, and flew well. Now it was time to test the portability. I folded the blades and packed the little chopper in the original box. There was even room in the box for my Triton charger (www.greatplanes.com). The radio box took more space than the helicopter box. The Shogun really is portable.
Four hundred miles later (by automobile), the Shogun 400 came out of the box and got its first flight in the wind. The hotel parking lot had 5–8 mph winds. Small circuits were completed. The little chopper did well. It was very predictable and surprisingly stable. The battery started to lose voltage at about 12 minutes, so I put it down. Again, the battery was warm, and the motor was hot.
The next day was calm. There was a big parking lot across from the hotel. I could not resist. The Shogun was ready to fly and soon covered a lot of ground. It is surprisingly fast in forward flight. No pitch-up tendency was observed. Power was a little lacking when recovering from a vertical descent. The first one ended up in a touch-and-go! The tail would hold in sideways flight and was very crisp.
It was so fast in forward flight and was flying so well, I decided to try a loop. The cyclic went back, it started a nice 3-foot-diameter loop. At the top it had lost a lot of speed and I started to pull the collective back. To my surprise, it started to fall. I was not in idle-up! Quick, grab the switch and continue to pull out! It ended up hitting the ground on its nose.
The battery broke loose and took out the HS-56HBs and broke the frame. The landing gear was broken. The main shaft was bent and blades were trashed. It was a good thing I was going home soon, where my local hobby shop had the parts to fix my little Shogun.
It took two hours to rebuild the Shogun. The rebuild was done without reference to any literature. The Shogun manual has a one-page breakdown, which does not help with assembly. It is only for part numbers. My local hobby shop was out of HS-56HBs, so I replaced them with HS-55s.
At this time I put a spacer between the tailboom and the tail-control rod to help reduce the friction in the tail-control system by giving the rod a straighter run. The gyro gain was able to be set 10 points higher. The new main blades needed some weight to balance correctly.
Since the rebuild, I have flown the Shogun for about two hours total in hover and fast-forward flight, with the stock motor. One day at the field, it got in the hands of a very capable pilot, Mr. Ray Stacy. He proved the stock Shogun could do mild 3-D. After watching Ray throw the Shogun around, his 8-year-old son Kyle took it around the patch!
I finally got my hands back on the helicopter and got the nerve to do some loops, rolls, and stall turns. Although it does have a one-way clutch, none of us tried any autorotations. The Shogun 400 showed no bad habits.
The little helicopter was flying fine, but I wanted more. The first modification was to the paddles. More roll and pitch authority was desired. I changed the paddles to Piccolo Pro paddles. These are much lighter, as they do not have the attached weight of the stock ones. The cyclic response increased, but the stability was still there. "The best of both worlds." How often does that happen? Now I needed some more power.
I received a rotating-can brushless motor to test from Hugh Mason of JustGoFly.com (www.justgofly.com). He just started distributing these cool little motors and has a few different sizes for small airplanes and helicopters. It was a matter of unbolting the old motor and putting the new brushless motor in the same way. The bolt holes and pinion were the same as the stock one. (The motor now comes with a nine-tooth pinion for the Shogun.)
The first thing I noticed was how light the motor was. It dropped 15 grams from the weight of the Shogun 400! I am happy to say it has much more power than the stock motor. With the same battery, I have been able to do big loops, rolls, and tumbles without worrying about power. With the head speed set to just over 2,000 rpm, I am getting 10 minutes of mixed 3-D and fast-forward flight with the same 1320 mA pack.
I can't wait to try some different blades. The new carbon blades should be available soon. The one autorotation I tried was a little rough. There is very little blade inertia with the stock blades. The Shogun falls slowly, but it is tough to get a good landing out of. The autorotations I have done have ended with a small bounce.
The only thing left to do is to put a scale body on the Shogun 400. There are many on back order through my local hobby shop. I can't wait to see them. It would look great with a Hughes 500 body!
I would recommend the Shogun 400 to new and seasoned helicopter pilots. In stock trim, it is a stable, easy-to-fly helicopter. Build time is very low, and parts are inexpensive. With a brushless motor, some amazing flights are possible. If you are able to get on the Web, search a forum such as www.runryder.com for some great Shogun footage.
Before I close this month, I'd like to thank Chad Middlebrook for his review notes, and Ray Stacy for his work in last month's column. They have worked closely with these products and can do a much better job of reviewing and expressing their viewpoints as a result. They don't just fly the stuff to review it; they fly the products because they like them!
Until next time, burn it to learn it! MA
Transcribed from original scans by AI. Minor OCR errors may remain.

